
Popular categories
Looking for a yarn?


Comments / Questions (27)
![]() Yolande wrote:
Yolande wrote:
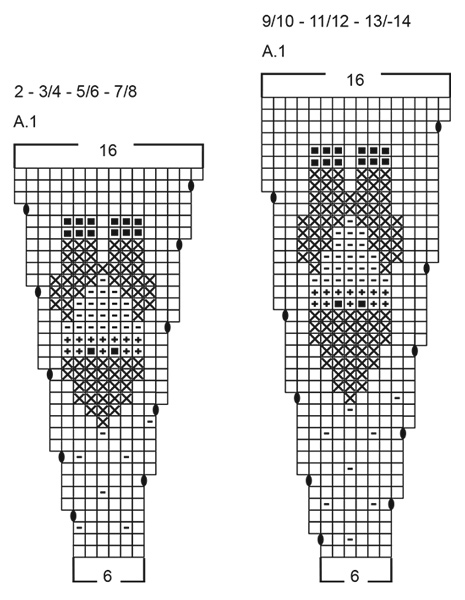
Bonjour Je ne comprends pas trop le diagramme J'ai l'impression qu'il est à l'envers en commençant par le haut 🤔 Merci pour votre réponse et bonne année à tous
09.01.2025 - 17:46DROPS Design answered:
Bonjour Yolande, le pull se tricote de haut en bas, donc, en tricotant les pères Noël de haut en bas (en commençant le diagramme par le bas), ils seront automatiquement à l'endroit - retrouvez cette partie de l'empiècement ici, cela pourra peut-être vous aider à mieux visualiser. Bon tricot!
09.01.2025 - 18:16
![]() Maria Magdalena Baltat wrote:
Maria Magdalena Baltat wrote:
Merci
03.01.2025 - 21:56
![]() Nina wrote:
Nina wrote:
Hei, jeg finner ikke farge nr 25, bringebærrød i noen nettbutikker, er den utgått eller bare utsolgt nå etter jul?
25.12.2024 - 23:24DROPS Design answered:
Hei Nina. Fargen er dessverre utgått fra vårt sortiment. mvh DROPS Design
02.01.2025 - 14:15
![]() Margaret Henderson wrote:
Margaret Henderson wrote:
Is it possible to knit the return santas sweater from bottom up ?? Rather than top down
01.12.2024 - 10:08DROPS Design answered:
Dear Margaret, yes, you could work it from the bottom up, but you will need to make all the necessary adjustments yourself. Happy knitting!
07.12.2024 - 23:30
![]() GILLIOT wrote:
GILLIOT wrote:
Bonjour Ma question n'a rien avoir avec le modele mais je ne trouve pas ou poser ma question Je ne retrouve pas commande 8031994 au nom de Martine BERGER. Ou puis je la retrouver et pouvez vous me confirmer quelle est bien passee? Avec tous mes remerciements pour votre retour Cordialement
08.10.2024 - 10:55DROPS Design answered:
Bonjour Mme Gilliot, pour toute question sur votre commande, merci de bien vouloir contacter directement le magasin auprès duquel vous l'avez passé, eux seuls pourront vous aider. Retrouvez les coordonnées des magasins DROPS ici ou dans le mail de confirmation que vous avez dû recevoir. Bon tricot!
08.10.2024 - 16:23
![]() Lucas wrote:
Lucas wrote:
Pourquoi le téléchargement des explications est impossible ? J ai comme message "erreur" alors que tout se passe bien avec d'autres modèles.
10.12.2023 - 21:28DROPS Design answered:
Bonjour Mme Lucas, nos modèles peuvent seulement être imprimés, cliquez sur le bouton "imprimer / explications" pour ouvrir une fenêtre de dialogue avec votre imprimante et ainsi choisir vos réglages. Bon tricot!
11.12.2023 - 09:32
![]() Hanne Kjærgaard wrote:
Hanne Kjærgaard wrote:
Er der ikke en fejl i opskriften? Jeg strikker str 3/4 og skal efter mønsterrappprten have 192 masker (det har jeg) og tage 8 m ud. Så har jeg 200. Men i opskrift står der, jeg har 184. Det er str 7-8 der har 200 m. Det går jo så i ged når jeg skal sætte af til ærmer. Suk!
03.11.2023 - 16:54DROPS Design answered:
Hej Hanne, du skal tage 8 masker ind (ikke ud) så du har 184 masker :)
09.11.2023 - 15:00
![]() Marianne Schäfer wrote:
Marianne Schäfer wrote:
Ich bin totale Stickanfängerin und frage Sie, ob der wunderschöne Pullover mit Wintermotiv “, Weihnachtspullover und passende Zipfelmütze“ auch eine Strickanleitung Reihe für Reihe in der Größe 104-110 für absolute Strickanfänger gibt. Ich verstehe leider ihre vorgeschlagene Anleitung nicht und kann sie nicht umsetzen. Für Ihre Hilfe möchte ich mich ganz herzlich bedanken.
17.10.2023 - 22:04DROPS Design answered:
Liebe Frau Schäfer, dieses Modell wurde in entweder 3/4 Jahre (= 98/104) oder 5/6 Jahre (= 110-116) entworfen, hier lesen Sie aber mehr, wie Sie die Grösse wählen könnnen. Dieser Pullover war ein von unseren DROPS-Along, hier lesen Sie mehr mit Fotos fast Schritt nach Schritt, sicher kann das Ihnen helfen. Viel Spaß beim stricken!
18.10.2023 - 08:21
![]() Inken wrote:
Inken wrote:
Moin! Ich habe eine Frage zu den Ärmeln. Im Text steht:In dieser Weise alle 3-5-6-7-8-9-10 cm insgesamt 4 x in der Höhe abnehmen (für alle Größen) = 34-36-38-38-40-42-46 Maschen übrig. Ohne Abnahmen weiterstricken, bis der Ärmel eine Länge von 15-20-24-26-30-34-37 cm ab der Teilung hat. Die letzten 3 Maße stimmen nicht. Z.B. soll ich 4x alle 8cm Maschen abnehmen. Das sind 32cm, doch im Text steht was von 30cm. Können sie mich aufklären? Grüße
29.08.2023 - 01:50DROPS Design answered:
Liebe Inken, die 1. Abnahme wird nach 3 cm gestrickt, die 2. Abnahme nach 11 cm (8 cm danach), die 3. Abnahme nach 19 cm (8 cm danach) und die 4. cm nach 27 cm (8 cm danach), dann stricken Sie noch 3 cm bis die Ärmel 30 cm misst. Viel Spaß beim stricken!
29.08.2023 - 09:17
![]() Caroline wrote:
Caroline wrote:
Hoe kan ik terugvinden hoeveel wol ik moet bestellen voor een specifieke maat of hoogte van een kind?
21.08.2023 - 19:28DROPS Design answered:
Dag Caroline,
Bovenaan bij de materialenlijst bij elk patroon staat per maat aangegeven hoeveel gram je nodig hebt. (Het eerste getal geldt voor de kleinste, het tweede getal voor de daaropvolgende maat, enzovoort). 1 bol weegt 50 gram, dus als er bijvoorbeeld 400 gram staat heb je 8 bollen nodig.
22.08.2023 - 20:12
|
|||||||||||||||||||
Merry Santas#merrysantassweater |
|||||||||||||||||||
 |
 |
||||||||||||||||||
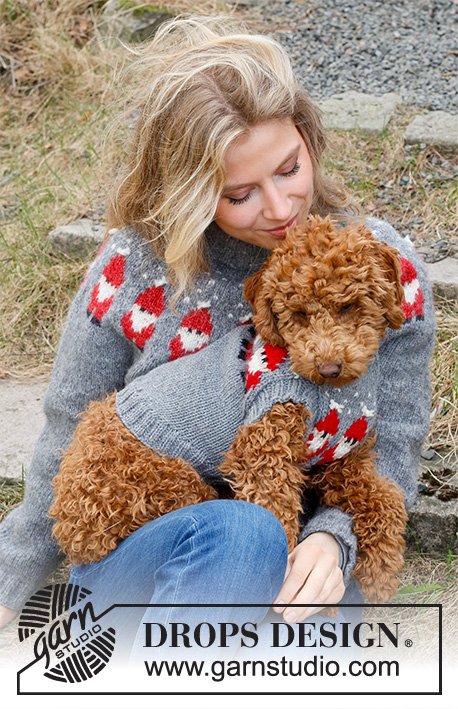
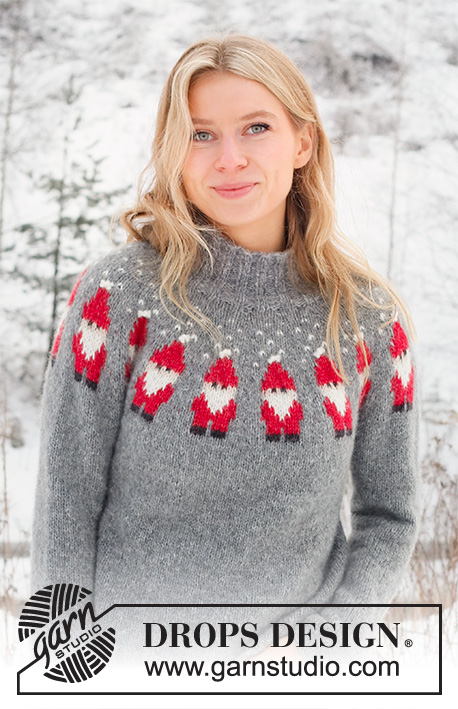
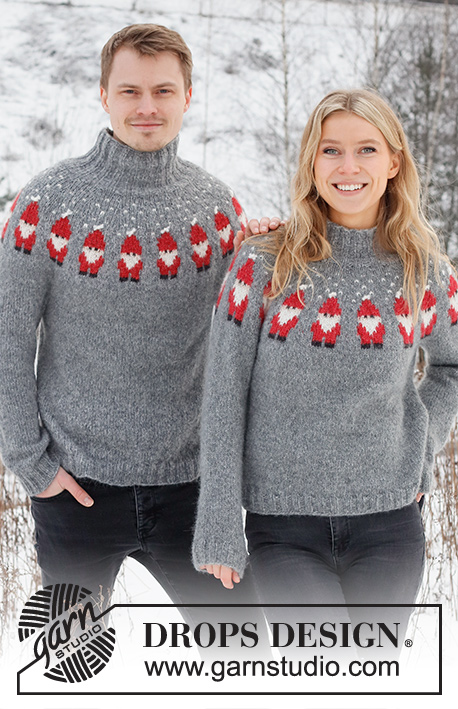
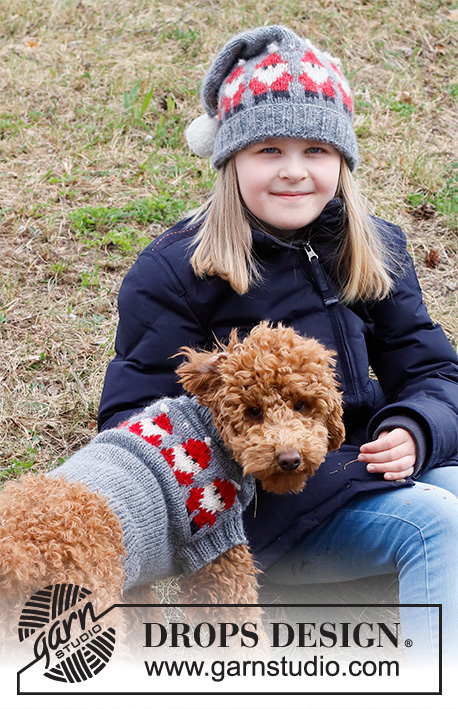
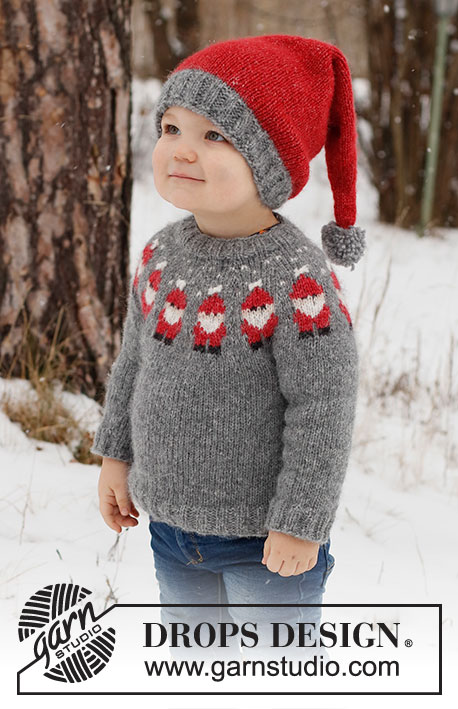
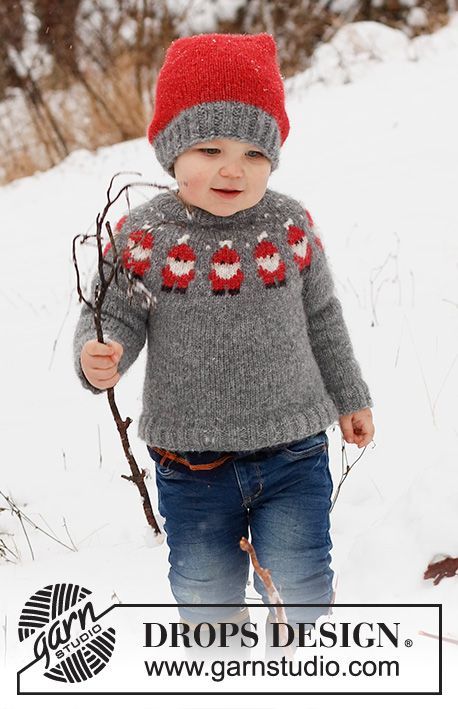
Knitted Christmas jumper and hat for children in DROPS Air. The jumper is worked top down with round yoke and Santa pattern. The hat is worked in the round, bottom up. Sizes 2 - 14 years. Theme: Christmas.
DROPS Children 41-1 |
|||||||||||||||||||
|
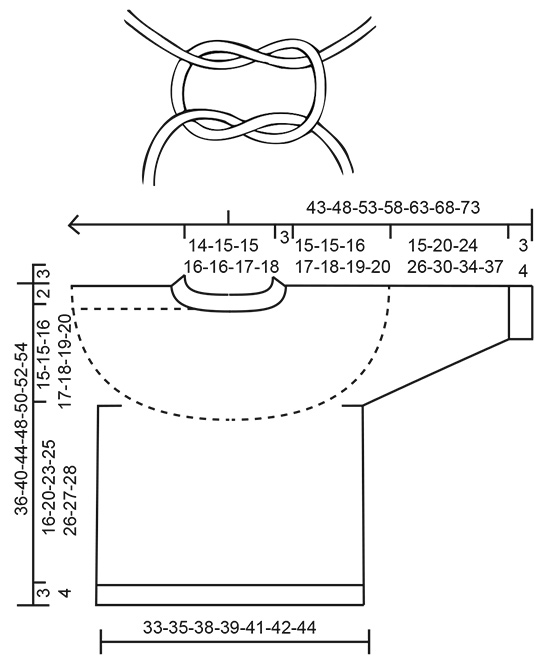
------------------------------------------------------- EXPLANATIONS FOR THE PATTERN: ------------------------------------------------------- INCREASE/DECREASE TIP (evenly spaced): To work out how to increase/decrease evenly, count the total number of stitches on needle (e.g. 60 stitches), and divide by the number of increases/decreases to be made (e.g. 6) = 10. In this example, increase by making 1 yarn over after each 10th stitch. On the next round knit the yarn overs twisted to avoid holes. When decreasing, knit together each 9th and 10th stitch. PATTERN: See diagram A.1. Choose the diagram for your size. The pattern is worked in stocking stitch. KNITTING TIP: To avoid the garment losing its elasticity when working pattern, it is important that the strands at the back are not tight. Use a larger size needle when working pattern if the piece becomes tight. DECREASE TIP-2 (for sleeves): Decrease 1 stitch on either side of the marker thread as follows: Work until there are 3 stitches left before the marker thread, knit 2 together, knit 2 (marker thread sits between these 2 stitches), slip 1 stitch as if to knit, knit 1 and pass the slipped stitch over the knitted stitch. DECREASE TIP-3 (for hat): Work until there are 2 stitches left before the marker, knit 2 together (= 1 stitch decreased). Repeat at each marker. CASTING-OFF TIP: To avoid the cast-off edge being tight you can cast off with a larger size needle. If the edge is still tight, make 1 yarn over after approx. each 4th stitch at the same time as casting off; the yarn overs are cast off as normal stitches. ------------------------------------------------------- START THE PIECE HERE: ------------------------------------------------------- JUMPER – SHORT OVERVIEW OF THE PIECE: The neck and yoke are worked in the round with circular needle, from mid back and top down. The yoke is divided for body and sleeves and the body is continued in the round with circular needle. The sleeves are worked with double pointed needles/short circular needle, top down. NECK: Cast on 60-64-64-68-68-72-76 stitches with double pointed needles/short circular needle size 4 mm and medium grey DROPS Air. Knit 1 round. Then work rib in the round (knit 2, purl 2) for 3 cm. Change to circular needle size 5 mm. YOKE: Insert 1 marker at the beginning of the round; the yoke is measured from this marker! Knit 1 round where you increase 6-8-14-10-16-12-14 stitches evenly spaced – read INCREASE/DECREASE TIP = 66-72-78-78-84-84-90 stitches. Now work according to diagram A.1 (= 11-12-13-13-14-14-15 repeats of 6 stitches). NOTE! Choose diagram for your size. Read KNITTING TIP! REMEMBER THE KNITTING TENSION! When A.1 is finished in height there are 176-192-208-208-224-224-240 stitches. Knit 1 round with medium grey where you decrease 4-8-12-8-12-4-8 stitches evenly spaced = 172-184-196-200-212-220-232 stitches. Continue with stocking stitch and medium grey until the yoke measures 15-15-16-17-18-19-20 cm from the marker. Now divide for the body and sleeves: Knit 25-27-29-30-32-33-34 (= half back piece), place the next 36-38-40-40-42-44-48 stitches on 1 thread, cast on 6 stitches (= in side under sleeve), knit 50-54-58-60-64-66-68 (= front piece), place the next 36-38-40-40-42-44-48 stitches on 1 thread, cast on 6 stitches (= in side under sleeve), knit the last 25-27-29-30-32-33-34 stitches (= half back piece). The body and sleeves are finished separately. THE PIECE IS NOW MEASURED FROM HERE! BODY: There are now 112-120-128-132-140-144-148 stitches on needle. Continue in the round with stocking stitch and medium grey for 16-20-23-25-26-27-28 cm (or to desired length; there is approx. 3-3-3-4-4-4-4 cm left to finished length). Change to circular needle size 4 mm. Work rib (knit 2, purl 2) for 3-3-3-4-4-4-4 cm. Loosely cast off with knit over knit and purl over purl – CASTING-OFF TIP. Cut and fasten the strand. The jumper measures approx. 36-40-44-48-50-52-54 cm from the shoulder down. SLEEVES: Place the 36-38-40-40-42-44-48 stitches from the thread on the one side of the piece on double pointed needles/short circular needle size 5 mm and knit up 1 stitch in each of the 6 stitches cast on under the sleeve = 42-44-46-46-48-50-54 stitches. Insert a marker thread in the middle of the 6 stitches under the sleeve. Allow the thread to follow your work onwards; it will be used when decreasing under the sleeve. Start at the marker thread and work stocking stitch in the round, with medium grey, for 3 cm. Now decrease 2 stitches under the sleeve – read DECREASE TIP-2. Decrease like this every 3-5-6-7-8-9-10 cm a total of 4 times = 34-36-38-38-40-42-46 stitches. Continue working until the sleeve measures 15-20-24-26-30-34-37 cm from the division. There is approx. 3-3-3-4-4-4-4 cm left to finished length; try the jumper on and work to desired length. Knit 1 round where you increase 6-4-6-6-4-6-2 stitches evenly spaced = 40-40-44-44-44-48-48 stitches. Change to double pointed needles size 4 mm. Work rib (knit 2, purl 2) for 3-3-3-4-4-4-4 cm. Cast off with knit over knit and purl over purl – remember CASTING-OFF TIP! The sleeve measures approx. 18-23-27-30-34-38-41 cm from the division. Work the other sleeve in the same way. KNOT: Make a knot at the top of each Santa hat. Cut 2 strands off-white, each 10 cm long. Put the strands together and thread them through the top off-white stitch on the hat, with both ends on the right side. Tie a knot, then another knot but in the opposite direction – see sketch. Cut the strands leaving ½ cm ends. Repeat at the top of each Santa hat. ------------------------------------------------------- HAT – SHORT OVERVIEW OF THE PIECE: The piece is worked with circular needle, in the round and bottom up. Change to double pointed needles when necessary, after decreasing stitches at the top. HAT: Cast on 96-100-104-108-112 stitches with circular needle size 3.5 mm and medium grey DROPS Air. Purl 1 round. Then work rib in the round (knit 2, purl 2) for 4-5-5-6-6 cm. Change to circular needle size 4.5 mm and knit 1 round where you decrease 12-12-12-12-12 stitches evenly spaced – read INCREASE/DECREASE TIP = 84-88-92-96-100 stitches. Change to raspberry and continue with stocking stitch. REMEMBER THE KNITTING TENSION! When the piece measures 18-19-19-19-20 cm from the cast-on edge, decrease 0-4-2-0-4 stitches evenly spaced = 84-84-90-96-96 stitches. Insert 6 markers with 14-14-15-16-16 stitches between each one. On the next round decrease 1 stitch before each marker – read DECREASE TIP-3 (= 6 stitches decreased). Decrease like this every 2nd round a total of 2-2-2-3-3 times. Then every 6th-7th-7th-7th-7th round 10-10-11-11-11 times = 12 stitches. Work until the hat measures 50-52-54-56-58 cm, then knit all stitches together 2 and 2 = 6 stitches. Cut the strand and pull it through the remaining stitches, tighten and fasten well. POM-POM: Make a pom-pom of 5 cm in diameter with medium grey. Sew it to the top of the hat. |
|||||||||||||||||||
Diagram explanations |
|||||||||||||||||||
|
|||||||||||||||||||
|
|||||||||||||||||||
|
|||||||||||||||||||
Have you finished this pattern?Tag your pictures with #dropspattern #merrysantassweater or submit them to the #dropsfan gallery. Do you need help with this pattern?You'll find 31 tutorial videos, a Comments/Questions area and more by visiting the pattern on garnstudio.com. © 1982-2025 DROPS Design A/S. We reserve all rights. This document, including all its sub-sections, has copyrights. Read more about what you can do with our patterns at the bottom of each pattern on our site. |
|||||||||||||||||||


With over 40 years in knitting and crochet design, DROPS Design offers one of the most extensive collections of free patterns on the internet - translated to 17 languages. As of today we count 314 catalogues and 11821 patterns translated into English (UK/cm).
We work hard to bring you the best knitting and crochet have to offer, inspiration and advice as well as great quality yarns at incredible prices! Would you like to use our patterns for other than personal use? You can read what you are allowed to do in the Copyright text at the bottom of all our patterns. Happy crafting!
Post a comment to pattern DROPS Children 41-1
We would love to hear what you have to say about this pattern!
If you want to leave a question, please make sure you select the correct category in the form below, to speed up the answering process. Required fields are marked *.