
Popular categories
Looking for a yarn?


Comments / Questions (11)
![]() Birgit Kirschbaum wrote:
Birgit Kirschbaum wrote:
....sorry, ich habs gefunden und so hatte ich es mir gedacht ;)
29.10.2024 - 18:43
![]() Birgit Kirschbaum wrote:
Birgit Kirschbaum wrote:
Wie wird die Unterseite des Kürbis verschlossen? Habe ich leider nicht gefunden.
29.10.2024 - 18:31DROPS Design answered:
Liebe Frau Kirschbaum, siehe den ganz letzten Satz: Einen Faden wird man durch die Randmasche fädeln, dann zusammenziehen um das Loch zu schließen. Viel Spaß beim Stricken!
30.10.2024 - 07:57
![]() Anna wrote:
Anna wrote:
Niestety mi brakło włoczki, pisze tak na wszelki wypadek żeby mieć motek więcej czyli 500g 😅 mój błąd nie mierzylam wg instrukcji tych 10 cm- ale dokupie włóczkę i dokoncze dynie 😀
20.09.2022 - 23:54
![]() Zana wrote:
Zana wrote:
Thank you for the answer. I did the Math and it works well.
23.10.2021 - 17:25
![]() Zana wrote:
Zana wrote:
Agradecida pela resposta. Thank you for the answer... I just finished the first lobe of a larger pumpkin as a test. The math worked beautifully! May all be well.
22.10.2021 - 16:43
![]() Zana wrote:
Zana wrote:
I want to make the pumpkin taller, but: The instructions for a larger pumpkin are rather confusing. I thought that row 3 (yo etc) already is equivalent of cast on to the desired # of stitches. Please explain what you mean by cast on on row 5. I started with 32 stitches to have a total of 60 stitches (+ 2 at each end). I know how to make it wider ... please clarify how to make it taller. Be well
19.10.2021 - 15:51DROPS Design answered:
Dear Zana, you have to divide the extra sts in 2, you have cast on 14 extra stitches/7 sts on each side of middle part. Work the 5th row until 11 sts + 7 sts (14 sts) remain, turn and work 6th row until 6 + 7 sts remain; and continue working the short rows as in diagram until there are 7 sts left on the left side of piece and 2 sts left on the right side of piece (as in diagram, you will just knit more rows in between). Happy knitting!
20.10.2021 - 07:51
![]() Ellie wrote:
Ellie wrote:
Hello! For the yarn size, does E+E mean that I have to use two threads from two E sized skeins when knitting? Thank you, and happy stitching!
16.10.2021 - 08:12DROPS Design answered:
Dear Ellie, yes, you will have to use two starnds of yarn from the E-yarn category. Happy Stitching!
17.10.2021 - 00:25
![]() Sabine wrote:
Sabine wrote:
Could you still add this pattern to the Ravelry database please?
07.10.2021 - 16:55DROPS Design answered:
Dear Sabine, we continiously adding our patterns to the Ravelry database, but with many thousands of them, its not always we egt to it at the time when we make it available, but somewhat later time. Happy Stitching!
08.10.2021 - 01:23
![]() Marie Persson wrote:
Marie Persson wrote:
Går det åt 450g garn plus skaftet till en pumpa?
07.10.2021 - 09:17DROPS Design answered:
Hej Marie. Ja det stämmer. Mvh DROPS Design
07.10.2021 - 10:05
![]() Helena Lindblom wrote:
Helena Lindblom wrote:
Hej! Instruktionerna hur kudden ska stickas saknas på den svenska sidan. Jag har tittat både på den norska och engelska (cm) sidan och där hittar jag mer skriven instruktion hur jag ska göra. Är det något som även kommer i det svenska mönstret eller måste jag använda mönstret på ett annat språk?
04.10.2021 - 14:07DROPS Design answered:
Hej Helena. Tack för info, nu finns mönstret även på svenska. Mvh DROPS Design
06.10.2021 - 13:32
|
|||||||||||||
Hello Cinderella#dropshellocinderellapumpkins |
|||||||||||||
 |
 |
||||||||||||
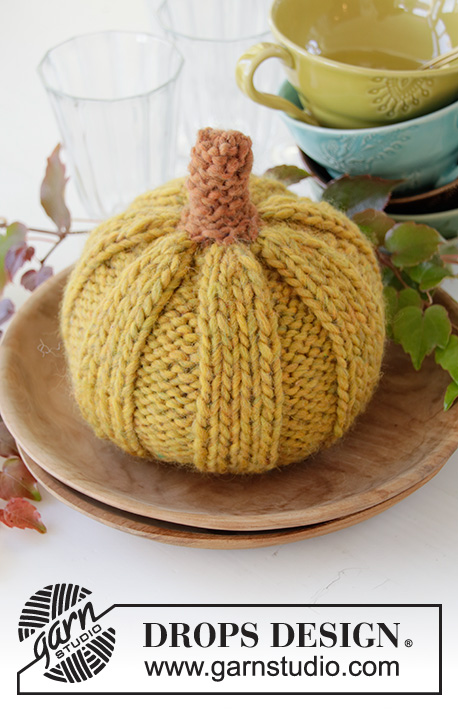
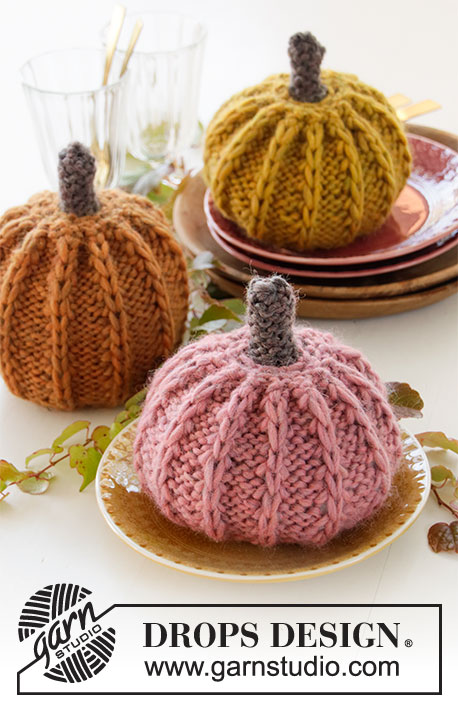
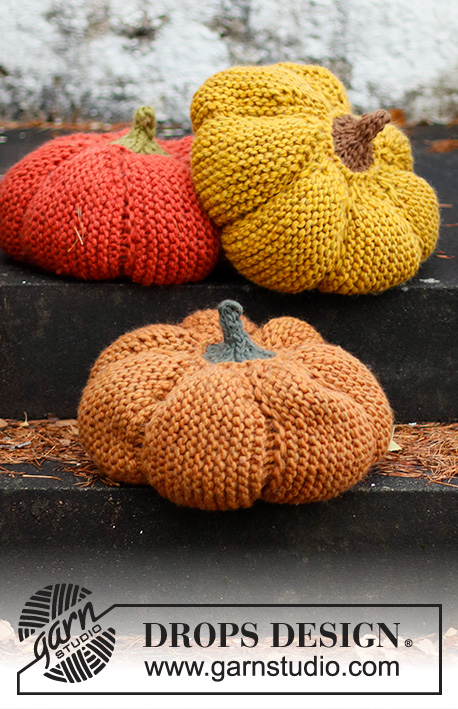
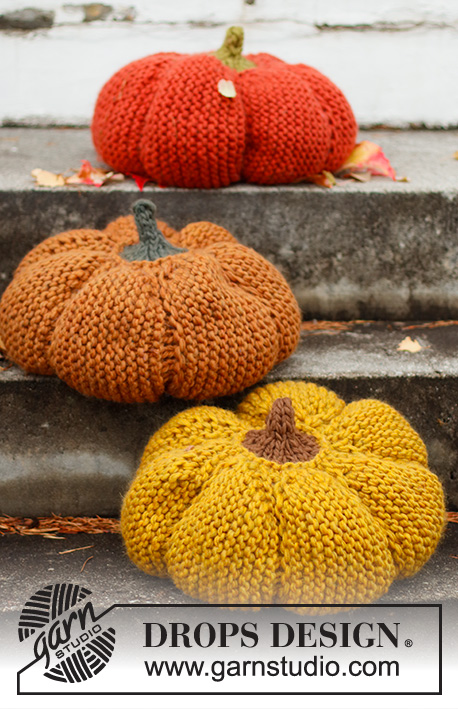
Knitted pumpkin pillow in 2 strands DROPS Snow. Theme: Halloween.
DROPS Extra 0-1540 |
|||||||||||||
|
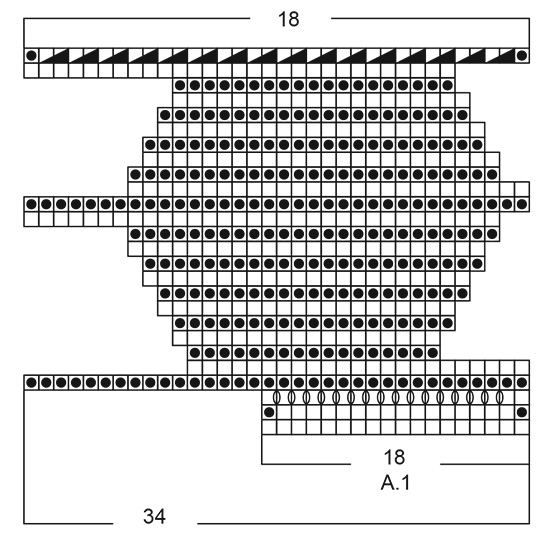
---------------------------------------------------------- EXPLANATION FOR THE PATTERN: ---------------------------------------------------------- GARTER STITCH (back and forth): Knit all rows. 1 ridge vertically = knit 2 rows. PATTERN: See diagram A.1. Diagrams show all rows in pattern seen from the right side. TIP: If you want a larger pumpkin cast on more stitches and work more rows vertically by doing as follows: Cast on half the number of stitches on desired height of pumpkin (must be divisible by 2) + 1 edge stitch in each side (= 1st row in diagram). Cast on the extra stitches at the beginning and end of row. I.e. on first row with short rows from right side (= 5th row in diagram A.1) work until 11 stitches remain + the extra stitches you cast on, before working back from wrong side (= 6th row in diagram) until 6 stitches + the extra stitches you cast on remain. Work back and forth the same way as in diagram, but continue short rows until 7 stitches remain from right side and 2 stitches from wrong side before working over all stitches (= 15th row in diagram). Follow the same procedure until decrease row (= last row in diagram). ---------------------------------------------------------- START THE PIECE HERE: ---------------------------------------------------------- PUMPKIN PILLOW – SHORT SUMMARY OF PIECE: Work piece back and forth on circular needle. Work the pillow sideways, then work the stem along one of the long sides. Work the entire piece in double yarn. PUMPKIN PILLOW: Cast on 18 stitches on circular needle size 12 mm with 2 strands colour orange, copper or curry. Work A.1 and REMEMBER THE KNITTING TENSION. Repeat A.1 until diagram has been worked 7 times in total vertically. Cast off by knitting. STEM: Pick up stitches for stem in the side of pumpkin, pick up in the first stitch in A.1 seen from right side. Use 2 strands colour orange, copper or curry, begin from right side and pick up 28 stitches evenly in total along right edge (seen from right side in knitting direction). Turn and purl 1 row from wrong side. Switch to 2 strands colour olive, army or toffee, and work in stocking stitch with 1 edge stitch in each side - AT THE SAME TIME as on first row from right side decrease 8 stitches evenly = 20 stitches. Then decrease 6 stitches evenly on the next 2 rows from right side = 8 stitches. On next row from wrong side decrease edge stitches in each side by purling 2 stitches together in each side = 6 stitches. Then work only from right side without cutting the yarn as follows: Knit 6, do not turn piece. Slide the stitches to the other end of needle to knit them again. Knit until stem measures approx. 8 cm from where the colour was changed. Let the yarn end be approx. 15 cm before cutting them (used for assembly), pull yarns through the last stitches. Tighten tog and fasten. ASSEMBLY: Sew stem together inside 1 edge stitch with colour olive, army or toffee. Fill the stem with some cotton wool. Use colour orange, curry or copper and sew together the side of pumpkin (cast-on edge is sewn to cast-off edge), sew in front loop of outermost stitch. Fill the pumpkin with some cotton wool - NOTE: Do not fill too much, but fill some cotton wool in each arch and some in the middle of pumpkin. Baste a yarn through the front loop of every stitch around the bottom, tighten together and fasten. |
|||||||||||||
Diagram explanations |
|||||||||||||
|
|||||||||||||
|
|||||||||||||
Have you finished this pattern?Tag your pictures with #dropspattern #dropshellocinderellapumpkins or submit them to the #dropsfan gallery. Do you need help with this pattern?You'll find 17 tutorial videos, a Comments/Questions area and more by visiting the pattern on garnstudio.com. © 1982-2025 DROPS Design A/S. We reserve all rights. This document, including all its sub-sections, has copyrights. Read more about what you can do with our patterns at the bottom of each pattern on our site. |
|||||||||||||


With over 40 years in knitting and crochet design, DROPS Design offers one of the most extensive collections of free patterns on the internet - translated to 17 languages. As of today we count 314 catalogues and 11821 patterns translated into English (UK/cm).
We work hard to bring you the best knitting and crochet have to offer, inspiration and advice as well as great quality yarns at incredible prices! Would you like to use our patterns for other than personal use? You can read what you are allowed to do in the Copyright text at the bottom of all our patterns. Happy crafting!
Post a comment to pattern DROPS Extra 0-1540
We would love to hear what you have to say about this pattern!
If you want to leave a question, please make sure you select the correct category in the form below, to speed up the answering process. Required fields are marked *.