DROPS Brushed Alpaca Silk
77% Alpaca, 23% Silk
from 3.95 $ /25g
Get the yarn to make this pattern from 23.70$.

The yarn cost is calculated from the pattern’s smallest size and the yarn’s cheapest product type. Looking for an even better price? You might find it on the DROPS Deals!

DROPS SS24

City Stride Sweater

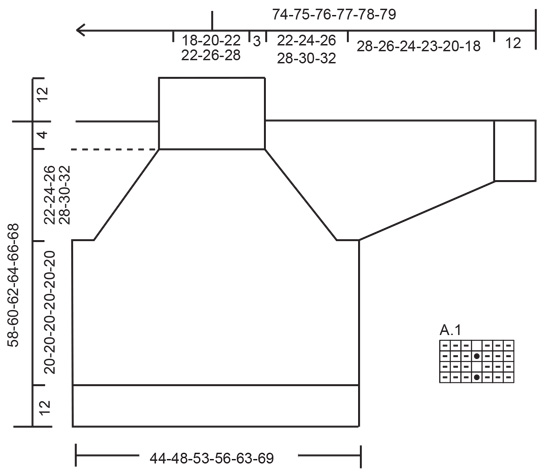
Knitted sweater in DROPS Brushed Alpaca Silk. The piece is worked top down with ribbed raglan-lines and split in the sides. Sizes S - XXXL.

DROPS 227-1
DROPS Design: Pattern no as-153
Yarn group C or A + A
-------------------------------------------------------

SIZES:
S - M - L - XL - XXL – XXXL

Finished measurements:
Chest measurements: 88-96-106-112-126-138 cm = 34⅝"-37¾"-41¾"-44"-49½"-54¼"
Full length: 58-60-62-64-66-68 cm = 22¾"-23⅝"-24⅜"-25¼"-26"-26¾"
All measurements in charts are in cm.

MATERIALS:
DROPS BRUSHED ALPACA SILK from Garnstudio (belongs to yarn group C)
150-175-200-225-250-275 g color 05, beige

NEEDLES:
DROPS CIRCULAR NEEDLE SIZE 5.5 MM = US 9: Length 40 cm = 16" and 60-60-60-80-80-80 cm = 24"-24"-24"-32"-32"-32".
DROPS CIRCULAR NEEDLE SIZE 4.5 MM = US 7: Length 40 cm = 16" and 80 cm = 32".
DROPS DOUBLE POINTED NEEDLES SIZE 5.5 MM = US 9.
DROPS DOUBLE POINTED NEEDLES SIZE 4.5 MM = US 7.
The technique MAGIC LOOP can be used – you then only need circular needle of 80 cm = 32" in each size.

KNITTING GAUGE:
16 stitches in width and 20 rows in height with stockinette stitch = 10 x 10 cm = 4" x 4".
NOTE: Needle size is only a guide. If you get too many stitches on 10 cm = 4", change to a larger needle size. If you get too few stitches on 10 cm = 4", change to a smaller needle size.

-------------------------------------------------------

Alternative Yarn – See how to change yarns here
Yarn Groups A to F – Use the same pattern and change the yarn here
Yarn usage using an alternative yarn – Use our yarn converter here

-------------------------------------------------------

DROPS Brushed Alpaca Silk
77% Alpaca, 23% Silk
from 3.95 $ /25g
Get the yarn to make this pattern from 23.70$.

The yarn cost is calculated from the pattern’s smallest size and the yarn’s cheapest product type. Looking for an even better price? You might find it on the DROPS Deals!

Pattern instructions

NOTE: This pattern is written in American English. All measurements in charts are in cm. For conversion from inches to cm - click here. There are different terms for crocheting in American and British English. If this pattern includes crochet, click for "crochet terms" here. For this pattern in British English, please click here.
-------------------------------------------------------

EXPLANATIONS FOR THE PATTERN:

-------------------------------------------------------

PATTERN:
See diagram A.1.

RIDGE/GARTER STITCH (worked back and forth):
Knit all rows.
1 ridge = knit 2 rows.

INCREASE TIP (evenly spaced):
To work out how to increase evenly, count the total number of stitches on the needle (e.g. 70 stitches) and divide by the number of increases to be made (e.g. 7) = 10.
In this example, increase by making 1 yarn over after each 10th stitch. On the next row purl the yarn overs twisted to avoid holes.

RAGLAN:
Increase 1 stitch on each side of 7 stitches (= A.1) in the transitions between the body and sleeves (= 8 stitches increased on the round). Increase 1 stitch by making 1 yarn over. On the next round knit the yarn overs twisted to avoid holes. Then work the new stitches in stockinette stitch.

DECREASE TIP (for sleeves):
Decrease 1 stitch on either side of the marker thread as follows: Work until there are 3 stitches left before the marker thread, knit 2 together, knit 2 (marker thread sits between these 2 stitches), slip 1 stitch as if to knit, knit 1 and pass the slipped stitch over the knitted stitch (2 stitches decreased).

BINDING-OFF TIP:
To avoid the bind-off edge being tight you can bind off with a larger size needle. If the edge is still tight, make 1 yarn over after approx. each 4th stitch at the same time as binding off; the yarn overs are bind off as normal stitches.

-------------------------------------------------------

START THE PIECE HERE:

-------------------------------------------------------

SWEATER – SHORT OVERVIEW OF THE PIECE:
The neck and yoke are worked in the round with circular needle, from mid back and top down. The yoke is divided for the body and sleeves and the body is continued in the round with circular needle as far as the split, then the front and back pieces are finished separately, back and forth. The sleeves are worked with double pointed needles/short circular needle, top down.

HIGH NECK:
Cast on 96-96-104-104-120-128 stitches with circular needle size 4.5 MM = US 7 and 2 strands Brushed Alpaca Silk. Remove 1 strand and continue with just 1 strand. Knit 1 round then work as follows, from mid-back:
Knit 1 twisted, * purl 1, knit 1 twisted *, work from *-* over the next 10-10-12-12-16-18 stitches, work A.1 (= 7 stitches), * knit 1 twisted, purl 1 *, work from *-* over the next 12 stitches, knit 1 twisted, A.1, * knit 1 twisted, purl 1 *, work from *-* over the next 20-20-24-24-32-36 stitches, knit 1 twisted, A.1, * knit 1 twisted, purl 1 *, work from*-* over the next 12 stitches, knit 1 twisted, A.1, * knit 1 twisted, purl 1 *, work from *-* over the last 10-10-12-12-16-18 stitches. Continue this rib for 12 cm = 4¾".
Insert 1 marker at the beginning of the round (= mid-back). The yoke is measured from this marker.

YOKE:
Change to circular needle size 5.5 MM = US 9 and work as follows: Knit 11-11-13-13-17-19 and decrease 2-1-1-1-2-2 stitches over these stitches (= 9-10-12-12-15-17 stitches), work A.1, knit 13 and decrease 3 stitches over these stitches (= 10 stitches), A.1, knit 21-21-25-25-33-37 and decrease 3-1-1-1-3-3 stitches over these stitches (= 18-20-24-24-30-34 stitches), A.1, knit 13 and decrease 3 stitches over these stitches (= 10 stitches), A.1, knit 10-10-12-12-16-18 and decrease 1-0-0-0-1-1 stitches over these stitches (= 9-10-12-12-15-17 stitches) = 84-88-96-96-108-116 stitches. Continue this pattern and on the next round begin to increase to RAGLAN – read description above (= 8 stitches increased). Increase like this every 2nd round a total of 16-18-20-22-25-26 times = 212-232-256-272-308-324 stitches. REMEMBER THE KNITTING GAUGE!

Continue working without further increases until the piece measures 22-24-26-28-30-32 cm = 8¾"-9½"-10¼"-11"-11¾"-12½" from the marker. The yoke is now divided for the body and sleeves as follows:
Work the first 32-35-39-41-47-50 stitches as before (= half back piece), place the next 42-46-50-54-60-62 stitches on a thread for the sleeve, cast on 6-6-6-8-8-10 stitches (= in side under sleeve), work the next 64-70-78-82-94-100 stitches (= front piece), place the next 42-46-50-54-60-62 stitches on a thread for the sleeve, cast on 6-6-6-8-8-10 stitches (= in side under sleeve), work the remaining 32-35-39-41-47-50 stitches (= half back piece).

BODY:
= 140-152-168-180-204-220 stitches. Insert a marker in the middle of the new stitches under each sleeve. Allow the markers to follow your work onwards; they will be used when dividing for the split. Start at one marker and continue with stockinette stitch in the round for 20 cm = 8". There is approx. 12 cm = 4¾" left to finished length; try the sweater on and work to desired length.
Now divide the piece at each marker and finish each piece separately.

BACK PIECE:
= 70-76-84-90-102-110 stitches. Knit 1 row from the right side and increase 7-7-9-9-11-11 stitches evenly spaced – read INCREASE TIP = 77-83-93-99-113-121 stitches. Purl 1 row from the wrong side with 2 stitches in garter stitch on each side. Change to circular needle size 4.5 MM = US 7 and work the next row from the right side as follows: 2 stitches in garter stitch, * knit 1 twisted, purl 1 *, work from *-* until there are 3 stitches left, knit 1 twisted and 2 stitches in garter stitch.
Continue this rib for 12 cm = 4¾". Loosely bind off with garter stitch over garter stitch, knit over knit and purl over purl – remember BINDING-OFF TIP.
The sweater measures approx. 58-60-62-64-66-68 cm = 22¾"-23⅝"-24⅜"-25¼"-26"-26¾" from the shoulder down.

FRONT PIECE:
= 70-76-84-90-102-110 stitches. Knit 1 row from the right side and increase 7-7-9-9-11-11 stitches evenly spaced = 77-83-93-99-113-121 stitches. Purl 1 row from the wrong side with 2 stitches in garter stitch on each side. Change to circular needle size 4.5 MM = US 7 and work the next row from the right side as follows: 2 stitches in garter stitch, * knit 1 twisted, purl 1 *, work from *-* until there are 3 stitches left, knit 1 twisted and 2 stitches in garter stitch.
Continue this rib for 12 cm = 4¾". Loosely bind off with garter stitch over garter stitch, knit over knit and purl over purl.

SLEEVES:
Place the 42-46-50-54-60-62 stitches from the thread on the one side of the piece on double pointed needles/short circular needle size 5.5 MM = US 9 and knit up 1 stitch in each of the 6-6-6-8-8-10 stitches cast on under the sleeve = 48-52-56-62-68-72 stitches. Insert a marker thread in the middle of the new stitches under the sleeve.
Work stockinette stitch in the round, AT THE SAME TIME when the sleeve measures 4 cm = 1½", decrease 2 stitches under the sleeve – read DECREASE TIP. Decrease like this every 7-4-3½-2½-1½-1½ cm = 2¾"-1½"-1¼"-1"-½"-½" a total of 4-5-6-8-9-10 times = 40-42-44-46-50-52 stitches. Continue working until the sleeve measures 28-26-24-23-20-18 cm = 11"-10¼"-9½"-9"-8"-7". Change to double pointed needles size 4.5 MM = US 7 and work rib (knit 1 twisted, purl 1) for 12 cm = 4¾". Bind off with knit over knit and purl over purl – remember BINDING-OFF TIP. The sleeve measures approx. 40-38-36-35-32-30 cm = 15¾"-15"-14¼"-13¾"-12½"-11¾" from the division. Work the other sleeve in the same way.

Diagram

All measurements in charts are in cm.

symbols = knit
symbols = purl
symbols = insert the right needle into the stitch below the next stitch, knit 1 and slip the stitch off the left needle (= Fisherman’s rib stitch)
diagram

Each of our patterns has specific tutorial videos to help you.

Do you have a question? See a list of frequently asked questions (FAQ)

Knitting tension is what determines the final measurements of your work, and is usually measured per 10 x 10 cm. It is provided like so: number of stitches in width x number of rows in height - eg: 19 stitches x 26 rows = 10 x 10 cm.

The knitting tension is very individual; some people knit/crochet loosely while others work tightly. You adjust the knitting tension with the needle size, which is why the suggested needle size only serve as a guide! You need to adjust this (up or down) to ensure that YOUR knitting tension matches the knitting tension provided in the pattern. If you work with a different knitting tension than provided you will have a different yarn consumption, and your work will have different measurements than what the pattern suggests.

The knitting tension also determines which yarns can replace each other. As long as you achieve the same knitting tension you can replace one yarn with another.

See DROPS lesson: How to measure your tension/gauge

See DROPS video: How to make a gauge tension swatch

The required amount of yarn is provided in grams, eg: 450 g. To calculate how many balls you’ll need you first need to know how many grams are in 1 ball (25g, 50g or 100g). This information is available if you click on the individual yarn quality on our pages. Divide the amount required with the amount of each ball. For example, if each ball is 50g (the most common amount), the calculation will be as follows: 450 / 50 = 9 balls.

The important thing when changing from one yarn to another is that the knitting/crochet tension remains the same. This is so that the measurements of the finished piece will be the same as on the sketch provided. It is easier to achieve the same knitting tension using yarns from the same yarn group. It is also possible to work with multiple strands of a thinner yarn to achieve the knitting tension of a thicker one. Please try our yarn converter. We recommend you to always work a test swatch.

Please NOTE: when changing yarn the garment might have a different look and feel to the garment in the photo, due to individual properties and qualities of each yarn.

See DROPS lesson: Can I use a different yarn than the one mentioned in the pattern?

All our yarns are categorised into yarn groups (from A to F) according to thickness and knitting tension – group A contains the thinnest yarns and group F the thickest. This makes it easier for you to find alternative yarns to our patterns, should you wish to switch yarn. All yarns within the same group have a similar knitting tension and can easily replace each other. However, different yarn qualities have different structures and properties which will give the finished work a unique look and feel.

Click here for an overview of the yarns in each yarn group

At the top of all our patterns you’ll find a link to our yarn converter, which is a helpful tool should you wish to use a different yarn than suggested. By filling in the yarn quality you wish to replace, the amount (in your size) and number of strands, the converter will present good alternative yarns with the same knitting tension. Additionally it will tell you how much you’ll require in the new qualities and whether you’ll need to work with multiple strands. Most skeins are 50g (some are 25g or 100g).

If the pattern is worked with multiple colours, every colour will have to be converted separately. Similarly, if the pattern is worked with several strands of different yarns (for example 1 strand Alpaca and 1 strand Kid-Silk) you will have to find alternatives for each, individually.

Click here to see our yarn converter

Since different yarns have different qualities and textures we have chosen to keep the original yarn in our patterns. However, you can easily find options among our available qualities by using our yarn converter, or simply pick a yarn from the same yarn group.

It is possible that some retailers still have discontinued yarns in stock, or that someone has a few skeins at home that they would like to find patterns for.

The yarn converter will provide both alternative yarn as well as required amount in the new quality.

If you think it's hard to decide what size to make, it can be a good idea to measure a garment you own already and like the size of. Then you can pick the size by comparing those measures with the ones available in the pattern's size chart.

You'll find the size chart at the bottom of the pattern.

See DROPS lesson: How to read size chart

The needle size provided in the pattern serves only as a guide, the important thing is to follow the knitting tension. And since knitting tension is very individual, you will have to adjust the needle size to ensure that YOUR tension is the same as in the pattern – maybe you’ll have to adjust 1, or even 2 needle sizes, up or down to achieve the correct tension. For this, we recommend that you work test swatches.

Should you work with a different knitting tension than the one provided, the measurements of the finished garment might deviate from the measurement sketch.

See DROPS lesson: How to measure your tension/gauge

See DROPS video: How to make a gauge tension swatch

Working a garment top-down provides more flexibility and room for personal adjustment. For example it is easier to try the garment on while working, as well as making adjustments to length of yoke and shoulder caps.

The instructions are carefully explaining every step, in the correct order. Diagrams are adjusted to the knitting direction and are worked as usual.

The diagram depicts all rows/rounds, and every stitch seen from the right side. It is read from bottom to top, from right to left. 1 square = 1 stitch.

When working back and forth, every other row is worked from the right side and every other row is worked from the wrong side. When working from the wrong side, the diagram will have to be worked reversed: from left to right, knit stitches are purled, purl stitches are knit etc.

When working in the round every round is worked from the right side and the diagram are worked from right to left on all rounds.

See DROPS lesson: How to read knitting diagrams

The diagram depicts all rows/rounds, and every stitch seen from the right side. It is worked from bottom to top, from right to left.

When working back and forth every other row is worked from the right side: from right to left and every other row is worked from the wrong side: from left to right.

When working in the round, every row in the diagram are worked from the right side, from right to left.

When working a circular diagram you start in the middle and work your way outwards, counter clockwise, row by row.

The rows usually start with a given number of chain stitches (equivalent to the height of the following stitch), this will either be depicted in the diagram or explained in the pattern.

See DROPS lesson: How to read crochet diagrams

Instructions for working several diagrams after each other on the same row/round, will often be written like so: “work A.1, A.2, A.3 a total of 0-0-2-3-4 times". This means you work A.1 once, then A.2 is worked once, and A.3 is repeated (in width) the number of times provided for your size – in this case like so: S = 0 times, M = 0 times, L=2 times, XL= 3 times and XXL = 4 times.

The diagrams are worked as usual: begin with the first row in A.1, then work the first row in A.2 etc.

See DROPS lesson: How to read knitting diagrams

See DROPS lesson: How to read crochet diagrams

The total width of the garment (from wrist-to-wrist) will be larger in the larger sizes, despite the actual sleeves being shorter. The larger sizes have longer sleeve caps and wider shoulders, so there will be a good fit in all sizes.

The measurement sketch/schematic drawing provides information regarding the full length of the garment. If it’s a jumper or a jacket the length is measured from the highest point on the shoulder (usually closest to the neckline), and straight down to the bottom of the garment. It is NOT measured from the tip of shoulder. Similarly, the length of yoke is measured from the highest point on the shoulder and down to where yoke is split into body and sleeves.

See DROPS lesson: How to read a schematic drawing

Diagrams are often repeated on the round or in height. 1 repeat is the diagram the way it appears in the pattern. If it says to work 5 repeats of A.1 in the round, then you work A.1 a total of 5 times after/next to each other in the round. If it says to work 2 repeats of A.1 vertically/in height you work the entire diagram once, then begin again at the start and work the entire diagram one more time.

Chain stitches are slightly narrower than other stitches and to avoid working the cast-on edge too tight, we simply chain more stitches to begin with. The stitch count will be adjusted on the following row to fit the pattern and measurement sketch.

The rib edge is more elastic and will contract slightly compared to, for example, stocking stitch. By increasing before the rib edge, you avoid a visible difference in width between the rib edge and the rest of the body.

It’s very easy to cast off too tightly, and by making yarn overs while casting off (and simultaneously casting these off) you avoid a too tight cast off edge.

See DROPS video: How to bind off with yarn overs (yo)

To achieve an even increase (or decrease) you can increase on, for example: every 3rd and 4th row alternately, like so: work 2 rows and increase on the 3rd row, work 3 rows and increase on the 4th. Repeat this until the increase is complete.

See DROPS lesson: Increase or decrease 1 st on every 3rd and 4th row alternately

Should you prefer to work in the round instead of back and forth, you may of course adjust the pattern. You’ll need to add steeks mid-front (usually 5 stitches), and follow the instructions. When you would normally turn and work from the wrong side, simply work across the steek and continue in the round. At the end you’ll cut the piece open, pick up stitches to work bands, and cover the cut edges.

See DROPS video: How to knit steeks and cut open

Should you prefer to work back and forth instead of in the round, you may of course adjust the pattern so you work the pieces separately and then assemble them at the end. Divide the stitches for the body in 2, add 1 edge stitch in each side (for sewing) and work the front and back pieces separately.

See DROPS lesson: Can I adapt a pattern for circular needles into straight needles?

Pattern repeats can vary slightly in the different sizes, in order to get the correct proportions. If you’re not working the exact same size as the garment in the photo, yours might deviate slightly. This has been carefully developed and adjusted so that the complete impression of the garment is the same in all sizes.

Make sure to follow instructions and diagrams for your size!

If you have found a pattern you like which is available in women’s size it’s not very difficult to convert it to men’s size. The biggest difference will be the length of sleeves and body. Start working on the women size that you think would fit across the chest. The additional length will be worked right before you cast off for the armhole/sleeve cap. If the pattern is worked top-down you can add the length right after the armhole or before the first decrease on sleeve.

Regarding additional yarn amount, this will depend on how much length you add, but it is better with a skein too many than too few.

All yarns will have excess fibres (from production) that might come off as lint or shedding. Brushed yarns (ie hairier yarns) have more of these loose, excess fibres, causing more shedding.

Shedding also depends on what is worn under or over the garment, and whether this pulls at the yarn fibres. It’s therefore not possible to guarantee that there will be no shedding

Below are some tips on how to get the best result when working with hairier yarns:

1. When the garment is finished (before you wash it) shake it vigorously so the looser hairs come off. NOTE: do NOT use a lint roller, brush or any method that pulls at the yarn.

2. Place the garment in a plastic bag and put it in your freezer - the temperature will cause the fibres to become less attached to each other, and excess fibres will come off easier.

3. Leave in the freezer for a few hours before taking it out and shaking it again.

4. Wash the garment according to the instructions on the yarn label.

Pilling is a natural process that happens to even the most exclusive of fibers. It's a natural sign of wear and tear that is hard to avoid, and that is most visible in high friction areas of your garment like a sweater's arms and cuffs.

You can make your garment look as new by removing the pilling, using a fabric comb or a pill/lint remover.

Still can't find the answer you need? Then scroll down and leave your question so one of our experts can try to help you. This will be done normally within 5 to 10 working days.
In the meantime, you can read the questions and answers that others have left to this pattern or join the DROPS Workshop on Facebook to get help from fellow knitters/crocheters!

You might also like...

Post a comment to pattern DROPS 227-1

We would love to hear what you have to say about this pattern!

If you want to leave a question, please make sure you select the correct category in the form below, to speed up the answering process. Required fields are marked *.

Comments / Questions (35)

country flag Bremerin wrote:

Am Ärmel , müssen die still gelegten Maschen wieder aufgenommen werden.Da steht dann ,je 1 .Masche aus den neu angeschlagenden Maschen auffassen .Das heißt dann pro hin oder rückreihe eine Masche mehr mit aufnehmen? Vg

13.04.2024 - 01:39

DROPS Design answered:

Liebe Frau Bremerin, die Ärmel werden in der Runde gestrickt, so werden die Maschen bei einer Hin-Reihe aufgefassen - siehe auch diese Lektion, ab Bild 18B. Viel Spaß beim Stricken!

15.04.2024 - 07:03

country flag Bremerin wrote:

Letzter Absatz Passe da ist die Rede von Abnahmen in jeder 2. Reihe ,in der Höhe. Ich denke aber das von den Raglanzunahmen die Rede ist.

05.04.2024 - 19:59

DROPS Design answered:

Liebe Frau Bremerin, ja genau, die Raglanzunahmen stricken Sie insgesamt 16-18-20-22-25-26 Mal in jeder 2. Runde, mit jeweils 8 Maschenzugenommen. Viel Spaß beim Stricken!

08.04.2024 - 07:37

country flag Danuta wrote:

Jak należy przerabiać ściągacze przodu i tyłu po lewej stronie? Oczka , które po prawej stronie były przekręcane na prawo teraz mam przerabiać też przekręcając na lewo, czy normalnie? Golf robiłam na okrągło, a teraz ściągacz przodu i tyłu robię na płasko, bo są rozcięcia .

26.03.2024 - 16:45

DROPS Design answered:

Witaj Danusiu, na lewej stronie robótki przerabiamy te oczka przekręcone na lewo. Pozdrawiamy!

26.03.2024 - 19:03

country flag Fiona wrote:

I would like to knit this in Drops Big Merino - both are Group C yarns, but the Brushed Alpaca Silk is much finer? How much Big Merino would be needed for each of the sizes? Will it come out bigger knitted in Big Merino? I usually use metres per gramme as a way of substituting yarns but it's 140/25g vs 75/50g, so do I need four times as much?

06.02.2024 - 13:17

DROPS Design answered:

Dear Fiona, you can use Big Merino instead of Brushed Alpaca Silk as they belong to the same yarn group; it will just look different because they are different yarns and properties; use the yarn converter to let the new amount required (in every possible alternative) calculated. Happy knitting!

07.02.2024 - 07:59

country flag Catriena Dekker wrote:

Al in het begin van de beschrijving(hoge hals) kom ik niet uit het stekenaantal. Wanneer ik brei en tig keer narekenen kom ik op 114 steken terwijl ik 104 (maat L) moest opzetten. En dan gaat de hele zaak scheef. Graag uw hulp

09.01.2024 - 17:24

DROPS Design answered:

Dag Catriena,

Heb je het stukje dat tussen de sterretjes staat (* 1 averecht, 1 recht gedraaid *) ook extra gebreid? Dus je breit 1 averecht, 1 recht gedraaid en dat doe je nog eens over de volgende 12 steken. In totaal brei je dan dus 13 keer wat tussen die sterretjes staat.

11.01.2024 - 18:56

country flag Jessica wrote:

Bonjour, Au début de l’empiècement, le 1er “13 mailles endroit en diminuant 3 mailles (= 10 mailles), A.1” est en trop, il faut passer directement à “21-21-25-25-33-37 mailles endroit en diminuant 3-1-1-1-3-3 mailles (= 18-20-24-24-30-34 mailles)”

17.09.2023 - 22:22

DROPS Design answered:

Bonjour Jessica, sauf si je comprends mal votre commentaire, les explications sont juste ainsi, vous devez tricoter 4 fois A.1 (= raglans, à la transition entre le dos/la manche, la manche/le devant, le devant/la manche et la manche/le dos). Bon tricot!

18.09.2023 - 16:27

country flag Ewa wrote:

Hej! Jag har fått "hjärnsläpp". När man delat bak-och framstycke för sprund och resår måste man ju sticka fram och tillbaka och inte runt! Hur stickas då de aviga varven i resåren? Det tycker inte jag framgår?

16.05.2023 - 18:53

DROPS Design answered:

Hej Ewa, jo resåren stickar du alltid rätm över rätm och avigm över avigm både från rätsidan och från avigsidan :)

17.05.2023 - 09:34

country flag Karen King wrote:

How do you know how many wool balls to buy for a pattern? I do not see any length measurement

01.03.2023 - 02:00

DROPS Design answered:

Dear Mrs King, you will find the total weight of required yarn for each size under the header, ie for ex in S you need 150 g DROPS Brushed Alpaca Silk/25 g a ball = 6 balls. Happy knitting!

01.03.2023 - 09:59

country flag Ewa wrote:

Hej! Den "höga" kragen ska vara sticka 12cm?! Det är inte särskilt högt?! Å på alla bilder ser det dessutom ut som om kragen är vikt dubbel?!

28.02.2023 - 17:46

DROPS Design answered:

Hei Ewa. En vrangbord på en "vanlig" hals er som ofte mellom 4-6 cm, så 12 cm er jo ganske høy i forhold til andre "vanlige" halser. Ønsker du høyre hals kan du strikke noen cm til (bare pass på at du har nok garn). Jeg syns ikke halsen på bildet ser dobbelt ut. Om du ser på jakken under "Du vil kanskje også like..." ser du lignende hals, men som er dobbelt. mvh DROPS Design

28.02.2023 - 20:40

country flag Keriman Kocer wrote:

Hi, After neck, we are knitting from the back of the piece, right?

03.02.2023 - 09:32

DROPS Design answered:

Dear Mrs Kocer, correct, rounds start on mid back on yoke. Happy knitting!

03.02.2023 - 13:07