
Popular categories
Looking for a yarn?


|
||||||||||||||||||||||||||||||||||
Swept Away |
||||||||||||||||||||||||||||||||||
 |
 |
|||||||||||||||||||||||||||||||||
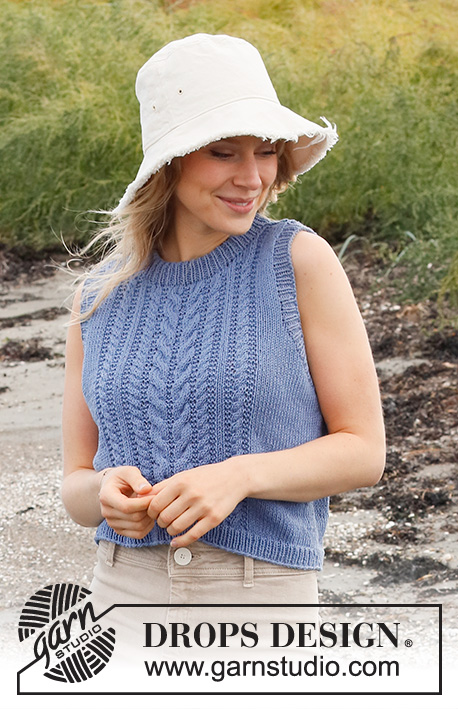
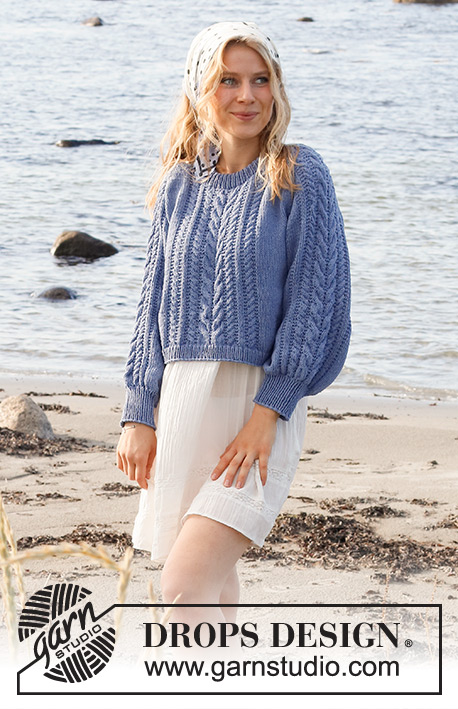
Knitted jumper in DROPS Merino Extra Fine. The piece is worked top down with saddle shoulders, double neck, cables and balloon sleeves. Sizes S - XXXL.
DROPS 221-12 |
||||||||||||||||||||||||||||||||||
|
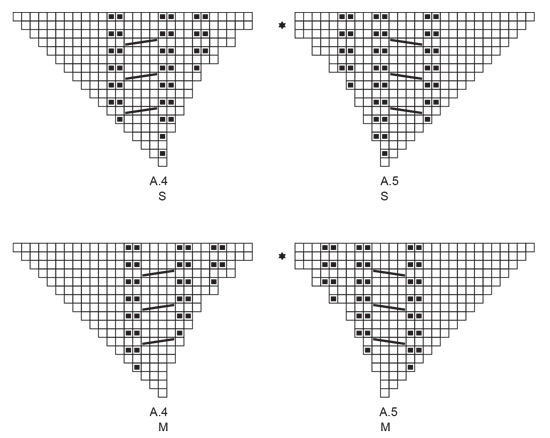
------------------------------------------------------- EXPLANATIONS FOR THE PATTERN: ------------------------------------------------------- PATTERN: See diagrams A.1 to A.5. The diagrams show all rows in the pattern from the right side. Find your size in the diagram (applies to A.3). A.1 and A.2 are worked on the shoulders and sleeves. A.3 is worked on the front and back pieces. A.4 and A.5 are worked on the neck, if you choose Alternative-2. INCREASE/DECREASE TIP (evenly spaced): To work out how to increase/decrease evenly, count the total number of stitches on needle (e.g. 104 stitches), and divide by the number of increases/decreases to be made (e.g. 32) = 3.3. In this example, increase by making 1 yarn over after approx. each 3rd stitch. On the next row work the yarn overs twisted to avoid holes. When decreasing, work together approx. each 2nd and 3rd stitch. INCREASE TIP-1 (for shoulders, sleeves and yoke): FROM THE RIGHT SIDE. BEFORE MARKER: The new stitch twists to the right. Use the left needle to pick up the strand from behind between 2 stitches from the previous round/row, knit the front loop. AFTER MARKER: The new stitch twists to the left. Use the left needle to pick up the strand from front between 2 stitches from the previous round/row, knit the back loop. FROM THE WRONG SIDE: BEFORE MARKER: The new stitch twists to the right. Use the left needle to pick up the strand from front between 2 stitches from the previous round/row, purl the back loop. AFTER MARKER: The new stitch twists to the left. Use the left needle to pick up the strand from behind between 2 stitches from the previous round/row, purl the front loop. INCREASE TIP-2 (for sleeves): Work until there are 2 stitches left before the marker-thread, 1 yarn over, knit 4 (marker-thread sits between these 4 stitches), 1 yarn over. On the next round knit the yarn overs twisted to avoid holes. Then work the new stitches in stocking stitch. DECREASE TIP (for sides of body): Work until there are 3 stitches left before the marker-thread, knit 2 together, work 2 stitches in stocking stitch (marker-thread sits between these 2 stitches) slip 1 stitch as if to knit, knit 1 and pass the slipped stitch over the knitted stitch (= 2 stitches decreased). CASTING-OFF TIP: To avoid the cast-off edge being tight you can cast off with a larger size needle. If the edge is still tight, make 1 yarn over after approx. each 4th stitch at the same time as casting off; the yarn overs are cast off as normal stitches. ------------------------------------------------------- START THE PIECE HERE: ------------------------------------------------------- JUMPER – SHORT OVERVIEW OF THE PIECE: THERE ARE 2 ALTERNATIVES NECKS IN THE PATTERN. The jumper in the picture is worked bottom up, the jumper in the pattern-text is worked top down to give a neater fit for the neck/sleeves. ALTERNATIVE-1: This alternative has an easier neck to work. Start by working a double neck in the round, then continue in the round increasing for the saddle shoulders (the neck is the same front and back). When the increases for the shoulders are finished, increase for the sleeves and then the yoke. The yoke is divided for the body and sleeves; the body is continued in the round with circular needle. The sleeves are worked in the round with short circular needle/double pointed needles. ALTERNATIVE-2: This alternative has the neck shown in the picture. The piece is started back and forth, from mid-front, and stitches are cast on each side to form the neckline at the same time as stitches are increased for the saddle shoulders. When the increases for the shoulders are finished, increase for the sleeves and then the yoke. The yoke is divided for the body and sleeves and the body is continued in the round with circular needle. The sleeves are worked in the round with short circular needle/double pointed needles. When the jumper is finished, stitches are knitted up for the double neck. ------------------------------------------------------- ALTERNATIVE-1 – START HERE: DOUBLE NECK: Read JUMPER – SHORT OVERVIEW OF THE PIECE above. Cast on 104-108-112-116-120-124 stitches with short circular needle size 3.5 mm and Merino Extra Fine. Work rib in the round (knit 1, purl 1) for 7 cm. When the rib is finished, knit 1 round and increase 32-36-40-40-40-36 stitches evenly spaced– read INCREASE/DECREASE TIP = 136-144-152-156-160-160 stitches. Knit 1 round (yarn overs knitted twisted). Then work the yoke. YOKE – ALTERNATIVE-1: Change to circular needle size 4.5 mm. Insert 1 marker after the first 49-51-53-54-55-55 stitches (= mid-front) – the yoke is measured from this marker! In addition insert 4 new markers without working the stitches and each marker inserted between 2 stitches. These markers are used when increasing for the saddle shoulders and should have a different colour from the marker mid-front. Marker-1: Insert before the first stitch on the round (= right back shoulder). Marker 2: Count 30 stitches from marker-1 (= shoulder), insert marker-2 before the next stitch. Marker 3: Count 38-42-46-48-50-50 stitches from marker-2 (= front piece), insert marker-3 before the next stitch. Marker 4: Count 30 stitches from marker-3 (= shoulder), insert marker-4 before the next stitch. There are 38-42-46-48-50-50 stitches left after marker-4 (= back piece). Allow these 4 markers to follow your work onwards. On the next round start the pattern and start increasing for the shoulders as described below. Read both sections before continuing! PATTERN – ALTERNATIVE-1: Work A.1 over the 30 shoulder stitches between markers 1 and 2 and between markers 3 and 4. Work A.3 over the 38-42-46-48-50-50 stitches on the front and back pieces (see marks in the diagram for your size). NOTE: As you increase for the shoulders, work the increased stitches on the front/back pieces into pattern A.3 until there is room for a complete repeat in width, then work new increased stitches in stocking stitch (in XXL and XXXL work all the increased stitches in stocking stitch as A.3 starts with a complete repeat). Continue this pattern. REMEMBER THE KNITTING TENSION! A.1 is repeated in height until the increases for the shoulders are finished, A.3 is repeated in height to finished length. INCREASES FOR SADDLE SHOULDERS – ALTERNATIVE-1: AT THE SAME TIME, on the same round as the start of the pattern, increase 4 stitches for the shoulders as follows: Increase BEFORE markers 3 and 1, and AFTER markers 2 and 4 – read INCREASE TIP-1. You only increase on the front and back pieces; the number of shoulder stitches remains the same. Increase every round a total of 18 times in all sizes = 208-216-224-228-232-232 stitches. After the last increase the piece measures 7 cm in all sizes – measured from the marker mid-front. Go to SLEEVE INCREASES below. ------------------------------------------------------- ALTERNATIVE-2 – START HERE: YOKE: Read JUMPER – SHORT OVERVIEW OF THE PIECE above. Cast on 100-104-108-110-112-112 stitches with circular needle size 4.5 mm and DROPS Merino Extra Fine. Insert 4 markers without working the stitches and each marker inserted between 2 stitches. These markers are used when increasing for the saddle shoulders. Marker-1: Insert after the first stitch on the round (= left front of neck, when garment is worn). Marker 2: Count 30 stitches from marker-1 (= shoulder), insert marker-2 before the next stitch. Marker 3: Count 38-42-46-48-50-50 stitches from marker-2 (= back piece), insert marker-3 before the next stitch. Marker 4: Count 30 stitches from marker-3 (= shoulder), insert marker-4 before the next stitch. There is 1 stitch left after marker-4 (= right front of neck). Allow these 4 markers to follow your work onwards. On the first row start the pattern and start increasing for the shoulder. In addition, cast on stitches on each side for the neckline. Read all sections before continuing! PATTERN – ALTERNATIVE-2: Work A.4 over the first stitch (choose diagram for your size), A.1 over the 30 shoulder stitches between markers 1 and 2, A.3 over the 38-42-46-48-50-50 stitches on the back piece between markers 2 and 3 (see marks in the diagram for your size), work A.1 over the 30 shoulder stitches between markers 3 and 4, A.5 over the last stitch (choose diagram for your size). NOTE: As you increase for the shoulders, work the increased stitches on the front piece as shown into A.4 and A.5. On the back piece work the stitches into A.3 until there is room for a complete repeat in width, then work new increased stitches in stocking stitch (in XXL and XXXL work all the increased stitches in stocking stitch as A.3 starts with a complete repeat). Continue this pattern. REMEMBER THE KNITTING TENSION! A.1 is repeated in height until the increases for the shoulders are finished, A.3 is repeated in height to finished length. When A.4 and A.5 are finished, work A.3 over these 50 pattern stitches (A.4/A.5 and the cast-on stitches mid-front) to finished length. INCREASES FOR SADDLE SHOULDERS – ALTERNATIVE-2: At the same time, on the first row (right side) increase 4 stitches for the shoulders as follows: From the right side, increase BEFORE markers 3 and 1, and AFTER markers 2 and 4 – read INCREASE TIP-1. From the wrong side, increase BEFORE markers 4 and 2, and AFTER markers 3 and 1. You only increase on the front and back pieces; the number of shoulder stitches remains the same. Continue like this, back and forth increasing on every row a total of 18 times in all sizes. NECKLINE – ALTERNATIVE-2: When you have worked 3 rows of pattern, cast on new stitches at the end of each row for the neckline (the first time stitches are cast on is at the end of the third row with pattern = right side). Cast on 1 stitch at the end of each row 4 times on each side, then 2 stitches at the end of each row 3 times on each side. At the end of row 17 (right side) cast on 16-20-24-26-28-28 stitches (mid-front of neck). Do not turn but work the last round in A.4/A.5 (= last increase for the saddle shoulders) over all stitches as follows: Work the last round in A.4, increase before marker-1, work A.1 as before over the next 30 stitches, increase after marker-2, work stocking stitch and A.3 as before over the back piece between markers 2 and 3, increase before marker-3, work A.1 as before over the next 30 stitches, increase after marker-4, work the last round in A.5, then knit the 16-20-24-26-28-28 cast-on stitches mid-front. Cut the strand. There are 208-216-224-228-232-232 stitches and the piece measures 7 cm in all sizes – measured from the cast-on edge mid-back. Now begin the next round before marker-1. Go to SLEEVE INCREASES below. ------------------------------------------------------- ALTERNATIVE-1 AND ALTERNATIVE-2 CONTINUE FROM HERE FOLLOWING THE SAME PATTERN. SLEEVE INCREASES: Work pattern as follows: Work A.2 between markers 1 and 2 and between markers 3 and 4, work A.3 as before between markers 2 and 3 and between markers 4 and 1 (make sure you continue on the correct row in the diagrams), the other stitches are worked in stocking stitch. AT THE SAME TIME on the first round increase 4 stitches for the sleeves as follows: Increase AFTER markers 1 and 3 and BEFORE markers 2 and 4 – remember INCREASE TIP-1. You only increase on the sleeves; the number of stitches on the front and back pieces remains the same. Work the increased stitches as shown in A.2. Increase every 2nd round a total of 2-2-2-2-2-3 times = 216-224-232-236-240-244 stitches. The piece measures approx. 9 cm in all sizes – measured from marker (alternative-1), cast-on edge mid-back (alternative-2). Now increase for the yoke. YOKE INCREASES: Move the 4 markers so they sit in the outermost stitch on each side of the front and back pieces (not between 2 stitches). There are 34-34-34-34-34-36 stitches between the markers on each sleeve. On the next round increase 8 stitches for the yoke, increasing both before and after each marker-stitch – remember INCREASE TIP-1. You are now increasing on both the front and back pieces and on the sleeves. The increased stitches are worked in stocking stitch on the front/back piece and in A.2 on the sleeves until there are 38 stitches in A.2, then further increases are worked in stocking stitch. Increase like this every 2nd round a total of 13-15-17-21-24-27 times = 320-344-368-404-432-460 stitches. Continue without further increases until the piece measures 19-21-23-26-28-30 cm - measured from marker (alternative-1), cast-on edge mid-back (alternative-2). Now divide for the body and sleeves as follows: S, M, L and XL: Start the round 1-1-2-2 stitches before the first marker-stitch. XXL: Start the round just before the first marker-stitch. XXXL: Start the round 1 stitch after the first marker-stitch. ALL SIZES: Place the first 64-68-74-82-84-88 stitches on a thread for the sleeve, cast on 8-8-10-10-10-12 stitches (in side under sleeve), work 96-104-110-120-132-142 stitches as before, place the next 64-68-74-82-84-88 stitches on a thread for the sleeve, cast on 8-8-10-10-10-12 stitches (in side under sleeve), work 96-104-110-120-132-142 stitches as before. Cut the strand. The body and sleeves are finished separately. THE PIECE IS NOW MEASURED FROM HERE. BODY: = 208-224-240-260-284-308 stitches. Insert 1 marker-thread in the middle of the 8-8-10-10-10-12 cast-on stitches under each sleeve. Allow the threads to follow your work onwards; they are used when decreasing in the sides. Start the round by one marker-thread and continue in the round as before with A.3 over the middle 50 stitches on the front and back pieces and the other stitches in stocking stitch. When the body measures 4 cm from the division, decrease 1 stitch on each side of both marker-threads – read DECREASE TIP (= 4 stitches decreased). Decrease like this every 4 cm a total of 3 times in each side = 196-212-228-248-272-296 stitches. Work until the body measures 16-16-16-15-15-15 cm from the division. There is 3 cm left to finished length – try the jumper on and work to desired length. Knit 1 round and increase 10-10-12-12-14-16 stitches evenly spaced – remember INCREASE/DECREASE TIP = 206-222-240-260-286-312 stitches. Change to circular needle size 3.5 mm. Work rib (knit 1, purl 1) for 3 cm. Cast off with knit over knit and purl over purl – read CASTING-OFF TIP! The jumper measures approx. 44-46-48-50-52-54 cm from the shoulder down. SLEEVES: Place the 64-68-74-82-84-88 stitches from the thread on the one side of the piece on short circular needle/double pointed needles size 4.5 mm and knit up 1 stitch in each of the new stitches cast on under the sleeve = 72-76-84-92-94-100 stitches. Insert a marker-thread in the middle of the new stitches under the sleeve; allow the thread to follow your work onwards – it is used when increasing under the sleeve. Continue in the round with A.2 as before over the middle 38 stitches – the other stitches are worked in stocking stitch. When the sleeve measures 3 cm increase 2 stitches under the sleeve – read INCREASE TIP-2. Increase like this every 3 cm a total of 5-5-4-4-3-3 times = 82-86-92-100-100-106 stitches. Continue working until the sleeve measures 33-31-30-27-26-24 cm from the division (There is approx. 9 cm left; try the jumper on and work to desired length). Knit 1 round and decrease 36-38-42-46-46-50 stitches evenly spaced = 46-48-50-54-54-56 stitches. Change to double pointed needles size 3.5 mm and work rib (knit 1, purl 1) for 9 cm. Cast off with knit over knit and purl over purl - remember CASTING-OFF TIP. The sleeve measures approx. 42-40-39-36-35-33 cm from the division. Work the other sleeve in the same way. ------------------------------------------------------- DOUBLE NECK – ALTERNATIVE-1: Fold the neck double to the inside and sew down. To avoid the neck being tight and rolling outwards, it is important that the seam is elastic. DOUBLE NECK – ALTERNATIVE-2: Start mid-back and knit up from the right side 136-144-152-156-160-160 stitches around the neck with short circular needle size 3.5 mm. Work rib in the round (knit 1, purl 1). On the first round decrease the number of stitches to 104-108-112-116-120-124 stitches. When the neck measures 7 cm, cast off a little loosely with knit over knit and purl over purl. Fold the neck double to the inside and sew down. To avoid the neck being tight and rolling outwards, it is important that the seam is elastic. |
||||||||||||||||||||||||||||||||||
Diagram explanations |
||||||||||||||||||||||||||||||||||
|
||||||||||||||||||||||||||||||||||

|
||||||||||||||||||||||||||||||||||

|
||||||||||||||||||||||||||||||||||
|
||||||||||||||||||||||||||||||||||

|
||||||||||||||||||||||||||||||||||

|
||||||||||||||||||||||||||||||||||

|
||||||||||||||||||||||||||||||||||

|
||||||||||||||||||||||||||||||||||
|
Have you made this or any other of our designs? Tag your pictures in social media with #dropsdesign so we can see them! Do you need help with this pattern?You'll find tutorial videos, a Comments/Questions area and more by visiting the pattern on garnstudio.com. © 1982-2024 DROPS Design A/S. We reserve all rights. This document, including all its sub-sections, has copyrights. Read more about what you can do with our patterns at the bottom of each pattern on our site. |
||||||||||||||||||||||||||||||||||


With over 40 years in knitting and crochet design, DROPS Design offers one of the most extensive collections of free patterns on the internet - translated to 17 languages. As of today we count 304 catalogues and 11422 patterns - 11422 of which are translated into English (UK/cm).
We work hard to bring you the best knitting and crochet have to offer, inspiration and advice as well as great quality yarns at incredible prices! Would you like to use our patterns for other than personal use? You can read what you are allowed to do in the Copyright text at the bottom of all our patterns. Happy crafting!
Comments / Questions (44)
De kabels in a4/a5 lijken de andere kant op te draaien dan zichtbaar in de foto?
10.06.2023 - 09:36Maak je de kabels in het eerste stuk aan de averechte kant ?
08.06.2023 - 08:13Valt bij alternatief 2 de nek aan de achterkant hoger (als wanneer je verkorte toeren breit ?)
04.06.2023 - 11:10Diagrammerne til opskriften åbner ikke, så jeg kan ikke få dem printet ud eller se dem
31.01.2023 - 20:16Vanaf de boord, de schouders de mouwen en de markeerdraden is me volkomen onduidelijk
08.12.2022 - 12:00DROPS Design answered:
Dag Liesberth,
Welk patroon brei je Alternatief 1 of Alternatief 2? En waar ben je op dit moment? Ik neem aan dat je de boord hebt gebreid en dat het je nu niet meer duidelijk is omdat je markeerdraden in moet voegen? Er wordt eerst een markeerdraad ingevoegd waarmee je de pas later kan meten. Daarnaast worden er 4 markeerdraden ingevoegd, die in de hoogte meelopen met je werk.
10.12.2022 - 08:44Ik heb wol en patroon besteld voor drops 221-12. Ik ben een ervaren breister maar ben 3 dagen. Bezig met het patroon te begrijpen lukt me dus niet. Graag duidelijke en systematische uitleg. Dis is een wanhoop
06.12.2022 - 14:53DROPS Design answered:
Dag Liesbert,
Kun je aangeven waar je precies tegen aanloopt? Dan kunnen we je waarschijnlijk beter helpen. Om te beginnen: heb je al een proeflapje gemaakt? Komt de stekenverhouding overeen met die in het patroon?
07.12.2022 - 20:32Ik heb patroon en wol gekocht voor patroon 222-12 patroon me-219 ik ben een ervaren breister maar na 3 dagen bestuderen weet ik nog steeds niet waar ik moet beginnen en in welke volgorde. Graag duidelijke uitleg dit id echt wanhoop. Waar moet ik beginnen, het vervolg etc
06.12.2022 - 14:48Buongiorno, non riesco ad aprire i diagrammi di questo modello, come mai?
24.11.2022 - 17:05DROPS Design answered:
Buonasera Nicoletta, i diagrammi si trovano in fondo alla pagina: provi a svuotare la cache del browser. Buon lavoro!
24.11.2022 - 19:51El patrón indica: "La prenda de la fotografía se teje de abajo hacia arriba ... visualmente, prácticamente no hay diferencia (más allá del escote en diagonal) – el patrón tejido de abajo hacia arriba podrá ser publicado online en el futuro". ¿Se ha publicado el patrón de abajo hacia arriba? ¿Hay foto del modelo tejido segun patron de arriba hacia abajo? ¿Qué quieren decir con "escote en diagonal" en la frase "no hay diferencia (más allá del escote en diagonal"?
17.10.2022 - 16:53DROPS Design answered:
Hola Silvia, Desgraciadamente no disponemos de más fotos que las publicadas online. De momento no tenemos información sobre el patrón tejido de abajo hacia arriba, pero contactaremos con el departamento de diseño para obtener más información.
20.10.2022 - 20:12Bonjour, au niveau de la partie augmentations empiècement, je ne comprends pas pourquoi il faut déplacer les 4 marqueurs dans des mailles ? Et pourquoi augmenter de 8 mailles alors que si on suit A2, au rang 4 il n'y a pas d'augmentations à faire.
16.09.2022 - 14:21DROPS Design answered:
Bonjour Manon, les augmentations "empiècement" correspondent aux augmentations de type raglan, autrement dit on augmente 2 m pour chaque pièce: dos, devant et manches, soit 8 m au total. On doit décaler les marqueurs pour qu'ils soient désormais dans une maille (= la 1ère et la dernière maille du dos/devant) et non plus entre 2 mailles. Tricotez les augmentations des manches en suivant A.2, et, quand A.2 est terminé (= 50 mailles), tricotez les augmentations suivantes en jersey. Bon tricot!
16.09.2022 - 15:14