
Popular categories
Looking for a yarn?


Comments / Questions (19)
![]() Elisabeth wrote:
Elisabeth wrote:
J\'ai commandé la laine pour tricoter ce modèle chez LUCE en FRANCE, impossible d\'obtenir une réponse sur vos dðlais de livraison à cette boutique. Et je ne suis pas la seule à me plaindre, c\'est une très mauvaise enseigne, je le vois dans les commentaires des clientes.
18.08.2023 - 14:30DROPS Design answered:
Bonjour Elisabeth, peut-être pourriez-vous nous donner votre numéro de commande? Ainsi nous pourrons le communiquer à Luce Laine Tricot qui pourra alors vous retrouver plus facilement et vous répondre dans les plus brefs délais. Merci.
21.08.2023 - 08:35
![]() Ann Hoodless wrote:
Ann Hoodless wrote:
Hi I loved the cardigan pattern but it knit up a bit small in the body, I did check my tension
20.08.2022 - 17:57
![]() Birgit Eklund Pedersen wrote:
Birgit Eklund Pedersen wrote:
Jeg har strikket denne dejlige bluse (221-20) og kunne godt tænke mig at strikke den udelukkende med drops Air. Kan det lade sig gøre? Vh Birgit
01.01.2022 - 14:18DROPS Design answered:
Hej Birgit. Ja du kan sticka den i kun DROPS Air men då må du bruke dubbel tråd, annars stämmer inte stickfastheten. Mvh DROPS Design
03.01.2022 - 13:47
![]() Birgit Eklund Pedersen wrote:
Birgit Eklund Pedersen wrote:
Hej. Jeg forstår ikke at ærmelængden er kortere jo større størrelse??
18.11.2021 - 18:28DROPS Design answered:
Hej Birgit. Den totale bredde fra (håndled til håndled) vil være længere i de større størrelser, også selvom selve ærmet er kortere. De større størrelser har længere ærmekuppel samt bredere skuldervidde. Dette resulterer i en god pasform i alle størrelser. Mvh DROPS Design
19.11.2021 - 09:35
![]() Daisie wrote:
Daisie wrote:
Please photograph the model standing up. It better showcases the garment. Thank you!
09.08.2021 - 03:29
![]() Chantal Dionne wrote:
Chantal Dionne wrote:
C’est au sujet de vos patrons. Lorsque j’essaye de les imprimer, soit les photos se séparent en deux sur deux pages ou encore, soit la première page commence à s’imprimer au bas ce qui fait que toute l’impression est décalée et que les mesures du croquis sont divisées sur 2 pages. Je n’ai jamais eu de difficultés auparavant. J’utilise une imprimante couleur HP Photosmart Cr4345 et elle va à merveille.. Merci
02.03.2021 - 05:18DROPS Design answered:
Bonjour Mme Dionne, désolée pour la réponse tardive, avez-vous réussi depuis? La plupart du temps, les problèmes d'impression viennent de paramètres utilisés lors de la précédente impression, pensez à bien vérifier vos paramètres. Bon tricot!
20.05.2021 - 08:47
![]() Caroline Lalanne wrote:
Caroline Lalanne wrote:
Jag får inte riktigt till det att öka jämtfördelat redan vid första pilen. I L är det 68 m och A1 är 4m= 17 "rapporter". Om jag ska öka med 32m vid pilen då går det inte att dela på mina 17 rapporter (17/32=1.8m). Hur ska jag göra? Mest jämt antal som maskökning jag får för mina rapporter är 34m. Eller är det något jag missat?
13.02.2021 - 09:33DROPS Design answered:
Hej Caroline, jo men du har 68 m, skal øka 32 jämt fördelat, så har du 100 m och nu har du 25 rapporter. På samme måde öker antal rapporter for hver gang du har økt ved en pil. :)
23.02.2021 - 15:09
![]() Inke Jörgensen wrote:
Inke Jörgensen wrote:
Leichte Brise - sehr schön!!!
04.02.2021 - 21:06
![]() Patricia wrote:
Patricia wrote:
Douceur d hiver
17.01.2021 - 17:11
![]() Lilla Seh-Taylor wrote:
Lilla Seh-Taylor wrote:
September Breeze
15.01.2021 - 07:58
|
|||||||||||||||||||
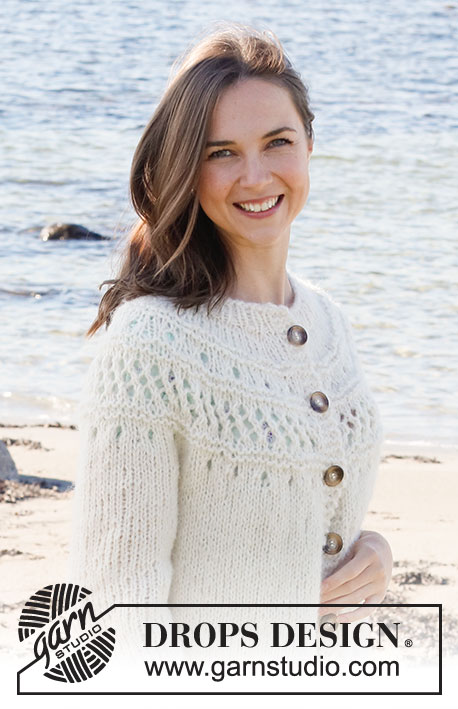
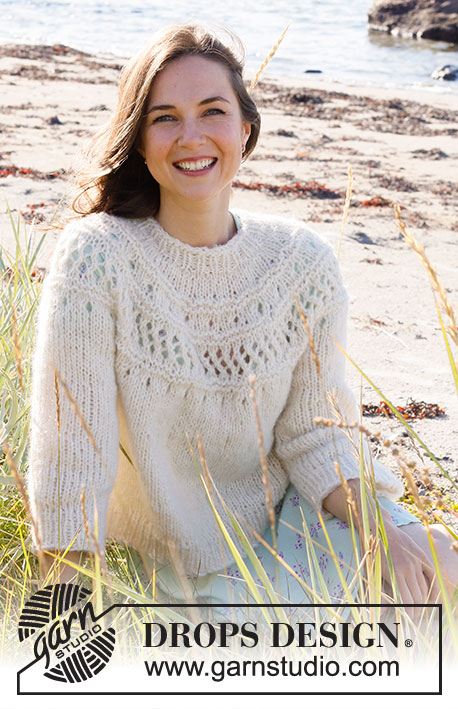
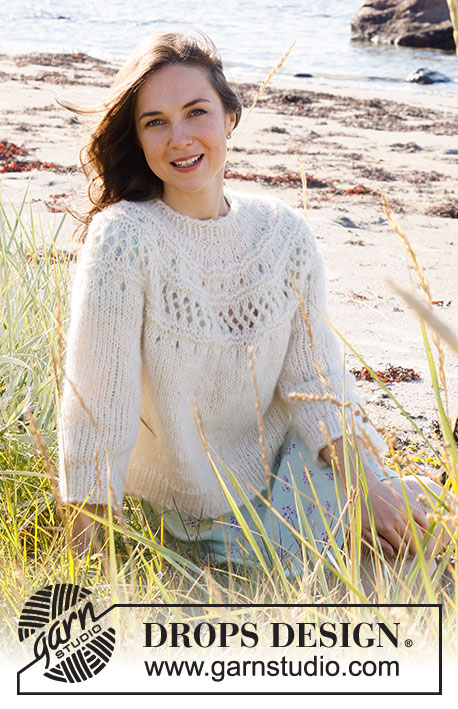
Way to Happiness#waytohappinesssweater |
|||||||||||||||||||
 |
 |
||||||||||||||||||
Knitted jumper in 1 strand DROPS Air and 1 strand DROPS Brushed Alpaca Silk (= 2 strands) or 1 strand Wish. Piece is knitted top down with round yoke, lace pattern, garter stitch and ¾ sleeves. Size: S - XXXL
DROPS 221-20 |
|||||||||||||||||||
|
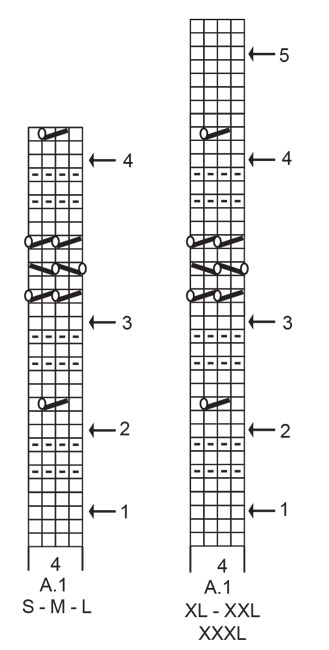
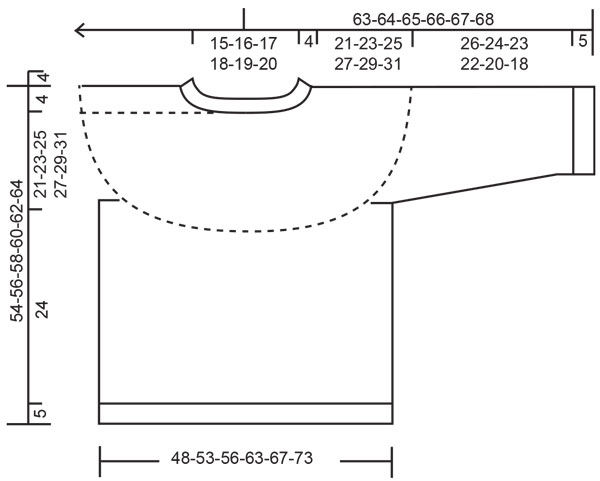
------------------------------------------------------- EXPLANATION FOR THE PATTERN: ------------------------------------------------------- PATTERN: See diagram A.1. Choose diagram for your size. INCREASE TIP (evenly): To calculate how to increase evenly, use the total number of stitches on round (e.g. 50 stitches) and divide stitches by number of increases to be done (e.g. 10) = 5. In this example increase by making 1 yarn over after every 5th stitch. On next round work yarn overs twisted to avoid holes. DECREASE TIP (applies to mid under sleeves): Decrease 1 stitch on each side of marker thread as follows: Work until 3 stitches remain before marker thread and knit 2 together, knit 2 (marker thread is between these 2 stitches), slip 1 stitch knitwise, knit 1, pass slipped stitch over stitch worked. CAST-OFF TIP: To avoid a tight cast-off edge you may use a larger needle size. If this also is too tight, work a 1 yarn over after approx. every 6th stitch while casting off (cast off yarn overs as regular stitches). ------------------------------------------------------- START THE PIECE HERE: ------------------------------------------------------- JUMPER - SHORT OVERVIEW OF THE PIECE: Work neck edge and yoke in the round on circular needle from mid back, top down. Now divide yoke for body and sleeves. Body is worked in the round on circular needle, top down. Work sleeves in the round on double pointed needles/short circular needle, top down. NECK EDGE: Cast on 50-52-54-58-60-62 stitches on circular needle size 7 mm with 1 strand Air + 1 strand Brushed Alpaca Silk (= 2 strands) or 1 strand Wish. Knit 1 round. Then work rib (= knit 1/purl 1) in the round for 4 cm. When rib is done, knit 1 round while increasing 10-12-14-14-16-18 stitches evenly - read INCREASE TIP = 60-64-68-72-76-80 stitches. Knit 1 round. Switch to circular needle size 8 mm. Insert 1 marker at the beginning of round (= mid back), measure yoke from this marker! YOKE: Now work pattern as follows: Work A.1 in the round - choose diagram for your size. REMEMBER THE KNITTING TENSION! Continue pattern in the round like this and increase evenly on rounds with arrow as follows - remember INCREASE TIP: ARROW-1: Increase 24-28-32-32-28-32 stitches evenly = 84-92-100-104-104-112 stitches. ARROW-2: Increase 24-28-32-28-28-32 stitches evenly = 108-120-132-132-132-144 stitches. ARROW-3: Increase 24-28-32-24-28-32 stitches evenly = 132-148-164-156-160-176 stitches. ARROW-4: Increase 24-24-24-20-28-28 stitches evenly = 156-172-188-176-188-204 stitches. Increase in size S, M and L is now done. In size XL, XXL and XXXL increase one more time: ARROW-5: Increase 26-30-30 stitches evenly = 202-218-234 stitches. When A.1 has been worked vertically, piece measures approx. 21-21-21-26-26-26 cm from marker. Then work in stocking stitch until piece measures 21-23-25-27-29-31 cm from marker. Now divide piece for body and sleeves. Work next round as follows: Work the first 23-26-28-31-33-36 stitches (= half back piece), slip the next 31-34-38-40-43-45 stitches on a stitch holder for sleeve and cast on 6-6-6-8-8-8 new stitches on needle (= in the side under sleeve), work the next 47-52-56-61-66-72 stitches (= front piece), slip the next 31-34-38-40-43-45 stitches on a stitch holder for sleeve and cast on 6-6-6-8-8-8 new stitches on needle (= in the side under sleeve), work the remaining 24-26-28-30-33-36 stitches (= half back piece). Then finish body and sleeves separately. NOW MEASURE PIECE FROM HERE! BODY: = 106-116-124-138-148-160 stitches. Continue in the round in stocking stitch. When piece measures 24 cm from division, increase 14-16-16-22-24-28 stitches evenly = 120-132-140-160-172-188 stitches. Switch to circular needle size 7 mm. Now work rib (= knit 1/purl 1) in the round for 5 cm. Cast off with knit over knit and purl over purl - read CAST-OFF TIP. Jumper measures approx. 54-56-58-60-62-64 cm from shoulder and down. SLEEVES: Slip the 31-34-38-40-43-45 stitches from stitch holder in one side of piece back on a short circular needle/double pointed needles size 8 mm, and pick in addition up 1 stitch in each of the 6-6-6-8-8-8 stitches cast on in the side under sleeve = 37-40-44-48-51-53 stitches. Insert a marker thread in the middle of the new stitches (= 3-3-3-4-4-4 new stitches on each side of marker thread). Move the marker thread upwards when working; it should be used for decrease mid under sleeve. Begin round at the marker thread and work stocking stitch in the round. When sleeve measures 4 cm from division, decrease 1 stitch on each side of marker thread - read DECREASE TIP. Decrease like this approx. every 0-13-4-2-1½-1 cm 1-2-4-5-6-7 times in total = 35-36-36-38-39-39 stitches. When piece measures 26-24-23-22-20-18 cm from division – or work until desired length (approx. 5 cm remain until finished measurements), increase 5-6-6-6-5-5 stitches evenly = 40-42-42-44-44-44 stitches. Switch to double pointed needles size 7 mm. Work rib (knit 1/purl 1) in the round for 5 cm. Cast off with knit over knit and purl over purl - remember CAST-OFF TIP. Work the other sleeve the same way. |
|||||||||||||||||||
Diagram explanations |
|||||||||||||||||||
|
|||||||||||||||||||
|
|||||||||||||||||||
|
|||||||||||||||||||
Have you finished this pattern?Tag your pictures with #dropspattern #waytohappinesssweater or submit them to the #dropsfan gallery. Do you need help with this pattern?You'll find 25 tutorial videos, a Comments/Questions area and more by visiting the pattern on garnstudio.com. © 1982-2025 DROPS Design A/S. We reserve all rights. This document, including all its sub-sections, has copyrights. Read more about what you can do with our patterns at the bottom of each pattern on our site. |
|||||||||||||||||||


With over 40 years in knitting and crochet design, DROPS Design offers one of the most extensive collections of free patterns on the internet - translated to 17 languages. As of today we count 314 catalogues and 11822 patterns translated into English (UK/cm).
We work hard to bring you the best knitting and crochet have to offer, inspiration and advice as well as great quality yarns at incredible prices! Would you like to use our patterns for other than personal use? You can read what you are allowed to do in the Copyright text at the bottom of all our patterns. Happy crafting!
Post a comment to pattern DROPS 221-20
We would love to hear what you have to say about this pattern!
If you want to leave a question, please make sure you select the correct category in the form below, to speed up the answering process. Required fields are marked *.