
Beliebte Kategorien
Suchen Sie nach einem Garn?


Kommentare / Fragen (101)
Renée hat geschrieben:
Please confirm this is correct for insert needle in st below section: On 9th (19th) row before working st on LH needle, insert RH needle from RS into st 3/6 rows down & pull through a loop of working yarn to required length from WS to RS. This loop will lie on RS stretching up to RH needle. K1. Then stick RH needle from RS through same stitch as you stuck it through previously & pull through another loop of yarn from WS to RS to required length. Is this what you mean?
29.11.2014 - 15:06Renée hat geschrieben:
The instructions for insert needle down in st 6/3 rows below. It states; yarn should be pulled from WS to a length of 2/1.5cms. However, it was explained lwr down in this chain: you get the yarn from the WS and pull the stitch from the RS (see post from 08.10.2014 kl. 17:06). But the pattern doesn't state that you pull from the RS. Also the pictures supplied look like the whole process is done from RS. I'm confused by the instructions provided. Please clarify in detail what is required here.
29.11.2014 - 11:41RHS hat geschrieben:
You missed the first part of my question in my previous post, here it is again below: I start the decreases when the entire piece measures 10cms: i.e. 10cms including the P2/K2 ribbing?
28.11.2014 - 11:59DROPS Design hat geantwortet:
Dear Mrs RHS and sorry for having missed this part of your question, you are correct, decreases start when piece measures 10 cm from the beg, ie including P2/K2 ribbing. Happy knitting!
28.11.2014 - 13:41RHS hat geschrieben:
About the YOs in A1. It's not stated in the pattern, but I assume from looking at the finished garment that the YOs are used to create holes in the work and are not used as increases. Therefore, when I come to work the YOs on the following round, I just need to knit or purl them (depending on what the pattern states) as if they were normal stitches And NOT knit or purl into the back of the loop? Is this correct?
23.11.2014 - 13:43DROPS Design hat geantwortet:
Dear Mrs RHS, you are correct, the yos made in pattern are creating holes, just work them regular P or K as in pattern but not into back of the loop. Happy knitting!
24.11.2014 - 11:16RHS hat geschrieben:
Re: previous query regarding the decrease of 3 sts in A1. Just to be clear, I mean perform 3 separate instances of knit 2 tog or purl 2 together. And not knit or purl 3 stitches together.
12.11.2014 - 12:24DROPS Design hat geantwortet:
Yes that's correct, it may look better to rather K/P 2 tog than 3 tog. Happy knitting!
12.11.2014 - 14:31RHS hat geschrieben:
Pattern states: A1 over first 82 sts, at same time dec 3 sts =79sts. Just to clarify, over the course of diagram A1, I have to knit or purl 3 sts together?
12.11.2014 - 12:20DROPS Design hat geantwortet:
Dear Mrs RHS, you work the next 82 sts following A.1 and at the same time K/P 2 sts tog evenly a total of 3 times to match the 79 sts in diagram. Happy knitting!
12.11.2014 - 14:12RHS hat geschrieben:
The symbols for:slip 1 st on cable needle behind & in front of piece are a bit confusing as the arrows point in the wrong direction to behind & in front. I knitted the Drops cabled wrist warmers and in that pattern the symbols (arrows) for cable behind and cable front pointed in the opposite direction to the symbols in this pattern. Are the symbols incorrect?
11.11.2014 - 15:20DROPS Design hat geantwortet:
Dear Mrs RHS, symbols are correct: for 4th symbol (= / over 2 squares), slip 1 st behind piece and for 5th symbol (= \ over 2 squares), slip 1 st in front of piece. There may be some changes from a pattern to another, make sure you are working as stated under diagram text. Happy knitting!
11.11.2014 - 17:45
![]() Maria Stella Magrì hat geschrieben:
Maria Stella Magrì hat geschrieben:
Per questo modello, come scegliere la taglia, ho visto che per altri modelli già la M corrisponde ad una 48 italiana
10.11.2014 - 14:33DROPS Design hat geantwortet:
Buongiorno Maria Stella. La taglia 48 dovrebbe corrispondere ad una XL. Se ha già un capo analogo di cui è soddisfatta delle misure, confronti le misure del suo capo con quelle riportate nel grafico alla fine del modello, per scegliere la taglia corretta. Buon lavoro!
10.11.2014 - 16:28
![]() Fanny hat geschrieben:
Fanny hat geschrieben:
Det minskas inte i diagrammet: se den lilla ringen som kompenserar.
01.10.2014 - 08:51
![]() Ulrica Törning hat geschrieben:
Ulrica Törning hat geschrieben:
På första mönstervarvet står det att det ska minskas 3 maskor jämt fördelat. Från 82 till 79 maskor. Samtidigt är det inritat två minskningar i diagrammet. Då blr det ju 77 maskor??? Eller är de två inräknade i de tre ni nämner först?
01.10.2014 - 07:48
|
||||||||||||||||||||||||||||||||||||||||||||||||||||
Frozen Ivy#frozenivyponcho |
||||||||||||||||||||||||||||||||||||||||||||||||||||
|
|
||||||||||||||||||||||||||||||||||||||||||||||||||||
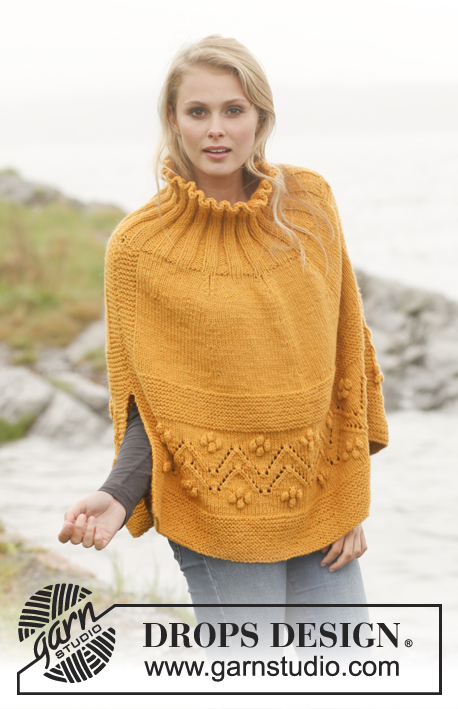
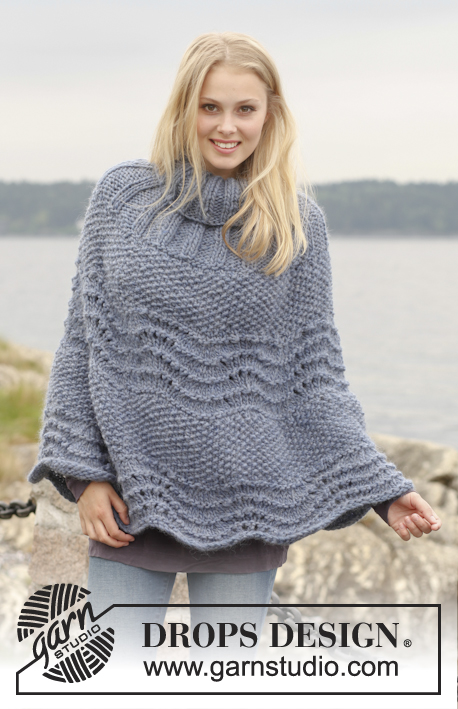
Gestrickter DROPS Poncho aus „Karisma“ mit Zöpfen und Blattmuster. Größe S - XXXL.
DROPS 151-2 |
||||||||||||||||||||||||||||||||||||||||||||||||||||
|
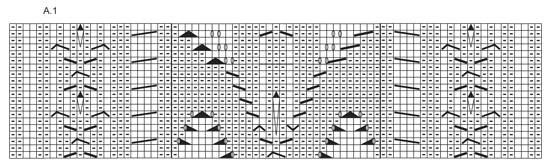
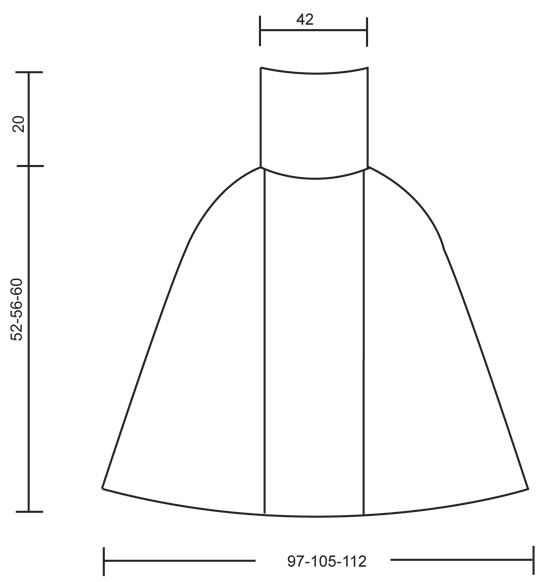
MUSTER: Siehe Diagramm A.1. TIPP ZUR ABNAHME: 6 M vor der Markierung beginnen und wie folgt stricken: 2 re zusammen, 1 re, 2 li, 2 re (die Markierung sitzt zwischen diesen beiden M), 2 li, 1 re, 1 M re abheben, 1 re, die abgehobene überziehen. ---------------------------------------------------------- PONCHO: 408-440-472 M auf Rundnadel 3,5 mit Karisma anschlagen. Zur Runde schliessen und 8 cm im Rippenmuster 2 li / 2 re stricken, dann zu RUNDNADEL 4 wechseln. Wie folgt weiter stricken: A.1 über die ersten 82 M, GLEICHZEITIG über diese M gleichmäßig verteilt 3 M abn (= 79 M), * glatt re über die nächsten 26-30-34 M stricken, weiter mit 2 li, 2 re, 2 li über die nächsten 6 M (diese M liegen direkt über: 2 li, 2 re, 2 li des Rippenmusters) *, von * - * noch 2 x wdh, glatt re über die nächsten 26-30-34 M, A.1 über die nächsten 82 M, GLEICHZEITIG über diese M gleichmäßig verteilt 3 M abn (= 79 M), * glatt re über die nächsten 26-30-34 M, weiter mit 2 li, 2 re, 2 li über die nächsten 6 M (diese M liegen direkt über: 2 li, 2 re, 2 li des Rippenmusters)*, von * - * noch 2 x wdh, glatt re über die nächsten 26-30-34 M = 402-434-466 M. 4 Markierungen anbringen: die 1.Markierung nach 108-112-116 M (zwischen 2 M re des ersten Rippenmusters),die 2. Markierung nach 172-184-196 M (zwischen 2 M re des dritten Rippenmusters),die 3. Markierung nach 309-329-349 M (zwischen 2 M re des vierten Rippenmusters), und die 4. Markierung nach 373-401-429 M (zwischen 2 M re des sechsten Rippenmusters). In der Musterfolge weiterstricken, gleichzeitig nach 10 cm auf jeder Seite der Markierungen je 1 M abn – SIEHE TIPP ZUR ABNAHME! Wiederholen Sie diese Abnahmen 19-19-19 x alle 2 cm, dann 5-9-13 x jeden cm (insgesamt 24-28-32 Abn) = 210 M in allen Größen. Die Arb misst nun ca. 52-56-60 cm. Zu RUNDNADEL 3,5 wechseln und 1 Rd re stricken, GLEICHZEITIG gleichmäßig verteilt 42 M abn = 168 M. 1 Rd li stricken, dann 20 cm im Rippenmuster 2 re / 2 li. Die M so abketten, wie sie erscheinen. |
||||||||||||||||||||||||||||||||||||||||||||||||||||
Erklärungen zum Diagramm |
||||||||||||||||||||||||||||||||||||||||||||||||||||
|
||||||||||||||||||||||||||||||||||||||||||||||||||||
 |
||||||||||||||||||||||||||||||||||||||||||||||||||||
 |
||||||||||||||||||||||||||||||||||||||||||||||||||||
Haben Sie diese Anleitung nachgearbeitet?Dann taggen Sie Ihre Fotos mit #dropspattern #frozenivyponcho oder schicken Sie sie an die #dropsfan Galerie Brauchen Sie Hilfe bei dieser Anleitung?Sie finden 15 Videotutorials, einen Kommentar/Fragen-Bereich und vieles mehr, wenn sie die Anleitung bei garnstudio.com aufrufen. © 1982-2026 DROPS Design A/S. Wir besitzen alle Rechte. Dieses Dokument, einschließlich aller Untersektionen, hat Urheberrechte. Mehr dazu, was Sie mit unseren Anleitungen machen können, finden Sie ganz unten auf der Seite zu jeder Anleitung. |
||||||||||||||||||||||||||||||||||||||||||||||||||||


Mit über 40 Jahren Tätigkeit im Entwerfen von Strick- und Häkelmustern bietet Ihnen DROPS Design eine der umfangreichsten Sammlungen von kostenlosen Anleitungen im Internet - in 17 Sprachen übersetzt. Zum jetzigen Zeitpunkt haben wir insgesamt 325 Handarbeitshefte und 12298 Anleitungen auf Deutsch. 12210
Unser Ziel ist es, Ihnen die besten Angebote zum Stricken und Häkeln, Inspirationen und Ratschläge sowie qualitativ hochstehende Garne zu unglaublichen Preisen zu bieten! Möchten Sie unsere Anleitungen nicht nur für den persönlichen Gebrauch nutzen? Unsere Copyright Bedingungen finden Sie bei allen unseren Anleitungen ganz unten auf der jeweiligen Seite. Viel Spaß beim Handarbeiten!
Kommentieren Sie die Anleitung DROPS 151-2
Wir würden gerne Ihre Meinung zu diesem Modell erfahren!
Wenn Sie eine Frage stellen möchten, prüfen Sie bitte, dass Sie die richtige Kategorie im unten stehenden Formular gewählt haben - so bekommen Sie schneller eine Antwort. Die obligatorischen Felder sind mit einem * gekennzeichnet.