
Beliebte Kategorien
Suchen Sie nach einem Garn?


Kommentare / Fragen (101)
![]() Lisbet Holze Jespersen hat geschrieben:
Lisbet Holze Jespersen hat geschrieben:
Hej igen. Den 11.1.2016 havde jeg nogle spørgsmål til opskrift 151-02. Da jeg p.t. sidder og strikker denne poncho må I gerne svare hurtigste muligt.
16.01.2016 - 23:58
![]() Lisbet Holze Jespersen hat geschrieben:
Lisbet Holze Jespersen hat geschrieben:
Sign.forklaring: 2 skrå op 1 skrå ned. Sæt 2 m på hj.pind bag arb. 1 ret og 1 vr. + 1 ret fra hj.p.. selvom der er sat 2 m på hj.pind. Der må være noget galt??? Sign.forklaring med at hente masker op bagfra. 3 m ialt. På næste pind strikkes således:1 løs af 2 r sammen. Løs m over 2 r sammen. Iflg. sign. skal der strikkes 1 vr ???
11.01.2016 - 15:01DROPS Design hat geantwortet:
= sæt 2 m på h.j.p bag arb, 1 ret, 1 vr + 1 ret fra hj.p. Det er de 2 sidste masker du strikker fra hjælpepinden. God fornøjelse!
26.01.2016 - 15:04
![]() M.boer hat geschrieben:
M.boer hat geschrieben:
In het patroon van deze poncho moet je in een naald 2 steken samenbreien/ of een overhaling. In de volgende naald kom je dus steken tekort , je kan dan niet 1 recht 1 averecht breien boven de b.v samengebreide steken want die heb je nergens toegevoegd. Graag uitleg / reactie. B.v.d. Vr.groet, Marja Boer.
05.05.2015 - 21:32DROPS Design hat geantwortet:
Hoi Marja. Je maakt ook 1 omslag bij elke 2 samenbreien/overhaling. Zoals ik het lees kom je dan uit met een gelijk aantal steken.
06.05.2015 - 17:38
![]() Sue hat geschrieben:
Sue hat geschrieben:
Have you produced a video tutorial for the3/6 stitch because I have no idea where or how to even start with that? Thank you.
27.01.2015 - 22:37DROPS Design hat geantwortet:
Dear Sue, there is no video available yet, but to work this st, *insert your needle 3/6 rows below, get yarn from WS and go back through that st with the yarn from RS (you have 1 more st on the right needle)*, then work next st and repeat from *-* once again in the same st below, you have now 3 sts on the right needle, on next round, work these 3 sts: Slip 1 as if to K, K2 tog, psso (1 st remains). Happy knitting!
28.01.2015 - 10:57
![]() Françoise Bastin hat geschrieben:
Françoise Bastin hat geschrieben:
Bonjour, J'ai réalisé ce poncho en rouge, il est magnifique. J'ai repris la base mais changé les deux panneaux de dessin. En fait j'ai repris presque l'entièreté d'un diagramme d'un pull pour homme (n°135-3). Je le trouve aussi magnifique. Je vais procéder de la même manière pour une autre personne et cela donnera 3 ponchos différents. Françoise.
21.01.2015 - 10:32RHS hat geschrieben:
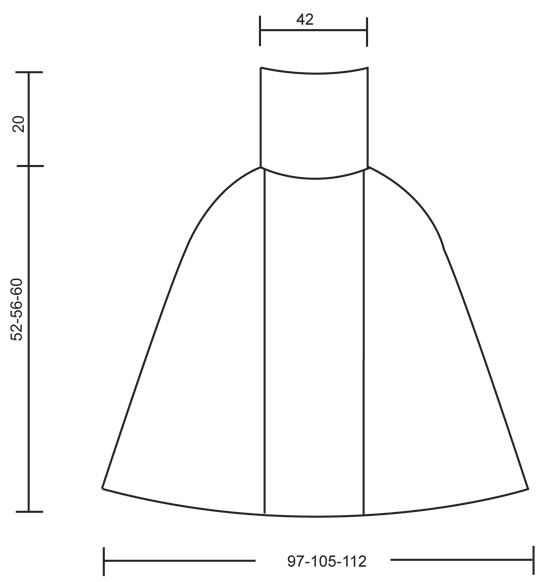
Hi Is the circumference of the neck 42cm or 84cm?
08.01.2015 - 12:25DROPS Design hat geantwortet:
Dear RHS, measurements in chart are taken flat, from side to side, circumference of the neck will be then approx. 84 cm (neck will be 42 cm from side to side when lying flat). Happy knitting!
08.01.2015 - 13:40
![]() Sandra hat geschrieben:
Sandra hat geschrieben:
Hallo an Alle, weiß denn jemand wieviel Wolle für Größe S/M benötigt wird :-) ? Dankeschön
25.12.2014 - 18:56DROPS Design hat geantwortet:
Den Garnverbrauch finden Sie neben dem Foto unter der gestrichelten Linie, dort ist das Material samt Verbrauch angegeben.
29.12.2014 - 10:11Renée hat geschrieben:
Thank you for your help!
04.12.2014 - 15:26Renée hat geschrieben:
Thanks for confirming. Just one final aspect I am a little unsure of regarding the insert needle 3/6 rows down, when you create the 2nd loop (the 3rd of the 3 sts), you stick the needle through the same stitch as you stuck it through to create the first loop. Is that correct? i.e. both loops/strands of yarn are pulled through the same stitch.
04.12.2014 - 13:37DROPS Design hat geantwortet:
Dear Renée, that's correct, you will then have 3 sts instead of 1 on this place (1st st picked below + K1 + 2nd st picked below) that you will dec to 1 st on next round. Happy knitting!
04.12.2014 - 15:05Renée hat geschrieben:
I already looked at the images you are directing me to and I did not find them particularly helpful. Can you please check my post from 29/11/14 at 15:06 where I have described what I think is required for the stitch 3/6 rows down and then confirm that this is correct or not. The description provided in the pattern is too vague and should be rewritten as it is quite misleading.
03.12.2014 - 17:02DROPS Design hat geantwortet:
Dear Renée, you are correct, *you insert needle some rows below, get the yarn from WS and pull it through the st (= towards RS) = you will have an extra st "loop" on right needle* - work 1 st and repeat again from *-* = 3 st on right needle - on next round, work these 3 sts: Slip 1 as if to K, K2 tog, psso. Happy knitting!
03.12.2014 - 17:34
|
||||||||||||||||||||||||||||||||||||||||||||||||||||
Frozen Ivy#frozenivyponcho |
||||||||||||||||||||||||||||||||||||||||||||||||||||
|
|
||||||||||||||||||||||||||||||||||||||||||||||||||||
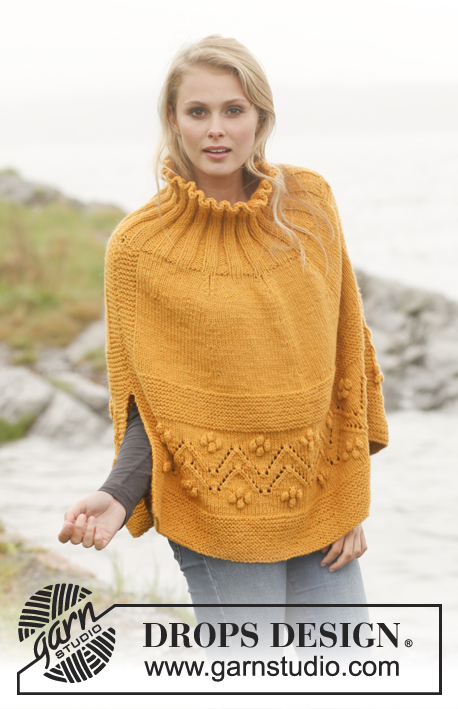
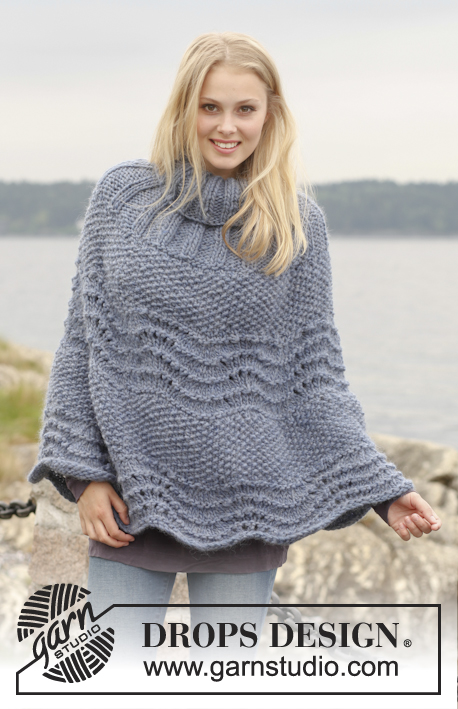
Gestrickter DROPS Poncho aus „Karisma“ mit Zöpfen und Blattmuster. Größe S - XXXL.
DROPS 151-2 |
||||||||||||||||||||||||||||||||||||||||||||||||||||
|
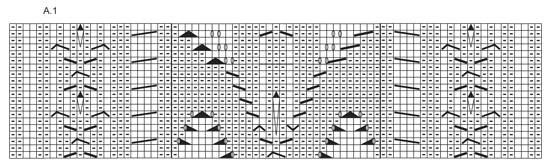
MUSTER: Siehe Diagramm A.1. TIPP ZUR ABNAHME: 6 M vor der Markierung beginnen und wie folgt stricken: 2 re zusammen, 1 re, 2 li, 2 re (die Markierung sitzt zwischen diesen beiden M), 2 li, 1 re, 1 M re abheben, 1 re, die abgehobene überziehen. ---------------------------------------------------------- PONCHO: 408-440-472 M auf Rundnadel 3,5 mit Karisma anschlagen. Zur Runde schliessen und 8 cm im Rippenmuster 2 li / 2 re stricken, dann zu RUNDNADEL 4 wechseln. Wie folgt weiter stricken: A.1 über die ersten 82 M, GLEICHZEITIG über diese M gleichmäßig verteilt 3 M abn (= 79 M), * glatt re über die nächsten 26-30-34 M stricken, weiter mit 2 li, 2 re, 2 li über die nächsten 6 M (diese M liegen direkt über: 2 li, 2 re, 2 li des Rippenmusters) *, von * - * noch 2 x wdh, glatt re über die nächsten 26-30-34 M, A.1 über die nächsten 82 M, GLEICHZEITIG über diese M gleichmäßig verteilt 3 M abn (= 79 M), * glatt re über die nächsten 26-30-34 M, weiter mit 2 li, 2 re, 2 li über die nächsten 6 M (diese M liegen direkt über: 2 li, 2 re, 2 li des Rippenmusters)*, von * - * noch 2 x wdh, glatt re über die nächsten 26-30-34 M = 402-434-466 M. 4 Markierungen anbringen: die 1.Markierung nach 108-112-116 M (zwischen 2 M re des ersten Rippenmusters),die 2. Markierung nach 172-184-196 M (zwischen 2 M re des dritten Rippenmusters),die 3. Markierung nach 309-329-349 M (zwischen 2 M re des vierten Rippenmusters), und die 4. Markierung nach 373-401-429 M (zwischen 2 M re des sechsten Rippenmusters). In der Musterfolge weiterstricken, gleichzeitig nach 10 cm auf jeder Seite der Markierungen je 1 M abn – SIEHE TIPP ZUR ABNAHME! Wiederholen Sie diese Abnahmen 19-19-19 x alle 2 cm, dann 5-9-13 x jeden cm (insgesamt 24-28-32 Abn) = 210 M in allen Größen. Die Arb misst nun ca. 52-56-60 cm. Zu RUNDNADEL 3,5 wechseln und 1 Rd re stricken, GLEICHZEITIG gleichmäßig verteilt 42 M abn = 168 M. 1 Rd li stricken, dann 20 cm im Rippenmuster 2 re / 2 li. Die M so abketten, wie sie erscheinen. |
||||||||||||||||||||||||||||||||||||||||||||||||||||
Erklärungen zum Diagramm |
||||||||||||||||||||||||||||||||||||||||||||||||||||
|
||||||||||||||||||||||||||||||||||||||||||||||||||||
 |
||||||||||||||||||||||||||||||||||||||||||||||||||||
 |
||||||||||||||||||||||||||||||||||||||||||||||||||||
Haben Sie diese Anleitung nachgearbeitet?Dann taggen Sie Ihre Fotos mit #dropspattern #frozenivyponcho oder schicken Sie sie an die #dropsfan Galerie Brauchen Sie Hilfe bei dieser Anleitung?Sie finden 15 Videotutorials, einen Kommentar/Fragen-Bereich und vieles mehr, wenn sie die Anleitung bei garnstudio.com aufrufen. © 1982-2026 DROPS Design A/S. Wir besitzen alle Rechte. Dieses Dokument, einschließlich aller Untersektionen, hat Urheberrechte. Mehr dazu, was Sie mit unseren Anleitungen machen können, finden Sie ganz unten auf der Seite zu jeder Anleitung. |
||||||||||||||||||||||||||||||||||||||||||||||||||||


Mit über 40 Jahren Tätigkeit im Entwerfen von Strick- und Häkelmustern bietet Ihnen DROPS Design eine der umfangreichsten Sammlungen von kostenlosen Anleitungen im Internet - in 17 Sprachen übersetzt. Zum jetzigen Zeitpunkt haben wir insgesamt 325 Handarbeitshefte und 12298 Anleitungen auf Deutsch. 12210
Unser Ziel ist es, Ihnen die besten Angebote zum Stricken und Häkeln, Inspirationen und Ratschläge sowie qualitativ hochstehende Garne zu unglaublichen Preisen zu bieten! Möchten Sie unsere Anleitungen nicht nur für den persönlichen Gebrauch nutzen? Unsere Copyright Bedingungen finden Sie bei allen unseren Anleitungen ganz unten auf der jeweiligen Seite. Viel Spaß beim Handarbeiten!
Kommentieren Sie die Anleitung DROPS 151-2
Wir würden gerne Ihre Meinung zu diesem Modell erfahren!
Wenn Sie eine Frage stellen möchten, prüfen Sie bitte, dass Sie die richtige Kategorie im unten stehenden Formular gewählt haben - so bekommen Sie schneller eine Antwort. Die obligatorischen Felder sind mit einem * gekennzeichnet.