
Beliebte Kategorien
Suchen Sie nach einem Garn?


Kommentare / Fragen (61)
![]() Barbara hat geschrieben:
Barbara hat geschrieben:
Pattern number 141-40 Sarah's delight vest The decrease for armhole on the back is causing some problems for me. The pattern says to decrease 3sts on the next two rows=6sts. 2sts six times=12 and 1sts x7 =7sts. A total of 25 stitches are decreased. I am doing the XXL and need to end up 84 its. Please help.
05.07.2022 - 22:13DROPS Design hat geantwortet:
Hi Barbara, You have 110 stitches before starting the armholes. You cast off on both sides: 3 stitches x 1 = 6, 2 sts x 4 = 16 and 1 st x 4 = 8. You have then cast off a total of 30 sts which leaves you with 80 sts. Happy knitting!
06.07.2022 - 06:57
![]() Barbara hat geschrieben:
Barbara hat geschrieben:
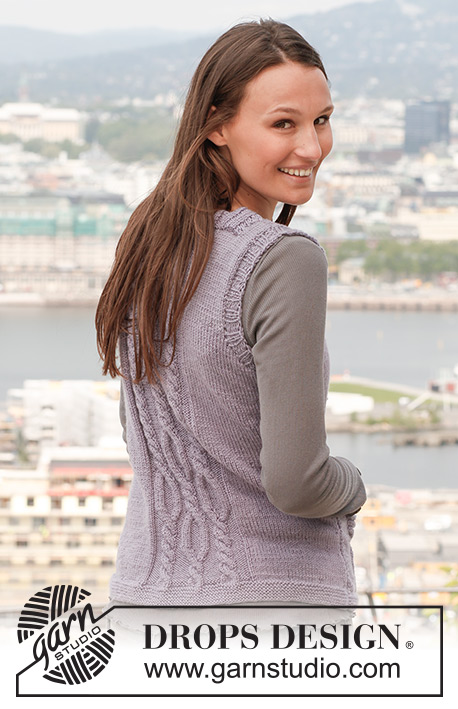
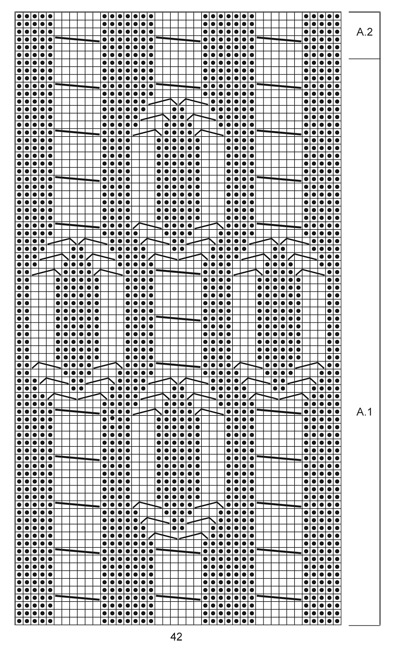
I have completed the back of pattern u-671 up to row 79. My question is do I now complete A3 It is hard to see from the photograph as the model has long hair which obscures the view of the upper back. I am anxious to complete this project so an early replay would be appreciated.
04.07.2022 - 09:04DROPS Design hat geantwortet:
Dear Barbara, when you have worked the whole diagram A.1, work now A.2 and repeat A.2 over A.1 (as shown in diagram = the 3 cables over 6 sts). Happy knitting!
04.07.2022 - 16:22
![]() Monica Ahlin hat geschrieben:
Monica Ahlin hat geschrieben:
När man stickat bakstycket med diagram A1s alla varv, skall man sedan sticka diagram A2 6 varv och sedan upprepa dessa 6 varv hela vägen upp?
30.03.2022 - 21:37DROPS Design hat geantwortet:
Hej Monica. Ja det stämmer. Mvh DROPS Design
31.03.2022 - 08:09
![]() Brandi hat geschrieben:
Brandi hat geschrieben:
Hello again. Earlier I had asked for help on the back piece for size xl. This was your answer: Dear Brandi, for size XL, you should cast off on BOTH SIDES 3 stitches 2 times = 6, 2 stitches 5 times = 10, and 1 stitch 4 times = 4, 6+10+4 = 10 stitches x 2 = so you cast off 20 stitch all together. 122-20= 82 stitch is the number of stitches you should end up with. Happy Stitching! The problem here is that 122-20 does not equal 82 it equals 102. Still needing help with the numbers. Thanks
04.08.2021 - 07:15DROPS Design hat geantwortet:
Dear Brandi, it looks like there was a small mistake in the previous answer, you will decrease 20 sts on each side (= 3 sts 2 times, 2 sts 5 times and 1 st 4 times), ie 40 sts in total = 102-40=82 sts remain. Happy knitting!
04.08.2021 - 07:59
![]() Brandi hat geschrieben:
Brandi hat geschrieben:
Currently working the back piece decreases for the armholes. When looking at the stitch counts for size xl it says I will start with 122 sts and end with 82 sts. When I counted the decreases it didn’t add up correctly. I’m sure I’m missing something. Please advise. Thank you
03.08.2021 - 16:57DROPS Design hat geantwortet:
Dear Brandi, for size XL, you should cast off on BOTH SIDES 3 stitches 2 times = 6, 2 stitches 5 times = 10, and 1 stitch 4 times = 4, 6+10+4 = 10 stitches x 2 = so you cast off 20 stitch all together. 122-20= 82 stitch is the number of stitches you should end up with. Happy Stitching!
04.08.2021 - 04:44
![]() Becky Eisen hat geschrieben:
Becky Eisen hat geschrieben:
I’m am working on the Right Front Piece and question is about the buttonhole. The patter says to k2tog in 3 and 4 stitch, then YO. The 3rd and 4th stitch are purl, so I P2tog. The button that is supposed to fit this tiny little hole is 20 mm. I could only get a 2.5 mm to fit. How to make a bigger hole, or am I missing something?
25.06.2021 - 19:55DROPS Design hat geantwortet:
Dear Becky, K2Tog and a yarnover should be anough for that size of button (on the next ro, take care that do not twist the stitch you knit into the yarnover. If it is still too small, try to do a double yarnover, and in the next row knit into the first and drop the second. Happy Stitching!
26.06.2021 - 01:10
![]() Keri Clark hat geschrieben:
Keri Clark hat geschrieben:
I am working on the right front piece and am at the direction in the pattern that says "AT THE SAME TIME when piece measures 12 1/4 (my size), dec 1 st towards mid front." I want to clarify what "towards mid front" means. Would I be decreasing in the stockinette section of the front, and doing so close to the patterned section of the front?
04.06.2021 - 06:43DROPS Design hat geantwortet:
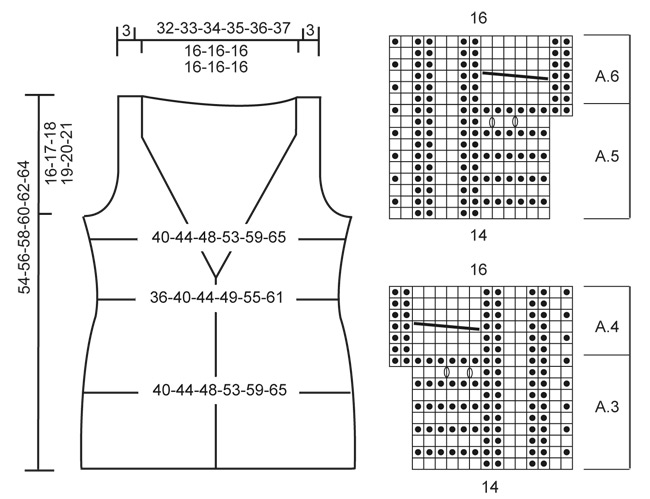
Dear Mrs Clark, the decreases worked mid front are for the V-Neck, ie decrease as explained under DECRASE TIP = after A.4 on right front piece, ie at the beginning of the stocking section after the cable. Happy knitting!
04.06.2021 - 07:14
![]() Anna Ramadori hat geschrieben:
Anna Ramadori hat geschrieben:
Salve! Volevo avvisare che c'è un errore nella spiegazione del diagramma. Nella quinta riga dove dice. Trasferire 1 m sul f. ausiliario sul dietro del lavoro, 3 m dir (voi indicate 2) poi il resto è giusto.
15.05.2021 - 07:44DROPS Design hat geantwortet:
Buonasera Anna, grazie per la segnalazione, abbiamo corretto la legenda. Buon lavoro!
15.05.2021 - 22:21
![]() Keri Clark hat geschrieben:
Keri Clark hat geschrieben:
Does the front pieces require the 10 rows of garter stitch ribbing as required for the back before starting with the A.3 pattern?
07.05.2021 - 01:28DROPS Design hat geantwortet:
Dear Keri, The cable pattern at the back starts after the garter stitch, but on the front edge starts right after the cast on, because this cable is going allon all the front edge. There is a number of stitches on which a garter stitch edge still knitted, next to the cabled stitch at the edge. So no extra garter stitch needed on the front, just follow the pattern. Happy Knitting!
07.05.2021 - 01:37
![]() Melody hat geschrieben:
Melody hat geschrieben:
I’m currently on the back piece and wondering for the armhole decrease and it’s says “cast off for armholes at the beg of every row in each side as follows”, does that mean cast of (x) number of stitches at the BEG and END of row? Or does it mean ONLY beg of every row, so a 1 RS and 1 WS (or vice versa) = 1 set which = 1 times?
25.03.2021 - 00:17DROPS Design hat geantwortet:
Dear Melody, it means, the beginning of EVERY row, so there are cast off on both sides. happy Knitting!
25.03.2021 - 01:51
|
|||||||||||||||||||
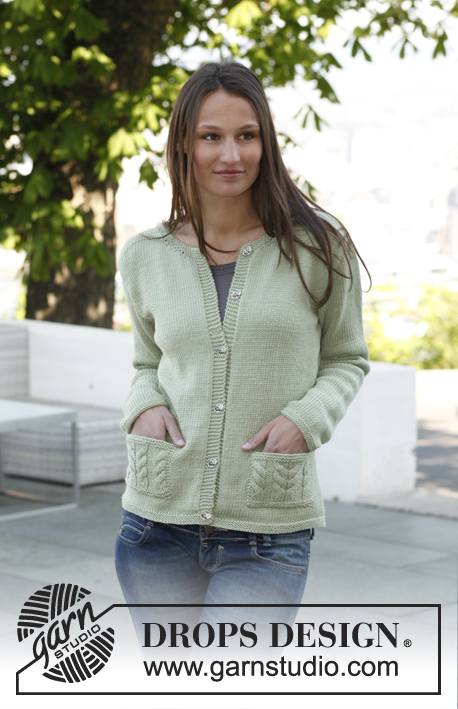
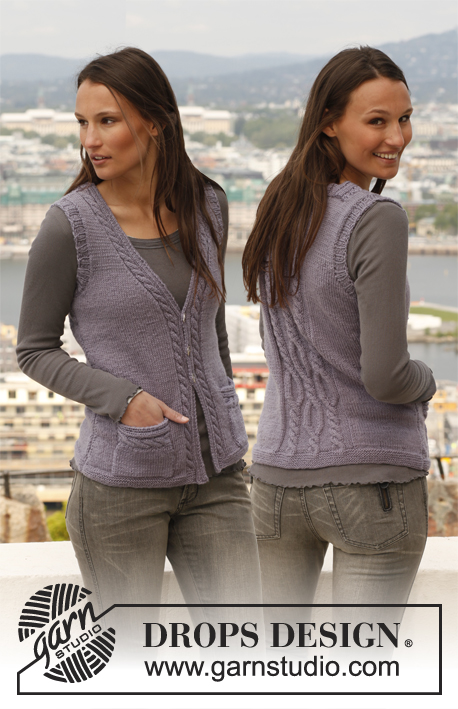
Sarah's Delight#sarahsdelightvest |
|||||||||||||||||||
 |
 |
||||||||||||||||||
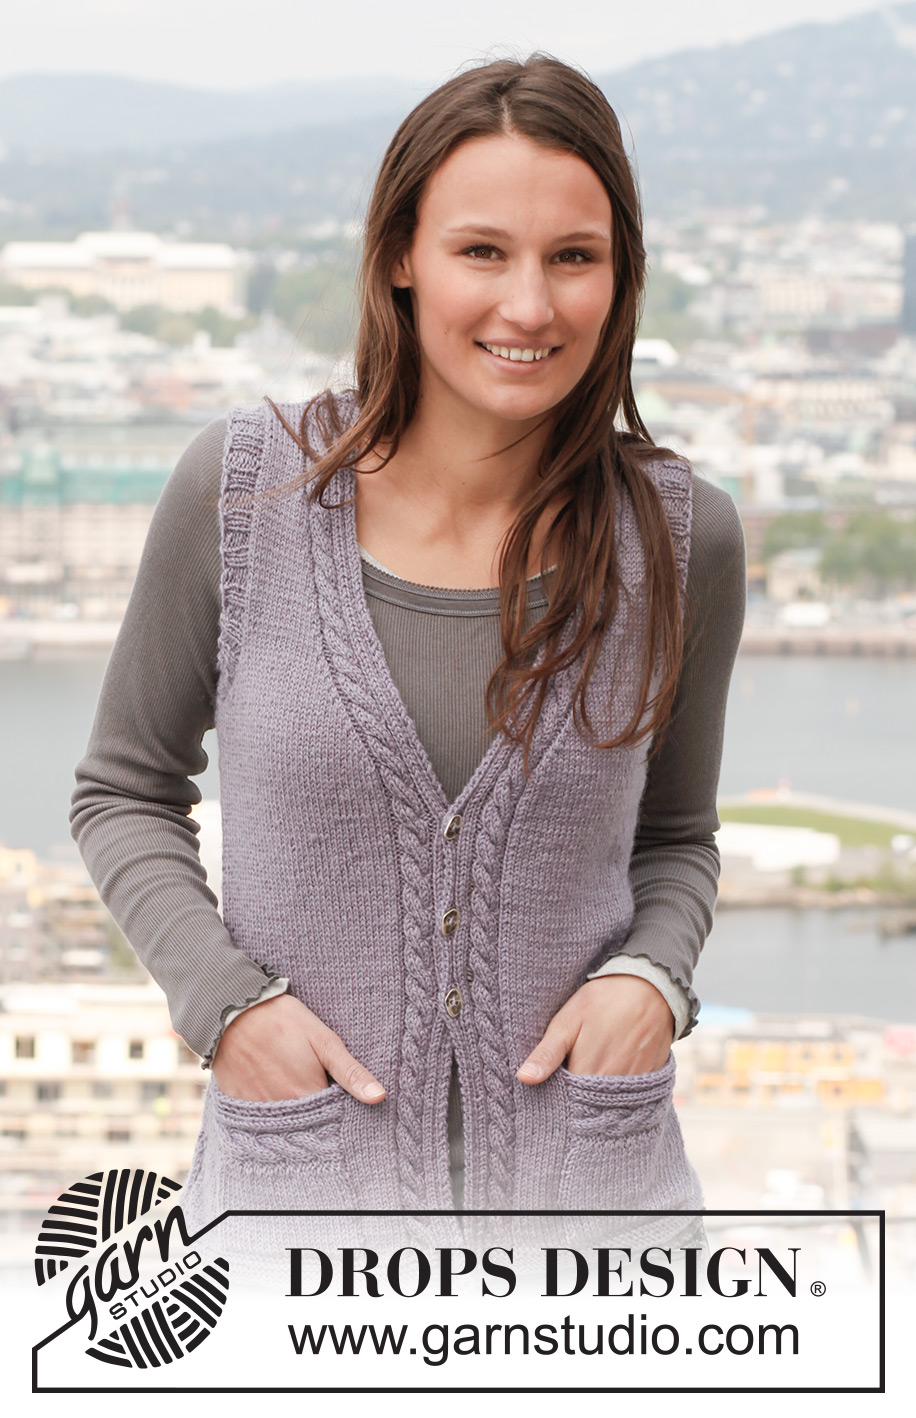
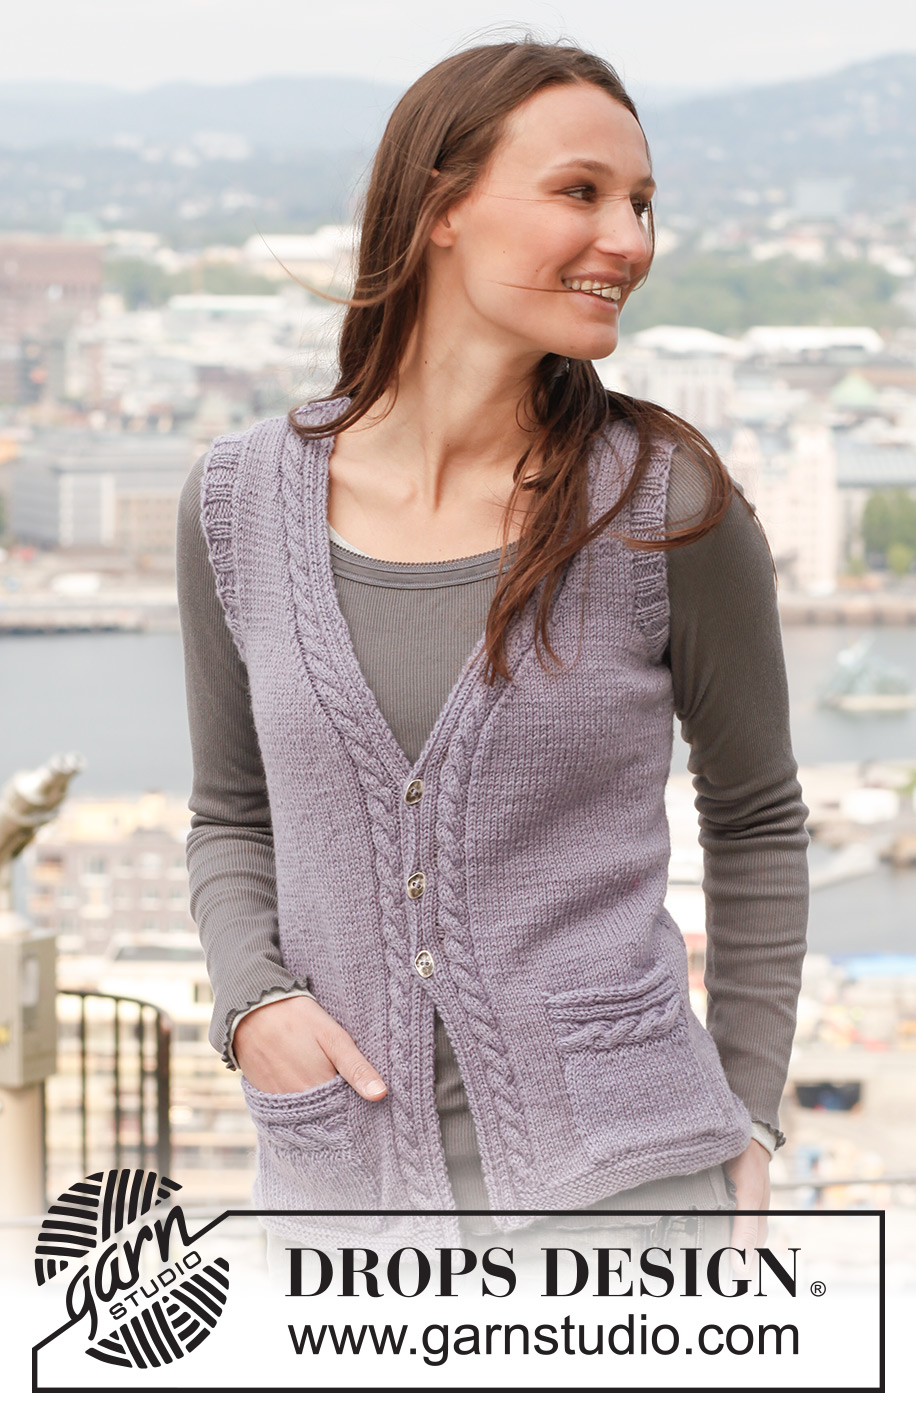
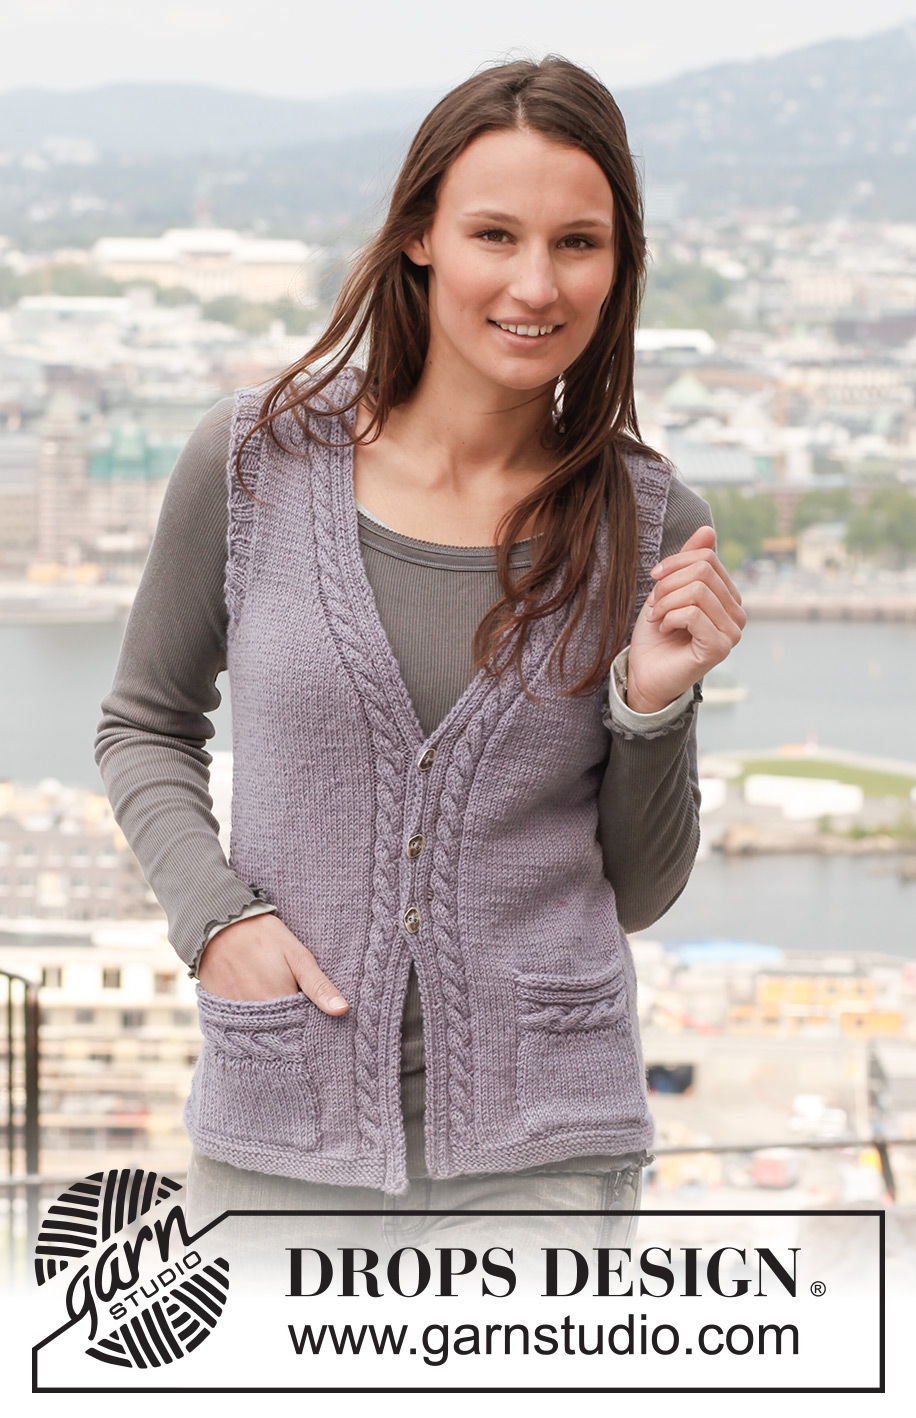
Gestrickte DROPS Weste in ”Karisma” mit Zopfmuster. Größe S - XXXL.
DROPS 141-40 |
|||||||||||||||||||
|
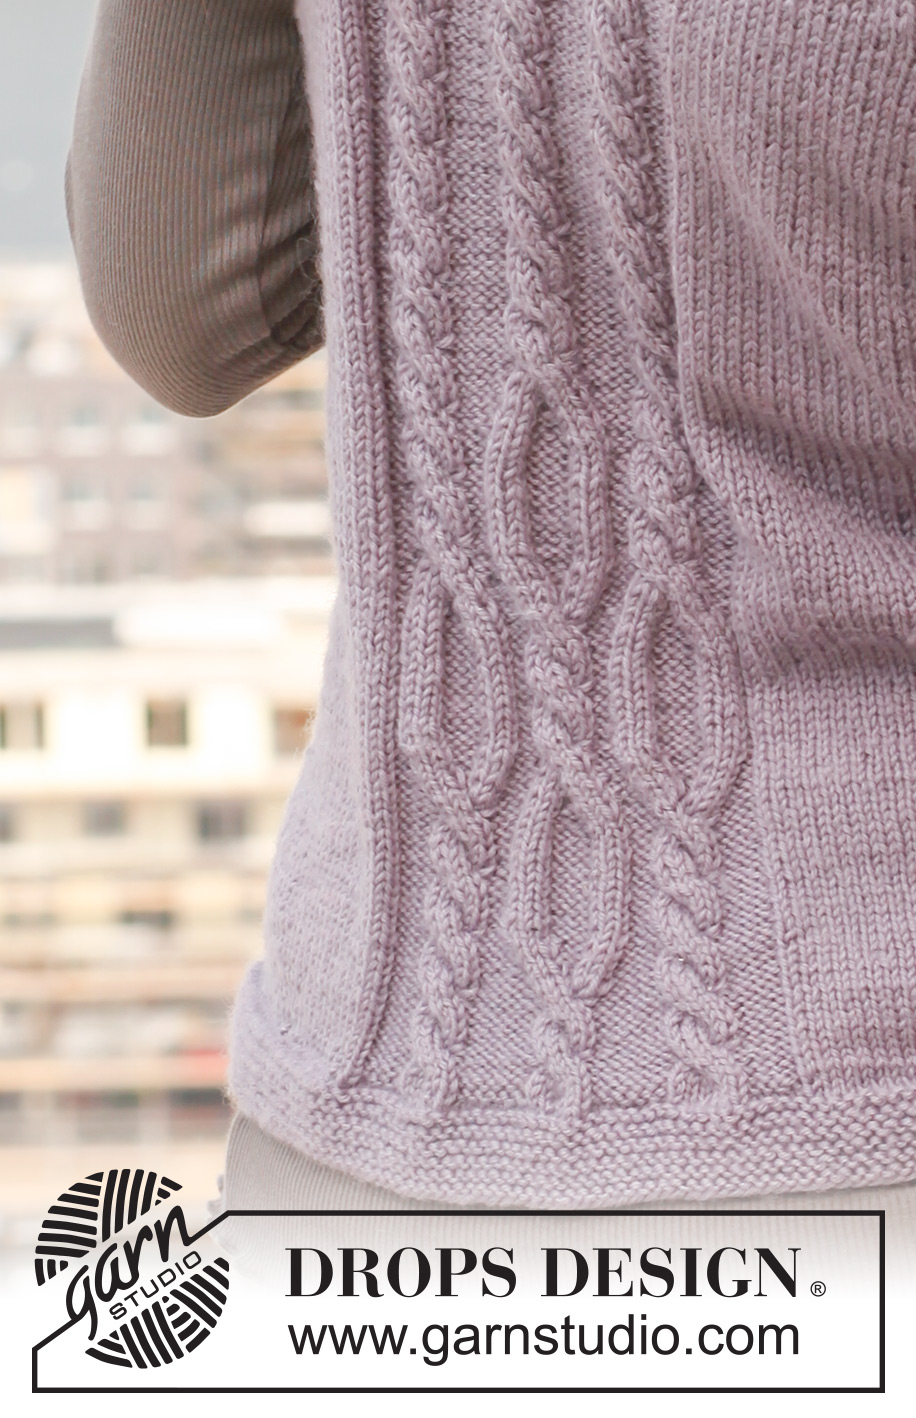
KRAUSRIPPEN (in Hin- und Rück-R): 1 Krausrippe = 2 R kraus re = 2 R re MUSTER: Siehe Diagramme A.1 bis A.6. Die Diagramme zeigen alle R der Muster, wie sie auf der Vorderseite erscheinen. ABNAHMETIPP: Es wird nach A.4 und vor A.6 abgenommen. Alle Abnahmen erfolgen in Hin-R! Vor A.6: 2 M re zusammenstricken. Nach A.4: 1 M wie zum Rechtsstricken abheben, 1 M re, die abgehobene M überziehen. KNOPFLÖCHER: An der rechten Blende werden Knopflöcher eingearbeitet. 1 Knopfloch = die 3. und 4. M ab dem Rand re zusammenstricken und 1 Umschlag arbeiten. Die Knopflöcher bei folgenden Maßen des Strickstücks einarbeiten: Gr. S: 16, 22 und 28 cm. Gr. M: 16, 23 und 29 cm. Gr. L: 17, 23 und 30 cm. Gr. XL: 18, 24 und 31 cm. Gr. XXL: 18, 25 und 32 cm. Gr. XXXL: 19, 26 und 33 cm. -------------------------------------------------------- RÜCKENTEIL: Das Rückenteil wird in Hin- und Rück-R gestrickt. 86-94-102-114-126-138 M (einschl. beidseitig je 1 Rand-M) auf Nadel Nr. 3 mit Karisma anschlagen. 5 KRAUSRIPPEN (= 10 R kraus re, siehe oben) stricken. Die nächste Hin-R wie folgt stricken: 1 Rand-M kraus re, 25-29-33-39-45-51 M re, die nächsten 34 M ebenfalls re stricken und gleichzeitig bei diesen M 8 M gleichmäßig verteilt zunehmen, 25-29-33-39-45-51 M re und 1 Rand-M kraus re (= 94-102-110-122-134-146 M). Zu Nadel Nr. 4 wechseln und die nächste Rück-R wie folgt stricken: 1 Rand-M kraus re, 25-29-33-39-45-51 M li, Muster A.1 (= 42 M), 25-29-33-39-45-51 M li und 1 Rand-M kraus re. Im Muster A.1 mit beidseitig je 25-29-33-39-45-51 M glatt re und je 1 Rand-M kraus re weiterstricken. GLEICHZEITIG für die Seitenschrägung bei einer Gesamtlänge von 5 cm beidseitig je 1 M abnehmen, die Abnahmen alle 3 cm noch weitere 3 x wdh (= 86-94-102-114-126-138 M). Wenn A.1 1 x in der Höhe gestrickt wurde, die M von A.1 im Muster A.2 weiterstricken. GLEICHZEITIG bei einer Gesamtlänge von 20 cm beidseitig je 1 M zunehmen, die Zunahmen alle 5-5½-5½-6-6½-6½ cm noch weitere 3 x wdh (= 94-102-110-122-134-146 M). Für die Armausschnitte bei einer Gesamtlänge von 38-39-40-41-42-43 cm beidseitig zu Beginn jeder R 1-1-1-2-2-2 x je 3 M, 2-3-4-5-6-8 x je 2 M und 2-3-4-4-7-8 x je 1 M abketten (= 76-78-80-82-84-86 M). Bei einer Gesamtlänge von 50-52-54-56-58-60 cm 8 M gleichmäßig verteilt über den mittleren 42 M abnehmen (= 68-70-72-74-76-78 M). In der nächsten Hin-R wie folgt stricken: 9-10-11-12-13-14 M glatt re, * 2 M li, 2 M re *, von *-* über die nächsten 48 M arbeiten, 2 M li, 9-10-11-12-13-14 M glatt re. Bei einer Gesamtlänge von 52-54-56-58-60-62 cm die mittleren 34 M für den Halsausschnitt abketten (= 17-18-19-20-21-22 verbleibende M pro Schulter). Jede Schulter einzeln zu Ende stricken. Weiter 9-10-11-12-13-14 M glatt re, 2 M li, 2 M re, 2 M li, 1 M re und 1 Rand-M kraus re am Halsausschnitt stricken. Bei einer Gesamtlänge von 54-56-58-60-62-64 cm die M abketten, wie sie erscheinen (d.h. re M re und li M li abketten). RECHTES VORDERTEIL: 49-53-57-63-69-75 M (einschl. beidseitig je 1 Rand-M) auf Nadel Nr. 3 mit Karisma anschlagen. Wie folgt stricken (1. R = Hin-R): Muster A.3 (= 14 M), kraus re über die letzten 35-39-43-49-55-61 M. In dieser Weise weiterstricken, bis A.3 1 x in der Höhe gestrickt wurde (= 51-55-59-65-71-77 M). Zu Nadel Nr. 4 wechseln. Nun wie folgt weiterstricken (1. R = Hin-R): Muster A.4 (= 16 M), glatt re über die letzten 34-38-42-48-54-60 M, 1 Rand-M kraus re. In diesem Muster weiterstricken, ab einer Gesamtlänge von 5 cm für die Seitenschrägung wie beim Rückenteil abnehmen (= 47-51-55-61-67-73 M). Bei einer Gesamtlänge von 16-16-17-18-18-19 cm mit den KNOPFLÖCHERN beginnen (siehe oben). Ab einer Gesamtlänge von 20 cm für die Seitenschrägung wie beim Rückenteil zunehmen. GLEICHZEITIG bei einer Gesamtlänge von 29-30-31-32-33-34 cm in Ríchtung Halsausschnitt 1 M abnehmen – siehe ABNAHMETIPP, die Abnahmen nach jedem cm noch weitere 22 x wdh. GLEICHZEITIG bei einer Gesamtlänge von 38-39-40-41-42-43 cm für den Armausschnitt wie beim Rückenteil abketten. Nach allen Abnahmen für die Armausschnitte und den Halsausschnitt verbleiben 19-20-21-22-23-24 M. Bei einer Gesamtlänge von ca. 53-55-57-59-61-63 cm über dem Zopf von A.4 gleichmäßig verteilt 2 M abnehmen (= 17-18-19-20-21-22 verbleibende M). In der nächsten R die M abketten, wie sie erscheinen. LINKES VORDERTEIL: Wie das rechte Vorderteil stricken, jedoch gegengleich. Statt A.3 und A.4 werden A.5 und A.6 gestrickt. Es werden keine Knopflöcher eingearbeitet. FERTIGSTELLEN: Die Schulternähte schließen. ARMAUSSCHNITTBLENDE: 90-94-98-102-106-110 M mit Nadel Nr. 3 aus dem Armausschnitt auffassen. 1 Rück-R re stricken, dann im Rippenmuster (= 2 M re, 2 M li im Wechsel) mit beidseitig je 1 Rand-M stricken. Bei einer Länge der Armausschnittblende von 3 cm die M abketten, wie sie erscheinen. FERTIGSTELLEN: Die Seitennähte innerhalb 1 Rand-M schließen. Die Knöpfe annähen. TASCHE: 16 M auf Nadel Nr. 4 mit Karisma anschlagen. Im Muster A.6 stricken, bei einer Gesamtlänge von 11 cm abketten. Aus dem rechten Rand des Strickstücks innerhalb der letzten li M von A.6 ca. 23 M auffassen. Glatt re mit beidseitig je 1 Rand-M kraus re stricken. Bei einer Gesamtlänge von 12 cm abketten. Die 2. Tasche ebenso stricken. Die Taschen jeweils mittig auf die Vorderteile nähen, direkt über den Krausrippen. |
|||||||||||||||||||
Erklärungen zum Diagramm |
|||||||||||||||||||
|
|||||||||||||||||||
 |
|||||||||||||||||||
 |
|||||||||||||||||||
Haben Sie diese Anleitung nachgearbeitet?Dann taggen Sie Ihre Fotos mit #dropspattern #sarahsdelightvest oder schicken Sie sie an die #dropsfan Galerie Brauchen Sie Hilfe bei dieser Anleitung?Sie finden 11 Videotutorials, einen Kommentar/Fragen-Bereich und vieles mehr, wenn sie die Anleitung bei garnstudio.com aufrufen. © 1982-2026 DROPS Design A/S. Wir besitzen alle Rechte. Dieses Dokument, einschließlich aller Untersektionen, hat Urheberrechte. Mehr dazu, was Sie mit unseren Anleitungen machen können, finden Sie ganz unten auf der Seite zu jeder Anleitung. |
|||||||||||||||||||


Mit über 40 Jahren Tätigkeit im Entwerfen von Strick- und Häkelmustern bietet Ihnen DROPS Design eine der umfangreichsten Sammlungen von kostenlosen Anleitungen im Internet - in 17 Sprachen übersetzt. Zum jetzigen Zeitpunkt haben wir insgesamt 324 Handarbeitshefte und 12290 Anleitungen auf Deutsch. 12202
Unser Ziel ist es, Ihnen die besten Angebote zum Stricken und Häkeln, Inspirationen und Ratschläge sowie qualitativ hochstehende Garne zu unglaublichen Preisen zu bieten! Möchten Sie unsere Anleitungen nicht nur für den persönlichen Gebrauch nutzen? Unsere Copyright Bedingungen finden Sie bei allen unseren Anleitungen ganz unten auf der jeweiligen Seite. Viel Spaß beim Handarbeiten!
Kommentieren Sie die Anleitung DROPS 141-40
Wir würden gerne Ihre Meinung zu diesem Modell erfahren!
Wenn Sie eine Frage stellen möchten, prüfen Sie bitte, dass Sie die richtige Kategorie im unten stehenden Formular gewählt haben - so bekommen Sie schneller eine Antwort. Die obligatorischen Felder sind mit einem * gekennzeichnet.