
Catégories populaires
Vous cherchez un fil?


Commentaires / Questions (168)
![]() Jane a écrit:
Jane a écrit:
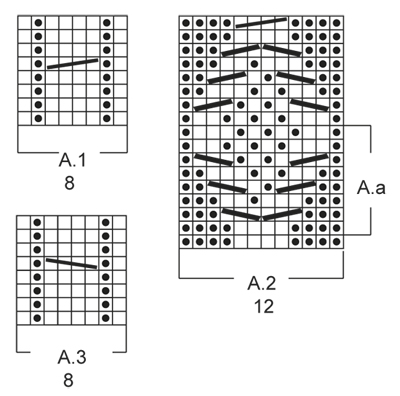
I am so sorry, I know you have answered this question before but I am still confused by the A.a chart. On the third row, when I come to the first cable it says to slip 1 stitch on cable needle behind the piece and knit 2. Do I purl the stitch from the cable needle or knit it. I don't understand when you say either P or K depending on the next row in diagram. Thanks so much for your help!!!
01.04.2022 - 23:07DROPS Design a répondu:
Dear Jane, the stitches in the middle of the cables in A.2 will be worked in moss stitch; so that you should either K (if this stitch is worked purled on next round) or P (if this stitch is worked K on next round). Happy knitting!
04.04.2022 - 10:59
![]() Linda Ponsford a écrit:
Linda Ponsford a écrit:
The pattern says to repeat A.2 one time, then A.a until the correct measurement. But the picture clearly shows A.2 repeated twice. Can you clarify this please?
04.01.2022 - 23:16DROPS Design a répondu:
Dear Mrs Ponsford, on the picture you work A.2 one time then the first rows = Aa = the beg of a 2nd repeat of the cable that will not be worked to the end because these stitches will be decreased for the toe (reason why you work them in stocking stitch, you won't have enough sts to continue the 2nd repeat due to the decreases), only the cables on each side will be kept. Happy knitting!
05.01.2022 - 08:02
![]() Trixi a écrit:
Trixi a écrit:
Könnten sie mir bitte erklären wenn 33-33-37 M zb. Stehen meinen sie denn insgesamt nur 103 M so weiterschicken? Ich verstehe leider auch nicht ganz wie das so beim stricken aussehen soll oder zusammengefügt wird. Gibt es konzeptzeichnungen? Oder andere optische Hilfe?
19.12.2021 - 18:06DROPS Design a répondu:
Liebe Trixi, es wird am Anfang nur 33-33-35 Maschen gestrickt - siehe vorrige Antwort, Sie stricken zuerst den Fußteil von hinteren Mitte bis die Öffnung für den Fuß fertig ist, dann stricken Sie in Runden bis zur Spitze. Folgen Sie nach und nach die Anleitung genau wie beschrieben, so bekommen Sie die Hausshuhen wie auf dem Foto. Viel Spaß beim stricken!
20.12.2021 - 08:15
![]() Trixi a écrit:
Trixi a écrit:
Ich bin es gewohnt mit bildlichen Anleitungen zu arbeiten, wieviele Runden werden am Anfang gestrickt? Am Anfang steht ein krausrippe und zur Erklärung 2re und dann wieder 2 re ich denke da ist ein Fehler und es sollte 2 re und 2 Li stehen oder? So wie es auf dem Bild auch zu sehen ist. Leier steht in der gesammten beschreiben nicht einmal von R 1 - z.B. 7 oder ähnliches. Können sie mir bitte sagen wie genau die Anleitung ist oder wo ich vielleicht eine ausführliche finden kann?
19.12.2021 - 17:58DROPS Design a répondu:
Liebe Trixi, das Bündchen 2 re/2 li wird am Ende gestrickt - siehe BÜNDCHENRAND; diese Hausschuhen werden zuerst in Hin- und Rück-Reihen ab hinteren Mitte (Fersen) gestrickt; die Anschlagskante wird am Ende doppelt gefaltet und zusammengenäht, dann wird das Bündchenrand gestrickt. Viel Spaß beim stricken!
20.12.2021 - 08:12
![]() Pauline Lee a écrit:
Pauline Lee a écrit:
Dear Esteemed Knitters, Diagrams A1, A2, A3 is not found within the general directions for the pattern itself. Thank you for your valued time.
26.10.2021 - 22:08DROPS Design a répondu:
Dear Pauline, if you mean the written out direction for those patterns, they are only available in diagram form, below the instructions. Happy Knitting!
27.10.2021 - 00:28
![]() Dorothy Moore a écrit:
Dorothy Moore a écrit:
When following the charts do you start at the bottom and work up or from the top and work down? In the chart for A2 and looking at the picture it looks like you start top to bottom but then the repeat A.a does not make any sense. Also please explain what p/k 1 in the cable instructions. How are you suppose to tell when to purl or when to knit the stitch.
17.10.2021 - 01:34DROPS Design a répondu:
Dear Dorothy, when following the chart, we go from the bottom up, right to left - see How to read knitting diagrams P/K 1 in cable instructions depends on moss stitch - the stitches need to be adjusted so that the pattern comes out. Happy knitting!
18.10.2021 - 05:37
![]() Lucy a écrit:
Lucy a écrit:
Hello, I have dreamed of someday knitting these slippers. I have tried unfortunately failed to understand the instructions. I have seen other videos from here showing how to knit the whole slipper. I would love it and I'm sure new knitters around the world would enjoy having a demo video on these slippers. Please consider making a demo video on the Celtic Dancer slipper. I will attempt them again after my current knitting project is complete. Thanks for listening. Have a wonderful day.
05.10.2021 - 16:23DROPS Design a répondu:
Dear Lucy, unfortunately, it's very difficult for us to make video tutorials for each pattern, which is why we usually make videos to explain the main or most complicated techniques and one for slippers in general, as a guide to create other slippers. Happy knitting!
06.10.2021 - 23:19
![]() Sue a écrit:
Sue a écrit:
Drops patterns look beautiful but the patterns are always so confusing to follow. Maybe you could try to write them differently.
27.09.2021 - 22:48
![]() Marylou Spencer a écrit:
Marylou Spencer a écrit:
Pattern is written in far too complicated a way - discouraging before one ever starts
16.09.2021 - 18:45
![]() Maureen a écrit:
Maureen a écrit:
Nevermind the message I sent earlier. I think I was working from the wrong video and have since found another one. It looks more like the lighter stitch. I think I'm happy with the current seaming results.
10.07.2021 - 14:39
|
|||||||||||||||||||
Celtic Dancer#celticdancerslippers |
|||||||||||||||||||
 |
 |
||||||||||||||||||
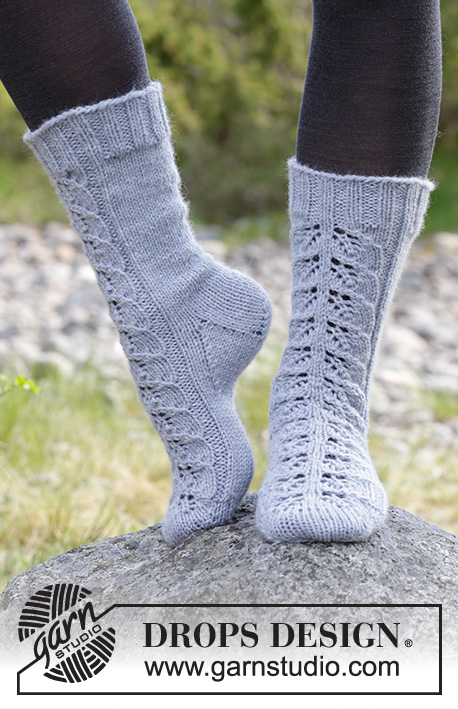
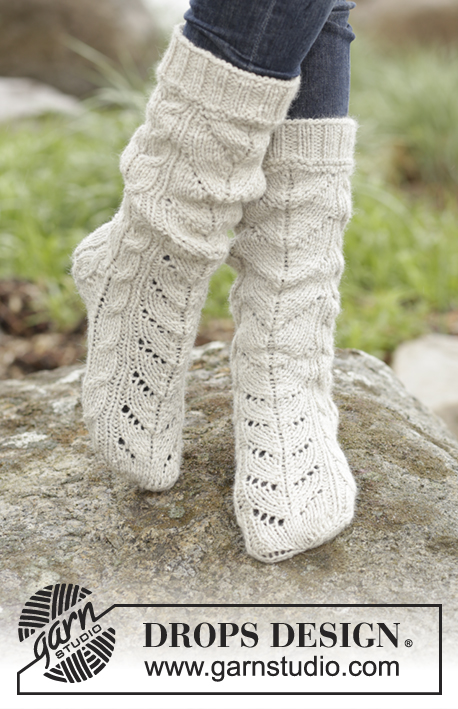
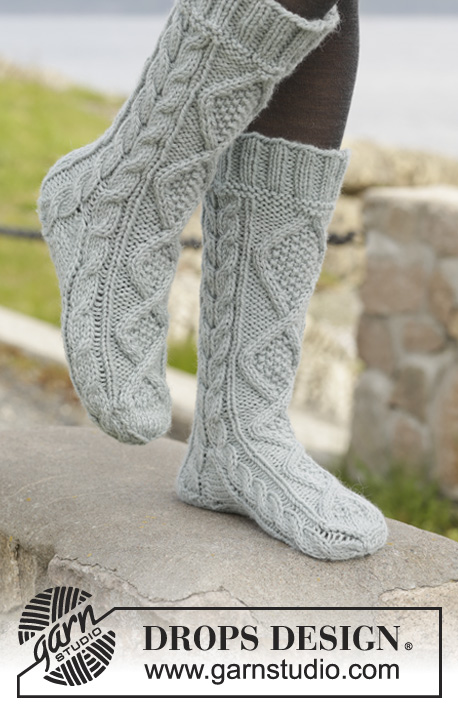
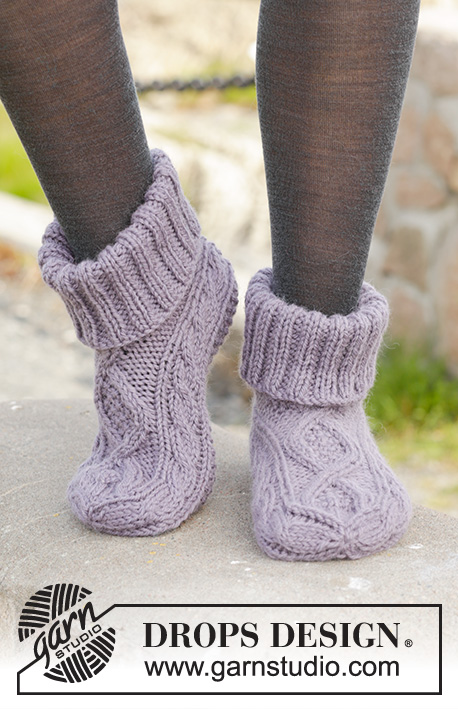
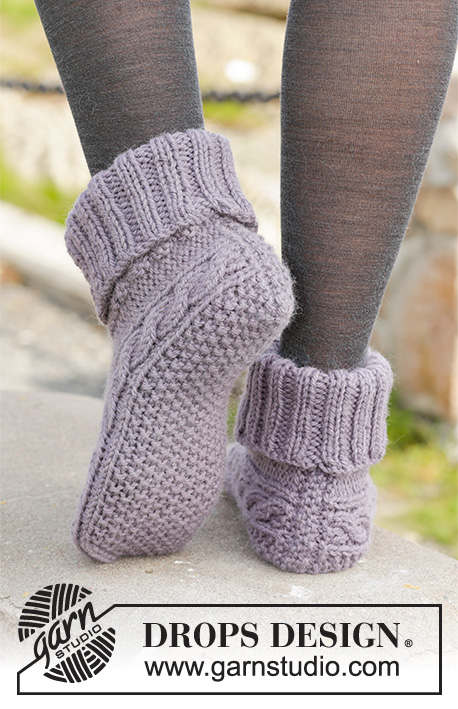
Chaussons DROPS avec torsades, en "Nepal". Du 35 au 43.
DROPS 156-55 |
|||||||||||||||||||
|
POINT FANTAISIE : Voir les diagrammes A.1-A.3. Les diagrammes représentent le motif, vu sur l'endroit. DIMINUTIONS : Diminuer 1 m avant le marqueur ainsi: 2 m ens à l'end. Diminuer 1 m après le marqueur ainsi: 2 m ens torse à l'end. POINT MOUSSE (en allers et retours): Tricoter tous les rangs à l'endroit. 1 côte mousse = 2 rangs end. POINT DE RIZ : Rang/tour 1: * 1 m end, 1 m env *, répéter de *-*. Rang/tour 2: Tricoter les m env à l'end et les m end à l'env. Répéter le rang/tour 2. ASTUCE POUR MESURER : Mesurer au milieu de la torsade dans A.1/A.3. ---------------------------------------------------------- CHAUSSON : Se tricote en allers et retours à partir du milieu dos. Monter 33-33-35 m avec les aiguilles 5 en Nepal (prévoir environ 20 cm de fil 20 cm à utiliser ensuite pour l'assemblage). Tricoter 1 côte au POINT MOUSSE - voir ci-dessus, EN MÊME TEMPS, au dernier rang, répartir 4 augmentations = 37-37-39 m. Tricoter ensuite ainsi sur l'endroit: 4 m env, A.3 (= 8 m), 13-13-15 m POINT DE RIZ – voir ci-dessus, A.1 (= 8 m), terminer par 4 m env. Continuer ainsi, tricoter les m env à l'end sur l'envers. Répéter A.1 et A.3 jusqu'à la fin. PENSER À BIEN CONSERVER LA MÊME TENSION QUE POUR L'ÉCHANTILLON! Quand l'ouvrage mesure 10½-11½-13 cm – voir ASTUCE POUR MESURER ci-dessus, tricoter ainsi sur l'endroit: 4 m env, A.3, 13-13-15 m point de riz, A.1, 4 m env, monter 4 m, tricoter les 4 premières m, le tour commence ici = 41-41-43 m. Tricoter maintenant en rond sur les aiguilles doubles pointes. Continuer en point fantaisie comme avant mais tricoter maintenant A.2 (= 12 m) au-dessus des 4 m env de chaque côté et des 4 nouvelles mailles. Quand A.2 a été tricoté 1 fois en hauteur, tricoter A.a jusqu'à ce que l'ouvrage mesure 17-19-22 cm. Tricoter maintenant en jersey au-dessus des m de A.a, ou commencer le jersey un peu plus tôt. Continuer A.1 et A.3 jusqu'à la fin. Maintenant placer 4 marqueurs ainsi: Tricoter A.3 mais placer le 1er marqueur entre la 1ère et la 2ème m et le 2ème marqueur entre la 7ème et la 8ème m dans A.3, tricoter au point de riz comme avant, tricoter A.1 mais placer le 3ème marqueur entre la 1ère et la 2ème m et placer le 4ème marqueur entre la 7ème et la 8ème m dans A.1, tricoter les mailles restantes à l'end (= 14 m pour le dessus du pied, 15-15-17 m sous le pied et 6 m de chaque côté). Diminuer maintenant pour la pointe au tour suivant ainsi: Diminuer 0-0-1 fois 1 m après le 2ème marqueur et 1 m avant le 3ème marqueur sous le pied – VOIR DIMINUTIONS ci-dessus, tricoter les mailles restantes = 14 m pour le dessus et 15 m pour le dessous du pied (= 41 m au total). Au tour suivant, diminuer ainsi: Diminuer 1 m avant le 1er et le 3ème marqueur et 1 m après 2ème et le 4ème marqueur (= 4 diminutions au total). Répéter ces diminutions 6 fois au total tous les tours, EN MÊME TEMPS, à la dernière diminution, tricoter les mailles des torsades dans A.1 et A.3 ainsi: 2 m ens torse à l'end, 2 m ens à l'end. Quand toutes les diminutions sont faites, il reste 13 m. L'ouvrage mesure environ 20-22-25 cm. Couper le fil et le passer dans les mailles restantes, serrer et arrêter. ASSEMBLAGE : Plier le bord de montage en double (= milieu dos), utiliser le fil du début pour coudre soigneusement au milieu dos. BORDURE : Se tricote en rond sur aiguilles doubles pointes autour de l'ouverture du chausson. Relever 50-50-54 m avec les aiguilles doubles pointes 4 en Nepal et tricoter 1 tour env, puis 1 tour end EN MÊME TEMPS, répartir 10 augmentations = 60-60-64 m. Tricoter en côtes 2 m end/2 m env jusqu'à ce que l'ouvrage mesure environ 12-13-14 cm. Rabattre les mailles comme elles se présentent. Plier la bordure en double. Tricoter l'autre chausson. |
|||||||||||||||||||
Légende diagramme(s) |
|||||||||||||||||||
|
|||||||||||||||||||
 |
|||||||||||||||||||
Vous avez terminé ce modèle?Alors taguez vos photos avec #dropspattern #celticdancerslippers ou bien présentez-les dans la galerie #dropsfan Vous avez besoin d'aide pour ce modèle ?Vous trouverez 22 tutoriels vidéo, une rubrique commentaires/questions et plus encore en vous rendant sur la page du modèle sur garnstudio.com © 1982-2026 DROPS Design A/S. Tous droits réservés. Ce document, y compris ces sous-sections, est protégé par les droits d'auteur (copyright). Apprenez-en davantage sur ce que vous pouvez faire avec nos modèles en bas de chacune des pages de notre site. |
|||||||||||||||||||


Avec plus de 40 ans dans la conception de modèles tricot et crochet, DROPS Design offre l'une des plus vastes collections de modèles gratuits sur internet - traduits dans 17 langues. À ce jour, on compte 324 catalogues et 12290 modèles en français.
Nous nous efforçons de vous apporter le meilleur de ce que le tricot et le crochet peuvent vous offrir, inspiration et conseils mais également des fils de haute qualité à des prix incroyables! Vous souhaiteriez utiliser nos modèles autrement que pour un usage personnel? Vous pouvez lire ce que vous êtes autorisés à faire dans le Copyright en bas de page de chacun de nos modèles. Bon tricot!
Poster un commentaire sur le modèle DROPS 156-55
Nous aimerions connaître votre avis sur ce modèle !
Si vous souhaitez poser une question, merci de bien vouloir vérifier que vous avez choisi la bonne catégorie dans le formulaire ci-dessous afin d'accélérer la réponse. Les champs obligatoires sont indiqués par une *.