
Popular categories
Looking for a yarn?


Comments / Questions (50)
![]() Maria wrote:
Maria wrote:
Suomenkielinen ohje on virheellinen, englanninkielisestä sain oikeat ohjeet takana olevan korotuksen tekemiseen. Toisellakin suomenkielisellä kommentoijalla on ollut ongelmia samassa kohdassa. Neulotaan siis käsittääkseni takana A1 mallikertojen välissä. 15s ei voi jättää neulomatta kuten suomenkielisessä ohjeessa neuvotaan ja tätä kohtaa englanninkielisessä ohjeessa ei olekaan ollenkaan.
14.05.2022 - 16:24
![]() Leila wrote:
Leila wrote:
Leider habe ich trotz eig guter abbildung u guter unten stehender Beschreibung Zopfmusters zu sehr stur auf die Anleitung geachtet und nun bis zur Hälfte des Werks alles glatt rechts gestrickt, da nirgendwo ein Hinweis war, die unten stehenden zopfmusterdiagramme zu beachten. Also sprich bei \". Die Markierungsfäden sitzen nun an beiden Seiten des Rumpfteils jeweils mittig in A.1. In diesem Weise in Runden weiterstricken\" wäre es gut, darauf hinzuweisen, an das Zopfmuster zu denken o.Ä
28.04.2022 - 21:36
![]() Josie wrote:
Josie wrote:
Merci d'avoir répondu à ma demande En fin de compte, est-ce qu'il faut tricoter en rond ? Merci beaucoup
28.04.2022 - 11:09DROPS Design answered:
Bonjour Josie, la partie DOS & DEVANT se tricote effectivement en rond. Bon tricot!
28.04.2022 - 12:01
![]() Josie wrote:
Josie wrote:
Bonjour madame, complètement perdue à partir du moment où j'ai mis le dev et le dos sur l'aiguille. J'ai regardé la correction, j'ai lu les commentaires différents mais c'est toujours le flou. Quand je commence mon tour, j'ai fais 8 m puis marqueur puis 1menv, *1m end,1m env, 1 jeté et 2 m ens end* au dessus des 28 m.puis 10m puis 1menv. Et je recommence 1mend,1 env 1 jeté et 2 m ens end sur les 44 suiv, il reste 2 m. Et bien moi il reste 10 m .... au secours SVP
27.04.2022 - 12:26DROPS Design answered:
Bonjour Josie, le tour du dos/devant commence 8 mailles avant le début des rangs précédents (la torsade A.1 se trouve ainsi à cheval entre le dos et le devant, soit les 8 premières de A.1 à la fin de la partie précédente + les 8 dernières mailles de A.1 au début de la partie suivante (pas de diminution), vous tricotez ensuite en jersey jusqu'à ce qu'il reste 8 mailles avant la fin de votre partie et tricotez de nouveau A.1 à cheval entre le dos et le devant: 8 mailles sur la fin de cette partie + 8 m sur le début de l'autre partie et vous terminez votre tour en jersey. Ceci peut-il vous aider?
27.04.2022 - 15:21
![]() Julia wrote:
Julia wrote:
Korotuksesta kysyisin. Neulotaanko korotusta takakappaleen 28 silmukalla, jotka jäävät A.1 mallikertojen väliin. Kun pääsen korotuksessa siihen asti, että pitäisi jättää 15s neulomatta, ensimmäisellä kerralla voin neuloa vain 3s ja työtä kääntäessä en voi neuloa yhtään kun jäljellä on vain 13s. Pitäisikö neuloa myös A.1 mallikertojen silmukoilla vai kuinka teen? Teen ohjeesta 6/9kk kokoa.
13.03.2022 - 07:49
![]() Carolina wrote:
Carolina wrote:
¡Hola! Muchas gracias por el patrón. Llevo 2 días tejiendo y destejiendo los aumentos en la espalda. ¿Me podéis explicar cómo hacerlo para la talla 6/9 meses? ¿Los aumentos quedan entre los dos gráficos A1 en la espalda o también hay que tejerlos?
08.12.2021 - 16:47DROPS Design answered:
Hola Carolina, los puntos aumentados quedan entre los dos gráficos y se trabajan sobre el punto jersey. Puedes ver cómo aumentar en el siguiente video: https://www.garnstudio.com/video.php?lang=es&id=11
11.12.2021 - 21:28
![]() Meha wrote:
Meha wrote:
Please explain this part written after the elevation at the back “ To avoid holes at every turn pick up loop between 2 stitches and knit twisted together with next stitch on needle. ” which 2 stitches must I pick the loop between and what does “knit twisted together” mean?
18.11.2021 - 15:46DROPS Design answered:
Hi Meha, When you have turned after a short row, you pick up the loop before the next stitch and place it on the left needle. Then you knit together both the loop and the next stitch, working in the back of both the loop and the stitch (rather than the front loop as usual) which means you twist the stitches and avoid a hole. Happy knitting!
24.11.2021 - 07:18
![]() Ingvild wrote:
Ingvild wrote:
Når det skal strikkes opp masker til vrangbord, er det meningen at man skal unngå å strikke opp masker på midten av bakstykket? Ser for meg at om man strikker opp masker langs hele bakstykket til de to vrangbordene vil dette se veldig rart ut når man skal sy sammen mellom benåpningene. Dette fremgår ikke av oppskriften.
15.11.2021 - 20:30DROPS Design answered:
Hej Ingvild, jeg er ikke helt sikker på hvor du er i opskriften. Mener du selve vrangborden som er rundt om hvert ben?
18.11.2021 - 11:55
![]() Bente Michaelsen wrote:
Bente Michaelsen wrote:
Det undre mig at de søde bukser ikke har en knaplukning mellem benene, så det er lettere at skifte ble. Jeg har selv tilføjet det, idet jeg ellers synes at modelen er upraktisk!
13.11.2021 - 23:25
![]() GUNILLA ENGLUND wrote:
GUNILLA ENGLUND wrote:
För 35 år sedan stickade jag till mitt barn en dress med knappar i grenen, praktiskt vid blöjbyte. Nu har jag fått barnbarnsbarn och tänkte sticka något liknande men nej, hittar inget sådant mönster, tråkigt. blir ingen dress.
09.09.2021 - 18:01
|
|||||||||||||
Ready to Play Romper#readytoplayromper |
|||||||||||||
 |
 |
||||||||||||
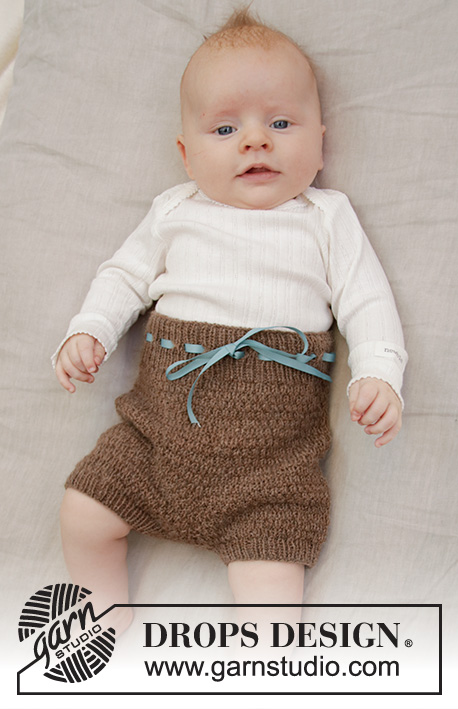
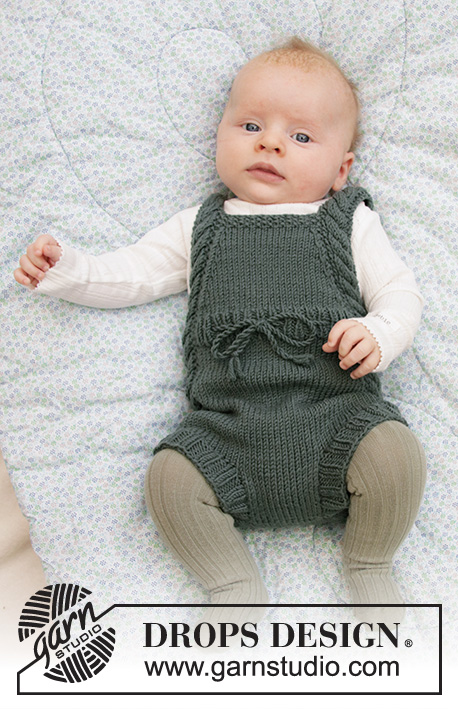
Knitted play suit for baby with cables and moss stitch in DROPS Merino Extra Fine. Size 1 - 24 months.
DROPS Baby 33-21 |
|||||||||||||
|
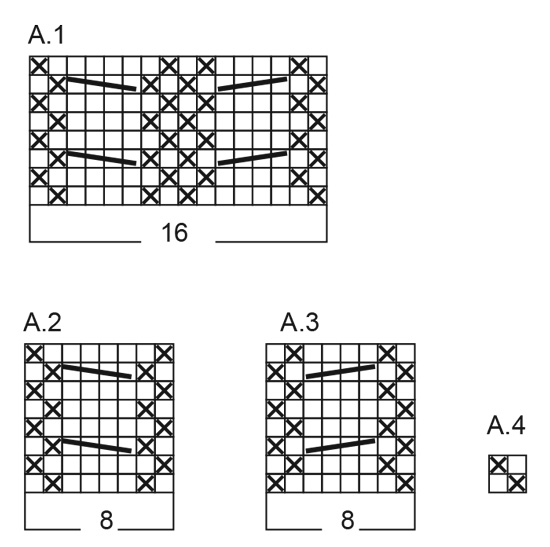
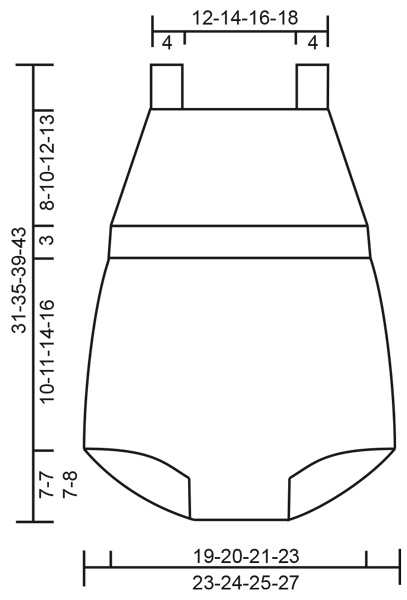
---------------------------------------------------------- EXPLANATION FOR THE PATTERN: ---------------------------------------------------------- GARTER STITCH (worked in the round): 1 ridge = 2 rounds. Knit 1 round and purl 1 round. GARTER STITCH (back and forth): 1 ridge = knit 2 rows. PATTERN: See diagrams A.1 to A.4 DECREASE TIP: Work until 2 stitches remain before A.1, decrease as follows: Knit 2 together, work stitches in A.1, slip 1 stitch knitwise, knit 1, pass slipped stitch over. ---------------------------------------------------------- START THE PIECE HERE: ---------------------------------------------------------- PLAY SUIT – SHORT OVERVIEW OF THE PIECE: Piece is worked back and forth in 2 parts, bottom up to after leg opening. Then work piece in the round before dividing at the waist, and finishing front piece back and forth on needle. BACK PIECE: Cast on 14-16-18-20 stitches on circular needle size 3.5 mm with Merino Extra Fine and work in stocking stitch back and forth. AT THE SAME TIME cast on 2 new stitches at the end of every row 9-9-9-10 times in total in each side = 50-52-54-60 stitches on needle and piece measures approx. 6-6-6-7 cm. Put piece aside and work the front piece. FRONT PIECE: Cast on 14-16-18-20 stitches on circular needle size 3.5 mm with Merino Extra Fine and work in stocking stitch back and forth for 5-5-5-6 cm. SIZE 1/3 months - 6/9 months - 12/18 months: Now cast on 6 new stitches at the end of every row 3 times in total each side. SIZE 24 months: Cast on 6 new stitches in each side at the end of every row 2 times, then 8 new stitches in each side 1 time = 50-52-54-60 stitches on needle and piece measures approx. 7-7-7-8 cm. BODY: Slip stitches from front and back piece on to same circular needle = 100-104-108-120 stitches on needle. Insert 1 marker in each side (= 50-52-54-60 stitches between markers) - NOW MEASURE PIECE FROM HERE. Continue to work - beginning of the round should be 8 stitches before first marker thread. Work A.1 (= 16 stitches), stocking stitch over the next 34-36-38-44 stitches in stocking stitch, A.1 (= 16 stitches), stocking stitch over the next 34-36-38-44 stitches in stocking stitch. Marker threads are in the middle of A.1 in each side. Continue this pattern in the round. When piece measures 2-3-5-7 cm, decrease 1 stitch on each side of both A.1 - READ DECREASE TIP (= 4 stitches decreased). Repeat decrease every 2 cm 4 times in total = 84-88-92-104 stitches on needle. When piece measures 10-11-14-16 cm from markers (piece measures approx. 17-18-21-24 cm from cast-on edge) work an elevation at the back as follows: work knit over knit and A.1 over A.1 as before over the first 58-60-62-68 stitches, i.e. until after the second repetition of A.1 (= front piece), knit until 5 stitches remain before A.1 at the beginning of round, turn and purl back until 5 stitches remain before A.1 in the other side, turn piece. Knit until 10 stitches remain before A.1, turn piece and purl until 10 stitches remain before A.1 in the other side. Turn piece and knit until the middle of the first A.1. Switch to circular needle size 3 mm and work 1 round as before over all stitches, AT THE SAME TIME increase 1 stitch between every A.1 = 86-90-94-106 stitches – NOTE: To avoid holes at every turn pick up loop between 2 stitches and knit twisted together with next stitch on needle. Work next round as follows: Continue with A.2 over the first 8 stitches (= make sure to begin on same row that should have been worked in A.1), work rib purl 1/knit 1 over the next 27-29-31-37 stitches, work A.3 over the next 8 stitches (= make sure to begin on same row that should have been worked in A.1), work rib purl 1/knit 1 over the next 43-45-47-53 stitches. When piece measures 1 ½ cm, work a row eyelet holes as follows: Work as before over the first 8 stitches, purl 1, * knit 1, purl 1, 1 yarn over, knit 2 together*, repeat from *-* over the next 24-28-28-36 stitches, work 10-8-10-8 stitches as before, purl 1, * knit 1, purl 1, 1 yarn over, knit 2 together*, repeat from *-* over the next 40-44-44-52 stitches, work 2-0-2-0 stitches as before. Then continue pattern and rib as before, until 1 round remains before rib measures 3 cm. Work next round as follows: Work over the first 43-45-47-53 stitches (= front piece), LOOSELY cast off the next 43-45-47-53 stitches with knit over knit and purl over purl (= back piece). FRONT PIECE: Insert 1 marker, NOW MEASURE PIECE FROM HERE! Switch to circular needle size 3.5 mm and work first row from right side as follows: Continue A.2 over the first 8 stitches on needle, 27-29-31-37 stitches in stocking stitch, A.3 over the last 8 stitches on needle. Continue like this back and forth. AT THE SAME TIME when piece measures 1-0-0-1 cm, decrease 1 stitch in each side - READ DECREASE TIP. Repeat decrease every 2nd-4th-6th-6th needle 7-7-6-6 times in total = 29-31-35-41 stitches remain on needle. When piece measures 7-9-11-12 cm from marker - adjust so that next row is from right side), work 6 rows with A.4 over stitches between A.2 and A.3 in each side. Work next row as follows from right side: work 8 stitches (= A.2) and slip these stitches on 1 stitch holder for shoulder strap, cast off the next 13-15-19-25 stitches and work the last 8 stitches (= A.3, shoulder strap). SHOULDER STRAP: Continue in A.3 back and forth until shoulder strap measures approx. 18 to 24 cm (or desired length). Cast off. Continue in A.2 back and forth until the other shoulder strap measures approx. 18 to 24 cm (or desired length). Cast off. ASSEMBLY: RIB EDGE: Pick up from right side approx. 50 to 58 stitches along one opening for leg on circular needle size 3 mm with Merino Extra Fine. Purl 1 row from wrong side AT THE SAME TIME increase evenly to 58-62-66-70 stitches. Then work rib = knit 2/purl 2 back and forth with 1 edge stitch in garter stitch in each side. When edge measures 2-4 cm, loosely cast off with knit over knit and purl over purl. Repeat along the other leg. Sew opening between legs inside 1 edge stitch - i.e. sew together one rib edge, then sew seam between leg openings and finally the other rib edge. Fasten a button at the bottom on each shoulder strap. Use holes in eyelet row on rib to button. TIE: Cut 2 lengths Merino Extra Fine yarn of approx. 3 metres. Twine the strands tog until they resist, fold the string double so that it twines again. Make a knot at each end. Begin mid front and thread tie up and down through eyelet row on rib in waist. |
|||||||||||||
Diagram explanations |
|||||||||||||
|
|||||||||||||
|
|||||||||||||
|
|||||||||||||
Have you finished this pattern?Tag your pictures with #dropspattern #readytoplayromper or submit them to the #dropsfan gallery. Do you need help with this pattern?You'll find 24 tutorial videos, a Comments/Questions area and more by visiting the pattern on garnstudio.com. © 1982-2025 DROPS Design A/S. We reserve all rights. This document, including all its sub-sections, has copyrights. Read more about what you can do with our patterns at the bottom of each pattern on our site. |
|||||||||||||


With over 40 years in knitting and crochet design, DROPS Design offers one of the most extensive collections of free patterns on the internet - translated to 17 languages. As of today we count 314 catalogues and 11820 patterns translated into English (UK/cm). 11820
We work hard to bring you the best knitting and crochet have to offer, inspiration and advice as well as great quality yarns at incredible prices! Would you like to use our patterns for other than personal use? You can read what you are allowed to do in the Copyright text at the bottom of all our patterns. Happy crafting!
Post a comment to pattern DROPS Baby 33-21
We would love to hear what you have to say about this pattern!
If you want to leave a question, please make sure you select the correct category in the form below, to speed up the answering process. Required fields are marked *.