
Popular categories
Looking for a yarn?


Comments / Questions (28)
![]() Josefina wrote:
Josefina wrote:
Hola, buenos dias! He realizado el cuello con 92 puntos Ahora inserto los 23 hilos marcadores cada 3 puntos Mi pregunta es: Por que me quedan 23 puntos sin poner Hilo marcador? Es asi Como ha de ir o Yo no lo interpreto bien Muchas Gracias
18.11.2020 - 10:56DROPS Design answered:
Hola Josefina, tienes que insertar hilos mercadores en los puntos, no entre los puntos. Buen trabajo!
19.11.2020 - 09:24
![]() Ine Bastin wrote:
Ine Bastin wrote:
Hebt u een breipatroon voor een damesvest maat m/l met brushed alpaca silk garen. Niet echt te vinden. Wel genoeg truien. En hoeveel garen heb ik dan nodig.?
13.11.2020 - 19:06DROPS Design answered:
Dag Ine,
Er zijn helaas inderdaad niet zoveel vesten in Brushed Alpaca Silk. Je zou een ander vest uit garencategorie C kunnen zoeken en met de garenvervanger uit kunnen rekenen hoeveel bollen je nodig hebt.
15.11.2020 - 18:29
![]() Cécile wrote:
Cécile wrote:
Bonjour, je ne comprends pas comment arriver au nombre de mailles indiquées après avoir réalisé les rangs de nœuds. Chaque nœud génère une maille de plus donc la première fois on ajoute 21 mailles. La deuxième fois, faut-il mettre les fils marqueurs en respectant l'espacement de trois mailles ou faut-il sélectionner 21 mailles en calculant l'espacement ? (idem pour les rangs de nœuds suivant). Merci de votre aide.
30.10.2020 - 00:44DROPS Design answered:
Bonjour Cécile, les fils marqueurs doivent toujours rester dans les mêmes mailles pour bien conserver le bon nombre de marqueurs et vérifier son nombre de mailles entre les marqueurs: après le 1er noeud, replacez le marqueur dans la 1ère des 3 nouvelles mailles, la fois suivante, augmentez comme avant = après la maille avec le fil marqueur (= 4 m entre chaque fil marqueur); la fois suivante, vous aurez 5 m entre chaque fil marqueur et ainsi de suite. Le fil marqueur doit toujours être dans la 1ère des 3 m tricotées pour le noeud. Vous augmenterez de 21 m à chaque tour (en taille L). Bon tricot!
30.10.2020 - 07:36
![]() Wilma Vrijs wrote:
Wilma Vrijs wrote:
Ik lees dat ik de markeerdraad in de steek moet plaatsen, maar ik weet niet hoe dat moet. Ik zie alleen filmpjes over het gebruiken van markeerders tussen steken, niet in steken. Alvast bedankt!
11.10.2020 - 09:12DROPS Design answered:
Dag Wilma,
Het is de bedoeling dat de markeerdraad de steek zelf aan geeft. Je zou hem met een haaknaald door de steek kunnen halen. Je kan ook steekmarkeerders gebruiken om de steek te herkennen.
11.10.2020 - 14:10
![]() Corry Dubois wrote:
Corry Dubois wrote:
Zeer mooi patroon ,maar toch een vraag ,markeerdraadjes tussen 3 steken is aan weerzijden van draadje 3 steken ,dit moetje je 20 maal doen over 80 steken dan kom ik uit bij 60 .of wordt de draad op 1 steek gezet en dan aan weerszijden van die steek 3 steken ?
19.09.2020 - 19:01DROPS Design answered:
Dag Corry,
Het is de bedoeling om de markeerdraad in de steek te plaatsen en niet tussen 2 steken. Op die manier kom je wel uit.
24.09.2020 - 13:34
![]() Ann wrote:
Ann wrote:
Can’t wait🤩
16.08.2020 - 09:21
![]() Mary Long wrote:
Mary Long wrote:
I love this pattern but I am unable to download it. I put it as-138 in the search bar and I'm asked to put it in another way!
14.07.2020 - 06:17
![]() Olena Kostrytsia wrote:
Olena Kostrytsia wrote:
This is gorgeous sweater!
04.06.2020 - 15:37
|
|
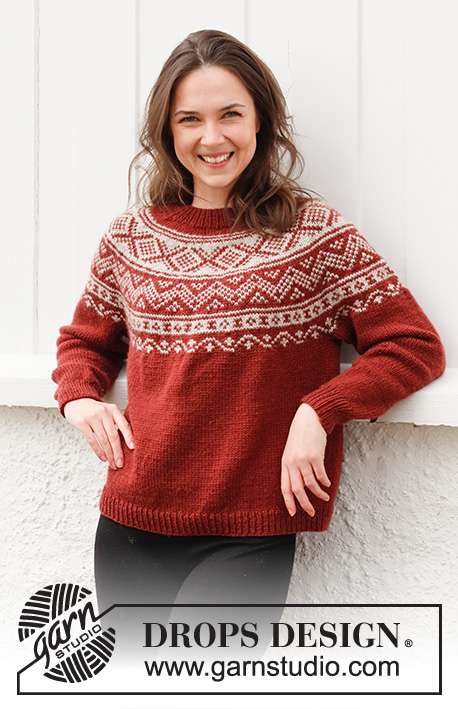
Amur Maple#amurmaplesweater |
|
 |
 |
Knitted jumper in DROPS Brushed Alpaca Silk. The piece is worked top down with round yoke, stocking stitch and increases. Sizes S - XXXL.
DROPS 217-12 |
|
|
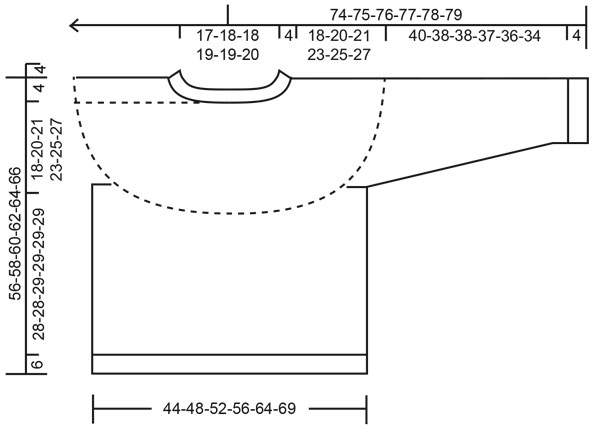
------------------------------------------------------- EXPLANATIONS FOR THE PATTERN: ------------------------------------------------------- DECREASE TIP (for sleeve): Decrease 1 stitch on either side of the marker thread as follows: Work until there are 3 stitches left before the marker thread, knit 2 together, knit 2 (marker thread sits between these 2 stitches), slip 1 stitch as if to knit, knit 1 and pass the slipped stitch over the knitted stitch. INCREASE TIP: Increase 1 stitch by knitting up 1 stitch in the loop between 2 stitches from the previous round. KNOT: Purl together 3 stitches (stitch with marker thread, the new stitch from the previous round and the next stitch), do not slip these stitches from the needle. Knit these same 3 stitches together and then purl them together 1 more time. Now slip them from the left needle. CASTING-OFF TIP: To avoid the cast-off edge being tight you can cast off with a larger size needle. If the edge is still tight, make 1 yarn over after approx. each 4th stitch at the same time as casting off; the yarn overs are cast off as normal stitches. ------------------------------------------------------- START THE PIECE HERE: ------------------------------------------------------- JUMPER – SHORT OVERVIEW OF THE PIECE: The piece is worked in the round with circular needle, from mid back and top down. Marker threads are inserted in the piece and increases worked here. The sleeves are worked with double pointed needles, top down. NECK: Cast on 76-80-84-88-92-96 stitches with circular needle size 4 mm and Brushed Alpaca Silk. Knit 1 round, then work rib (knit 2, purl 2) for 4 cm. Change to circular needle size 5 mm. Insert 1 marker at the beginning of the round, mid back; the yoke will be measured from this marker! YOKE: Insert 19-20-21-22-23-24 marker threads in the piece, insert the marker threads in the stitches, with 3 stitches between each marker thread. Continue working stocking stitch in the round. When the piece measures 2 cm increase 1 stitch after each stitch with a marker thread – read INCREASE TIP. On the next round work a knot at each marker thread; the knots are worked in the stitch with a thread, the increased stitch from the previous round and the next stitch – read KNOT. REMEMBER THE KNITTING TENSION! Continue with stocking stitch and repeat the increase and the knots every 2-2½-2½-2½-2½-2½ cm a total of 8-8-8-9-10-10 times; each time you increase there will be 1 more stitch between each knot. After all the increases there are 228-240-252-286-322-336 stitches on the needle. Continue with stocking stitch until the piece measures 18-20-21-23-25-27 cm from the marker; on the last round increase 4-16-20-18-2-8 stitches evenly spaced = 232-256-272-304-324-344 stitches. The yoke is divided for the body and sleeves as follows: Knit 34-38-40-44-49-53 stitches (= half the back piece), place the next 48-52-56-64-64-66 stitches on a thread for the sleeve, cast on 6-6-8-8-10-12 new stitches on the needle (= in side under sleeve), knit 68-76-80-88-98-106 stitches (= front piece), place the next 48-52-56-64-64-66 stitches on a thread for the sleeve, cast on 6-6-8-8-10-12 new stitches on the needle (= in side under sleeve), knit the remaining 34-38-40-44-49-53 stitches (= half the back piece). Body and sleeves are finished separately. THE PIECE IS NOW MEASURED FROM HERE! BODY: = 148-164-176-192-216-236 stitches. Continue with stocking stitch. When the piece measures 28-28-29-29-29-29 cm from the division, change to circular needle size 4 mm and work rib (= knit 2, purl 2). Cast off with knit when the rib measures 6 cm – read CASTING-OFF TIP. SLEEVE: Place the 48-52-56-64-64-66 stitches from the thread on the one side of the piece on double pointed needles size 5 mm and knit up 1 stitch in each of the 6-6-8-8-10-12 stitches cast on under the sleeve = 54-58-64-72-74-78 stitches. Insert a marker thread in the middle of the 6-6-8-8-10-12 stitches under the sleeve. Allow the thread to follow your work onwards; it will be used when decreasing under the sleeve. Start the round at the marker thread and knit in the round. When the sleeve measures 3 cm from the division decrease 2 stitches mid under the sleeve – read DECREASE TIP. Decrease like this every 6-5-4-3-2½-2 cm a total of 6-7-9-12-12-13 times = 42-44-46-48-50-52 stitches. Continue working until the sleeve measures 40-38-38-37-36-34 cm from the division (there is approx. 4 cm left to finished length; you can try the jumper on and work to desired length). Change to double pointed needles size 4 mm and increase 2-0-2-0-2-0 stitches = 44-44-48-48-52-52 stitches. Work rib (knit 2, purl 2) for 4 cm. Cast off with knit. The sleeve measures approx. 44-42-42-41-40-38 cm from the division. Work the other sleeve in the same way. |
|
|
|
Have you finished this pattern?Tag your pictures with #dropspattern #amurmaplesweater or submit them to the #dropsfan gallery. Do you need help with this pattern?You'll find 23 tutorial videos, a Comments/Questions area and more by visiting the pattern on garnstudio.com. © 1982-2025 DROPS Design A/S. We reserve all rights. This document, including all its sub-sections, has copyrights. Read more about what you can do with our patterns at the bottom of each pattern on our site. |
|


With over 40 years in knitting and crochet design, DROPS Design offers one of the most extensive collections of free patterns on the internet - translated to 17 languages. As of today we count 314 catalogues and 11820 patterns translated into English (UK/cm). 11820
We work hard to bring you the best knitting and crochet have to offer, inspiration and advice as well as great quality yarns at incredible prices! Would you like to use our patterns for other than personal use? You can read what you are allowed to do in the Copyright text at the bottom of all our patterns. Happy crafting!
Post a comment to pattern DROPS 217-12
We would love to hear what you have to say about this pattern!
If you want to leave a question, please make sure you select the correct category in the form below, to speed up the answering process. Required fields are marked *.