
Popular categories
Looking for a yarn?


Comments / Questions (47)
![]() Anny Aanestad wrote:
Anny Aanestad wrote:
Hei, i denne oppskrift står det felle 8 masker i begynnelsen av omg på ermet, men er det riktig ? Blir det skjeavtale når jeg setter ermen inn på bolen?Eller felle 4 Masker på hver side av merketråden under ermet! Hva er riktig! På forhånd takk.
13.12.2020 - 12:22DROPS Design answered:
Hei Anny. Du kan fint gjøre slik du skriver, men det blir heller ikke galt å gjøre slik det står i oppskriften. Det står ikke at man skal sette en merketråd under ermet, slik at midt i erme kan da være mellom 4. og 5. avfelte maske av de 8 maskene. God Fornøyelse!
16.12.2020 - 15:21
![]() Eve Bird wrote:
Eve Bird wrote:
The model shows the bottom corners at an angle, but I did not read any instructions to do this when I started my sweater? Did I miss something? One more, am I decreasing for arm holes and making a button hole and decreasing at button edges all at the same time once I reach length?
09.02.2020 - 04:39DROPS Design answered:
Dear Mrs Bird, I'm sorry, I don't understand what you mean with the "bottom corners at an angle" - You will have to decrease for raglan (they happen at a different rythm on body and sleeve) and for buttonholes on the right front band - this can happen that the decreases have to be worked at the same time, make sure to check the measurements. Happy knitting!
10.02.2020 - 09:02
![]() Marilyn wrote:
Marilyn wrote:
Hi, I am working the decreases on the Pistachio cardigan. For the raglan decreases on the body, when it states that at the end, there should be 15 sts remaining on each front piece, does that include the button band? I do not think it should, looking carefully at the sweater on the model.
24.01.2017 - 02:48DROPS Design answered:
Dear Marilyn, these 15 sts include front band sts, eg in larger size, there were 33 sts for each front piece, you dec for raglan (on each front piece): 4 x 1 st + 14 x 1 st = 18 sts, 15 sts remain. Remember to work 1 more st in seed st (and 1 st less in stocking st). Happy knitting!
24.01.2017 - 09:52
![]() Suus wrote:
Suus wrote:
Ik kan fysiek niet met een rondbreinaald omgaan. Kan het ook op 2 pennen? Hoe pak ik dit aan.
03.11.2016 - 08:24DROPS Design answered:
Hoi Suus. Ja, dat kan als je ruimte hebt voor alle st op de rechte naald. Je kan hier ook lezen hoe je een patroon kan aanpassen voor rechte naalden.
03.11.2016 - 15:53
![]() Martin wrote:
Martin wrote:
Comment obtenir explications de vos modèles en aiguilles droites.. Merci!!!
28.12.2015 - 19:17DROPS Design answered:
Bonjour Mme Martin, on tricote ici le dos et les devants (puis l'empiècement) en allers et retours sur aiguille circulaire pour avoir suffisamment de place pour y loger toutes les mailles. Pour les manches, cliquez ici pour en savoir plus sur l'adaptation des modèles. Bon tricot!
02.01.2016 - 15:00
![]() Chris Hannes wrote:
Chris Hannes wrote:
Wanneer de mouwen en lijf samen op een rondbreinaald zijn gezet wordt er dan direct gestart met de mindering of worden er eerst 2 nldn gebreid?
22.11.2015 - 22:14DROPS Design answered:
Beste Chris. Je begint meteen met minderen.
23.11.2015 - 13:33
![]() Angela wrote:
Angela wrote:
I really enjoy looking at your styles...it appears that over time you are making your patterns easier to read for a novice like me...I could easily see myself knitting this sweater, style is very wearable...as so many of yours are...will have to contact the CA retailer to buy some of your yarn and get started! I hope you never get rid of this site...amo
11.03.2015 - 06:04
![]() L.Woeltjes wrote:
L.Woeltjes wrote:
Begrijp het niet helemaal, minderen op het lijf, hoe???
13.07.2014 - 13:32Danielle Cardinal wrote:
Comment trouver le guide des tailles pour les modèles garnstudio ?
04.02.2014 - 03:33DROPS Design answered:
Bonjour Mme Cardinal, les tailles évoluent avec le temps et sont différentes d'un pays à l'autre, pour trouver la taille idéale pour chaque projet, l'idéal est de mesurer un vêtement analogue que vous aimez et de comparer ces mesures à celles du schéma à la fin des explications. Bon tricot!
04.02.2014 - 09:17Barbara wrote:
I want to start knitting this pattern! Could you please help me with the size.. which size would fits me? is there a guide for sizes?
18.10.2013 - 08:39DROPS Design answered:
Dear Barbara, you will find at the bottom of the pattern a measurement chart with all measures taken flat, from side to side. Check these measurements with one of your garment you like the shape and size and follow the matching size. Happy knitting!
18.10.2013 - 09:40
|
|
Pistachio#pistachiocardigan |
|
|
|
|
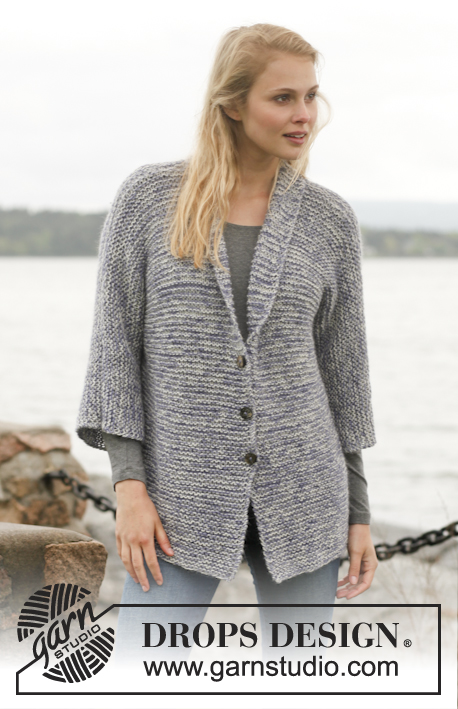
Knitted DROPS jacket with raglan and shawl collar in ”Snow”. Size: S - XXXL.
DROPS 149-33 |
|
|
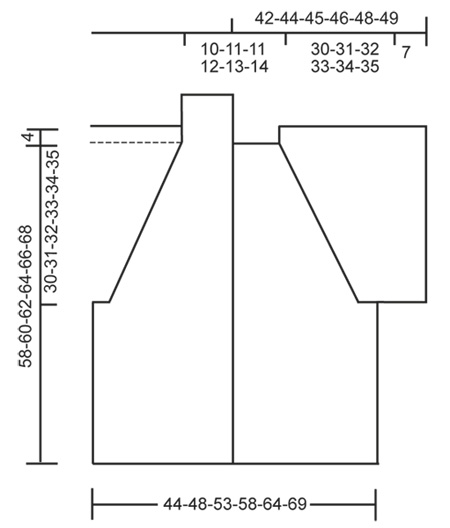
MOSS ST: Row 1: * K 1, P 1 *, repeat from *-*. Row 2: K over P and P over K. Repeat 2nd row. BUTTONHOLES: Dec for buttonholes on right band from RS. 1 buttonhole = K tog third and fourth st from mid front and make 1 YO. Dec for buttonholes when piece measures: SIZE S: 12, 20, 28 and 36 cm SIZE M: 13, 21, 29 and 37 cm SIZE L: 14, 22, 30 and 38 cm SIZE XL: 15, 23, 31 and 39 cm SIZE XXL: 16, 24, 32 and 40 cm SIZE XXXL: 17, 25, 33 and 41 cm DECREASE TIP (raglan): Dec as follows from RS: Before marker: Beg 3 sts before marker: K 2 tog, K 1 (marker is after this st). After marker: K 1 (marker is before this st), slip 1 st as if to K, K 1, psso. Dec as follows from WS: Before marker: P 2 twisted tog, P 1 (marker is after this st). After marker: P 1 (marker is before this st), P 2 tog. ---------------------------------------------------------- BODY: Worked back and forth on circular needle from mid front. Cast on 92-100-108-116-128-136 sts (incl 6 band sts in each side towards mid front) on circular needle size 10 mm with Snow. P 1 row from WS, then work as follows from RS: 6 sts in MOSS ST (= band), rib K 1/P 1 until 6 sts remain, work 6 sts in moss st (= band). Work 1 row from WS the same way. Continue in stocking st with 6 sts in moss st in each side. REMEMBER THE KNITTING TENSION. Remember to dec for BUTTONHOLES on right band - see explanation above. When piece measures 28-29-30-31-32-33 cm, work next row from WS as follows: Work 22-24-26-28-31-33 sts (= left front piece), cast off 8 sts, work 32-36-40-44-50-54 sts (= back piece), cast off 8 sts and work the remaining 22-24-26-28-31-33 sts (= right front piece). Put piece aside and knit the sleeves. SLEEVE: Worked in the round. Loosely cast on 56-58-60-62-64-66 sts circular needles size 10 mm with Snow. Work 4 rounds in moss st, then work in stocking st. When piece measures 7 cm, cast off 8 sts at beg of round = 48-50-52-54-56-58 sts. Put piece aside and knit another sleeve. YOKE: Slip sleeves on to same circular needle as body where armholes were cast off = 172-184-196-208-224-236 sts. Insert 1 marker in all transitions between sleeves and body = 4 markers. READ ALL OF THE FOLLOWING SECTION BEFORE CONTINUING! Continue in stocking st with 6 sts in moss st in each side. Now beg dec for raglan - READ DECREASE TIP: Dec is different on sleeves and body - like this: ON SLEEVE: Dec on every other row 17-17-17-17-18-18 times, then on every row 3-4-5-6-6-7 times (= 8 sts remain on sleeve). ON BODY: Dec on every 6th row 2-1-0-0-0-0 times, then every 4th row 7-9-8-8-6-4 times, then on every other row 0-0-4-5-10-14 times (= 13-14-14-15-15-15 sts remain on each front piece and 14-16-16-18-18-18 sts remain on back piece). AT THE SAME TIME when piece measures 36-37-38-39-40-41 cm, work 1 st of stocking st into band, i.e. no of sts in moss st inc and no of sts in stocking st on front piece dec (total no of sts is the same), repeat every 9-6-7-5-5-6 cm 3-4-4-5-5-5 times in total (= 9-10-10-11-11-11 sts in moss st on band). After all dec are done, 56-60-60-64-64-64 sts remain on needle. Work 1 row from RS while dec 8-8-8-10-10-10 sts evenly (do not dec over bands) = 48-52-52-54-54-54 sts. After last row with dec, work 1 row from WS while at the same time slipping the first 9-10-10-11-11-11 sts on row on 1 stitch holder (work them first), cast off the next 30-32-32-32-32-32 sts and keep the last 9-10-10-11-11-11 sts on needle, turn piece. Then work short rows for collar over sts on needle as follows (continue with moss st): * work 2 rows over the first 5-5-5-6-6-6 sts towards mid front, work 2 rows over all sts *, repeat from *-* until collar measures 17-18-18-18-18-18 cm from beg of short rows (measure on the inside towards neck on the shortest), cast off. Slip sts from stitch holder in the other side back on needle, work 1 row from RS, then work short rows the same way. ASSEMBLY: Sew the openings under the sleeves. Sew collar tog mid back (sew edge to edge) and sew it to the neckline at the back of neck with neat, little stitches. Sew on buttons. |
|
 |
|
Have you finished this pattern?Tag your pictures with #dropspattern #pistachiocardigan or submit them to the #dropsfan gallery. Do you need help with this pattern?You'll find 21 tutorial videos, a Comments/Questions area and more by visiting the pattern on garnstudio.com. © 1982-2026 DROPS Design A/S. We reserve all rights. This document, including all its sub-sections, has copyrights. Read more about what you can do with our patterns at the bottom of each pattern on our site. |


With over 40 years in knitting and crochet design, DROPS Design offers one of the most extensive collections of free patterns on the internet - translated to 17 languages. As of today we count 324 catalogues and 12267 patterns translated into English (UK/cm). 12267
We work hard to bring you the best knitting and crochet have to offer, inspiration and advice as well as great quality yarns at incredible prices! Would you like to use our patterns for other than personal use? You can read what you are allowed to do in the Copyright text at the bottom of all our patterns. Happy crafting!
Post a comment to pattern DROPS 149-33
We would love to hear what you have to say about this pattern!
If you want to leave a question, please make sure you select the correct category in the form below, to speed up the answering process. Required fields are marked *.