
Popular categories
Looking for a yarn?


Comments / Questions (62)
![]() Peggy Rognan wrote:
Peggy Rognan wrote:
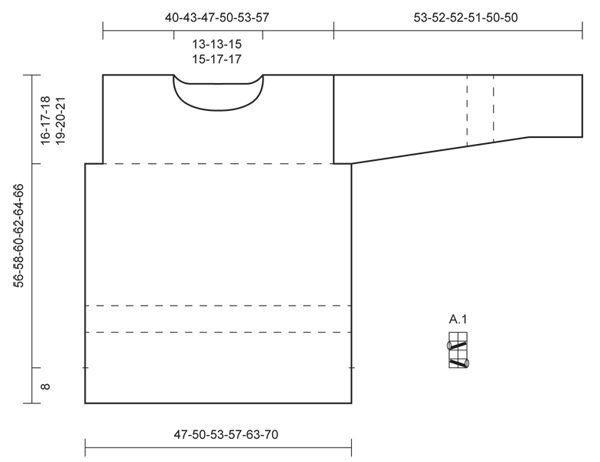
Hvor ligger mønsteret. Ser bare en hvit genser som er tegnet opp. Ikke noe diagram å gå etter-
13.07.2017 - 10:18DROPS Design answered:
Hej Peggy, du finder mønster A.1 til højre for måleskitsen nederst i opskriften. God fornøjelse!
13.07.2017 - 10:36
![]() Britta Wild wrote:
Britta Wild wrote:
Hallo, ist die Anleitung für den Ärmel komplett? Auf dem Foto sieht man die 2 Krausrippen bei 14 und bei 22 cm. Diese sind auch in der Anleitung beschrieben. Zusätzlich sieht man auf dem Foto aber auch noch Krausrippen oben an der Schulter, wo der Ärmel an den Pulli angenäht wird. Außerdem wird nicht beschrieben, wie die Schulter zu stricken ist? Kann es sein, dass man im Muster weiterstrickt, ohne Abnahmen zu stricken? Ich freue mich auf eine Antwort.
06.07.2017 - 19:12DROPS Design answered:
Liebe Frau Wild, es gibt nur die 2 Krausrippen bei 14 und 22 cm, ganz am Ende der Ärmel werden die Maschen abgekettet + zusammengenäht. Es gibt keine Abnahme für Armkugel, wie im Maßskizze gezeigt. Viel Spaß beim stricken!
07.07.2017 - 09:17
![]() Unni Kvil Nordal wrote:
Unni Kvil Nordal wrote:
Hei! Vil gjerne ha denne genseren 6 cm lenger (bolen). Hvor mye garn må jeg da ha i tillegg i størrelse XL?
15.06.2016 - 18:33DROPS Design answered:
Hei Unni. Det kan jeg desvaerre ikke hjaelpe dig med. Jeg vil tro butikken kan hjaelpe dig med dette. God fornöjelse.
16.06.2016 - 14:28
![]() Carmen Gil wrote:
Carmen Gil wrote:
Hola,quisiera saber si este patrón se puede hacer sin agujas circulares.Y el cuello,también se podria rematar sin agujas circulares?,no las domino muy bien.GRacias
04.11.2015 - 00:21DROPS Design answered:
Hola Carmen, se puede trabajar con agujas rectas. La complejidad está en la cantidad de pts que debes tener en la aguja (muchos pts). Para la cenefa del cuello puedes usar agujas rectas pero en este caso debes dejar abierto el hombro izquierdo para trabajar el cuello de ida y vta y luego cerrarlos juntos (hombro y cenefa del escote)
08.11.2015 - 10:20
![]() Birte Andreasen wrote:
Birte Andreasen wrote:
Der går 2 nøgler garn mere til, end der står i opskriften.
14.09.2015 - 14:50
![]() Karin wrote:
Karin wrote:
Under diagrammets ärm till höger som vanligt!
28.05.2015 - 21:46
![]() Inger Svensson wrote:
Inger Svensson wrote:
VAR är diagrammet?
28.05.2015 - 17:57
![]() Carla wrote:
Carla wrote:
Scusa ripeto la frase che è venuta male: il segnapunto che metto dove dicono le spiegazioni(maniche) non corrisponde mai con le calature per lo scalfo, ma di tanto.
16.05.2015 - 08:07
![]() Carla wrote:
Carla wrote:
Si molto probabilmente è un problema a monte, cioè al numero di aumenti delle maniche. Ora sto lavorando una XL e appena inizio le maniche provo ad aumentare il numero degli aumenti richiesto nelle spiegazioni e vi faccio sapere. Grazie mille per l'interesse e complimenti per il vostro lavoro Carla Camilloni
21.04.2015 - 09:26
![]() Carla wrote:
Carla wrote:
Scusa ripeto la frase che è venuta male: il segnapunto che metto dove dicono le spiegazioni(maniche) non corrisponde mai con le calature per lo scalfo, ma di tanto.
20.04.2015 - 20:40DROPS Design answered:
Buongiorno Carla. Se capiamo correttamente il problema, potrebbe aver bisogno di aumentare un numero maggiore di m sulle maniche, facendo aumenti più ravvicinati. Ci riscriva se non è questo il problema. Buon lavoro!
21.04.2015 - 09:52
|
|||||||||||||
Everyday#everydaysweater |
|||||||||||||
 |
 |
||||||||||||
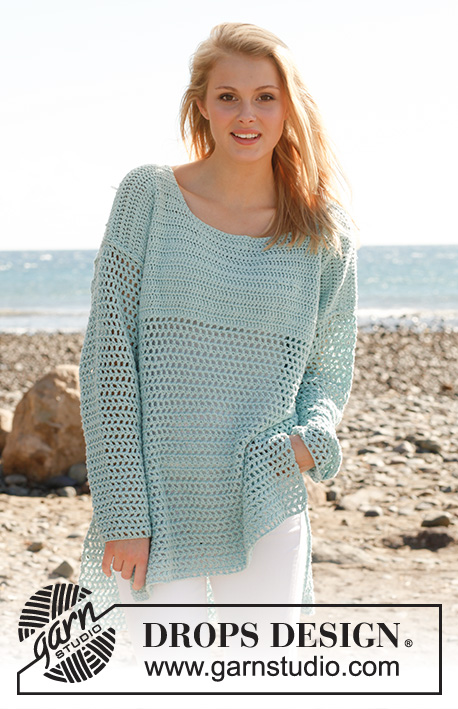
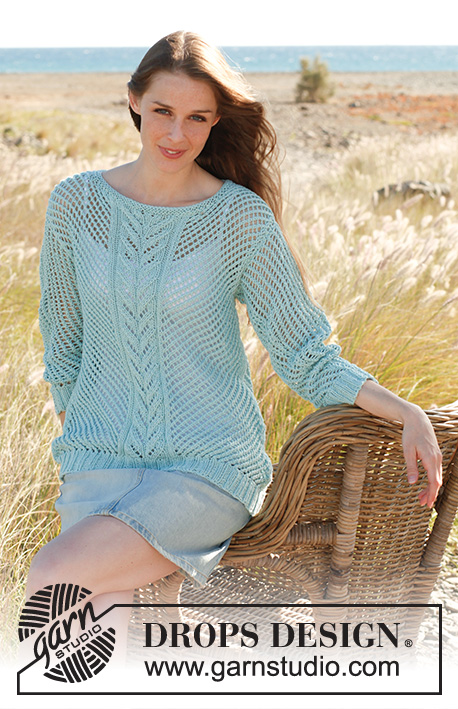
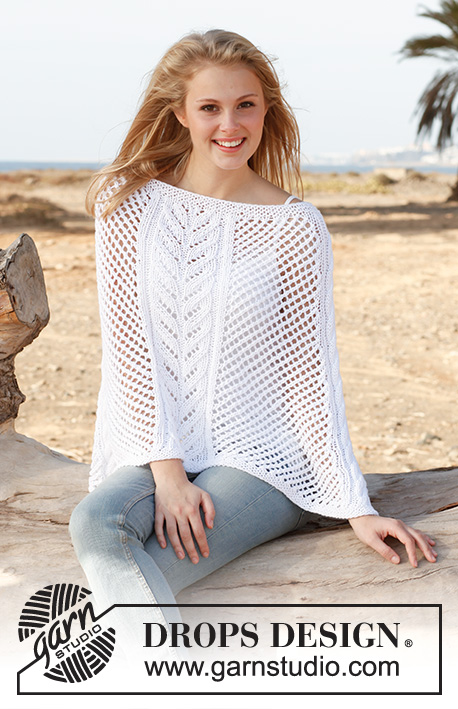
Knitted DROPS jumper with lace pattern in "Bomull Lin" or "Paris". Size: S - XXXL.
DROPS 145-12 |
|||||||||||||
|
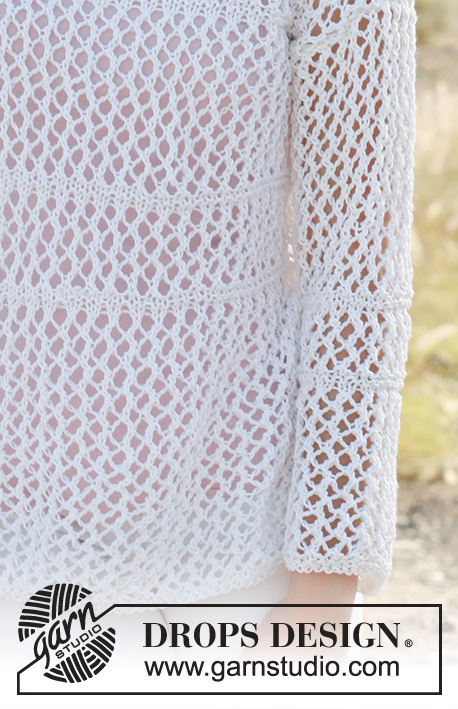
GARTER ST (back and forth on needle): K all rows. 1 ridge = 2 rows K. NOTE: All edge sts in the sides are worked in garter st. PATTERN: See diagram A.1, diagram shows all rows in 1 pattern repetition seen from RS. INCREASE TIP: Inc 1 st by making 1 YO inside 1 edge st in each side. Work the new sts gradually in pattern A.1. -------------------------------------------------------- BACK PIECE: Worked back and forth on needle. Cast on 58-62-66-70-78-86 sts on circular needle size 5.5 mm with Bomull-Lin. Work 4 rows in GARTER ST - see explanation above (1st row = RS). Then work A.1 with 1 edge st in garter st in each side. REMEMBER THE KNITTING TENSION! When piece measures 20-21-22-23-24-25 cm, work 4 rows in garter st over all sts. Then work A.1 until piece measures 28-29-30-31-32-33 cm, then work 2 ridges over all sts (= 2 stripes with ridges between pattern A.1). Then work A.1 until piece measures 40-41-42-43-44-45 cm, then K 2 rows (= 1 ridge) over all sts - AT THE SAME TIME cast off for armholes at the beg of these 2 rows as follows: Cast off 4-4-4-4-6-8 sts = 50-54-58-62-66-70 sts. K 2 rows over all sts (= 2 ridges in total), then work A.1 with 1 st in garter st in each side until finished measurements. When piece measures 54-56-58-60-62-64 cm, cast off the middle 12-12-14-14-16-16 sts for neck and finish each shoulder separately. Then cast off 2 sts on next row from neck = 17-19-20-22-23-25 sts remain on the shoulder. Loosely cast off all sts when piece measures 56-58-60-62-64-66 cm. FRONT PIECE: Cast on and work as on back piece until piece measures 46-48-49-51-52-54 cm = 50-54-58-62-66-70 sts on row. On next row from RS, cast off the middle 6-6-8-8-10-10 sts for neck and finish each shoulder separately. Then cast off on every row from neck as follows: Cast off 2 sts 2 times, 1 st 1 time = 17-19-20-22-23-25 sts remain on shoulder. Loosely cast off all sts when piece measures 56-58-60-62-64-66 cm. SLEEVE: Worked back and forth on needle. Cast on 28-30-30-32-34-36 sts on circular needle size 5.5 mm. Work 4 rows in GARTER ST (1st row = RS). Then work A.1 with 1 edge st in garter st in each side. When piece measures 8-8-8-7-7-7 cm, inc 1 st in each side - READ INCREASE TIP, work the new sts gradually in pattern. Repeat inc every 10-8-6½-6½-6-6 cm 4-5-6-6-6-6 more times (5-6-7-7-7-7 times in total) = 38-42-44-46-48-50 sts - AT THE SAME TIME when piece measures approx. 14 cm, work 2 ridges over all sts, continue with A.1 until piece measures 22 cm, then work 2 ridges (= 2 stripes with ridges between pattern A.1). Continue with A.1 with 1 edge st in garter st until piece measures 50-49-49-48-45-43 cm, now insert 1 marker in each side of sleeve (for assembly). Continue until piece measures 53-52-52-51-50-50 cm (shorter measurements in the larger sizes because of broader shoulder width). Loosely cast off all sts. ASSEMBLY: Sew shoulder seams in front loop of outermost sts. Sew in sleeves, sew sleeve seams inside 1 edge st - NOTE: The section worked after the marker at the top of sleeve, should fit the cast off for armhole. Sew side seams from armholes and down, but leave approx 8 cm open at the bottom for vents. NECK EDGE: Worked in the round. Knit up from RS approx. 70 to 80 sts around the neck on circular needle size 5.5 mm (40 cm). P next round - while AT THE SAME TIME adjusting no of sts to 62-62-68-68-74-74. K 1 round and P 1 round (= 2 ridges in total), loosely cast off all sts on next round. |
|||||||||||||
Diagram explanations |
|||||||||||||
|
|||||||||||||
 |
|||||||||||||
Have you finished this pattern?Tag your pictures with #dropspattern #everydaysweater or submit them to the #dropsfan gallery. Do you need help with this pattern?You'll find 16 tutorial videos, a Comments/Questions area and more by visiting the pattern on garnstudio.com. © 1982-2026 DROPS Design A/S. We reserve all rights. This document, including all its sub-sections, has copyrights. Read more about what you can do with our patterns at the bottom of each pattern on our site. |
|||||||||||||


With over 40 years in knitting and crochet design, DROPS Design offers one of the most extensive collections of free patterns on the internet - translated to 17 languages. As of today we count 324 catalogues and 12245 patterns translated into English (UK/cm). 12245
We work hard to bring you the best knitting and crochet have to offer, inspiration and advice as well as great quality yarns at incredible prices! Would you like to use our patterns for other than personal use? You can read what you are allowed to do in the Copyright text at the bottom of all our patterns. Happy crafting!
Post a comment to pattern DROPS 145-12
We would love to hear what you have to say about this pattern!
If you want to leave a question, please make sure you select the correct category in the form below, to speed up the answering process. Required fields are marked *.