
Popular categories
Looking for a yarn?


Comments / Questions (2)
![]() Lorena wrote:
Lorena wrote:
Halo, how about using the snow wool? still 250 g in total or more? thank you
28.01.2026 - 16:31DROPS Design answered:
Hi Lorena, Drops Snow belongs to yarn group E, so is a lot thicker than Drops Daisy. You will get a much thicker balaclava and a much larger balaclava too, unless you adjust the number of stitches you work. Better to select a different yarn from the same yarn groups as Daisy, then it will still be 250 g and you can use the stitch counts in the text. Regards, Drops Team
29.01.2026 - 06:43
![]() Lorenza wrote:
Lorenza wrote:
I am making this pattern with Flora + Kid silk: I would like to know if I can still block the squares with water before assembling them. I am not sure about Kid silk being mohair and silk. Thanks for your feedback
03.12.2025 - 21:22DROPS Design answered:
Hi Lorenza, A mohair yarn can be blocked but you need to be gentle to avoid damaging the fibres. Spray blocking or very gentle blocking with lukewarm water and then gentle reshaping by hand is best, rather than pinning. Regards, Drops Team.
04.12.2025 - 06:52
|
||||||||||||||||||||||||||||
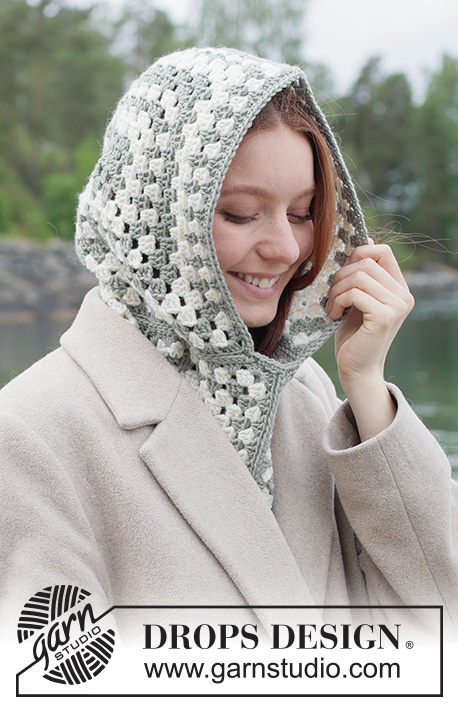
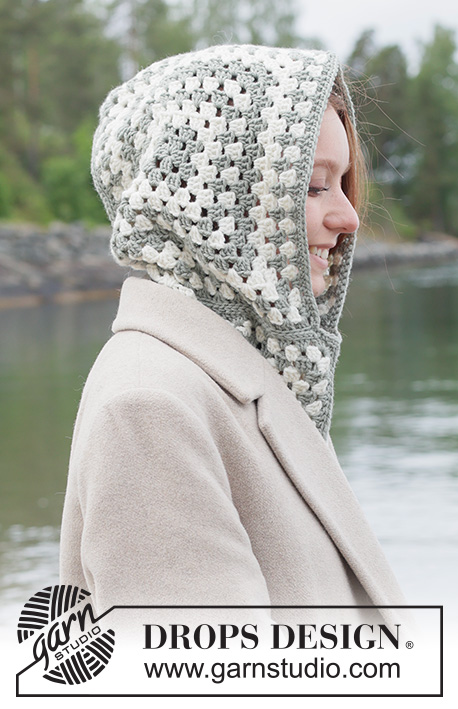
Frostglen Hood#frostglenhood |
||||||||||||||||||||||||||||
 |
 |
|||||||||||||||||||||||||||
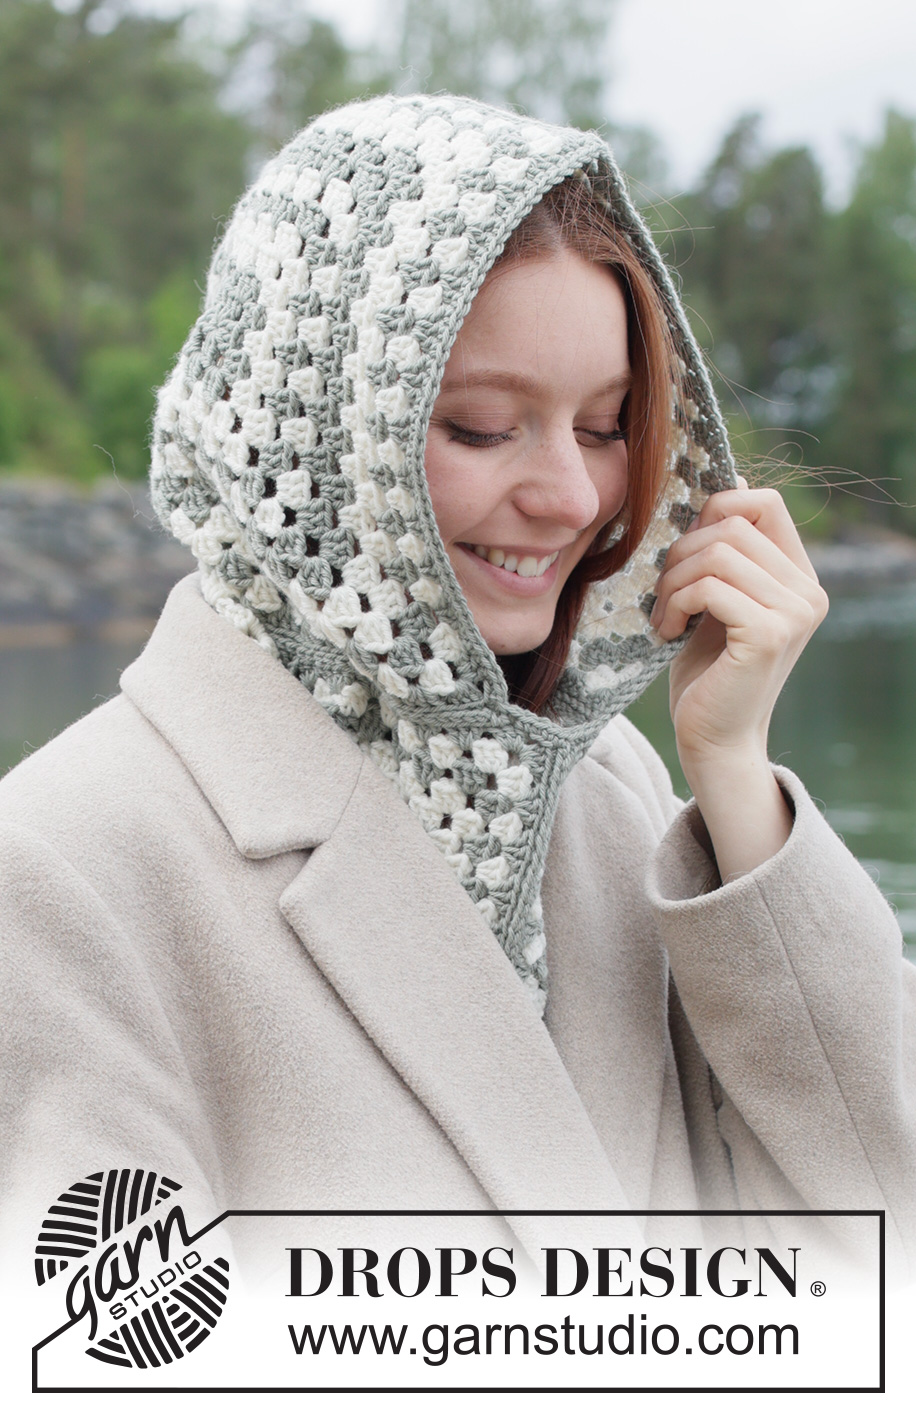
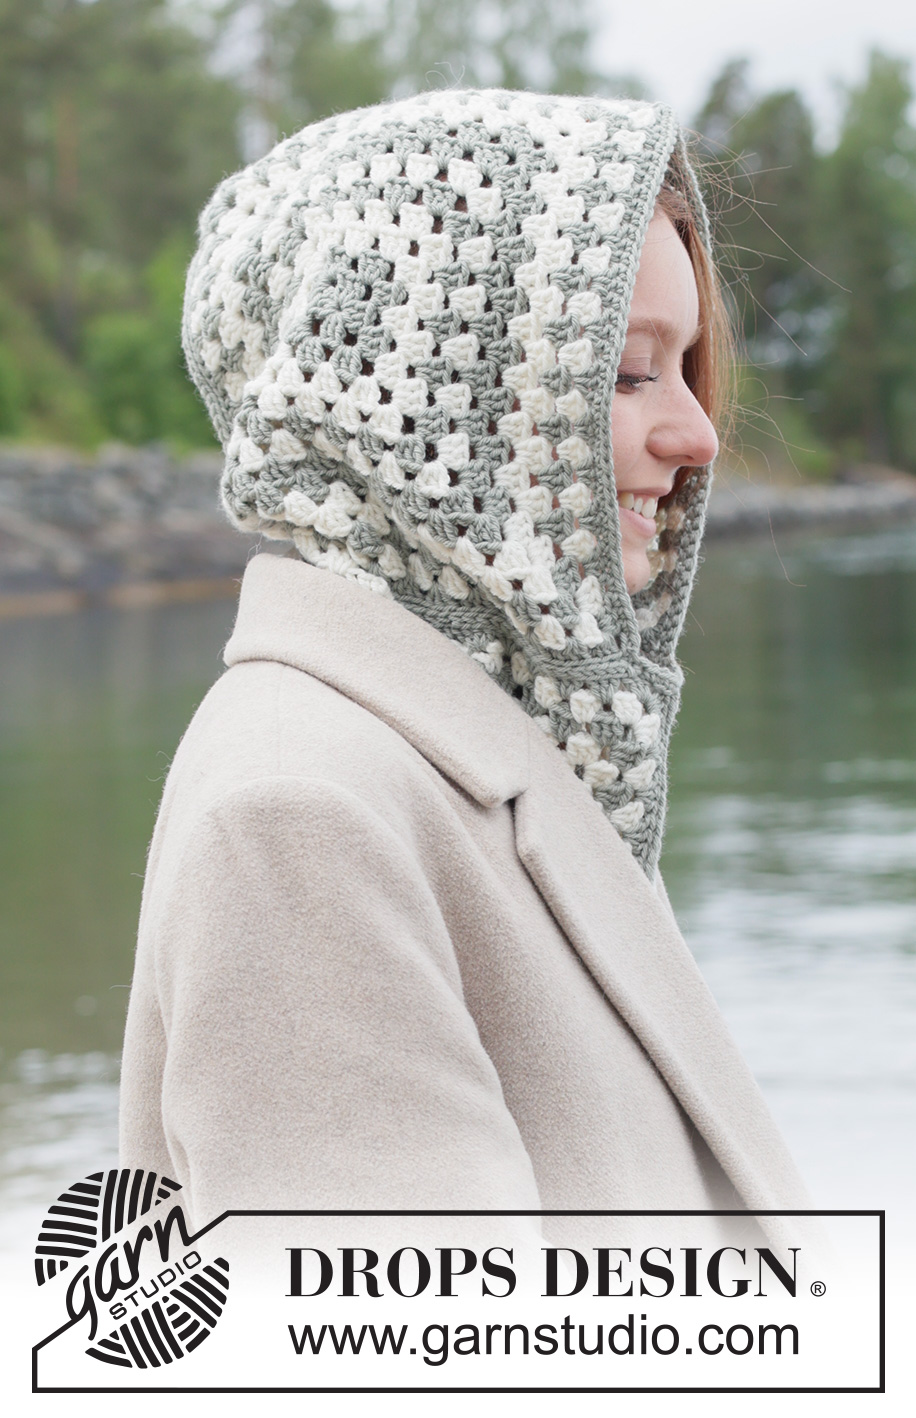
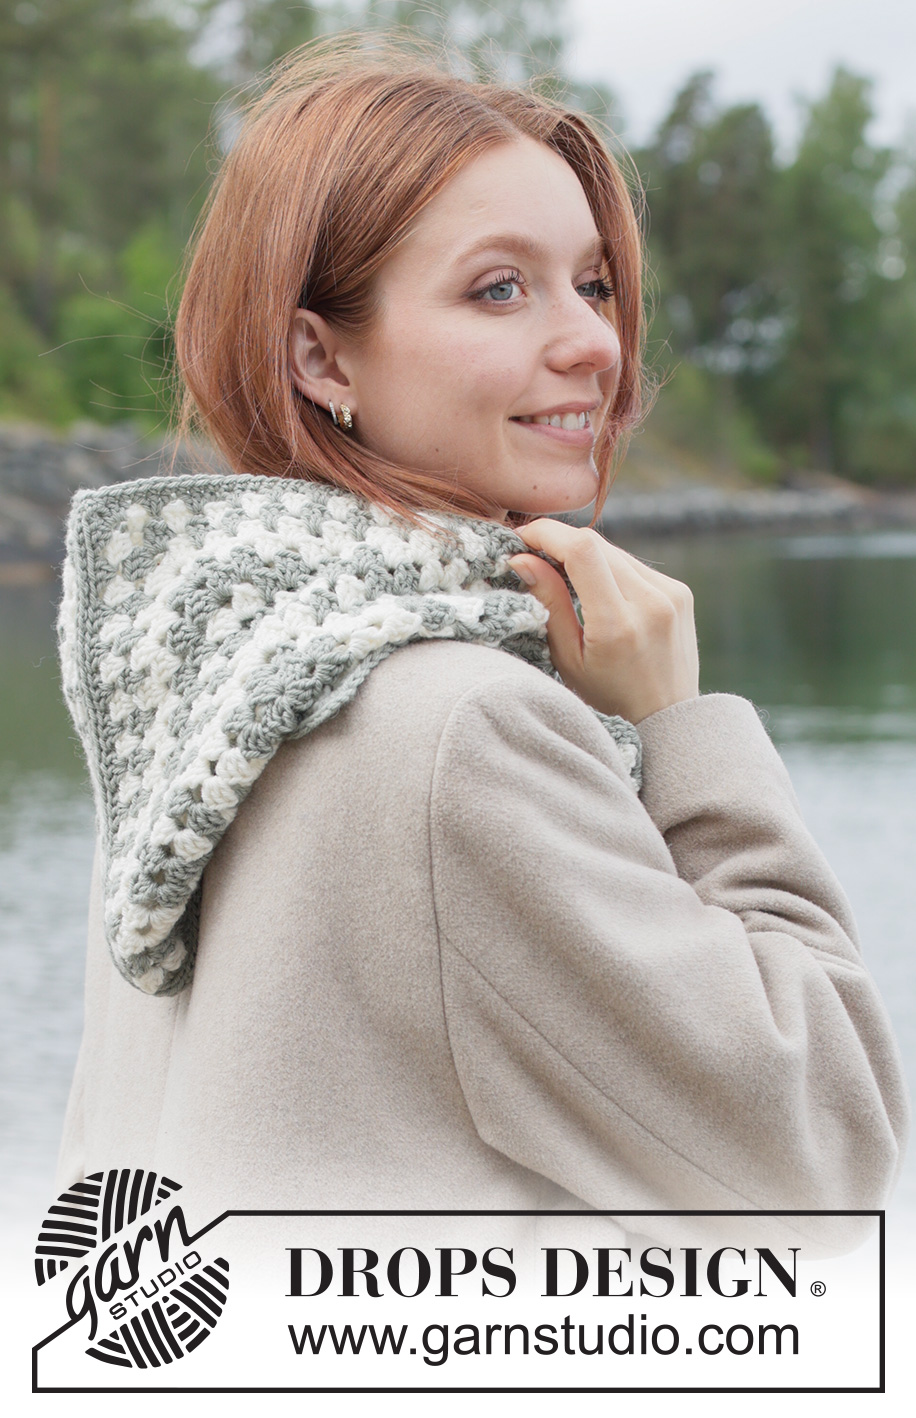
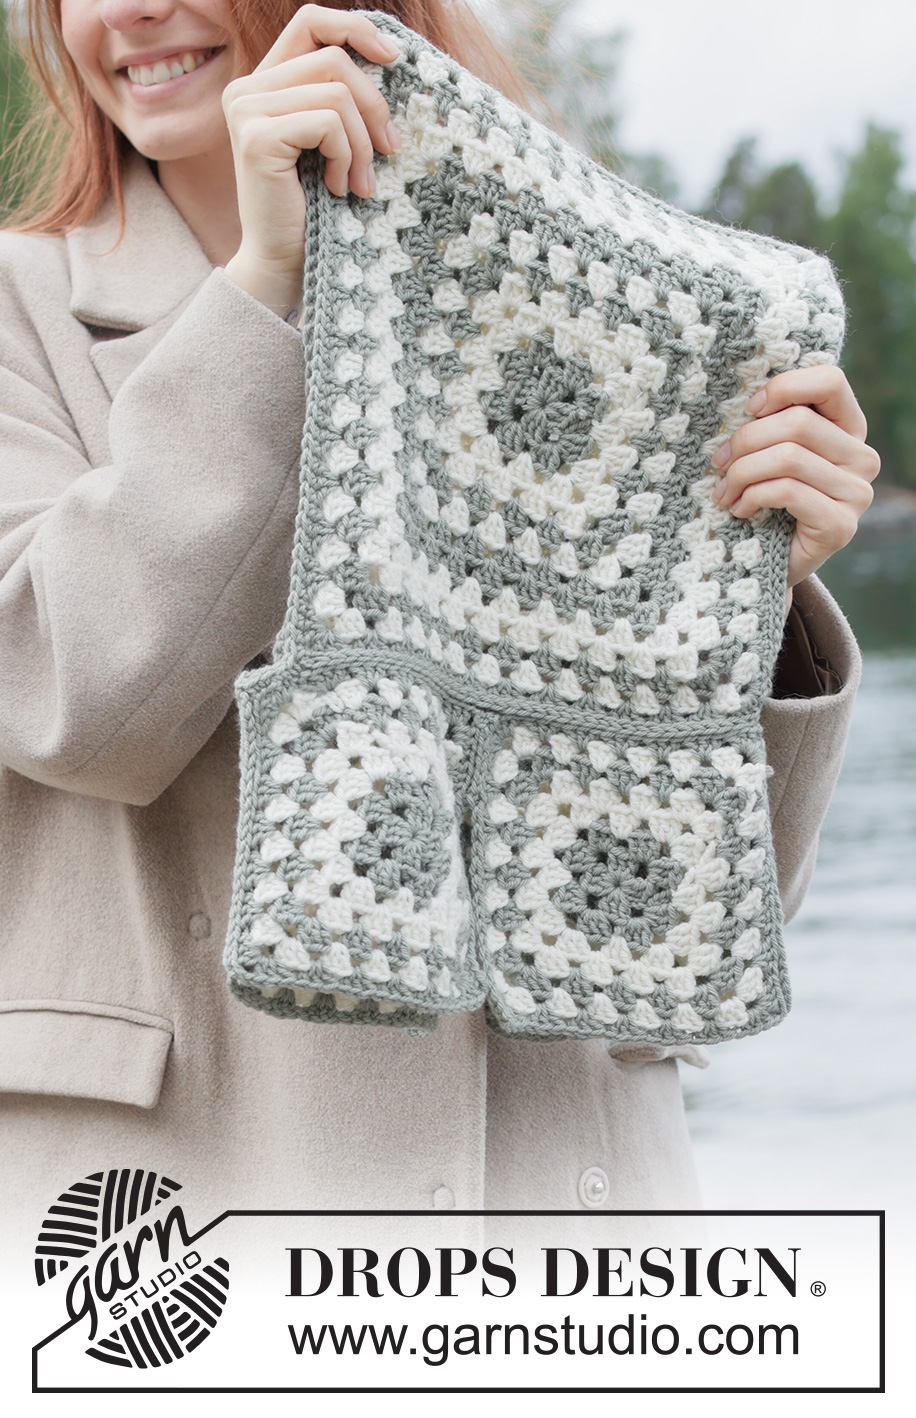
Crocheted hoodie hat/balaclava in DROPS Daisy. Piece is worked in granny squares that are worked together. Size one size.
DROPS 261-9 |
||||||||||||||||||||||||||||
|
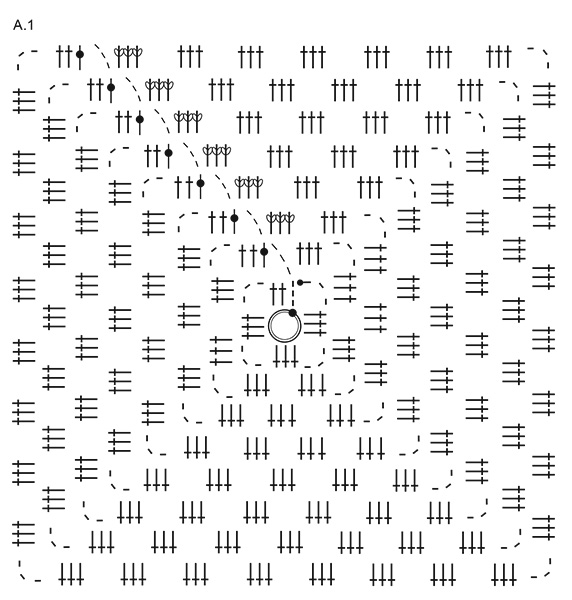
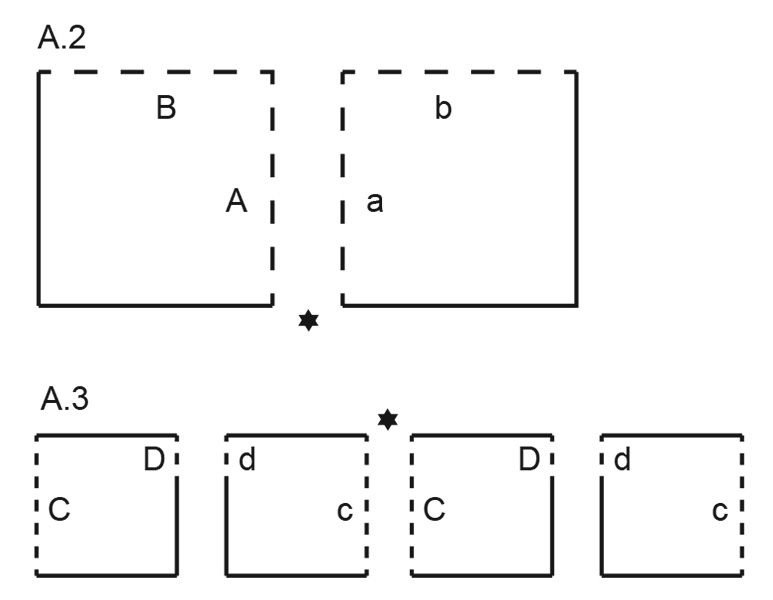
---------------------------------------------------------- EXPLANATION FOR THE PATTERN: ---------------------------------------------------------- PATTERN: See diagrams A.1 to A.3 (diagrams A.2 and A.3 are used for assembly). CROCHET INFORMATION: If you work at the back of the crochet hook the chain stitch will often be too tight. 1 chain stitch should be just as long as 1 treble crochet is wide. COLOURS: Work in total 2 large squares and 4 small squares as follows: Large square: Cast on + 2 rounds in colour Sage Green, * 2 rounds in colour Off White, 1 round in colour Sage Green, 1 round in colour Off White, 2 rounds in colour Sage Green *, repeat from *-* until square measures 28 x 28 cm – adjust so that last round is worked in colour Sage Green. Small square: Work the same way as large square until square measures 16 x 16 cm - adjust so that last round is worked in colour Sage Green. COLOUR CHANGE: To get a nice transition at colour change work slip stitch at the end of round with the new colour. ASSEMBLY TIP: Place 2 squares edge to edge so that they can be worked together. Start in the corners and work as follows: *Insert hook from right side and down through back loop of stitch on one square, then insert hook from right side and down through back loop of stitch on the other square, get the yarn and pull thread through both loop on hook *, work from *-* until these 2 squares have been worked together along the side of square. Work like this along the side shown in diagrams A.2 and A.3 and at the end when neck is worked on to hood. ---------------------------------------------------------- START THE PIECE HERE: ---------------------------------------------------------- BALAKLAVA - SHORT OVERVIEW OF THE PIECE: Piece is worked in granny squares that are worked in the round. Work in 2 different sizes. The 2 large squares form the hood and the small squares form the neck. Work the squares together. HOOD: Read CROCHET INFO, COLOURS and COLOUR CHANGE in explanation above, use hook size 4.5 mm and work in total 2 large squares according to diagram A.1 until square measures approx. 28 x 28 cm – when entire A.1 has been worked continue the pattern the same way – adjust so that last round is worked in colour Sage Green. Fasten off. NECK: Work 4 small squares according to diagram A.1 until squares measures 16 x 16 cm - remember COLOUR and adjust so that last round is worked in colour Sage Green. Fasten off. ASSEMBLY: Read ASSEMBLY TIP and place the 2 large squares together into a hood by working together stitch against stitch 2 of the sides on the first square against 2 of the sides on the other square - see diagram A.2 and work A against a and B against b. Work the small squares together into neck (i.e. a circle) - see diagram A.3 and remember ASSEMBLY TIP but on 2 of the side work only 1 third of the stitches together to give room for shoulders - see sides marked with D and d in diagram A.3. Work the neck on to hood by placing the seam mid back on hood against one of the splicings on the circle. Work together stitch against stitch the entire round - remember ASSEMBLY TIP, approx. 8 cm remain mid front (= under the chin). Then work 1 round double stitch around the entire opening for face in colour Sage Green. Fasten off. |
||||||||||||||||||||||||||||
Diagram explanations |
||||||||||||||||||||||||||||
|
||||||||||||||||||||||||||||
 |
||||||||||||||||||||||||||||
 |
||||||||||||||||||||||||||||
Have you finished this pattern?Tag your pictures with #dropspattern #frostglenhood or submit them to the #dropsfan gallery. Do you need help with this pattern?You'll find 8 tutorial videos, a Comments/Questions area and more by visiting the pattern on garnstudio.com. © 1982-2026 DROPS Design A/S. We reserve all rights. This document, including all its sub-sections, has copyrights. Read more about what you can do with our patterns at the bottom of each pattern on our site. |
||||||||||||||||||||||||||||


With over 40 years in knitting and crochet design, DROPS Design offers one of the most extensive collections of free patterns on the internet - translated to 17 languages. As of today we count 324 catalogues and 12284 patterns translated into English (UK/cm). 12284
We work hard to bring you the best knitting and crochet have to offer, inspiration and advice as well as great quality yarns at incredible prices! Would you like to use our patterns for other than personal use? You can read what you are allowed to do in the Copyright text at the bottom of all our patterns. Happy crafting!
Post a comment to pattern DROPS 261-9
We would love to hear what you have to say about this pattern!
If you want to leave a question, please make sure you select the correct category in the form below, to speed up the answering process. Required fields are marked *.