
Popular categories
Looking for a yarn?


Comments / Questions (115)
![]() Lorna wrote:
Lorna wrote:
I am not getting the same effect on the A.7 pattern as your picture. My cables are not raised. The rest of the cabling looks amazing but not my A.7. Myself (and a more advanced knitter) have practiced on a smaller swatch only to get same result. Any help or tips would be appreciated :)
02.03.2024 - 19:02DROPS Design answered:
Dear Lorna, it seems to be an issue with the gauge. Try working tighter than before; it should help raise the cables. Also, if you use a different yarn from Karisma (or another 100% wool not superwash) the result can also be different. For example, with a superwash yarn the cables won't be raised as much either. Happy knitting!
04.03.2024 - 00:30
![]() Mette wrote:
Mette wrote:
Jeg forstår ikke , når der står at arbejdet strikkes nedefra og op på rund pind, ( str m.) slå 304 masker op og når jeg så har strikket 5 cm rib skal jeg tage ind jeg forstår slet ikke opstart på opskriften
23.02.2024 - 14:35DROPS Design answered:
Hej Mette, jo du skal følge omgangen som beskrevet i opskriften, for at få mønsteret til at stemme hele vejen rundt :)
01.03.2024 - 14:00
![]() Lotte Chili Kristensen wrote:
Lotte Chili Kristensen wrote:
Hvordan ser man om størrelsen passer - hvilke brystmål har drops karisma opskriften til en Str xl Vh slotte
02.02.2024 - 10:51DROPS Design answered:
Hej Lotte, jo du finder måleskitsen nederst i opskriften. Størrelse XL har da et brystmål på 62cm x 2 = 124 cm :)
02.02.2024 - 12:14
![]() Picard wrote:
Picard wrote:
Bonjour est ce que ce modèle existe pour femme , merci
23.01.2024 - 14:26DROPS Design answered:
Bonjour Mme Picard, tout à fait, retrouvez la version femme ici. Bon tricot!
24.01.2024 - 08:07
![]() Berit wrote:
Berit wrote:
Varför är det så krånglig beskrivning på resåren? Om jag stickar 28 m A1 och sedan 18m A2 då blir det ju 4 rm efter varandra. Går det att göra som ”vanligt ” att sticka 2rm och 2am, eller finns det någon finess med detta sättet.
13.01.2024 - 13:41
![]() Sarangi Ketola wrote:
Sarangi Ketola wrote:
Hello. Can this pattern knit, top to down instead of down to top?
11.01.2024 - 09:03DROPS Design answered:
Dear Mrs Ketola, it might be possible but you would have to adjust the whole pattern to work it the other way. You might rather work from an existing pattern top down - see jumpers for men worked top down here. Happy knitting!
11.01.2024 - 15:36
![]() Angela wrote:
Angela wrote:
Hi, I'm a little confused in the raglan/neck part. Should I decrease for the neck and set aside those stitches on a thread WHILE doing my raglan decreases (rather than completing the raglan decreases, and THEN decreasing for the neck)? It also seems like something is wrong with the stitch count for size L? It says there should be 34 stitches on the thread, and 102 on the needle (136 stitches total), but then in the Double Neck section it says to knit up 142 stitches. Thanks!
27.12.2023 - 16:26DROPS Design answered:
Dear Angela, while you will shape neck, you have to continue raglan decreases as before, this means after the middle stitches for neck are on a thread, continue back and forth from neck; there were 436 sts - (30+6) x 8 sts decreased for raglan - 34 sts slipped on a thread (- 6 sts decreased) - (2 sts 1 time x 2 sides) - (1 st 1 time x 2 sides) = 102 sts remain. Happy knitting!
02.01.2024 - 08:51
![]() Marian Pors wrote:
Marian Pors wrote:
Ik wil dit patroon breien met Drops cotton- merino. De garencategorie van dit patroon is B. Bij deze categorie wordt geadviseerd te breien met naald dikte 4. Maar in het patroon wordt gesproken over naalddikte 4.5. Waarom dit verschil?
27.10.2023 - 10:13DROPS Design answered:
Dag Marian,
De naalddikte kan van patroon tot patroon verschillen en hoeft niet altijd overeen te komen met de naalddikte die bij het garen staat. Waarschijnlijk is er bij dit patroon voor een andere naalddikte gekozen vanwege de kabels. Waar het uiteindelijk om gaat is dat je proeflapje overeenkomt met die in het patroon.
28.10.2023 - 10:25
![]() Lorraine H wrote:
Lorraine H wrote:
Thank you for your quick response to my previous question about the sleeve increases. In your response: "and at the end of the round, continue diagram (= purl first 2 increases, knit next 2 and purl next 2)" , as this refers to A10, shouldn't this read = purl first 2 increases, knit next 6?
21.10.2023 - 07:27DROPS Design answered:
Dear Lorraine, yes, it should be purl 2 and knit 6 for size L. Happy knitting!
23.10.2023 - 00:10
![]() Lorraine H wrote:
Lorraine H wrote:
Regarding my previous question about the increases to the sleeves, I forgot to mention that I am making the L size. And therefore would be starting A9 with a knit stitch. That is why I was thinking that the first two increases would be knit stitches.
20.10.2023 - 09:23DROPS Design answered:
Thanks for these extra infos - see answer below.
20.10.2023 - 14:07
|
|||||||||||||||||||||||||||||||
Ice Island#iceislandsweater |
|||||||||||||||||||||||||||||||
 |
 |
||||||||||||||||||||||||||||||
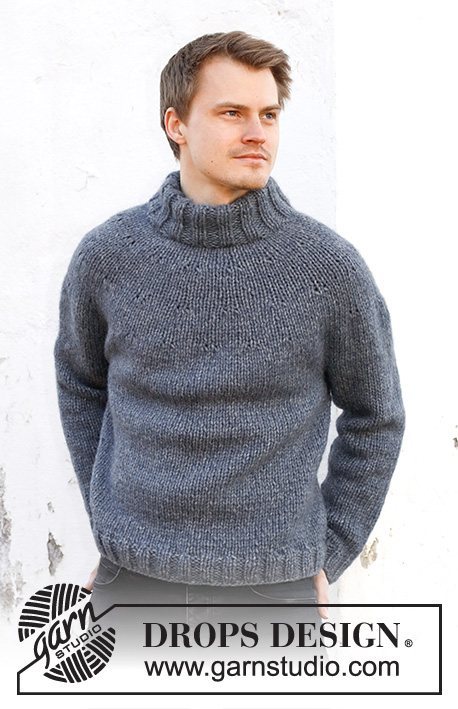
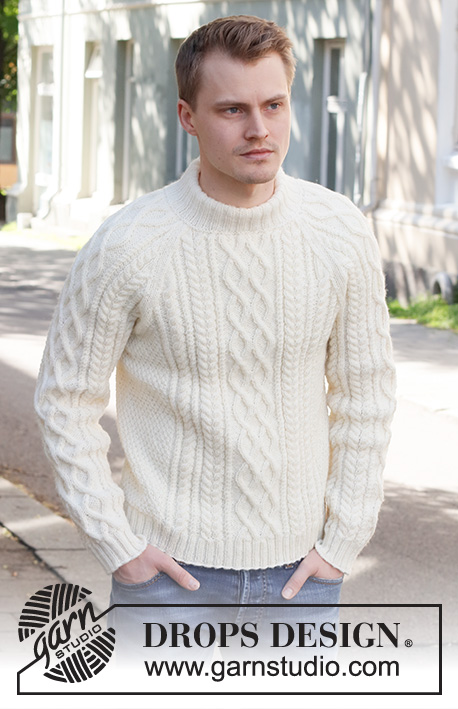
Knitted jumper for men in DROPS Karisma. The piece is worked with raglan, cables and double neck. Sizes S - XXXL.
DROPS 224-10 |
|||||||||||||||||||||||||||||||
|
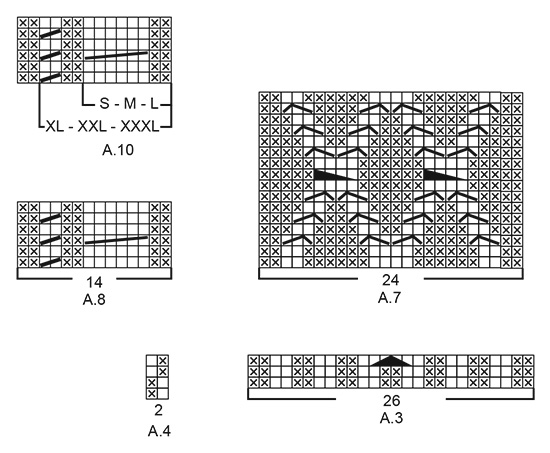
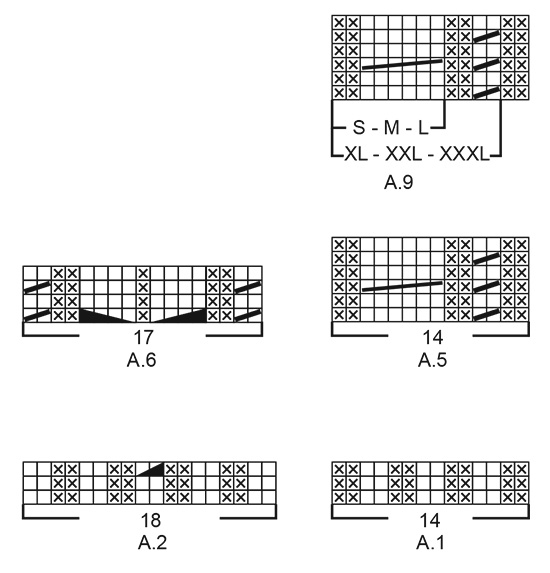
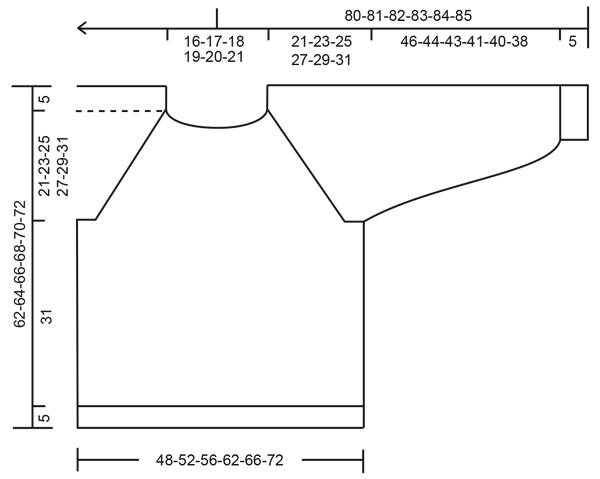
------------------------------------------------------- EXPLANATIONS FOR THE PATTERN: ------------------------------------------------------- PATTERN: See diagrams A.1 to A.10. The diagrams show all rows in the pattern from the right side. DECREASE/INCREASE TIP (evenly spaced): To work out how to decrease/increase evenly, count the number of stitches to be decreased/increased over (e.g. 23 stitches), and divide by the number of decreases/increases to be made (e.g. 6) = 3.8. In this example, decrease by knitting together approx. each 3rd and 4th stitch. When increasing, make 1 yarn over after approx. each 4th stitch. On the next round work the yarn overs twisted to avoid holes. INCREASE TIP (sleeves): Increase 2 stitches under the sleeve by making 1 yarn over on each side of the marker-stitch as follows: Work the marker-stitch (always the first stitch in A.4), 1 yarn over, pattern as far as the marker-stitch, 1 yarn over (= 2 stitches increased). On the next round work the yarn overs twisted to avoid holes. Then work the new stitches into A.9/A.10 until you have room for a complete repeat, then work the stitches in A.4. RAGLAN: Decrease to raglan on each side of the marker, in each transition between body and sleeves as follows. FROM RIGHT SIDE: AFTER THE MARKER: Knit 1, slip 1 stitch as if to knit, knit 1 and pass the slipped stitch over the knitted stitch (= 1 stitch decreased) BEFORE THE MARKER: Work until there are 3 stitches left before the marker, knit 2 together, knit 1 (= 1 stitch decreased). FROM WRONG SIDE: AFTER THE MARKER: Purl 1, purl 2 together (= 1 stitch decreased) BEFORE THE MARKER: Work until there are 3 stitches left before the marker, purl 2 twisted together, purl 1 (= 1 stitch decreased). ------------------------------------------------------- START THE PIECE HERE: ------------------------------------------------------- JUMPER – SHORT OVERVIEW OF THE PIECE: The body is worked in the round with circular needle as far as the armholes. The sleeves are worked in the round with double pointed needles/short circular needle, bottom up. The body and sleeves are placed on the same circular needle and the yoke worked, decreasing to raglan at the same time. Stiches are cast off for the neck mid-front and the piece continued back and forth. The neck is worked to finish. BODY: Cast on 272-288-304-344-360-392 stitches with circular needle size 3.5 mm and DROPS Karisma. Knit 1 round. Then work the following rib: Purl 1, knit 2 * purl 2, knit 2 *, work from *-* over the next 20-24-28-24-28-36 stitches, work A.1 over the next 14-14-14-28-28-28 stitches (= 1-1-1-2-2-2 repeats of 14 stitches), A.2 (= 18 stitches), A.3 (= 26 stitches), A.2, A.1 over the next 14-14-14-28-28-28 stitches (= 1-1-1-2-2-2 repeats of 14 stitches), * knit 2, purl 2 *, work from *-* over the next 44-52-60-52-60-76 stitches, knit 2, A.1 over the next 14-14-14-28-28-28 stitches, A.2, A.3, A.2, A.1 over the next 14-14-14-28-28-28 stitches, * knit 2, purl 2 *, work from *-* over the next 20-24-28-24-28-36 stitches, knit 2 and purl 1. Continue this rib – NOTE: In diagrams A.2 and A.3 repeat the first 2 rounds onwards. When 1 round remains before the piece measures 5 cm, decrease stitches as follows: Work stocking stitch over the first 23-27-31-27-31-39 stitches and decrease 6-6-6-6-6-8 stitches evenly over these stitches – read DECREASE/INCREASE TIP, work A.1 as before over the next 14-14-14-28-28-28 stitches, work the last round in A.2 (= 18 stitches, 1 stitch decreased), work the last round in A.3 (= 26 stitches, 2 stitches decreased), work the last round in A.2 (= 18 stitches, 1 stitch decreased), A.1 as before over the next 14-14-14-28-28-28 stitches, work stocking stitch over the next 46-54-62-54-62-78 stitches and decrease 13-13-13-13-13-17 stitches evenly over these stitches, A.1 as before over the next 14-14-14-28-28-28 stitches, work the last round in A.2 (= 18 stitches, 1 stitch decreased), work the last round in A.3 (= 26 stitches, 2 stitches decreased), work the last round in A.2 (= 18 stitches, 1 stitch decreased), A.1 as before over the next 14-14-14-28-28-28 stitches, work stocking stitch over the last 23-27-31-27-31-39 stitches and decrease 7-7-7-7-7-9 stitches evenly over these stitches = 238-254-270-310-326-350 stitches. The rib is now finished. Insert 1 marker in the first stitch and 1 marker in the 120th-128th-136th-156th-164th-176th stitch (= sides). Allow these markers to follow your work onwards; they are used when casting off for the armholes. Change to circular needle size 4.5 mm. Work the next round as follows: A.4 over the first 17-21-25-21-25-31 stitches, A.5 over the next 14-14-14-28-28-28 stitches (= 1-1-1-2-2-2 repeats of 14 stitches), A.6 (= 17 stitches), A.7 (= 24 stitches), A.6, A.8 over the next 14-14-14-28-28-28 stitches (= 1-1-1-2-2-2 repeats of 14 stitches), A.4 over the next 33-41-49-41-49-61 stitches (marker sits in the middle of these stitches), A.5 over the next 14-14-14-28-28-28 stitches, A.6, A.7, A.6, A.8 over the next 14-14-14-28-28-28 stitches and A.4 over the last 16-20-24-20-24-30 stitches. Continue this pattern. REMEMBER THE KNITTING TENSION! When the piece measures 36 cm in all sizes, cast off for the armholes as described below. There is approx. 26-28-30-32-34-36 cm left to finished length. Adjust so that next round is an odd numbered row in the diagrams, and cast off the first 6-6-7-7-8-8 stitches, continue the pattern until there are 5-5-6-6-7-7 stitches left before the second marker-stitch, cast off 11-11-13-13-15-15 stitches, work until there are 5-5-6-6-7-7 stitches left on the round and cast off 5-5-6-6-7-7 stitches = 108-116-122-142-148-160 stitches on the front piece and 108-116-122-142-148-160 stitches on the back piece. Cut the strand. Lay the piece to one side and work the sleeves. SLEEVES: Cast on 56-60-60-64-64-68 stitches with double pointed needles size 3.5 mm and DROPS Karisma. Knit 1 round, then work rib in the round (knit 2, purl 2) for 5 cm. Knit 1 round where you increase 19-15-15-19-19-15 stitches evenly spaced – remember DECREASE/INCREASE TIP = 75-75-75-83-83-83 stitches. Insert 1 marker in the first stitch – allow the marker to follow your work onwards; it is used when increasing under the sleeve. Change to double pointed needles size 4.5 mm. Work the next round with pattern as follows: A.4 over the first stitch (marker-stitch), A.9 (= 8-8-8-12-12-12 stitches – start the diagram by the mark for your size and work from right to left), A.6 (= 17 stitches), A.7 (= 24 stitches), A.6, A.10 (= 8-8-8-12-12-12 stitches – start at the first stitch in A.10 and work from right to left as far as the mark for your size). Continue this pattern. When the piece measures 8-10-7-8-9-6 cm, increase 2 stitches under the sleeve – read INCREASE TIP. Increase like this every 4-2½-2½-2½-2-2 cm a total of 11-15-17-15-17-19 times = 97-105-109-113-117-121 stitches – NOTE: The increased stitches are first worked in A.9/A.10 until there is room for a complete repeat, then worked in A.4. Continue working until the sleeve measures approx. 51-49-48-46-45-43 cm (shorter measurements in larger sizes due to wider neck and longer yoke). Try the sleeve on and work to desired length. Adjust so that the next round is an odd numbered row in the diagrams and cast off for the armhole as follows: Cast off the first 6-6-7-7-8-8 stitches, work as before until there are 5-5-6-6-7-7 stitches left and cast off the last 5-5-6-6-7-7 stitches = 86-94-96-100-102-106 stitches. Cut the strand. Work the other sleeve in the same way. YOKE: Place the sleeves on the same circular needle size 4.5 mm as the body, where stitches were cast off for the armholes (without working the stitches) = 388-420-436-484-500-532 stitches. Insert a marker thread in each transition between the body and sleeves = 4 marker threads. Allow the threads to follow your work onwards; they are used when decreasing to raglan. Start at the transition between the back piece and the left sleeve – you can insert a marker here to show the start of the round. Continue the pattern as before, with 2 stitches in stocking stitch on each side of all 4 marker threads. OVERVIEW OF THE NEXT SECTION: On the next round start to decrease to raglan; you will also cast off stitches for the neck mid-front and finish working back and forth from mid-front. When there are not enough stitches for the cables, work stocking stitch over these stitches. Read RAGLAN and NECK before continuing. RAGLAN: Decrease to RAGLAN on each side of all 4 marker threads – read description above. Decrease every 2nd round a total of 24-27-30-32-36-38 times, then every round 7-7-6-7-4-4 times. NECK: When the piece measures 55-57-59-60-62-64 cm (adjust so the next round is an odd round in the diagrams), decrease 6-6-6-10-10-10 stitches evenly over the middle 24-24-24-32-32-32 in front – remember DECREASE/INCREASE TIP. Then place the middle 30-32-34-42-46-54 stitches on a thread for the neck. Work to the beginning of the round. Cut the strand. Start from the wrong side, by the neck and continue the pattern back and forth. AT THE SAME TIME cast off at the beginning of each row from the neck as follows: 2 stitches 1 time and 1 stitch 1-1-1-2-2-2 times on each side. After all the decreases to raglan and neck there are 98-104-102-112-116-124 stitches on the needle. Cut the strand. DOUBLE NECK: Start mid-back and knit up 134-142-142-162-170-186 stitches around the neck (including the stitches on the thread and on the needle) with short circular needle size 3.5 mm and DROPS Karisma. On the next round decrease stitches to avoid the neck being too loose – knit 1 round and decrease to 104-108-112-116-120-124 stitches evenly spaced. Purl 1 round and knit 1 round. Work the next round as follows: Knit 1, * purl 2, knit 2 *, work from *-* until there are 3 stitches left, purl 2 and knit 1. Continue this rib until the neck measures 8-8-8-10-10-10 cm. On the next round increase all purl-2 to purl-3 by making 1 yarn over after each purled section (the yarn overs are purled twisted on the next round to avoid holes). Continue working until the neck measures 11-11-11-13-13-13 cm. Switch to circular needle size 4.5 mm and cast off loosely with knit over knit and purl over purl. Fold the neck double to the inside and sew down. To avoid the neck being tight and rolling outwards, it is important that the seam is elastic. ASSEMBLY: Sew the opening under each sleeve. |
|||||||||||||||||||||||||||||||
Diagram explanations |
|||||||||||||||||||||||||||||||
|
|||||||||||||||||||||||||||||||
|
|||||||||||||||||||||||||||||||
|
|||||||||||||||||||||||||||||||
|
|||||||||||||||||||||||||||||||
Have you finished this pattern?Tag your pictures with #dropspattern #iceislandsweater or submit them to the #dropsfan gallery. Do you need help with this pattern?You'll find 28 tutorial videos, a Comments/Questions area and more by visiting the pattern on garnstudio.com. © 1982-2025 DROPS Design A/S. We reserve all rights. This document, including all its sub-sections, has copyrights. Read more about what you can do with our patterns at the bottom of each pattern on our site. |
|||||||||||||||||||||||||||||||


With over 40 years in knitting and crochet design, DROPS Design offers one of the most extensive collections of free patterns on the internet - translated to 17 languages. As of today we count 314 catalogues and 11821 patterns translated into English (UK/cm). 11821
We work hard to bring you the best knitting and crochet have to offer, inspiration and advice as well as great quality yarns at incredible prices! Would you like to use our patterns for other than personal use? You can read what you are allowed to do in the Copyright text at the bottom of all our patterns. Happy crafting!
Post a comment to pattern DROPS 224-10
We would love to hear what you have to say about this pattern!
If you want to leave a question, please make sure you select the correct category in the form below, to speed up the answering process. Required fields are marked *.