
Popular categories
Looking for a yarn?


Comments / Questions (39)
![]() Ellinor wrote:
Ellinor wrote:
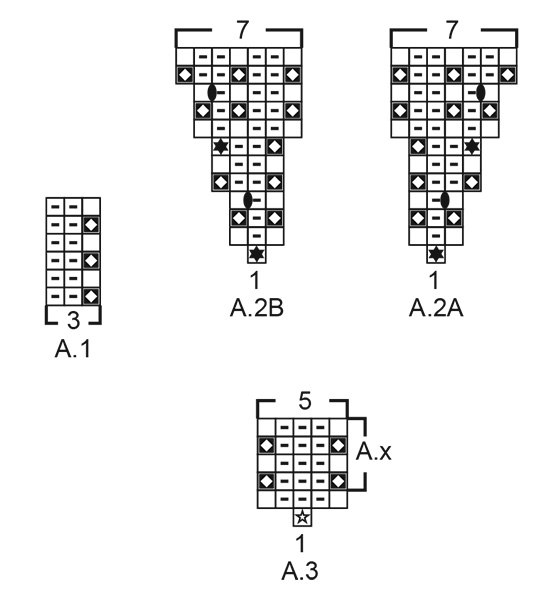
Hej! Är mönstret i diagram A.1 korrekt? Det står på mittenparti att man avslutar med den första maskan i raden på diagrammet efter varje rad… men då blir ju nästa rad förskjutet och resultatet blir inte som diagrammet… Stämmer detta? Tycker inte att mitt arbete ser ut som på bilden.
22.11.2022 - 18:26
![]() Martina Weyerhäuser wrote:
Martina Weyerhäuser wrote:
Hallo, Ich suche diese Anleitung für ein Baby in 48 cm Kopfumfang. Also im Patentmuster. Wie viel muss ich bei der Anleitung denn runterrechnen
19.10.2022 - 18:25DROPS Design answered:
Liebe Frau Weyerhäuser, wir können leider nicht jede Anleitung nach jeder Anfrage anpassen, aber vielleicht können Ihnen unsere Balaclavas für Babys inspirieren. Danke im voraus für Ihr Verständnis. Viel Spaß beim stricken!
20.10.2022 - 09:46
![]() Alissa wrote:
Alissa wrote:
Hello, I don't understand the part when starting the Neck: How do you start the round at the marker mid-back? It won't connect in the round... Why isn't it worked in the round after casting on new stitches like all the other balaclava tutorials on your website?
14.08.2022 - 19:41DROPS Design answered:
Dear Alissa, this balaclava is worked from top down. You first work the central part of the hood and the complete hood. In the last row, you have finished casting on stitches to join the opening for the face. Now you cut the yarn. Then, you move the stitches without working, until getting to the stitches in the mid-back and then continue working in the round, according to the pattern. Happy knitting!
14.08.2022 - 21:59
![]() Dea wrote:
Dea wrote:
Buonasera, ho notato un piccolo errore. Nella frase " quando il lavoro misura 16 - 18 cm dal segnapunti e il ferro successivo dal diritto del lavoro", per me manca il verbo "è" tra "successivo" e "dal diritto. .." .
24.03.2022 - 17:27DROPS Design answered:
Buonasera Dea, grazie per la segnalazione, abbiamo corretto il testo. Buon lavoro!
24.03.2022 - 22:47
![]() Rozet Georgette wrote:
Rozet Georgette wrote:
Should it be possible to send a detailed explanation in French for making this pattern ?
01.03.2022 - 20:09DROPS Design answered:
Dear Mrs Rozet, click on the scroll down menu below the picture and select "FRANÇAIS" to get this pattern in French. Happy knitting!
02.03.2022 - 09:36
![]() Martine wrote:
Martine wrote:
Bonjour. Peut-on utiliser des aiguilles doubles pointes ( à la place des aiguilles circulaires ) pour ce modèle. Merci
06.02.2022 - 19:54DROPS Design answered:
Bonjour Martine, nos aiguilles doubles pointes ne font que 20 cm chacune, elles risquent d'être rapidement trop courtes pour tricoter en rond, mais vous pouvez y arriver avec plusieurs jeux. Bon tricot!
07.02.2022 - 10:30
![]() Meral wrote:
Meral wrote:
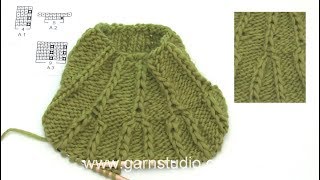
I'm finding it very difficult to follow this pattern! What does A.1 mean?
27.01.2022 - 10:09DROPS Design answered:
Dear Meral, A.1 reffers to the pattern chart below the written instructions. You can find more informations on how read our patterns and pattern charts in our DROPS lessons - here . Happy knitting!
27.01.2022 - 18:08
![]() Ingrida wrote:
Ingrida wrote:
I have a question about the gauge. I did the swatch with 3.5 mm circular needle of A1 diagram and got 21 stitches in width and 37 rows in height with 1 strand of each yarn (10x10cm). The instruction says that i should be getting 25 rows in height. Is the instruction incorrect or am i doing something wrong?
19.01.2022 - 20:33DROPS Design answered:
Dear Ingrida, wash and let your swatch dry flat (block it) and check again if tension is right or not; most important here will be the width, you can adjust the height, but just remember that you might require more yarn if you need more rows in height. Read more here. Happy knitting!
20.01.2022 - 09:14
![]() Mariann Tengs wrote:
Mariann Tengs wrote:
Har lagt opp 12 masker til hals og forstår ikke hvordan jeg kan begynne neste omgang midt bak på luen når de 12 masker er på slutten av pinnen. Og hvis jeg fra nå av skal strikke rundt , hvordan blir det, når patentmønsteret på retten og vrangen har vært forskjellig når jeg strikket frem og tilbake?
07.01.2022 - 13:52DROPS Design answered:
Hej Mariann, Vi beskriver nøje hvordan du gør: Legg opp 12-18 nye masker på slutten av neste pinne fra retten = 96-108 masker. Klipp tråden. Ta bort merket ved midtpartiet. Sett 1 nytt merke i arbeidet – ca midt bak på luen – merket skal sitte i en patentmaske. ARBEIDET MÅLES VIDERE FRA DETTE MERKET. Videre strikkes halsen rundt som forklart under.
17.01.2022 - 10:36
![]() Margareta Hagberg wrote:
Margareta Hagberg wrote:
Mittpartiet: skall man sticka rätstickning eller A1. ??
04.01.2022 - 21:29
|
|||||||||||||||||||
Wrapped in Wonder#wrappedinwonderbalaclava |
|||||||||||||||||||
 |
 |
||||||||||||||||||
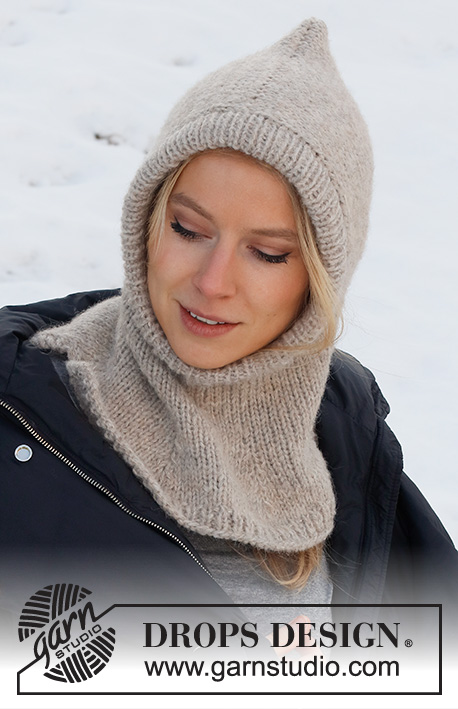
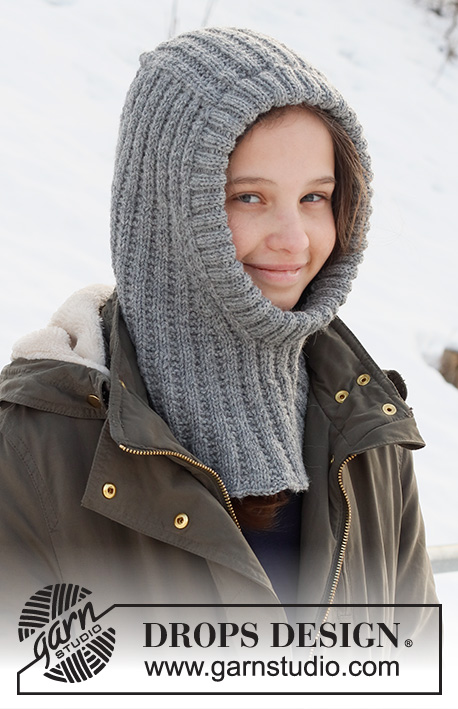
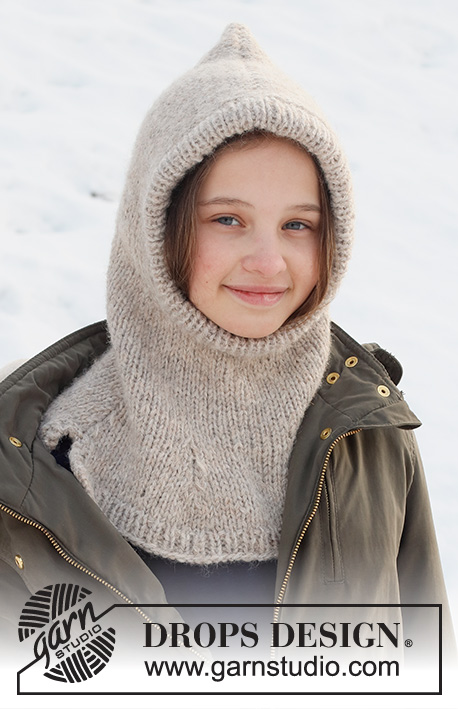
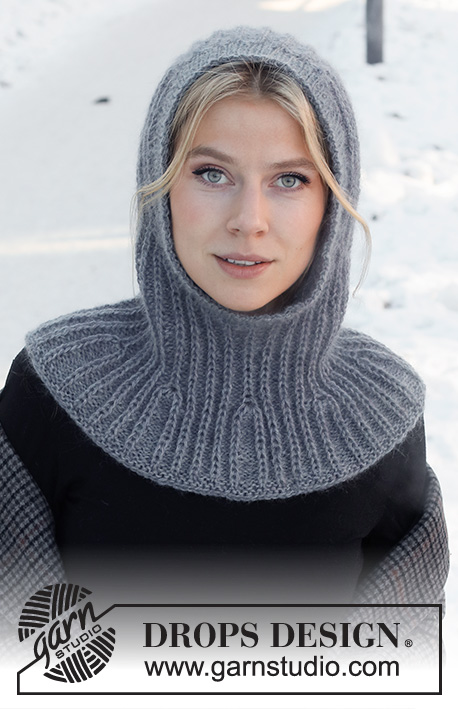
Knitted hat / balaclava in DROPS Alpaca and DROPS Kid-Silk. The piece is worked top down with Fisherman’s rib and ribbed edging.
DROPS 214-73 |
|||||||||||||||||||
|
------------------------------------------------------- EXPLANATIONS FOR THE PATTERN: ------------------------------------------------------- RIDGE/GARTER STITCH (worked back and forth): Knit all rows. 1 ridge in height = Knit 2 rows. PATTERN: See diagrams A.1 to A.3. The diagrams show all rows in the pattern from the right side. CASTING-OFF TIP: To avoid the cast-off edge being tight you can cast off with a larger size needle. If the edge is still tight, make 1 yarn over after approx. each 6th stitch at the same time as casting off; the yarn overs are cast off as normal stitches. ------------------------------------------------------- START THE PIECE HERE: ------------------------------------------------------- BALACLAVA – SHORT OVERVIEW OF THE PIECE: The mid-section is worked back and forth with circular needle from mid-front and backwards. Stitches are knitted up on each side of the mid-section and the piece continued back and forth before stitches are cast on for the neck. The piece finished in the round. A ribbed edge is worked around the face-opening to finish. MID-SECTION: Cast on 24-24 stitches (including 1 edge stitch on each side) with circular needle size 4 mm and 1 strand Alpaca and 1 strand Kid-Silk (2 strands). Purl 1 row from the wrong side. Then continue as follows from the right side: 1 edge stitch in GARTER STITCH on each side – read description above, work A.1 until there are 2 stitches left (7-7 repeats of 3 stitches), work the first stitch in A.1 (so the pattern starts and finishes in the same way) and 1 edge stitch in garter stitch. Continue this pattern back and forth. REMEMBER THE KNITTING TENSION! When the piece measures 13-14 cm and the next row is from the wrong side, cast off the edge stitches on each side = 22-22 stitches. Cut the strand, then work the hood as described below. HOOD: Knit up stitches on each side of the mid-section from the right side as follows: Knit up 25-28 stitches along the one side inside the 1 edge stitch, continue A.1 as before over the 22-22 stitches on the needle and knit up 25-28 stitches along the other side inside the 1 edge stitch = 72-78 stitches. Insert 1 marker at the beginning of the row. THE PIECE IS NOW MEASURED FROM THIS MARKER! Continue A.1 back and forth over all stitches with 1 edge stitch in garter stitch on each side towards mid-front – the pattern should match the pattern on the mid-section. When the piece measures 16-18 cm from the marker and the next row is from the right side, increase on each side towards mid front as follows: 1 edge stitch in garter stitch, work A.1 over the first 3 stitches, A.2A (= 1 stitch), A.1 as before until there are 5 stitches left, A.2B (= 1 stitch), A.1 over the next 3 stitches and finish with 1 edge stitch in garter stitch. Continue this pattern and increase on each side as shown in the diagrams. When A.2 has been completed in height there are 84-90 stitches. Continue working until the piece measures 22-24 cm from the marker – the hat measures approx. 28-30 cm from the middle of the mid-section down. Now cast on stitches for the neck (try the hat on and work to desired length before casting on). Cast on 12-18 stitches at the end of the next row from the right side = 96-108 stitches. Cut the strand and remove the marker. Insert a new marker in the piece, approx. mid-back, inserted in a Fisherman’s rib stitch. THE PIECE IS NOW MEASURED FROM THIS MARKER. Continue working the neck as described below. NECK: Start the round at the marker mid-back and continue with A.1 in the round over all stitches – make sure the pattern matches all the way round. When the piece measures 8-8 cm from the marker mid-back, increase as follows: Work A.3 in the marker-stitch, * A.1 as before over the next 11 stitches, A.3 in the next Fisherman’s rib stitch *, work from *-* a total of 7-8 times and A.1 as before over the last 11 stitches = 128-144 stitches. Continue working until the piece measures 15-15 cm from the marker. Knit 1 round and purl 1 round. Then loosely cast off with knit – read CASTING-OFF TIP! The hat measures approx. 43-45 cm from the middle of the mid-section down. EDGE AROUND FACE-OPENING: Start from the right side at the bottom of the opening, where stitches were cast on for the neck. Knit up 140 to 160 stitches around the opening, inside the 1 edge stitch using short circular needle size 3 mm and 1 strand Alpaca and 1 strand Kid-Silk (2 strands). The number of stitches should be divisible by 2. NOTE: On the mid-section and along the stitches cast on for the neck, knit up 1 stitch in each Fisherman’s rib stitch and 3 stitches between each Fisherman’s rib stitch. Work rib in the round (knit 1, purl 1) for 3-3 cm – make sure the rib matches neatly over the mid-section and the cast-on stitches. Loosely cast off with knit over knit and purl over purl – remember CASTING-OFF TIP. |
|||||||||||||||||||
Diagram explanations |
|||||||||||||||||||
|
|||||||||||||||||||
|
|||||||||||||||||||
Have you finished this pattern?Tag your pictures with #dropspattern #wrappedinwonderbalaclava or submit them to the #dropsfan gallery. Do you need help with this pattern?You'll find 22 tutorial videos, a Comments/Questions area and more by visiting the pattern on garnstudio.com. © 1982-2025 DROPS Design A/S. We reserve all rights. This document, including all its sub-sections, has copyrights. Read more about what you can do with our patterns at the bottom of each pattern on our site. |
|||||||||||||||||||


With over 40 years in knitting and crochet design, DROPS Design offers one of the most extensive collections of free patterns on the internet - translated to 17 languages. As of today we count 314 catalogues and 11820 patterns translated into English (UK/cm). 11820
We work hard to bring you the best knitting and crochet have to offer, inspiration and advice as well as great quality yarns at incredible prices! Would you like to use our patterns for other than personal use? You can read what you are allowed to do in the Copyright text at the bottom of all our patterns. Happy crafting!
Post a comment to pattern DROPS 214-73
We would love to hear what you have to say about this pattern!
If you want to leave a question, please make sure you select the correct category in the form below, to speed up the answering process. Required fields are marked *.