
Categorie popolari
State cercando un filato?


Commenti / Domande (27)
![]() Della ha scritto:
Della ha scritto:
Hi. I’m wondering how I am going to fit 154 stitches at the end of A1 on a 15mm x 80cm circular needle. I’ve just started this garment and I’m doing the neck on the 12mm x 80cm and 44 stitches just fit 😳
22.08.2021 - 16:21DROPS Design ha risposto:
Dear Della, our knitters didn't really had problems fitting the stitches on the needles, but you can always use a longer circular, or even two circs, if you feel they are too crowded. Happy Stitching!
22.08.2021 - 17:33
![]() Emmanuelle ha scritto:
Emmanuelle ha scritto:
Merci pour votre réponse ultra rapide. C\'est parti, je me lance ! Bonne journée, Emmanuelle
02.08.2021 - 08:01
![]() Emmanuelle ha scritto:
Emmanuelle ha scritto:
Bonjour, très joli modèle. Une question toutefois avant de me lancer : je n'ai pas d'aiguille double pointe en 12. Peut-on commencer à tricoter dès le début (col) en rond avec les aiguilles circulaires 12 ? Merci par avance de votre réponse.
01.08.2021 - 10:45DROPS Design ha risposto:
Bonjour Emmanuelle et merci. Effectivement, vous pouvez tricoter le col sur une aiguille circulaire de 80 cm en utilisant la technique dite du magic loop jusqu'à ce que vous ayez augmenté suffisamment de mailles pour continuer sur une 60 ou sur la 80 mais en rond "normalement". Bon tricot!
02.08.2021 - 07:23
![]() Alica ha scritto:
Alica ha scritto:
Dear Drops, I have a problem with the yarn. Wanted to buy it, but I do not know which color is that colour 05, tan. When I choose colour 05 it is more brown. What does it mean tan? I would like to have the same colour as on the picture here. Pls help:)
04.05.2021 - 07:09DROPS Design ha risposto:
Hei Alica, The name of Polaris no 5 is Taupe (not tan) and is the colour you see in the picture - a dark mauve/grey. Happy knitting!
04.05.2021 - 07:42
![]() Madou ha scritto:
Madou ha scritto:
Merci pour les explications et les précisions ! Mon pull est à présent terminé et mon chat me le pique déjà... Le pull tient vraiment chaud et est très confortable à porter ! Conseil : ne pas hésiter à bien serrer l'encolure ! J'ai réalisé le modèle en taille Medium et je tiens juste à préciser qu'il me reste encore à peu près 150 g de laine, donc 1000 g vont bien pour cette taille, alors même que j'ai rallongé un peu les manches. Très beau pull, merci !
10.04.2021 - 16:09
![]() Madou ha scritto:
Madou ha scritto:
Bonjour, J'adore ce modèle et je viens de finir l'empiècement devant et dos, il ne me reste donc plus que les manches à tricoter. J'ai repris mes 24 mailles pour tricoter la première manche, et dois monter 2 mailles sous la manche. Dois-je les monter sur l'aiguille gauche ou droite ? Aussi, pourquoi suis-je censée avoir 28 mailles après avoir monter 24 + 2 mailles sous la manche ? Je vous remercie d'avance. Madou
08.04.2021 - 16:12DROPS Design ha risposto:
Bonjour Madou, montez 2 m de chaque côté des mailles en attente, par ex: montez 2 m, tricotez les 24 m de la manche et montez 2 m. La correction a été faite, merci. Bon tricot!
09.04.2021 - 07:11
![]() Laura Z Rhodes ha scritto:
Laura Z Rhodes ha scritto:
Hello, wonderfully patient DROPS design team. I have another sleeve question, regarding decreases. Are the decreases over 24 rows (one stitch decrease right side, one row no decreases, one row decrease left side, one row no decreases, for a total of 2 stitches decreased over 4 rows), or are the decreases over 12 rows (one stitch decrease start of knit row, one stitch decrease start of purl row, for a total of 2 stitches decreased over 2 rows)? Thank you.
17.02.2021 - 19:14DROPS Design ha risposto:
Dear Mrs Rhodes, the decreases will be worked over 24 rows, (1 row decreasing 1 st on the right side, 1 row without decreasing, 1 row decreasing on the left side, 1 row without decreasing), repeat from (to) a total of 6 times = 6 sts have been decreased on each side and 24 rows have been worked, 16 sts remain - decrease either at the beginning or at the end of a row from RS. Happy knitting!
18.02.2021 - 09:12
![]() Laura Rhodes ha scritto:
Laura Rhodes ha scritto:
Thank you so much for clearing up my question about the end of row marker. I am now ready to do the sleeves, but I don’t understand what you mean by casting on stitches mid under sleeve? I am to cast on 2 stitches (I am making the M), but twice, for a total of 28 stitches? Where is mid under sleeve? Thanks so much. The knitting is going super and I am excited to finish. :-)
15.02.2021 - 03:26DROPS Design ha risposto:
Hi Laura, The sleeve is worked over the stitches from the one thread as well as 2 stitches cast on, on each side = 4 new stitches (these stitches are used when the sleeve is sewn to the body when it is finished). You work back and forth until the sleeve is finished, then the sleeve seam and the opening under the sleeve are sewn together. Mid under the sleeve will be the underside of the sleeve, where the seam is. Hope this helps and happy knitting!
15.02.2021 - 07:54
![]() Laura Z Rhodes ha scritto:
Laura Z Rhodes ha scritto:
Thanks for your reply, but I am still confused about where the pattern starts in each row. At the start of A.1, I placed the marker before the first P. I understand increasing, but rnd7 seems to begin with a K placed BEFORE the marker. Is this the last K on rnd6? Then marker, then P1, K1, P1, K1 pattern? Rnd11 pattern is P1, P1 incr, P1, K1? Rnd12 is P1, K2, P1, K1? Rnd14 is P1, K2, P1, P incr? Or do you want the first incr on the last K of rnd13? Rnd15-18 is P1, K2? All start at EOR marker.
11.02.2021 - 17:30DROPS Design ha risposto:
Dear Mrs Rhodes, you increase on row 6 and the stitch before the P stitch on row 7 is the new stitch that will be worked K, this means the marker on beg of round stays here and over P1, K1 (= increase on row 6), K1, you will now work: K1, P1, K1, P1. On row 11 work K1, P1, inc, P1 and row 12: K1, P1, K2, P1 etc... ie just work the stitches as they are shown in diagram. Hope this helps. Happy knitting!
12.02.2021 - 06:49
![]() Laura Z Rhodes ha scritto:
Laura Z Rhodes ha scritto:
Hello! I am following along the pattern chart, working from lower right to upper left, and I am at the row (row 7) where it looks like the pattern begins one stitch *before* the end-of-round marker. Is this correct? And then, in row 15, it again looks like I am adding stitches before the end-of-round marker. This would keep the purl stitches in line, which I assume you want? Thanks so much.
11.02.2021 - 02:44DROPS Design ha risposto:
Dear Mrs Rhodes, yes that's correct, you increased one stitch in each repeat on previous round, and now you work K1, P1, K1, P1 over the (P1, K1 worked with the increase, P1). On row 15, you will start with K2 since you increased on previous row 1 stitch in the first stitch of the repeat. Hope this helps. Happy knitting!
11.02.2021 - 06:52
|
||||||||||
November Woodland#novemberwoodlandsweater |
||||||||||
 |
 |
|||||||||
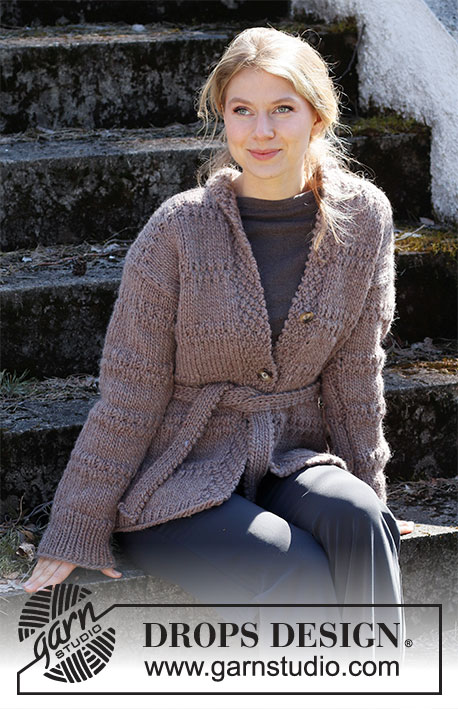
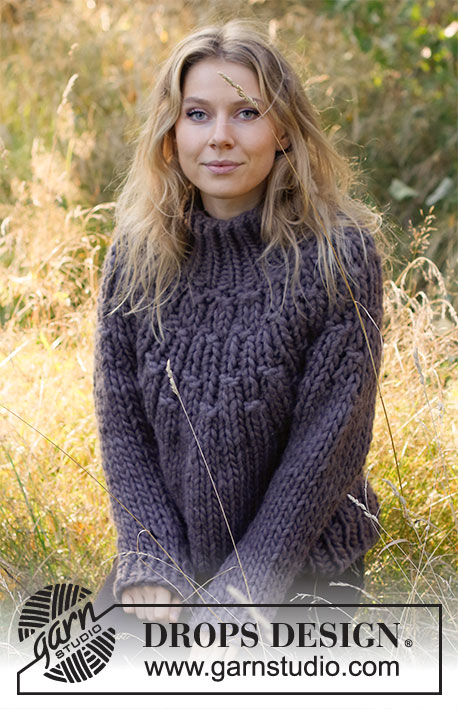
Maglione lavorato ai ferri con collo alto e sprone rotondo in DROPS Polaris. Lavorato dall’alto in basso. Taglie: S - XXXL
DROPS 216-24 |
||||||||||
|
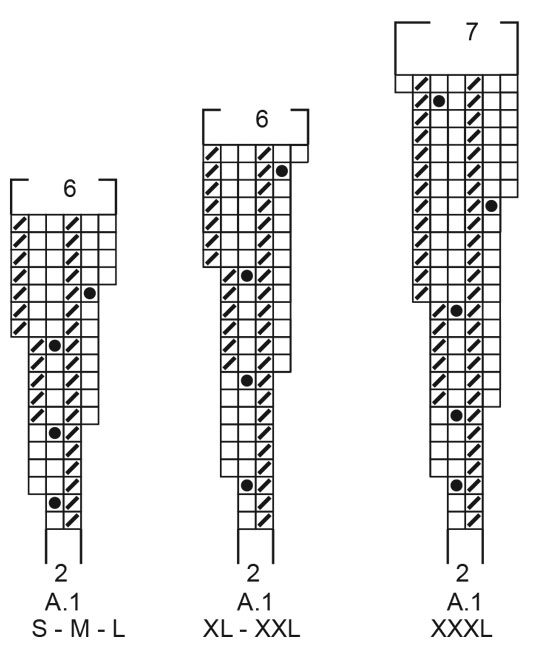
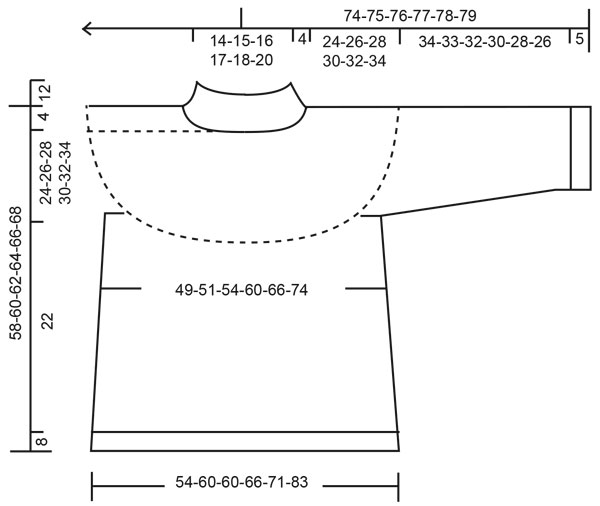
------------------------------------------------------- TECNICHE IMPIEGATE: ------------------------------------------------------- MOTIVO: Vedere il diagramma A.1. Scegliere il diagramma per la vostra taglia. MAGIC LOOP: Se il cavo del ferro circolare è troppo lungo per lavorare in tondo, lavorare con la tecnica del magic loop come segue: spostare le maglie al centro del ferro circolare (al centro del cavo). Dividere il n° di maglie circa al centro, e tirare il cavo tra 2 maglie. Poi far scorrere le maglie a un lato per lavorare dalla punta del ferro, e lavorare fino a quando il cavo viene disteso. Estrarre il cavo tra 2 maglie dal lato opposto prima di continuare nello stesso modo, e continuare fino a quando sono state lavorate abbastanza maglie per proseguire in tondo nel solito modo. SUGGERIMENTO PER GLI AUMENTI (applicato al corpo): Aumentare 1 maglia facendo 1 gettato, Sul giro successivo lavorare i gettati a ritorto per evitare buchi. SUGGERIMENTO PER LE DIMINUZIONI (applicato alle maniche): NOTA! Per avere le diminuzioni in modo alternato sul lato destro e sinistro del lavoro, lavorare come segue: Lavorare in modo alternato all’inizio e alla fine di un ferro con le diminuzioni. Diminuire come segue dal diritto del lavoro: 2 maglie insieme a diritto. Diminuire come segue dal rovescio del lavoro: 2 maglie insieme a rovescio. ------------------------------------------------------- INIZIO DEL LAVORO: ------------------------------------------------------- MAGLIONE – BREVE RIASSUNTO DEL LAVORO: Lavorato in tondo con i ferri a doppia punta/ferri circolari, dall’alto in basso. Lavorare le maniche in piano con i ferri circolari e cucire alla fine. BORDO DEL COLLO: Avviare 34-36-38-40-42-44 maglie con i ferri a doppia punta n° 12 mm con Polaris. Lavorare a coste in tondo = 1 maglia diritto/1 maglia rovescio per 12 cm. SPRONE: Leggere MAGIC LOOP nelle spiegazioni sopra. Inserire un segnapunti qui, MISURARE IL LAVORO DA QUI! Passare ai ferri circolari n° 15 mm e lavorare il motivo A.1 in tondo – cercate la vostra taglia nel diagramma. FARE ATTENZIONE ALLA TENSIONE DEL LAVORO! Alla fine di A.1, ci sono 102-108-114-120-126-154 maglie sul giro. Lavorare 1 giro diritto in cui aumentare 0-4-2-8-10-2 maglie in modo uniforme – leggere il SUGGERIMENTO PER GLI AUMENTI nella spiegazione sopra = 102-112-116-128-136-156 maglie. Poi continuare a maglia rasata fino a quando il lavoro misura 24-26-28-30-32-34 cm dal segnapunti. Lavorare il giro successivo come segue: lavorare le prime 15-16-17-19-20-23 maglie (= metà dietro), mettere le 21-24-24-26-28-32 maglie successive in sospeso su un fermamaglie per la manica e avviare 4-4-4-4-6-6 nuove maglie sul ferro (= a lato sotto la manica), lavorare le 30-32-34-38-40-46 maglie successive (= davanti), mettere le 21-24-24-26-28-32 maglie successive in sospeso su un fermamaglie per la manica e avviare 4-4-4-4-6-6 nuove maglie sul ferro (= a lato sotto la manica), lavorare le 15-16-17-19-20-23 maglie rimaste (= metà dietro). Ora finire il corpo e le maniche in modo separato. ORA MISURARE IL LAVORO DA QUI! CORPO: = 68-72-76-84-92-104 maglie. Lavorare in tondo a maglia rasata fino a quando il lavoro misura 22 cm dalla divisione per tutte le taglie. Passare ai ferri circolari n° 12 mm, e lavorare a coste in tondo = 1 maglia diritto/1 maglia rovescio per 8 cm per tutte le taglie. Intrecciare senza stringere con diritto su diritto e rovescio su rovescio. Il maglione misura circa 58-60-62-64-66-68 cm dalla spalla. MANICA: Lavorare le maniche in piano con i ferri circolari e cucire alla fine. Riportare le 21-24-24-26-28-32 maglie in sospeso a un lato del lavoro sui ferri circolari n° 15 mm e avviare 2-2-2-2-3-3 nuove maglie a ogni lato = 25-28-28-30-34-38 maglie. Lavorare a maglia rasata in piano, allo stesso tempo sul ferro successivo dal diritto del lavoro diminuire 1-0-0-0-0-0 maglie (diminuire solo per la taglia S) lavorando insieme a diritto le 2 maglie più esterne sul lato sinistro del lavoro = 24-28-28-30-34-38 maglie. Quando il lavoro misura 4-2-2-4-4-2 cm, diminuire 1 maglia sul lato destro del lavoro – leggere il SUGGERIMENTO PER LE DIMINUZIONI. Diminuire in modo alternato sul lato sinistro e destro del lavoro ogni 2-2-2-1-1-1 ferro 8-12-12-14-14-18 volte in totale (= 4-6-6-7-7-9 volte a ogni lato) = 16-16-16-16-20-20 maglie. Lavorare fino a quando il lavoro misura 34-33-32-30-28-26 cm dalla divisione. (NOTA: Misure più corto per le taglie più grandi a causa della maggiore ampiezza delle spalle). Passare ai ferri circolari n° 12 mm. Lavorare in piano a coste con 1 maglia diritto/1 maglia rovescio per 5 cm. Intrecciare senza stringere con diritto su diritto e rovescio su rovescio. Lavorare l’altra manica nello stesso modo. CONFEZIONE: Cucire sotto la manica nel filo più esterno della maglia di vivagno per evitare una cucitura spessa – dividere il filo in modo che sia più sottile durante la cucitura. Cucire l’apertura sotto le maniche. |
||||||||||
Spiegazioni del diagramma |
||||||||||
|
||||||||||
 |
||||||||||
 |
||||||||||
Avete terminato questo modello?Allora taggate le vostre foto con #dropspattern #novemberwoodlandsweater o inviatele alla #dropsfan gallery. Avete bisogno di aiuto con questo modello?Troverete 24 video tutorial, una sezione per i commenti/domande e molto altro guardando il modello su www.garnstudio.com © 1982-2026 DROPS Design A/S. Ci riserviamo tutti i diritti. Questo documento, compreso tutte le sue sotto-sezioni, è protetto dalle leggi sul copyright. Potete leggere quello che potete fare con i nostri modelli alla fine di ogni modello sul nostro sito. |
||||||||||


Con oltre 40 anni di esperienza nel design di modelli di maglia e uncinetto, DROPS Design offre la più estesa collezione di modelli gratuiti su internet - tradotti in 17 lingue. Ad oggi vi possiamo fornire 324 cataloghi e 12290 modelli - 9561 dei quali sono tradotti in Italiano.
Ci stiamo impegnando molto per darvi il meglio che vi possiamo offrire in termini di maglia e uncinetto, ispirazioni e consigli così come filati di grande qualità ad un prezzo incredibile! Volete utilizzare i nostri modelli per qualcosa d'altro oltre al vostro uso personale? Potete leggere tutto ciò che è consentito nel testo sul Copyright in basso su tutte le pagine dei nostri modelli. Buon lavoro!
Lasciare un commento sul modello DROPS 216-24
Noi saremmo felici di ricevere i tuoi commenti e opinioni su questo modello!
Se vuoi fare una domanda, fai per favore attenzione a selezionare la categoria corretta nella casella qui sotto per velocizzare il processo di risposta. I campi richiesti sono indicati da *.