
Categorie popolari
State cercando un filato?


Commenti / Domande (174)
![]() Emanuela ha scritto:
Emanuela ha scritto:
La mia taglia è S
18.04.2026 - 07:32DROPS Design ha risposto:
Buonsera Emauela, può apportare le modifiche che preferisce al modello, ma in questa sede non possiamo fornirle un'assistenza così personalizzata. Buon lavoro!
19.04.2026 - 13:45
![]() Emanuela ha scritto:
Emanuela ha scritto:
Buongiorno. Mi piacerebbe lavorare il motivo anche ai lati del corpo. Si può fare, e come? Grazie
17.04.2026 - 17:46DROPS Design ha risposto:
Buonsera Emauela, può apportare le modifiche che preferisce al modello, ma in questa sede non possiamo fornirle un'assistenza così personalizzata. Buon lavoro!
19.04.2026 - 13:45
![]() Melanie ha scritto:
Melanie ha scritto:
Ein wunderschöner Sweater! Ich habe ihn in Gr. XL aus 320g Lana Grossa Gomitolo Intenso gestrickt.
17.04.2026 - 06:13
![]() Meyer ha scritto:
Meyer ha scritto:
Quand c'est écrit de compter 11 mailles et mettre le fil marqueur sur la maille suivante c'est du coup bien sûr la 12eme? Merci d'avance
06.03.2026 - 14:59DROPS Design ha risposto:
Bonjour Mme Meyer, tout à fait, les fils marqueurs sont ici placés dans une maille, et pas entre les mailles. Bon tricot!
06.03.2026 - 16:55
![]() Rai ha scritto:
Rai ha scritto:
For size XL cast stitch count is 100, but back and front is 28 stitches (56 total) and each sleeve 20 (40 total). those numbers doesn\'t add up to 100 (56+40=96). where goes those 4 stitches?
13.02.2026 - 22:42
![]() Joëlle ha scritto:
Joëlle ha scritto:
Bonjour, Est-il possible de réaliser ce pull avec la laine Alaska ? Merci pour votre réponse
03.02.2026 - 20:58DROPS Design ha risposto:
Bonjour Joëlle, tout à fait, vous pouvez remplacer 2 fils du groupe A (ici Alpaca et Kid-Silk) par 1 fil du groupe C (Alaska par ex), retrouvez ici comment calculer la quantité nécessaires; pensez juste que l'effet sera différent car ces laines ont des caractéristiques différentes, et bien sûr, pensez à vérifier votre tension, comme pour n'importe quel autre modèle. Bon tricot!
04.02.2026 - 17:22
![]() Lana ha scritto:
Lana ha scritto:
Hello, thank you for this lovely pattern. This is my first time working with a chart and I was unsure how to read it - is it left to right or right to left and bottom up or top down? And do we just keep repeating the chart?
25.01.2026 - 21:37DROPS Design ha risposto:
Hello Lana, thank you for your lovely feedback. When knitting in the round (in this case), you read diagrams from right to left and bottom up. Happy knitting!
08.02.2026 - 12:21
![]() Adrie ha scritto:
Adrie ha scritto:
Hi, Als ik maat xl maak moet ik 100 steken opzetten. Na de boordsteek moet ik markeerdraden in het werk doen. Na 14, 20,28,20 steken en dan hou ik 14 steken over. Bij mekaar opgeteld is dat 96 steken. Ik moest er 100 opzetten, dus hou er 4 over. Wat gaat hier fout en hoe los ik dat op? Bedankt en groetjes Adrie
24.01.2026 - 19:18DROPS Design ha risposto:
Dag Adrie,
Heb je de markeerders in de steken geplaatst? En niet tussen de steken?
25.01.2026 - 10:11
![]() Inge ha scritto:
Inge ha scritto:
Als mijn proeflapje 5 steken meer telt alsook de toeren 4 meer zijn . Moet ik een kleiner naalddikte gebruiken .Kan ik in plaats daarvan een maat kleiner breien . Ik heb naar cm L nodig ,zou medium dan in verhoudibg staan met de meerde steken ?
09.01.2026 - 13:12DROPS Design ha risposto:
Dag Inge,
Dit zou je om kunnen rekenen aan de hand van de stekenverhouding. Je weet het aantal steken op 10 cm, op die manier zou je kunnen berekenen hoeveel steken je op moet zetten om op een bepaalde afmeting te komen.
10.01.2026 - 15:32
![]() Eva ha scritto:
Eva ha scritto:
Hallo, ich würde den Pullover gerne mit der Wolle Drops Air stricken. Wie rechne ich um, welche Knäulmenge ich dann für einen Pullover in Größe S brauche? Ps: bei dem Umrechner kann ich leider nur eine von beiden angegebenen Garnsorten eingeben deswegen bin ich mir unsicher. Vielen Dank im Voraus!
03.01.2026 - 21:20DROPS Design ha risposto:
Liebe Eva, Sie können sich an der Lauflänge eines der beiden Garne orientieren, z.B. Alpaca: 250 g = 5 Knäuel zu je 167 m = 835 m, dann teilen Sie die Lauflänge durch die Lauflänge von Air = 150 m, 835 durch 150 = ca. 5,5, also 6 Knäuel Air. Viel Spaß beim Stricken!
24.02.2026 - 17:46
|
|||||||||||||||||||
Deep Woods Sweater#deepwoodssweater |
|||||||||||||||||||
 |
 |
||||||||||||||||||
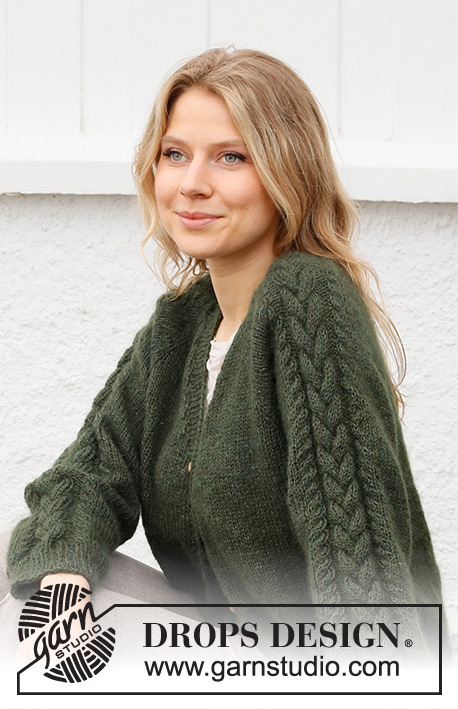
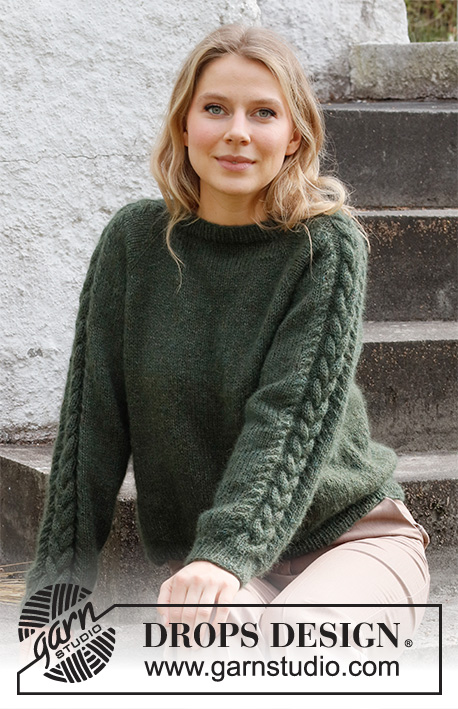
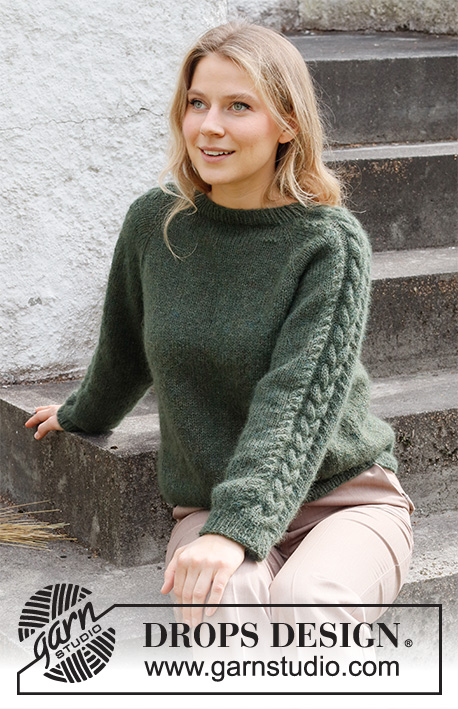
Maglione lavorato ai ferri in DROPS Alpaca e DROPS Kid-Silk. Lavorato dall’alto in basso con raglan, e trecce sulle maniche. Taglie: S - XXXL.
DROPS 215-5 |
|||||||||||||||||||
|
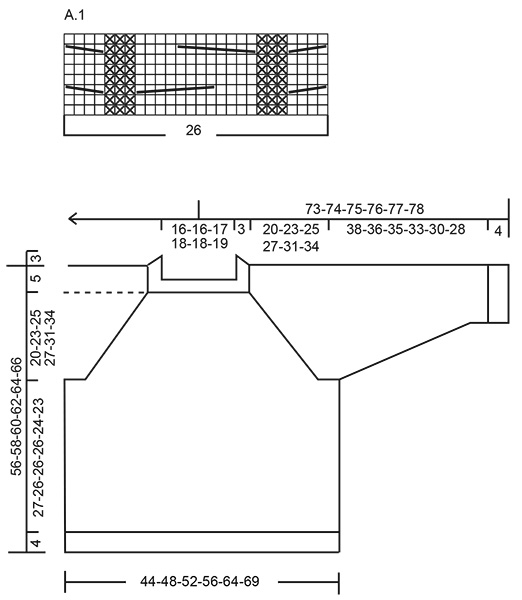
------------------------------------------------------- TECNICHE IMPIEGATE: ------------------------------------------------------- MOTIVO: Vedere il diagramma A.1. RAGLAN: Aumentare 1 maglia a ogni lato della maglia a maglia rasata (maglia con il segnapunti) in ogni punto di passaggio tra il corpo e le maniche (= 8 aumenti sul giro). Aumentare 1 maglia facendo 1 gettato. Sul giro successivo lavorare i gettati a ritorto per evitare buchi. Poi lavorare le nuove maglie a maglia rasata. SUGGERIMENTO PER LE DIMINUZIONI (applicato alle maniche): Diminuire 1 maglia a ogni lato del segnapunti come segue: Lavorare fino a quando rimangono 3 maglie prima del segnapunti, 2 maglie insieme a diritto, 2 maglie diritto (il segnapunti è al centro di queste 2 maglie), passare 1 maglia a diritto senza lavorarla, 1 maglia diritto, accavallare la maglia passata sopra quella appena lavorata. SUGGERIMENTO PER LA CHIUSURA: Per evitare che il bordo di chiusura sia tirato potete intrecciare con un ferro di una misura più grande. Se il bordo risulta ancora tirato, fare 1 gettato dopo circa 4 maglie durante la chiusura e intrecciare i gettati come maglie normali. ------------------------------------------------------- INIZIO DEL LAVORO: ------------------------------------------------------- MAGLIONE – BREVE RIASSUNTO DEL LAVORO: Lavorare lo sprone in tondo con i ferri circolari dal centro dietro e dall’alto in basso. ALLO STESSO TEMPO aumentare per il raglan. Dividere lo sprone per il corpo e le maniche e continuare il corpo in tondo. Lavorare le maniche in tondo con i ferri circolari corti/ferri a doppia punta, dall’alto in basso. SPRONE: Avviare 88-92-96-100-104-108 maglie con i ferri circolari n° 4 mm e 1 capo di Kid-Silk e 1 capo di Alpaca (= 2 capi). Lavorare 1 giro diritto poi lavorare a coste (1 maglia diritto, 1 maglia rovescio) su tutte le maglie per 3 cm. Passare ai ferri circolari n° 5 mm e inserire 1 segnapunti qui. Ora misura lo sprone da questo segnapunti. Inserire 4 segnapunti nel lavoro come segue (senza lavorare le maglie): Contare 11-12-13-14-15-16 maglie (= metà dietro), inserire 1 segnapunti nella maglia successiva, contare 20 maglie (= manica), inserire 1 segnapunti nella maglia successiva, contare 22-24-26-28-30-32 maglie (= davanti), inserire 1 segnapunti nella maglia successiva, contare 20 maglie (= manica), inserire 1 segnapunti nella maglia successiva, rimangono 11-12-13-14-15-16 maglie sul giro prima del 1° segnapunti (= metà dietro). Lavorare 1 giro diritto in cui aumentare 6 maglie in modo uniforme su entrambe le maniche = 100-104-108-112-116-120 maglie (= 26 maglie su ogni manica). Poi lavorare a maglia rasata sulle maglie del davanti e dietro e A.1 (= 26 maglie) su ogni manica, ALLO STESSO TEMPO sul 1° giro, aumentare per il RAGLAN in ogni punto di passaggio tra il corpo e le maniche – leggere la descrizione sopra. Aumentare per il raglan ogni 2 giri per un totale di 22-25-27-29-33-36 volte a entrambi i lati di tutti e 4 le maglie con i segnapunti = 276-304-324-344-380-408 maglie. FARE ATTENZIONE ALLA TENSIONE DEL LAVORO! Dopo l’ultimo aumento per il raglan continuare a lavorare senza ulteriori aumenti fino a quando il lavoro misura 20-23-25-27-31-34 cm dal segnapunti. Lavorare il giro successivo come segue: lavorare le prime 34-38-41-44-49-53 maglie (= metà dietro), mettere le 70-76-80-84-92-98 maglie successive in sospeso per la manica e avviare 6-6-6-8-10-12 nuove maglie sul ferro (= a lato sotto la manica), lavorare le 68-76-82-88-98-106 maglie successive (= davanti), mettere le 70-76-80-84-92-98 maglie successive in sospeso per la manica e avviare 6-6-6-8-10-12 nuove maglie sul ferro (= a lato sotto la manica), lavorare le 34-38-41-44-49-53 maglie rimaste (= metà dietro). ORA MISURARE IL LAVORO DA QUI! CORPO: = 148-164-176-192-216-236 maglie. Continuare a lavorare a maglia rasata fino a quando il lavoro misura 27-26-26-26-24-23 cm dalla divisione. Passare ai ferri circolari n° 4 mm. Lavorare a coste (1 maglia rovescio, 1 maglia diritto) su tutte le maglie fino a quando le coste misurano 4 cm. Intrecciare senza stringere con diritto su diritto e rovescio su rovescio, leggere il SUGGERIMENTO PER LA CHIUSURA. Il maglione misura circa 56-58-60-62-64-66 cm dalla spalla. MANICA: Riportare le 70-76-80-84-92-98 maglie in sospeso a un lato del lavoro sui ferri a doppia punta/ferri circolari corti n° 5 mm e riprendere 1 maglia in ognuna delle 6-6-6-8-10-12 maglie avviate sotto la manica = 76-82-86-92-102-110 maglie. Inserire un segnapunti al centro delle 6-6-6-8-10-12 maglie sotto la manica. Lasciare che il segnapunti segua il lavoro; verrà utilizzato durante le diminuzioni sotto la manica. Iniziare all’altezza del segnapunti e continuare a maglia rasata e A.1 in tondo. Quando il lavoro misura 3 cm dalla divisione, diminuire 2 maglie sotto la manica – leggere il SUGGERIMENTO PER LE DIMINUZIONI. Diminuire in questo modo ogni 3½-3-2-1½-1-1 cm per un totale di 10-11-13-16-19-21 volte = 56-60-60-60-64-68 maglie. Continuare a lavorare fino a quando la manica misura 38-36-35-33-30-28 cm dalla divisione (o fino alla lunghezza desiderata); diminuire 12 maglie in modo uniforme sulle maglie di A.1 = 44-48-48-48-52-56 maglie. Passare ai ferri a doppia punta n° 4 mm e lavorare a coste (= 1 maglia diritto, 1 maglia rovescio) per 4 cm. Intrecciare senza stringere con diritto su diritto e rovescio su rovescio ma per evitare che il bordo di chiusura risulti tirato, usare i ferri a doppia punta n° 5 mm. Lavorare l’altra manica nello stesso modo. |
|||||||||||||||||||
Spiegazioni del diagramma |
|||||||||||||||||||
|
|||||||||||||||||||
 |
|||||||||||||||||||
Avete terminato questo modello?Allora taggate le vostre foto con #dropspattern #deepwoodssweater o inviatele alla #dropsfan gallery. Avete bisogno di aiuto con questo modello?Troverete 30 video tutorial, una sezione per i commenti/domande e molto altro guardando il modello su www.garnstudio.com © 1982-2026 DROPS Design A/S. Ci riserviamo tutti i diritti. Questo documento, compreso tutte le sue sotto-sezioni, è protetto dalle leggi sul copyright. Potete leggere quello che potete fare con i nostri modelli alla fine di ogni modello sul nostro sito. |
|||||||||||||||||||


Con oltre 40 anni di esperienza nel design di modelli di maglia e uncinetto, DROPS Design offre la più estesa collezione di modelli gratuiti su internet - tradotti in 17 lingue. Ad oggi vi possiamo fornire 324 cataloghi e 12290 modelli - 9561 dei quali sono tradotti in Italiano.
Ci stiamo impegnando molto per darvi il meglio che vi possiamo offrire in termini di maglia e uncinetto, ispirazioni e consigli così come filati di grande qualità ad un prezzo incredibile! Volete utilizzare i nostri modelli per qualcosa d'altro oltre al vostro uso personale? Potete leggere tutto ciò che è consentito nel testo sul Copyright in basso su tutte le pagine dei nostri modelli. Buon lavoro!
Lasciare un commento sul modello DROPS 215-5
Noi saremmo felici di ricevere i tuoi commenti e opinioni su questo modello!
Se vuoi fare una domanda, fai per favore attenzione a selezionare la categoria corretta nella casella qui sotto per velocizzare il processo di risposta. I campi richiesti sono indicati da *.