
Categorie popolari
State cercando un filato?


Commenti / Domande (140)
![]() Nancy Tencer ha scritto:
Nancy Tencer ha scritto:
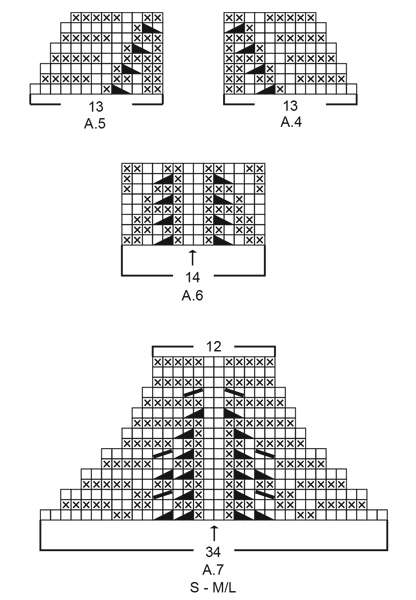
I am starting the back. I cannot understand Diag A4 and A5. I am reading it right to left on the odd rows and left to right on the even rows and it’s not looking right. Why would I purl 2tog tbl with 2 knit stitches? The pattern is not coming out.
20.11.2025 - 01:57DROPS Design ha risposto:
Dear Mrs Tencer, the stitches are decreased as purl stitches, so you will purl 2 twisted together either knit or purl stitches from previous row. Between A.4 and A.5 just work stitches K over K and P over P. Happy knitting!
20.11.2025 - 10:23
![]() Özi ha scritto:
Özi ha scritto:
Hallo Drops Team, ich bin am Rückenteil des Tops und müsste jetzt abketten aber ich habe die 14 cm noch nicht erreicht. Es fehlen mir noch 1,5 cm. Wie soll ich vorgehen? Danke im vorraus . Grüße Özi
04.09.2025 - 09:32DROPS Design ha risposto:
Liebe Frau Özi, stimmt Ihre Maschenprobe in der Höhe? Wenn Sie in die 4. Größe 5 Mal die 8 Reihen A.4/A.5 stricken, dann sollen diese 40 Reihen ca 12,5 cm messen, mit den Krausrippen haben Sie dann 14 cm. Sollte Ihre Maschenprobe in der Höhe nicht stimmen, können Sie dann wahrscheinlich etwas mehr krausrechts stricken. Viel Spaß beim Stricken!
04.09.2025 - 10:55
![]() Elli ha scritto:
Elli ha scritto:
Hi, ich stricke gerade TEIL 1 vom Vorderteil und beginne mit 60 Maschen. Nach dreimaliger Wiederholung von A6 (immer 8 Maschen weniger) komme ich auf 36 Maschen, nicht 34 Maschen (60-(3x8)=36). Wo fehlen mir noch zwei Abnahmen? Vielen Dank für Ihre Hilfe.
20.08.2025 - 12:46DROPS Design ha risposto:
Liebe Elli, stricken Sie noch eine Hinreihe mit Abnahmen wie in A.6 gezeigt, so sind es 2 weitere Maschen abgenommen, so haben Sie nur 34 Maschen übrig. Viel Spaß beim Stricken!
20.08.2025 - 16:18
![]() Beata ha scritto:
Beata ha scritto:
Dzień dobry, czy schematy zawierają rzędy na lewej stronie robótki czy należy je przerabiać tak jak oczka schodzą z drutów? I czy 3 ściągacze francuskie to w sumie 6 rzędów?
11.08.2025 - 23:19DROPS Design ha risposto:
Witaj Beato, schemat zawiera wszystkie rzędy robótki, ale pokazuje oczka na prawej stronie robótki. Więcej jak czytać schematy znajdziesz TUTAJ. 3 ściągacze francuskie to inaczej 6 rzędów przerobionych na prawo. Pozdrawiamy!
12.08.2025 - 12:45
![]() Christiane ha scritto:
Christiane ha scritto:
Sind in den Muster-Zeichnungen die Muster von der Vorderseite zu lesen? Also wird die Reihe 2 von Muster A5 5 rechts 2 links 2 rechts 1 links 2 rechts gestrickt? Vielen Dank schonmal für die Erklärung
02.08.2025 - 16:18DROPS Design ha risposto:
Liebe Christiane, bei den Hinreihen lesen Sie die Diagramme rechts nach links und bei den Rückreihen lesen Sie sie links nach rechts; so bei der 2. Reihe stricken Sie A.5 wie folgt: 5 M rechts, 2 M links, 2 M rechts, 1 M links, 2 M rechts. Viel Spaß beim Stricken!
04.08.2025 - 08:22
![]() Anonym ha scritto:
Anonym ha scritto:
Strawberry Summer: Er diagram A4 og A5 incl. de 5 kantmasker?
24.07.2025 - 07:08DROPS Design ha risposto:
Hej. Ja det är det. Mvh DROPS Design
01.09.2025 - 09:13
![]() Hanne ha scritto:
Hanne ha scritto:
Jeg strikker Strawberry Summer top str S. Har delt i for og bagstykke og er ved indtagningerne på bagstykket. Der står man skal gentage diagram A4 og A5 ialt 4 gange. Men diagrammerne starter med 13 masker og slutter med 9 masker. Hvordan gentager man et diagram der har 13 masker når man kun har 9 masker? Det havde været smart hvis hele diagrammet var vist, så man ikke selv skal regne ud hvordan man gentager.
23.07.2025 - 10:22DROPS Design ha risposto:
Hej Hanne. Allt eftersom du feller masker i diagrammet så blir det också mindre antal masker du strikker i de diagrammen (sett gärna merken så du ser var rapporterna startar och slutar). Mvh DROPS Design
01.09.2025 - 08:58
![]() Laurence ha scritto:
Laurence ha scritto:
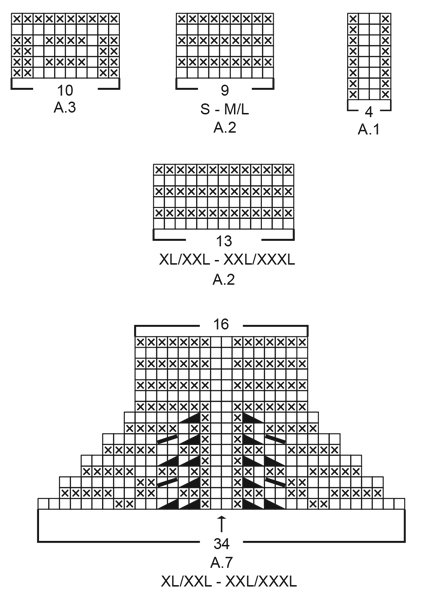
Bonjour, Je réalise le top en taille S. J'arrive à 33 cm et je commence à suivre les grilles. On me dit A2 puis A1. Or, la grille A2 compte 9 mailles. J'arrive donc, ensuite, sur 2 mailles endroit, or, A1 commence par une maille envers... Dois-je suivre cette grille et décaler toutes mes côtes ou suivre les côtes comme elles se présentent ? Merci par avance
09.07.2025 - 19:13DROPS Design ha risposto:
Bonjour Laurence, vous devez suivre les côtes comme elles se présentent. Bon tricot!
19.07.2025 - 23:03
![]() Valerie ha scritto:
Valerie ha scritto:
Hallo, wat betreft de rug staat gemeld dat je A4 en A5 op de goed kant in totaal 4 keer breidt in hoogte. Dan wwordt vermeld dat je voor een medium nog 88 steken over hebt omdat je er 16 minderde. Hier snap ik het niet. Per naald brei je 2x samen (in A4 en A5). Dus je minderd 2 steken dit 4 keer dan heb je toch maar 8 in totaal geminderd? Ik heb heb schema van A5 en A4 gevolgd of moet ik dit nogmaals herhalen?
05.07.2025 - 13:55DROPS Design ha risposto:
Dag Valerie,
Je mindert 16 aan de ene kant en 16 aan de andere kant, dus je houdt (120-16-16=) 88 steken over.
08.07.2025 - 21:12
![]() Tina ha scritto:
Tina ha scritto:
Jeg vil gerne strikke den i Drops Muskat - hvordan skal jeg justere maskeantal mm? Den er str. S
27.06.2025 - 12:10DROPS Design ha risposto:
Hei Tina. Toppen er strikket i DROPS Safran som tilhører garngruppe A, mens DROPS Muskat tilhører garngruppe B (tykkere garn enn garn i garngruppe A). Selv om man justerer maskeantallet er vil ikke resten av oppskriften stemme. Design avd. har dessverre ikke mulighet til å omskrive en allerede publisert oppskrift (maskeantall i bredden, i høyden, målene i målskissen og garnmengden vil ikke stemme ved å bruke et tynnere garn). mvh DROPS Design
30.06.2025 - 14:29
|
||||||||||||||||||||||
Strawberry Summer#strawberrysummertop |
||||||||||||||||||||||
 |
 |
|||||||||||||||||||||
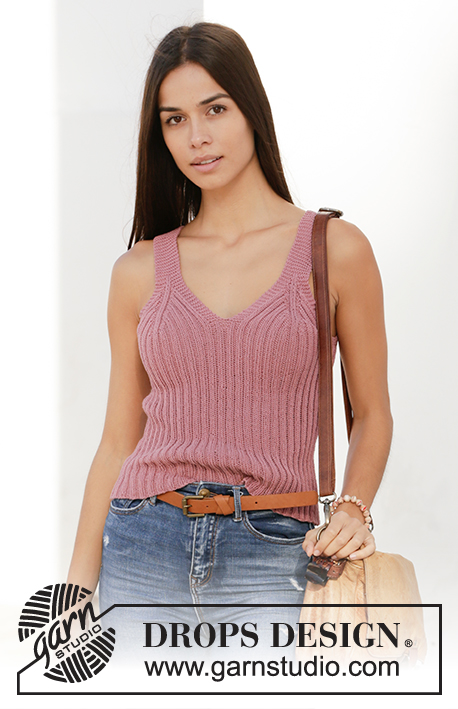
Top ai ferri in DROPS Safran. Si lavora dal basso verso l’alto a coste. Taglie: Dalla S alla XXXL.
DROPS 211-18 |
||||||||||||||||||||||
|
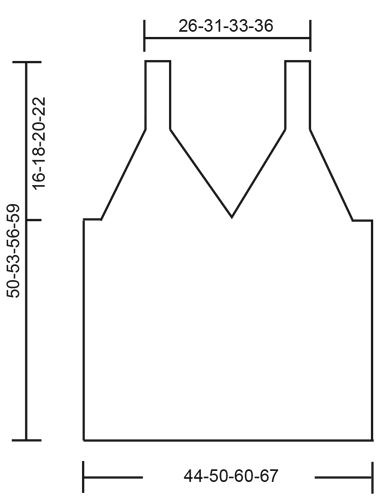
---------------------------------------------------------- TECNICHE IMPIEGATE: ---------------------------------------------------------- PUNTO LEGACCIO (avanti e indietro sui ferri): Lavorare tutti i ferri a diritto. 1 costa a legaccio in altezza = lavorare 2 ferri a diritto. MOTIVO: Vedere i diagrammi da A.1 a A.7. Seguire il diagramma corrispondente alla propria taglia (per i diagrammi A.2 e A.7). I diagrammi mostrano tutti i ferri del motivo, visti sul diritto del lavoro. ---------------------------------------------------------- IL LAVORO INIZIA QUI: ---------------------------------------------------------- TOP - BREVI INDICAZIONI PER IL LAVORO: Lavorare il davanti e il dietro dal basso verso l’alto, in tondo sui ferri circolari fino agli scalfi. Lavorare poi il dietro e i 2 davanti separatamente, avanti e indietro sui ferri circolari fino alla fine del lavoro. Le bretelle dei davanti vengono cucite al dietro. DAVANTI E DIETRO: Avviare 224-256-304-336 maglie sui ferri circolari n° 3 con il filato Safran. Lavorare il diagramma A.1 in tondo – ALLO STESSO TEMPO, inserire 1 segno all’inizio del giro (= lato sinistro quando il capo è indossato, e 1 segno dopo 112-128-152-168 maglie (= lato destro quando il capo è indossato). Entrambi i segni si trovano tra 2 maglie rovescio. I segni seguono il lavoro. RICORDARSI DI MANTENERE LA CORRETTA TENSIONE DEL LAVORO! Quando il lavoro misura 33-34-35-36 cm, lavorare il giro successivo come segue (rimane circa 1 cm prima di dividere il lavoro al centro sul davanti, e di diminuire per gli scalfi): Lavorare il diagramma A.2 (= 9-9-13-13 maglie), continuare il diagramma A.1 sulle 42-50-58-66 maglie successive, diagramma A.3 (= 10 maglie al centro sul davanti), diagramma A.1 sulle 42-50-58-66 maglie successive, diagramma A.2 sulle 18-18-26-26 maglie successive (= 2 ripetizioni di 9-9-13-13 maglie – il segno si trova tra queste 2 ripetizioni), diagramma A.1 sulle 94-110-126-142 maglie successive (= dietro), e lavorare il diagramma A.2 sulle ultime 9-9-13-13 maglie. Proseguire in questo modo finché i diagrammi A.2 e A.3 non sono state lavorati 1 volta in verticale. Al giro successivo, intrecciare per gli scalfi, quindi lavorare il giro successivo come segue: Intrecciare 4-4-8-8 maglie per lo scalfo, lavorare 5 maglie a PUNTO LEGACCIO – vedere le spiegazioni sopra, diagramma A.1 sulle 42-50-58-66 maglie successive, lavorare 10 maglie a punto legaccio (= centro sul davanti), diagramma A.1 sulle 42-50-58-66 maglie successive, lavorare 5 maglie a punto legaccio, intrecciare 8-8-16-16 maglie per lo scalfo, lavorare 5 maglie a punto legaccio, diagramma A.1 sulle 94-110-126-142 maglie successive, lavorare 5 maglie a punto legaccio, e intrecciare le ultime 4-4-8-8 maglie per lo scalfo. Tagliare il filo. Finire il dietro e il davanti separatamente. DIETRO: = 104-120-136-152 maglie. Iniziare sul rovescio del lavoro e lavorare 1 ferro a coste come prima con 5 maglie vivagno a punto legaccio da ciascun lato. Proseguire lavorando a coste con 5 maglie vivagno a punto legaccio da ciascun lato e, ALLO STESSO TEMPO, diminuire per gli scalfi ad ogni ferro sul diritto del lavoro come spiegato di seguito. Quindi lavorare il primo ferro sul diritto del lavoro, come segue: Lavorare il diagramma A.4 (= 13 maglie), proseguire a coste come prima finché non rimangono 13 maglie sul ferro, finire con il diagramma A.5 (= 13 maglie). Proseguire in questo modo finché i diagrammi A.4 e A.5 non sono stati lavorati 4-4-5-6 volte in tutto in verticale (= 16-16-20-24 maglie diminuite da ciascun lato) = rimangono 72-88-96-104 maglie. Lavorare 3 coste a legaccio avanti e indietro su tutte le maglie. Intrecciare le maglie - Assicurarsi che il bordo di chiusura delle maglie non sia troppo stretto. Il dietro misura circa 11-11-14-16 cm dalla divisione. DAVANTI: = 104-120-136-152 maglie. Dividere il lavoro al centro sul davanti e mettere metà delle maglie in attesa su 1 ferma maglie o su un ferro aggiuntivo. Continuare la prima parte come spiegato di seguito. PARTE-1: = 52-60-68-76 maglie. Iniziare sul rovescio del lavoro e lavorare 1 ferro a coste come prima, con 5 maglie vivagno a punto legaccio da ciascun lato. Inserire 1 segno tra le 2 maglie centrali (= tra 2 maglie diritto viste sul diritto del lavoro). Il segno indica il centro del lavoro. Proseguire lavorando a coste con 5 maglie vivagno a punto legaccio da ciascun lato e, ALLO STESSO TEMPO, diminuire da ciascun lato del centro come spiegato di seguito. Quindi lavorare il primo ferro sul diritto del lavoro, come segue: 5 maglie vivagno a punto legaccio, lavorare a coste come prima finché non rimangono 7 maglie prima del segno, diagramma A.6 (= 14 maglie), lavorare a coste come prima finché non rimangono 5 maglie, e finire con 5 maglie vivagno a punto legaccio. Proseguire in questo modo e ripetere il diagramma A.6 in verticale finché non rimangono 34 m– finire dopo 1 ferro sul rovescio del lavoro. Lavorare ora il diagramma A.7 su queste 34 maglie. Dopo aver completato il diagramma A.7, ci sono 12-12-16-16 maglie per la bretella, e il davanti misura circa 11-13-16-18 cm dalla divisione. Lavorare la bretella come spiegato di seguito. BRETELLA: = 12-12-16-16 maglie. Lavorare a punto legaccio avanti e indietro finché la bretella non misura circa 10-12-10-10 cm – provarsi il top e lavorare fino alla lunghezza necessaria; la bretella deve passare sulla spalla fino al dietro. Intrecciare le maglie. PARTE-2: Riportare sui ferri circolari n° 3 le 52-60-68-76 maglie messe in attesa sul ferma maglie o sul ferro aggiuntivo, e lavorare la parte-2 come indicato per la parte-1. Lavorare la bretella come indicato per la bretella della parte-1. Intrecciare le maglie. CONFEZIONE: Cucire le bretelle al dietro - iniziare dal bordo da ciascun lato e cucire con 1 punto in ogni maglia. Tagliare e fermare il filo. |
||||||||||||||||||||||
Spiegazioni del diagramma |
||||||||||||||||||||||
|
||||||||||||||||||||||
 |
||||||||||||||||||||||
 |
||||||||||||||||||||||
 |
||||||||||||||||||||||
Avete terminato questo modello?Allora taggate le vostre foto con #dropspattern #strawberrysummertop o inviatele alla #dropsfan gallery. Avete bisogno di aiuto con questo modello?Troverete 16 video tutorial, una sezione per i commenti/domande e molto altro guardando il modello su www.garnstudio.com © 1982-2026 DROPS Design A/S. Ci riserviamo tutti i diritti. Questo documento, compreso tutte le sue sotto-sezioni, è protetto dalle leggi sul copyright. Potete leggere quello che potete fare con i nostri modelli alla fine di ogni modello sul nostro sito. |
||||||||||||||||||||||


Con oltre 40 anni di esperienza nel design di modelli di maglia e uncinetto, DROPS Design offre la più estesa collezione di modelli gratuiti su internet - tradotti in 17 lingue. Ad oggi vi possiamo fornire 324 cataloghi e 12290 modelli - 9561 dei quali sono tradotti in Italiano.
Ci stiamo impegnando molto per darvi il meglio che vi possiamo offrire in termini di maglia e uncinetto, ispirazioni e consigli così come filati di grande qualità ad un prezzo incredibile! Volete utilizzare i nostri modelli per qualcosa d'altro oltre al vostro uso personale? Potete leggere tutto ciò che è consentito nel testo sul Copyright in basso su tutte le pagine dei nostri modelli. Buon lavoro!
Lasciare un commento sul modello DROPS 211-18
Noi saremmo felici di ricevere i tuoi commenti e opinioni su questo modello!
Se vuoi fare una domanda, fai per favore attenzione a selezionare la categoria corretta nella casella qui sotto per velocizzare il processo di risposta. I campi richiesti sono indicati da *.