
Categorie popolari
State cercando un filato?


Commenti / Domande (57)
![]() Bente Thøgersen ha scritto:
Bente Thøgersen ha scritto:
Hej. Jeg strikker baby tæppe 33-2. Der bliver buler på vrang siden. Skal der være det.. 🤔🎁🎄
30.11.2025 - 20:48DROPS Design ha risposto:
Hei Bente. Teppet strikkes i et hullmønster og det vil bli litt "skrukkete/buler/bølgete", om det er strikket riktig. Når det er ferdig, kan du fukte teppet og legge det flatt til tørk. mvh DROPS Design
08.12.2025 - 11:00
![]() Anna-Marie Van Eijk ha scritto:
Anna-Marie Van Eijk ha scritto:
Wat een heerlijk patroon. Trots op het eindresultaat. Heb een foto maar jan deze niet toevoegen
23.11.2025 - 21:52
![]() Tinna ha scritto:
Tinna ha scritto:
Jeg har strikket tæppet, men der er ligesom buler på bagsiden svarende til bladmønstret. Hvad gør jeg forkert?
28.10.2025 - 08:26
![]() Ann Rohde ha scritto:
Ann Rohde ha scritto:
Hej jeg vil gerne strikke baby tæppe golden slumber. Hvor mange nøgler skal jeg bruge
04.04.2025 - 17:20DROPS Design ha risposto:
Hei ANn. Øverst i oppskriften under materialer står det hvor mye garn du trenger (DROPS BABYMERINO fra Garnstudio 450 g farge 44, pudder = 9 nøster). mvh DROPS Design
07.04.2025 - 14:06
![]() Karen ha scritto:
Karen ha scritto:
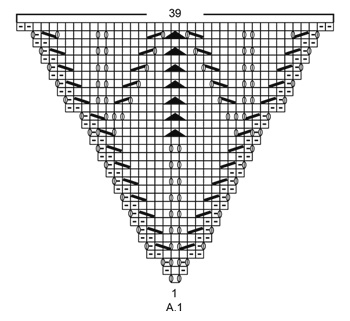
The below explanation for the first two rows of Chart A.1 do not seem to match the Diagram Explanation. If the first row is a YO, K1, YO, the next row would be a wrong side row. According to the Diagram Explanation the first stitch would be a K1 (wrong side), and the row would be worked as K1, P1, K1. Has the Diagram Explanation been revised? Thank you.
09.02.2025 - 22:19DROPS Design ha risposto:
Dear Karen, please note that the diagram is worked in the round, this means you will work every round from the right side, reason why you work (P1, K1, P1) on 2nd round. Happy knitting!
10.02.2025 - 12:04
![]() Karen ha scritto:
Karen ha scritto:
I need assistance in understanding instructions for Chart A.1 for the Golden Slumber Pattern 33-2 (Leaf Pattern) . I did not find a video online. It is not clear if I should work only the first 2 stitches to start Chart A.1. Any assistance is appreciated. I love the pattern and looking forward to knitting this beautiful blanket for my grand niece baby. Thank you.
06.02.2025 - 22:10DROPS Design ha risposto:
Dear Karen, there is only 1 stitch on the first row in A.1; as you have 8 sts on needle, you will work the 8 sts as follows: *A.1 = YO, K1, YO, then K1*, repeat from *-* 3 more times, there are 3 sts for each A.1 and 1 stitch for each corner. On next round work: *A.1 = P1, K1, P1, then K1*, repeat from *-* 3 more times. Then continue like this, ie read digram from the right towards the left on every row and knit 1 between each A.1. Happy knitting!
07.02.2025 - 15:46
![]() Jeanne ha scritto:
Jeanne ha scritto:
Hej. Jeg er efter lidt kamp nået til 2. omgang A2-A4, hvor der, så vidt jeg forstår, skal strikkes A3 to gange. Jeg kan ikke helt finde ud af, hvordan jeg skal starte og hvor maskerne skal komme fra? Kan I hjælpe? Vh Jeanne
18.12.2024 - 20:16DROPS Design ha risposto:
Hej Jeanne, når du har 160 masker, strikker du således: Strik A.2 (= 9 masker), strik A.3 (= 18 masker), strik A.4 (= 12 masker) og strik hjørnemasken ret , dette gentager du langs med hver side og således fortsætter du til A.2 og A.4 er strikket én gang i højden :)
20.12.2024 - 11:47
![]() Paulina ha scritto:
Paulina ha scritto:
Dzień dobry, czy dobrze rozumiem ten fragment: Powtarzać schematy A.2, A.3 i A.4 na wysokość. Za każdym razem gdy powtarzamy schematy na wysokość, jest wystarczająca liczba oczek, aby przerobić 1 raz dodatkowy schemat A.3 między schematami A.2 i A.4. Tzn, że po przerobieniu 1 raz na wysokość tych schematów, w każdej kolejnej wysokości powtarzamy 2razy schemat A3 czy w każdej kolejnej wysokości dodajemy po jednym schemacie A3 i z każdà wysokością jest ich więcej?
19.06.2024 - 13:02DROPS Design ha risposto:
Witaj Paulino, w każdej kolejnej wysokości dodajesz po jednym schemacie A3 i z każdą wysokością jest ich coraz więcej. Pozdrawiamy!
19.06.2024 - 17:27
![]() Tina Brandt Sørensen ha scritto:
Tina Brandt Sørensen ha scritto:
Start på A1 viser én maske. Men jeg skal slå 8 masker op, så jeg har to masker på hver pind? Hvordan gør jeg?
04.04.2024 - 06:00DROPS Design ha risposto:
Hej Tina, du strikker A.1 + 1 ret og det gør du 4 gange :)
04.04.2024 - 15:40
![]() Gitte Hedemann ha scritto:
Gitte Hedemann ha scritto:
Jeg har brug for hjælp til starten af Golden slumber babytæppe? Vh. Gitte Hedemann
03.02.2024 - 18:46DROPS Design ha risposto:
Hei Gitte. Vi skal hjelpe deg så godt vi kan, men fint om du kan fortelle mer nøyaktig hva du trenger hjelp til i starten (begynnelsen blir som en firkant, du starter med 2 masker på hver pinne = 4 strømpepinner og bytter til rundpinne når du har nok masker) og følger diagram A.1. mvh DROPS Design
12.02.2024 - 11:57
|
|||||||||||||||||||
Golden Slumber#goldenslumberblanket |
|||||||||||||||||||
 |
 |
||||||||||||||||||
Coperta ai ferri per bimbi, lavorata a partire dal centro per formare un quadrato, a punto foglie, in DROPS BabyMerino. Tema: Coperta per bambini.
DROPS Baby 33-2 |
|||||||||||||||||||
|
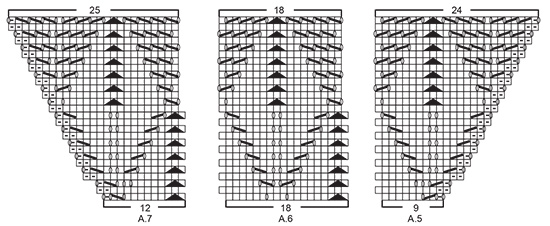
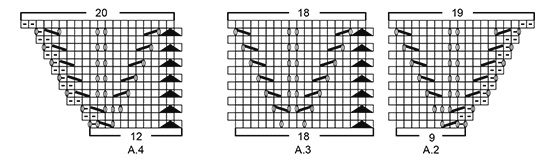
------------------------------------------------------- TECNICHE IMPIEGATE: ------------------------------------------------------- MOTIVO: Vedere i diagrammi da A.1 a A7. I diagrammi mostrano tutti i ferri del motivo, visti sul diritto del lavoro. ------------------------------------------------------- IL LAVORO INIZIA QUI: ------------------------------------------------------- COPERTA - BREVI INDICAZIONI PER IL LAVORO: Si lavora in tondo con i ferri a doppia punta / ferri circolari a partire dal centro, per formare un quadrato. Passare ai ferri circolari lunghi quando necessario. COPERTA: Avviare 8 maglie con i ferri a doppia punta n° 3,5 ed il filato BabyMerino. Ripartire le maglie sui ferri a doppia punta in modo che ci siano 2 maglie su ogni ferro. Lavorare 1 giro a diritto. Lavorare il giro successivo come segue: Lavorare il * diagramma A.1 (= 1 maglia), 1 maglia diritto (= maglia d’angolo – per individuare meglio la maglia d’angolo, potete inserire un segno in questa maglia) *, ripetere da *-* in tutto 4 volte. Proseguire con il diagramma A.1 e con 1 maglia diritto nell’angolo tra ogni ripetizione del diagramma A.1. RICORDARSI DI MANTENERE LA CORRETTA TENSIONE DEL LAVORO! Dopo aver lavorato il diagramma A.1 1 volta in verticale, ci sono 39 maglie tra ogni maglia d’angolo e 160 maglie in tutto sul ferro. Lavorare il giro successivo come segue: * diagramma A.2 (= 9 maglie), diagramma A.3 (= 18 maglie), diagramma A.4 (= 12 maglie) e lavorare a diritto la maglia d’angolo *, lavorare da *-* in tutto 4 volte. Proseguire con i diagrammi A.2-A.4 in questo modo. Dopo aver lavorato i diagrammi A.2 - A.4 1 volta in verticale, ci sono 232 maglie (57 maglie tra ogni maglia d’angolo). Ripetere i diagrammi A.2, A.3 e A.4 in verticale. Ogni volta che vengono completati i diagrammi in verticale, ci sono sufficienti maglie per lavorare una volta in più il diagramma A.3 tra i diagrammi A.2 e A.4. Lavorare i diagrammi A.2 - A.4 in tutto 9 volte in verticale (o fino alla lunghezza necessaria) = 808 maglie (201 maglie tra ogni maglia d’angolo). Lavorare il giro successivo come segue: * diagramma A.5 (= 9 maglie), diagramma A.6 finché non rimangono 12 maglie prima della maglia d’angolo (quindi lavorare 10 ripetizioni di 18 maglie, se i diagrammi A.2 - A.4 sono stati lavorati 9 volte in verticale), diagramma A.7 (= 12 maglie) e lavorare a diritto la maglia d’angolo * lavorare da *-* in tutto 4 volte. Dopo aver completato i diagrammi A.5 - A.7, ci sono 920 maglie sul ferro (229 maglie tra ogni maglia d’angolo) e il lavoro misura circa 100 cm tra ogni maglia d’angolo. INTRECCIARE LE MAGLIE: Intrecciare le maglie, ma per evitare che il bordo di chiusura delle maglie sia troppo stretto, fare 1 maglia gettata dopo ogni gettata del giro precedente. Intrecciare le maglie gettate come fossero maglie normali. Passare un filo nelle maglie al centro della coperta (nelle maglie del ferro di avvio). Stringere il filo per chiudere il buco e fermare il filo. |
|||||||||||||||||||
Spiegazioni del diagramma |
|||||||||||||||||||
|
|||||||||||||||||||
 |
|||||||||||||||||||
 |
|||||||||||||||||||
 |
|||||||||||||||||||
Avete terminato questo modello?Allora taggate le vostre foto con #dropspattern #goldenslumberblanket o inviatele alla #dropsfan gallery. Avete bisogno di aiuto con questo modello?Troverete 17 video tutorial, una sezione per i commenti/domande e molto altro guardando il modello su www.garnstudio.com © 1982-2026 DROPS Design A/S. Ci riserviamo tutti i diritti. Questo documento, compreso tutte le sue sotto-sezioni, è protetto dalle leggi sul copyright. Potete leggere quello che potete fare con i nostri modelli alla fine di ogni modello sul nostro sito. |
|||||||||||||||||||


Con oltre 40 anni di esperienza nel design di modelli di maglia e uncinetto, DROPS Design offre la più estesa collezione di modelli gratuiti su internet - tradotti in 17 lingue. Ad oggi vi possiamo fornire 325 cataloghi e 12298 modelli - 9569 dei quali sono tradotti in Italiano.
Ci stiamo impegnando molto per darvi il meglio che vi possiamo offrire in termini di maglia e uncinetto, ispirazioni e consigli così come filati di grande qualità ad un prezzo incredibile! Volete utilizzare i nostri modelli per qualcosa d'altro oltre al vostro uso personale? Potete leggere tutto ciò che è consentito nel testo sul Copyright in basso su tutte le pagine dei nostri modelli. Buon lavoro!
Lasciare un commento sul modello DROPS Baby 33-2
Noi saremmo felici di ricevere i tuoi commenti e opinioni su questo modello!
Se vuoi fare una domanda, fai per favore attenzione a selezionare la categoria corretta nella casella qui sotto per velocizzare il processo di risposta. I campi richiesti sono indicati da *.