
Categorie popolari
State cercando un filato?


Commenti / Domande (93)
![]() Emiliep ha scritto:
Emiliep ha scritto:
Je veux dire que je pense que le diagramme est faux car à partir du 10 ème rang on a plus que 6 rangs à faire en A1a alors qu'il y a 7 lignes d'ajourés au centre pour arriver à 9 arceaux ?
20.05.2018 - 22:14DROPS Design ha risposto:
Bonjour Emiliep, au dernier rang de A.1a, on crochète le 17ème symbole (carré dans la légende, mais rectangle dans le diagramme). Bon crochet!
22.05.2018 - 08:48
![]() Emiliep ha scritto:
Emiliep ha scritto:
Je dis ça car à compter du rang 10 il reste 6 rang à faire pour 10 motifs centraux ?
20.05.2018 - 21:54
![]() Emiliep ha scritto:
Emiliep ha scritto:
Bonjour, le diagramme est A1b est faux, non ? il comporte une ligne de plus que le A1a sur les motifs centraux ?
20.05.2018 - 21:46DROPS Design ha risposto:
Bonjour Emiliep, je compte bien 16 rangs pour A.1b et autant pour A.1a. Bon crochet!
22.05.2018 - 08:46Nourhan Osama ha scritto:
Continue A.3 in the round (repeat the 9 rounds vertically) until square measures 68-70-72-74-76-78 cm in the part of jacket , do you mean about vertically that i work in 2 corner back and forth OR in the 4 corner like before ?thanks and sorry for more question
15.05.2018 - 07:55DROPS Design ha risposto:
Dear Mrs Osama, you continue working A.3, ie you repeat the 9 rows in A.3 (= in height) over all sts in the round until square measures 68-70-72-74-76-78 cm x 68-70-72-74-76-78 cm. Happy crocheting!
15.05.2018 - 09:41Nourhan Osama ha scritto:
I am sorry , but i don't understand about the measures ,, like the first in Jacket ( When entire diagram A.2a and A.2b have been worked, square measures approx. 36 x 36 cm / 14 1/4" x 14 1/4''.) what this numbers /14 1/4" * 14 1/4" is refers to ?
14.05.2018 - 06:33DROPS Design ha risposto:
Hi Nourham, The first measurement (36 x 36) is in centimetres, the second measurement (14 1/4 x 14 1/4) is in inches. Happy crocheting!
14.05.2018 - 08:09Nourhan Osama ha scritto:
In round 17 you begin with a rectangle 4 chain stitches but i don't see it in the picture of jacket you are done,, can i dispensing this rectangle ??
07.05.2018 - 10:21DROPS Design ha risposto:
Dear Mrs Osama, this is the 17th symbol under diagram text (which looks like a square there), ie: round begins with 4 chain stitches and finishes with 1 slip stitch in 4th chain stitch at beginning of round Fasten off. Begin next round around chain space between the last treble group worked - fasten yarn with 1 slip stitch in chain space. Happy crocheting!
07.05.2018 - 10:48
![]() Mary Houlihan ha scritto:
Mary Houlihan ha scritto:
Would you say this pattern is only for the ‘experienced’ crocheter?
05.05.2018 - 02:22DROPS Design ha risposto:
Dear Mary, I would say this is for the intermediate. As it appears to be complicated, and there are a number of stitches and stitch combinations to follow, and you have to be able to read the chart. However the chart you help you visually what stitch / stitch combination goes where, and the most complicated stitch is a triple trble, and two trebles worked together. There are turtorials to help you (links on the left, just below the picture, and do not forget, you can always ask for help on person in the store you bought your DROPS yarn from. Happy Crafting!
06.05.2018 - 08:57
![]() Evelyne ha scritto:
Evelyne ha scritto:
Bonjour j'essaie desperement de faire ce modèle et pour une novice comme moi je ne parviens pas à comprendre le diagramme existe t'il des explications plus détaillées? Merci pour votre réponse
03.05.2018 - 16:10DROPS Design ha risposto:
Bonjour Evelyne, n 'hésitez pas à poser vos questions ici, ou, pour toute aide complémentaire individuelle, merci de contacter le magasin où vous avez acheté votre fil. Bon tricot!
04.05.2018 - 08:27
![]() Sue Towler ha scritto:
Sue Towler ha scritto:
Hi,I\'m really confused with your chart. I have 16 stitches after round 3, but your symbol says I should have 14? Also, why is there a space between the treble stitches on round 4? You have 3 then a big gap before making 11 more. It doesn\\\'t look like the crochet charts I\\\'m used to.
02.05.2018 - 18:28DROPS Design ha risposto:
Dear Mrs Towler, at the end of row 3 you should have *5 ch, 11 tr in the ch-space and 3 tr in 4-ch-space* x 4. (= 4 repeats of A.1) + the 3 ch from beg of round. There are some gaps in the chart due to the placement of symbols, simply follow symbols in diagram as they appear. For any individual assistance reading diagrams, you are welcome to contact the store where you bought your yarn. Happy crocheting!
03.05.2018 - 09:05Nourhan Osama ha scritto:
My queastion about the step between 5th and 6th round .....in th 5th round in figure A.1b i will make 3 chains 12 times between every single crochet in stitches ,, but do i make 3 chain then slip stitch it or make single crochet ? and Then i finish it,,and go above the 5 chain stitches do i make slip stitches in it also or make 5 chain st ?
28.04.2018 - 22:28DROPS Design ha risposto:
Dear Mrs Osama, on round 5 you repeat only 11 times (1 sc, 3 ch), then work 1 sc in last ch-space and work now 5 ch and repeat round from beg: (1 sc, 3 ch) x 11, 1 sc in last ch-space, 5 ch. At the end of round, after the last 5 ch, work 1 sl st in 1st ch from beg of round, then work sl st to the first ch-space (as at the beg of round 4). Happy crocheting!
30.04.2018 - 10:24
|
|||||||||||||||||||||||||||||||||||||||||||||||||||||||||||||||||||||||||||||||||||||
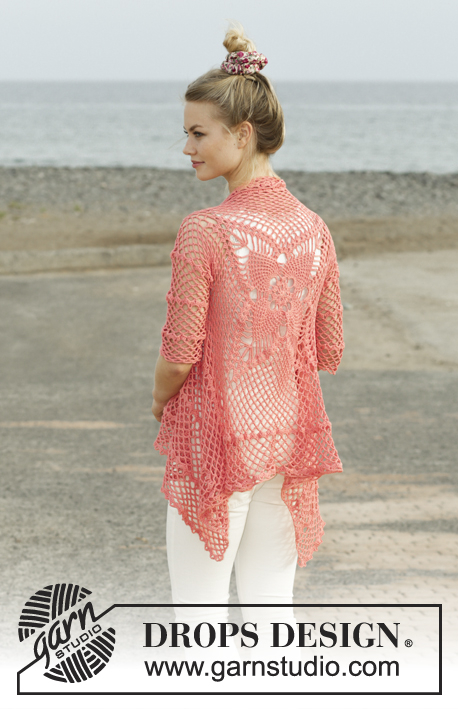
Butterfly Queen#butterflyqueenjacket |
|||||||||||||||||||||||||||||||||||||||||||||||||||||||||||||||||||||||||||||||||||||
 |
 |
||||||||||||||||||||||||||||||||||||||||||||||||||||||||||||||||||||||||||||||||||||
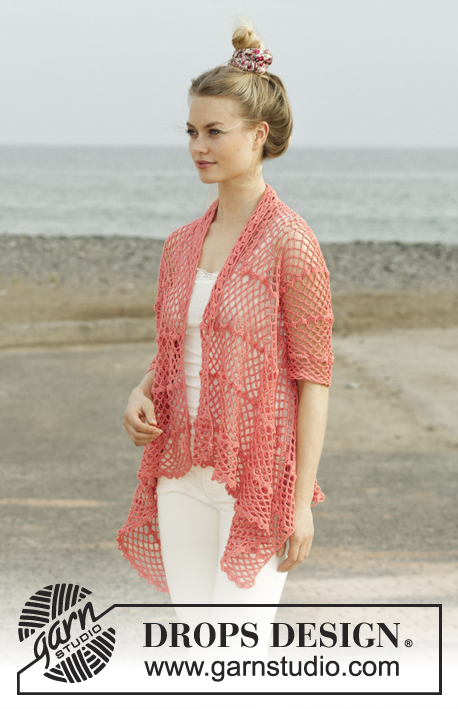
Cardigan all’uncinetto lavorato in un quadrato con motivo traforato. Taglie: Dalla S alla XXXL. Il cardigan è lavorato in DROPS Flora.
DROPS 186-11 |
|||||||||||||||||||||||||||||||||||||||||||||||||||||||||||||||||||||||||||||||||||||
|
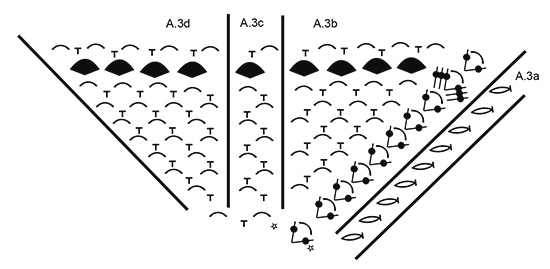
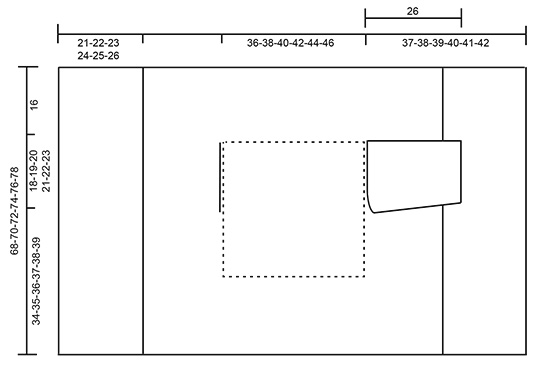
INFORMAZIONI GENERALI: MOTIVO: Vedere i diagrammi da A.1 a A.4. INFORMAZIONI PER IL LAVORO (per il diagramma A.4): Sostituire la prima maglia bassa all’inizio della riga con 1 catenella. Sostituire la prima maglia alta tripla all’inizio della riga con 5 catenelle. SUGGERIMENTO PER LE DIMINUZIONI (al centro sotto la manica): Lavorare 5 catenelle, saltare 1 maglia bassa + 1 arco di catenelle, lavorare 1 maglia bassa intorno all’arco di catenelle successive + 1 arco di catenelle (= 1 ripetizione diminuita), proseguire come prima finché non rimane 1 arco di catenelle + 1 maglia bassa della riga precedente, saltare queste maglie e finire con 1 maglia alta doppia nella prima catenella all’inizio della riga precedente (= 1 ripetizione diminuita). ---------------------------------------------------------- CARDIGAN: Si lavora in tondo a partire dal centro sul dietro, in un quadrato; lavorare poi i davanti, avanti e indietro. Lavorare le maniche avanti e indietro a partire dagli scalfi, poi cucire insieme sotto la manica. Con l’uncinetto n° 3,5 ed il filato Flora avviare 4 catenelle e formare un anello con 1 maglia bassissima nella prima catenella. Proseguire in tondo, lavorando il diagramma A.1b 4 volte in tutto sul giro - il diagramma A.1a mostra come iniziare e finire i giri e si lavora in aggiunta al diagramma A.1b. RICORDARSI DI MANTENERE LA CORRETTA TENSIONE DEL LAVORO! Terminati i diagrammi A.1a e A.1b, tagliare il filo e iniziare il giro successivo intorno all’arco di catenelle dell’ultimo gruppo di maglie alte lavorate; fissare il capo con 1 maglia bassissima in questo arco di catenelle Lavorare ora il diagramma A.2 in tondo come segue: * diagramma A.2b, ripetere il diagramma A.2c 6 volte in tutto in larghezza, diagramma A.2d *, ripetere da *-* 4 volte in tutto sul giro – il diagramma A.2a mostra come iniziare e finire i giri e si lavora in aggiunta al diagramma A.2b/c/d. Terminati i diagrammi A.2a e A.2b, il quadrato misura circa 36 x 36 cm. Ci sono ora: 1 arco di catenelle (1 maglia alta + 6 catenelle + 1 maglia alta) in ognuno dei 4 angoli e 14 archi di catenelle lungo ognuno dei lati del quadrato. LEGGERE ATTENTAMENTE TUTTE LE INDICAZIONI SEGUENTI PRIMA DI PROSEGUIRE ! Proseguire come segue: * Lavorare A.3b intorno all’arco di catenelle nell’angolo, ripetere il diagramma A.3c finché non rimane 1 arco di catenelle prima dell’angolo, diagramma A.3d intorno all’arco di catenelle successivo *, ripetere da *-* 4 volte in tutto sul giro – il diagramma A.3a mostra come iniziare e finire i giri ed è lavorato in aggiunta ai diagrammi A.3b/c/d. ALLO STESSO TEMPO, quando il lavoro misura circa 36-38-40-42-44-46 cm x 36-38-40-42-44-46 cm, lavorare gli scalfi come segue: diagramma A.3 come prima fino al primo angolo, lavorare intorno all’arco di catenelle come prima, lavorare ora catenelle fino al centro dell’arco successivo (quindi al centro tra il primo ed il secondo angolo), come segue: Lavorare 1 catenella per ogni catenella / maglia bassa saltata. Proseguire con il motivo come prima fino ad arrivare a metà del lato, tra il 3° e il 4° angolo. Lavorare ora catenelle fino al 4° angolo, come segue: Lavorare 1 catenella per ogni catenella /maglia bassa saltata, lavorare intorno all’arco di catenelle nell’angolo e finire il giro come prima. Al giro successivo, lavorare il diagramma A.3 come prima di nuovo su tutte le m (quindi aggiustare il motivo sugli scalfi in modo che il giro completo sia corretto). Proseguire con il diagramma A.3 in tondo (ripetere i 9 giri in verticale) finché il quadrato non misura 68-70-72-74-76-78 cm x 68-70-72-74-76-78 cm (quindi circa 16 cm dallo scalfo per tutte le taglie) – assicurarsi di finire dopo un giro con gruppi di maglie alte. Tagliare il filo e inserire 1 segno nel lavoro (tra il primo ed il secondo angolo). DAVANTI: Lavorare ora avanti e indietro tra il primo ed il secondo angolo. ATTENZIONE! Lavorare i davanti senza aumentare. Vedere il SUGGERIMENTO PER IL LAVORO ! Lavorare il diagramma A.4a intorno all’angolo, ripetere il diagramma A.4b finché non rimane 1 arco di catenelle prima dell’angolo, lavorare il diagramma A.4c intorno a questo arco di catenelle e intorno all’angolo. Proseguire con il motivo come indicato nel diagramma e ripetere il diagramma A.4 in verticale finché la riga con i gruppi di maglie alte non è stata lavorata 2 volte in tutto in verticale, poi ripetere solo le righe con archi di catenelle finché il lavoro non misura circa 19-20-21-22-23-24 cm dal segno, lavorare ora la riga con gruppi di maglie alte 1 volta per tutte le taglie. Il lavoro misura ora 21-22-23-24-25-26 cm dal segno. Tagliare il filo. Lavorare in modo uguale l’altro davanti (quindi lavorare avanti e indietro tra il terzo ed il quarto angolo). MANICHE: Lavorare le maniche a partire dallo scalfo sul davanti / dietro. Lavorare avanti e indietro, dall’alto verso il basso e cucire alla fine. Iniziare dal centro, sotto la manica e lavorare come segue: Ricordarsi le INFORMAZIONI PER IL LAVORO ! Lavorare il diagramma A.4a intorno al primo arco di catenelle, ripetere il diagramma A.4b 15-16-17-18-19-20 volte in tutto in larghezza (aggiustare per distribuire il diagramma A.4b a intervalli regolari lungo lo scalfo, quindi è necessario lavorare 2 archi di catenelle intorno allo stesso arco di catenelle oppure saltare 1 arco di catenelle), diagramma A.4c intorno agli ultimi 2 archi di catenelle. Lavorare ora il diagramma A.4 avanti e indietro – ALLO STESSO TEMPO, quando il lavoro misura 4 cm (aggiustare in modo che la riga successiva sia una riga di catenelle / maglie basse) diminuire 1 ripetizione da ciascun lato – vedere il SUGGERIMENTO PER LE DIMINUZIONI. Diminuire in questo modo circa ogni 8-8-8-6-6-6 cm 3-3-3-4-4-4 volte in tutto = 12-13-14-15-16-17 archi di catenelle di 6 m dopo l’ultima diminuzione. Proseguire finché il lavoro non misura circa 28 cm per tutte le taglie - finire dopo una riga di archi di catenelle. Tagliare il filo. Lavorare l’altra manica in modo uguale dall’altra parte del lavoro. CONFEZIONE: Cucire sotto le maniche; cucire nel filo più esterno delle maglie e assicurarsi che la cucitura non sia troppo stretta. |
|||||||||||||||||||||||||||||||||||||||||||||||||||||||||||||||||||||||||||||||||||||
Spiegazioni del diagramma |
|||||||||||||||||||||||||||||||||||||||||||||||||||||||||||||||||||||||||||||||||||||
|
|||||||||||||||||||||||||||||||||||||||||||||||||||||||||||||||||||||||||||||||||||||
 |
|||||||||||||||||||||||||||||||||||||||||||||||||||||||||||||||||||||||||||||||||||||
 |
|||||||||||||||||||||||||||||||||||||||||||||||||||||||||||||||||||||||||||||||||||||
 |
|||||||||||||||||||||||||||||||||||||||||||||||||||||||||||||||||||||||||||||||||||||
 |
|||||||||||||||||||||||||||||||||||||||||||||||||||||||||||||||||||||||||||||||||||||
Avete terminato questo modello?Allora taggate le vostre foto con #dropspattern #butterflyqueenjacket o inviatele alla #dropsfan gallery. Avete bisogno di aiuto con questo modello?Troverete 12 video tutorial, una sezione per i commenti/domande e molto altro guardando il modello su www.garnstudio.com © 1982-2026 DROPS Design A/S. Ci riserviamo tutti i diritti. Questo documento, compreso tutte le sue sotto-sezioni, è protetto dalle leggi sul copyright. Potete leggere quello che potete fare con i nostri modelli alla fine di ogni modello sul nostro sito. |
|||||||||||||||||||||||||||||||||||||||||||||||||||||||||||||||||||||||||||||||||||||


Con oltre 40 anni di esperienza nel design di modelli di maglia e uncinetto, DROPS Design offre la più estesa collezione di modelli gratuiti su internet - tradotti in 17 lingue. Ad oggi vi possiamo fornire 324 cataloghi e 12290 modelli - 9561 dei quali sono tradotti in Italiano.
Ci stiamo impegnando molto per darvi il meglio che vi possiamo offrire in termini di maglia e uncinetto, ispirazioni e consigli così come filati di grande qualità ad un prezzo incredibile! Volete utilizzare i nostri modelli per qualcosa d'altro oltre al vostro uso personale? Potete leggere tutto ciò che è consentito nel testo sul Copyright in basso su tutte le pagine dei nostri modelli. Buon lavoro!
Lasciare un commento sul modello DROPS 186-11
Noi saremmo felici di ricevere i tuoi commenti e opinioni su questo modello!
Se vuoi fare una domanda, fai per favore attenzione a selezionare la categoria corretta nella casella qui sotto per velocizzare il processo di risposta. I campi richiesti sono indicati da *.