
Categorie popolari
State cercando un filato?


Commenti / Domande (38)
![]() Luisa ha scritto:
Luisa ha scritto:
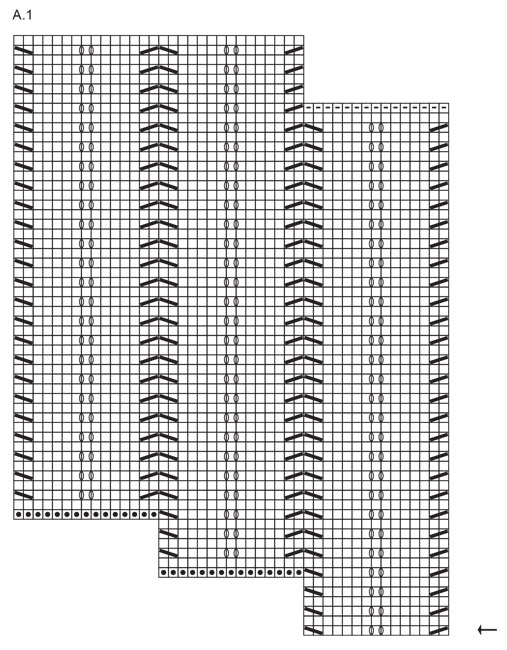
Chiedo scusa ma non mi é chiaro come funziona lo schema. Io monto 15 m con il primo colore, ogni settimo ferro aggiungo 15 m fino ad arrivare a 55 ferri, a questo punto aggiungo 15m con il secondo colore con cui lavoro 54 f, al 55esimo aggiungo 15m del terzo colore e lavoro 6 f etc? Giusto?
12.07.2022 - 00:14DROPS Design ha risposto:
Buongiorno Luisa, dal 55 ferro deve iniziare ad intrecciare le maglie come indicato. Per il cambio colori deve fare riferimento a quanto riportato nel paragrafo "Strisce". Buon lavoro!
13.07.2022 - 00:09
![]() Luisa ha scritto:
Luisa ha scritto:
Buongiorno se voglio farlo più grande, come faccio? Lavoro 2 schemi di seguito?
11.07.2022 - 20:11DROPS Design ha risposto:
Buonasera Luisa, se vuole lavorarlo più grande può aggiungere delle ripetizioni al motivo. Buon lavoro!
11.07.2022 - 21:58
![]() Torunn Mikkelsen ha scritto:
Torunn Mikkelsen ha scritto:
Jeg forstår ikke om det skal klippes tråd eller ikke etter økning av 15 masker - det står litt ulikt i kommentarene. Så lurer jeg på om det er kun 2 pinner natur i starten eller er det tre siden det står en pinne før stjernen?
04.05.2021 - 15:56DROPS Design ha risposto:
Hej Torunn, Hvor i opskriften skriver vi at det skal klippes tråd? Ja du strikker 1.pind med natur fra retsiden og så 2 pinde mere siden du bytter tråd på begynnelsen av en pinne fra vrangen :)
06.05.2021 - 15:45
![]() Eveline ha scritto:
Eveline ha scritto:
What you suggest, to change color at RS (this would be row 3 / 5 /7 etc) is not what the pattern tells us to do. It clearly state to change color on wrong side. Knit first 3 rows off white, row 4 golden, row 6 off white, so I should start row 8 with golden. Only then there's no golden tread at the end of the new casts ons.. So maybe what you suggest to change on the RS will make it possible. Do you believe this is a mistake in the pattern? Or am I reading it wrong?
27.01.2021 - 15:29DROPS Design ha risposto:
Dear Eveline, you are right, my mistake sorry. Colour changes should be from WS - that means you will have to cut the yarn when casting the new stitches, you can cast on either with the colour of the last row from RS worked or then with the colour of the next colour that will be worked from WS. Happy knitting!
28.01.2021 - 08:46
![]() Eveline ha scritto:
Eveline ha scritto:
Hello, can you explain how I have to switch form off white to golden rod from row 7 to row 8? On row 7 I have to cast on 15 more stiches working in off white, but have to change to golden rod on row 8. Is there a way or do I have to cut cords every 15 stiches? That would be so terrible. .
26.01.2021 - 16:01DROPS Design ha risposto:
Dear Eveline, you are working each time 2 rows with the same colour: work row 7 to the end of the row, cast on the new stitches, turn and work row 8 with the same colour. Turn change colour and work the next 2 rows. Colour changes should be at the right side of piece, seen from RS, ie at the beg of row from RS. Happy knitting!
26.01.2021 - 16:41
![]() Yvette ha scritto:
Yvette ha scritto:
Ik snap iets niet aan dit patroon. Ik heb de eerste 7 naalden gebreidt (3 naturel, 2 oker, 2 naturel) en moet nu 15 steken aan het eind toevoegen. Maar als ik dan omkeer om rij 8 te breien moet ik overgaan op de okerkleur, echter die zit dan niet daar aan het eind van die nieuwe 15 steken.. Hoe doe je dit? Omdat dit een sjaal is wil ik de draad niet aan de andere kant meenemen, dus iets klopt niet. Hopelijk maak ik mezelf zo duidelijk en kunt u het uitleggen. Vr. gr.
19.01.2021 - 21:33DROPS Design ha risposto:
Dag Yvette,
Na het opzetten van de 15 steken zul je steeds de draad af moeten knippen om met de andere kleur te beginnen.
23.01.2021 - 10:58
![]() Carol Ibbetson ha scritto:
Carol Ibbetson ha scritto:
Hello again. Just checked the chart key again and realised it is non standard. i.e. a blank square is knit on BOTH sides. This could easily cause issues to a UK knitter who would be used to seeing a 'dot' for a stitch that is knit on the WS. Rest of my comments hold true though - many thanks
15.04.2019 - 16:50
![]() Carol Ibbetson ha scritto:
Carol Ibbetson ha scritto:
From a UK tech editor working on this pattern for a magazine. - chart shows stocking st instead of garter st - Color changes must be made on RS rows in garter st, not WS - Photo should be flipped vertically to match pattern Happy to check any patts if required. Just msg me. Thanks C
15.04.2019 - 16:33DROPS Design ha risposto:
Dear Mrs Ibbeston, the diagram key is correct to this pattern: all stitches should be worked in garter stitch = knit from right side and from wrong side. Happy knitting!
23.04.2019 - 16:01
![]() DS Meyer ha scritto:
DS Meyer ha scritto:
It might be helpful to clarify the chart. The 15 stitches are as folliws, K2tog, knit 5, yo, knit 1, yo, knit5, SKP. I misread the chart before sending my earlier comment.
22.03.2019 - 19:25
![]() DS Meyer ha scritto:
DS Meyer ha scritto:
With both a K2tog and a SKP on every right side row, the original 15 stitches decrease 2 stitches every row; with 1 yarnover, then the stitchs before and after the yarnover change each row. How do you keep 15 stitches and create the chevron look?
22.03.2019 - 18:29DROPS Design ha risposto:
Dear Mrs Meyer, you will keep 15 sts until row 7 then cast on 15 new sts at the end of row 7- since the number of decrease is compensated by the number of YOs you will keep the same number of sts. Happy knitting!
25.03.2019 - 08:34
|
|||||||||||||||||||
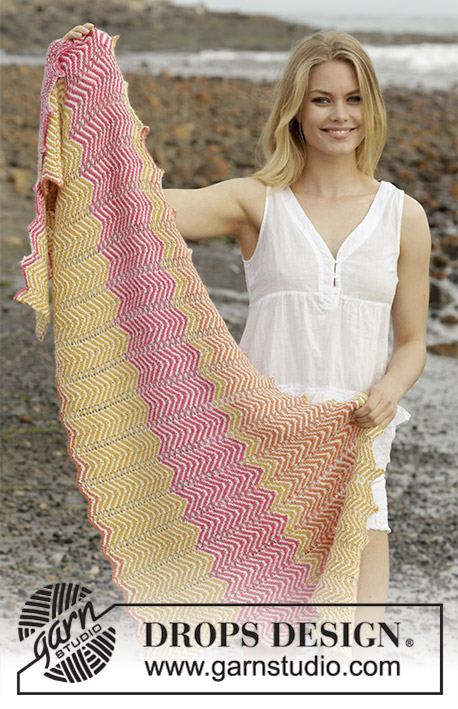
Sunrise Hues#sunrisehuesshawl |
|||||||||||||||||||
 |
 |
||||||||||||||||||
Scialle ai ferri con motivo a zigzag e a strisce, lavorato in DROPS Alpaca.
DROPS 187-26 |
|||||||||||||||||||
|
INFORMAZIONI GENERALI: STRISCE: Cambiare colore all’inizio di un ferro sul rovescio del lavoro. Lavorare le strisce come segue: lavorare il 1° ferro a diritto sul diritto del lavoro con il colore panna/ecrù, * 2 ferri con il colore panna/ecrù, 2 ferri con il colore ocra *, ripetere da *-* finché non sono stati lavorati 55 ferri. Lavorare l’ultimo ferro sul diritto del lavoro; intrecciare le 15 maglie all’inizio di questo ferro. * Lavorare 2 ferri con il colore panna/ecrù, 2 ferri con il colore arancione *, ripetere da *-* finché non sono stati lavorati 54 ferri. Lavorare l’ultimo ferro sul diritto del lavoro; intrecciare le 15 maglie all’inizio di questo ferro. * Lavorare 2 ferri con il colore panna/ecrù, 2 ferri con il colore ocra *, ripetere da *-* finché non sono stati lavorati 6 ferri. Lavorare l’ultimo ferro sul diritto del lavoro. * Lavorare 2 ferri con il colore panna/ecrù, 2 ferri con il colore ciliegia *, ripetere da *-* finché non sono stati lavorati 48 ferri. Lavorare l’ultimo ferro sul diritto del lavoro; intrecciare le 15 maglie all’inizio di questo ferro. * Lavorare 2 ferri con il colore panna/ecrù, 2 ferri con il colore ocra *, ripetere da *-* finché non sono stati lavorati 54 ferri. * Lavorare 2 ferri con il colore panna/ecrù, 2 ferri con il colore arancione *, ripetere da *-* finché non sono stati lavorati 6 ferri. COSTA A LEGACCIO /PUNTO LEGACCIO (avanti e indietro): 1 costa a legaccio = 2 ferri a diritto. MOTIVO: Vedere il diagramma A.1. ---------------------------------------------------------- SCIALLE: Lo scialle ha una forma asimmetrica e si lavora seguendo il diagramma. Si diminuisce su un lato e si aumenta sull’altro. Avviare 15 maglie sui ferri circolari n° 4,5 con il colore panna/ecrù. Seguire il diagramma A.1 – vedere la freccia per iniziare. Lavorare le STRISCE – vedere le spiegazioni sopra. Sul ferro 7, avviare 15 nuove maglie alla fine del ferro = 30 maglie. Continuare con il diagramma A.1. Ogni 6 ferri avviare 15 nuove maglie alla fine del ferro. All’inizio delle ferro 55, intrecciare le prime 15 maglie e poi intrecciare ogni 54° ferro come indicato al paragrafo strisce. Proseguire seguendo il diagramma A.1, aumentando e intrecciando le maglie finché non sono finite le strisce colore panna/ecrù e ciliegia– sono state intrecciate 3 volte le maglie su un lato e avviate nuove maglie 27 volte sull’altro lato = 375 maglie. Proseguire ora senza aumentare e senza intrecciare le maglie finché tutte le strisce non sono state lavorate. Intrecciare ora tutte le maglie. |
|||||||||||||||||||
Spiegazioni del diagramma |
|||||||||||||||||||
|
|||||||||||||||||||
 |
|||||||||||||||||||
Avete terminato questo modello?Allora taggate le vostre foto con #dropspattern #sunrisehuesshawl o inviatele alla #dropsfan gallery. Avete bisogno di aiuto con questo modello?Troverete 13 video tutorial, una sezione per i commenti/domande e molto altro guardando il modello su www.garnstudio.com © 1982-2026 DROPS Design A/S. Ci riserviamo tutti i diritti. Questo documento, compreso tutte le sue sotto-sezioni, è protetto dalle leggi sul copyright. Potete leggere quello che potete fare con i nostri modelli alla fine di ogni modello sul nostro sito. |
|||||||||||||||||||


Con oltre 40 anni di esperienza nel design di modelli di maglia e uncinetto, DROPS Design offre la più estesa collezione di modelli gratuiti su internet - tradotti in 17 lingue. Ad oggi vi possiamo fornire 324 cataloghi e 12290 modelli - 9561 dei quali sono tradotti in Italiano.
Ci stiamo impegnando molto per darvi il meglio che vi possiamo offrire in termini di maglia e uncinetto, ispirazioni e consigli così come filati di grande qualità ad un prezzo incredibile! Volete utilizzare i nostri modelli per qualcosa d'altro oltre al vostro uso personale? Potete leggere tutto ciò che è consentito nel testo sul Copyright in basso su tutte le pagine dei nostri modelli. Buon lavoro!
Lasciare un commento sul modello DROPS 187-26
Noi saremmo felici di ricevere i tuoi commenti e opinioni su questo modello!
Se vuoi fare una domanda, fai per favore attenzione a selezionare la categoria corretta nella casella qui sotto per velocizzare il processo di risposta. I campi richiesti sono indicati da *.