
Categorie popolari
State cercando un filato?


Commenti / Domande (86)
![]() Barbara ha scritto:
Barbara ha scritto:
Ik snap het begin vh patroon niet helemaal. Na het invoegen vd markeerdraad staat brei ribbelsteek volgens strepen. Moet ik dan eerst breien volgens strepen en dan pas met naald 1 beginnen? Sorry het is me niet duidelijk. Hoop dat jullie mij kunnen helpen, alvast dank!
06.10.2024 - 18:47DROPS Design ha risposto:
Dag Barbara,
Je breit het werk in ribbelsteek en je breit steeds een aantal centimeters strepen. Daarnaast volg je de beschrijving op. Dus terwijl je de strepen in ribbelsteek breit, brei je naald 1 t/m 4 zoals beschreven.
08.10.2024 - 21:05
![]() Mariarosa ha scritto:
Mariarosa ha scritto:
Buonasera C'è un errore nella descrizione: se aumento 2 maglie (2 volte gettato) a inizio del ferro, poi dice di diminuire 1 sola volta alla fine ovvero lavorare insieme le ultime 2 maglie? Grazie
26.08.2024 - 17:19DROPS Design ha risposto:
Buonasera Mariarosa, si diminuisce anche sul rovescio del lavoro. Buon lavoro!
26.08.2024 - 21:15
![]() Barbara ha scritto:
Barbara ha scritto:
In naald in doe je de markeerdraad in de 2e steek, maar op de foto bij het patroon zie ik dat de omslagen in het midden zitten. Dit klopt toch niet? Kunt u het alstublieft uitleggen?
04.07.2024 - 10:22DROPS Design ha risposto:
Dag Barbara,
Uiteindelijk komen de omslagen in het midden te zitten, maar je breit a.h.w. eerst overdwars, maar nadat je 80 keer hebt gemeerderd, brei je de andere kant. Als je eenmaal aan de slag bent ontdek je wel hoe het werkt.
04.07.2024 - 18:37
![]() Charleen ha scritto:
Charleen ha scritto:
If I wanted to knit this in less then 4 colours, how many yarns/metres in total would be required to knit the pattern.
16.01.2023 - 19:11DROPS Design ha risposto:
Dear Charleen, since this shawl has been worked with only several colours, we only have the amount for all colours together, but you might need 200 g of one single colour. Happy knitting!
17.01.2023 - 10:03
![]() Elsa Lourdes ha scritto:
Elsa Lourdes ha scritto:
Buenas noches, mi consulta es cuando indican en la primera fila : "un derecho, una hebra, un derecho una hebra, trabajar hasta que queden dos puntos" significa que en esa fila de 164 puntos ¿solo hago dos lazadas y el resto de derecho hasta llegar a los dos últimos puntos? o sigo con : derecho y hebra hasta llegar a los dos últimos puntos, le agradecería la respuesta, gracias.
04.10.2022 - 01:56DROPS Design ha risposto:
Hola Elsa, las 2 hebras (para los aumentos) se trabajan solo al inicio de la fila, el resto de la fila se trabaja en punto musgo hasta los 2 últimos puntos.
04.10.2022 - 15:32
![]() Jean Williams ha scritto:
Jean Williams ha scritto:
Can you show a picture of the bottom of this shawl as I am casting the 10 sts every 10 rows but what happens on the other side of the piece
25.05.2022 - 18:22DROPS Design ha risposto:
Dear Jean, these are the only photos that we have available of this model. On one side, you have small peaks, with the 10 cast-off stitches, while the second side is straight (with no cast-off stitches). Happy knitting!
25.05.2022 - 20:19
![]() Marion ha scritto:
Marion ha scritto:
Sehr schöne Anleitung. Absolut Fernsehtauglich. Stricke bereits das 2.Tuch.
11.05.2022 - 13:20
![]() Iris Simon ha scritto:
Iris Simon ha scritto:
Liebes Drops-Team, vielen Dank für die schnelle Antwort, und die vielen schönen Anleitungen die es bei euch gibt. Jetzt habe ich den Dreh raus. LG, Iris
16.03.2022 - 13:07
![]() Iris Simon ha scritto:
Iris Simon ha scritto:
Hallo, auch ich komme (wie Yvonne) mit der Anleitung nicht klar. Wenn ich ab Beginn an der 2. Masche zunehme, ist das am Rand. In den Bildern ist die Zunahme aber mittig zu sehen. Auch die Abnahme von je 10 Maschen passiert doch nicht erst nach 160 Reihen!? Ich bitte um Hilfe!
15.03.2022 - 09:40DROPS Design ha risposto:
Liebe Frau Simon, die Zunahmen befinden sich am Anfang vom Tuch am Anfan der Hinreihe, aber nach und nach werden Sie ca in der Mitte sein. So stricken Sie insgesamt for 160 Reihen dann ketten Sie die 10 Maschen ab, so wird das 2. Teil vom Tuch gestrickt. Dieses Tuch wurde schon mehrmals erfolgreich gestrickt, folgen Sie die Anleitung Schritt für Schritt und das Tuch wird nach und nach Form annehmen. Beim Ravelry können Sie auch viele Bilder von Strickerinnen schauen, vielleicht kann es auch Ihnen helfen. Viel Spaß beim stricken!
15.03.2022 - 10:13
![]() Ela ha scritto:
Ela ha scritto:
Szal jest cudowny. Wydziergałam już 4 szale. Moim zdaniem opis jest jasny do zrozumienia. Dziękuję.
07.01.2022 - 23:27
|
|
Point the Way#pointthewayshawl |
|
 |
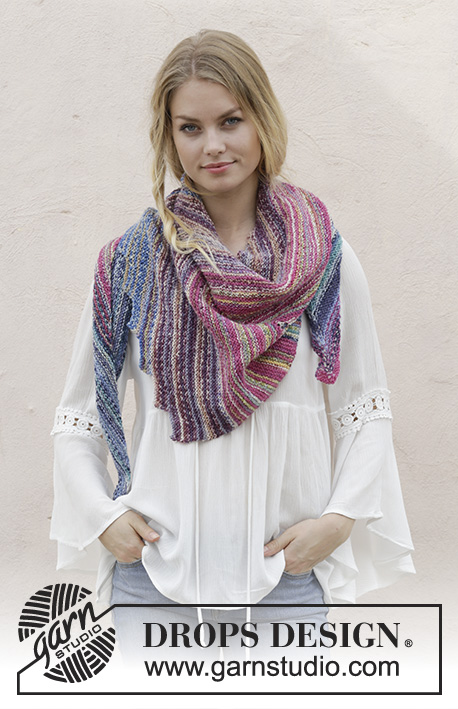 |
Scialle ai ferri a punto legaccio e a strisce, in DROPS Fabel.
DROPS 186-4 |
|
|
INFORMAZIONI GENERALI: COSTA A LEGACCIO/PUNTO LEGACCIO (avanti e indietro sui ferri): 1 costa a legaccio = lavorare 2 ferri a diritto. STRISCE: Lavorare a strisce come segue (ATTENZIONE! Cambiare il filo alla fine di un ferro sul diritto del lavoro). * Lavorare 12 cm con il colore turchese/blu Lavorare 3 cm alternando 1 costa a legaccio con il colore turchese/blu con 1 costa a legaccio con il colore sogno rosa Lavorare 12 cm con il colore sogno rosa. Lavorare 3 cm alternando 1 costa a legaccio con il colore sogno rosa con 1 costa a legaccio con il colore lavanda Lavorare 12 cm con il colore lavanda. Lavorare 3 cm alternando 1 costa a legaccio con il colore lavanda con 1 costa a legaccio con il colore nebbiolina di mare Lavorare 12 cm con il colore nebbiolina di mare *, ripetere da *-*. ---------------------------------------------------------- SCIALLE: Si lavora a partire da uno dei lati corti e si lavora nel senso della lunghezza. Avviare 164 maglie sui ferri circolari n° 4,5 con il colore turchese/blu. Lavorare 1 ferro a diritto sul rovescio del lavoro. Inserire 1 segno nella 2a maglia – visto sul diritto del lavoro. Proseguire a PUNTO LEGACCIO e a STRISCE - vedere le spiegazioni sopra, e lavorare come segue: FERRO 1 (sul diritto del lavoro): 1 maglia diritto, 1 maglia gettata, 1 maglia diritto (maglia con il segno), 1 maglia gettata, lavorare finché non rimangono 2 maglie, 2 maglie insieme a diritto. FERRO 2 (sul rovescio del lavoro): 2 maglie insieme a diritto, lavorare a diritto fino alla fine del ferro; lavorare le maglie gettate a diritto per formare dei buchi. FERRO 3 (sul diritto del lavoro): Lavorare fino alla maglia con il segno, 1 maglia gettata, 1 maglia diritto (maglia con il segno), 1 maglia gettata, lavorare finché non rimangono 2 maglie, 2 maglie insieme a diritto. FERRO 4 (sul rovescio del lavoro): 2 maglie insieme a diritto, lavorare a diritto fino alla fine del ferro; lavorare le maglie gettate a diritto per formare dei buchi. Ripetere i ferri 3 e 4; continuare ad aumentare con 1 maglia gettata da ciascun lato della maglia con il segno e a diminuire alla fine dei ferri sul diritto del lavoro e all’inizio dei ferri sul rovescio del lavoro. Il numero delle maglie rimane lo stesso. Proseguire finché non sono stati fatti 80 aumenti da ciascun lato della maglia con il segno = 164 maglie sui ferri (160 ferri). FERRO 1 (= sul diritto del lavoro): Intrecciare le prime 10 maglie, lavorare fino alla maglia con il segno, 1 maglia gettata, 1 maglia diritto (= maglia con il segno), 1 maglia gettata, lavorare finché non rimangono 2 maglie, 2 maglie insieme a diritto. FERRO 2 (sul rovescio del lavoro): 2 maglie insieme a diritto, lavorare fino alla fine del ferro; lavorare le maglie gettate a diritto per formare dei buchi = 154 maglie. FERRO 3 (= sul diritto del lavoro): Lavorare fino alla maglia con il segno, 1 maglia gettata, 1 maglia diritto (= maglia con il segno), 1 maglia gettata, lavorare finché non rimangono 2 maglie, 2 maglie insieme a diritto. FERRO 4 (sul rovescio del lavoro): 2 maglie insieme a diritto, lavorare fino alla fine del ferro; lavorare le maglie gettate a diritto per formare dei buchi = 154 maglie. FERRI 5-10: Lavorare come indicato per i ferri 3 e 4 = 154 maglie. Ripetere i ferri da 1 a 10, vengono diminuite 10 maglie ogni 10 ferri. Proseguire finché non rimangono 4 maglie sui ferri, intrecciare queste maglie. Tagliare e fermare i fili. |
|
Avete terminato questo modello?Allora taggate le vostre foto con #dropspattern #pointthewayshawl o inviatele alla #dropsfan gallery. Avete bisogno di aiuto con questo modello?Troverete 11 video tutorial, una sezione per i commenti/domande e molto altro guardando il modello su www.garnstudio.com © 1982-2026 DROPS Design A/S. Ci riserviamo tutti i diritti. Questo documento, compreso tutte le sue sotto-sezioni, è protetto dalle leggi sul copyright. Potete leggere quello che potete fare con i nostri modelli alla fine di ogni modello sul nostro sito. |
|


Con oltre 40 anni di esperienza nel design di modelli di maglia e uncinetto, DROPS Design offre la più estesa collezione di modelli gratuiti su internet - tradotti in 17 lingue. Ad oggi vi possiamo fornire 325 cataloghi e 12298 modelli - 9569 dei quali sono tradotti in Italiano.
Ci stiamo impegnando molto per darvi il meglio che vi possiamo offrire in termini di maglia e uncinetto, ispirazioni e consigli così come filati di grande qualità ad un prezzo incredibile! Volete utilizzare i nostri modelli per qualcosa d'altro oltre al vostro uso personale? Potete leggere tutto ciò che è consentito nel testo sul Copyright in basso su tutte le pagine dei nostri modelli. Buon lavoro!
Lasciare un commento sul modello DROPS 186-4
Noi saremmo felici di ricevere i tuoi commenti e opinioni su questo modello!
Se vuoi fare una domanda, fai per favore attenzione a selezionare la categoria corretta nella casella qui sotto per velocizzare il processo di risposta. I campi richiesti sono indicati da *.