
Categorie popolari
State cercando un filato?


Commenti / Domande (39)
![]() Lue ha scritto:
Lue ha scritto:
Hello, I’m having problems understanding the pattern -please help. My round began with the front piece and ends with the back piece. I have now got to the part ‘After all increases …’ it says cast on 7 st then slip st on to a holder and to work the pattern on the back piece ….. then goes on to the front piece. However, following my round and casting on to the beginning of my round would mean I’m getting to the front piece first. Hope you can help , Thanks
23.06.2025 - 02:57DROPS Design ha risposto:
Dear Lue, yes, there seems to be a typo in the pattern; first you work over the front piece and then over the back piece. The number of stitches remains the same, so you don't need to change anything. Happy knitting!
29.06.2025 - 19:28
![]() Lue ha scritto:
Lue ha scritto:
Hello, Please help ….where do I add the increase for the 2nd round front yoke - I know the instructions mention ‘each side of A.1 ..’ … but is that before or after A.1 or after the stocking stitch that follows A.1 or after the yarn over? Lue
06.05.2025 - 13:12DROPS Design ha risposto:
Dear Lue, you will increase for front/back pieces/sleeves after the first stitch in stocking stitch after A.1 at the beginning of front/back pieces/sleeves and before the last stitch in stocking stitch just before next A.1 at the end of front/back pieces/sleeves. Note that depending on your size you might have to increase a different number of sts each round. Happy knitting!
06.05.2025 - 13:48
![]() Susi ha scritto:
Susi ha scritto:
Der Pulli hat doch keinen V- Ausschnitt, wie oben angegeben ? Das ist doch ganz klar ein Rundhals? Schade, denn ich suchte eine Anleitung für einen V- Ausschnitt mit Raglan von oben. :-(
12.03.2023 - 10:25DROPS Design ha risposto:
Liebe Susi, danke für den Hinweis, Halsausschnitt ist jetzt korrigiert - hier finden Sie unsere Pullover von oben nach unten mit V-Ausschnitt. Viel Spaß beim stricken!
13.03.2023 - 09:43
![]() Gaye ha scritto:
Gaye ha scritto:
Hi, I really love this pattern but the small size is too big. I would be an XS, would I be able to use a smaller needle to get this size?
04.11.2022 - 19:25DROPS Design ha risposto:
Dear Gaye, using a smaller needle may not be enough to get the size you want. You need to use a rule-of-three to calculate the stitches needed for your measurements, according to your gauge and adapt the pattern to the new calculations and measurements. You can see how to calculate a pattern here: https://www.garnstudio.com/lesson.php?id=25&cid=19. Happy knitting!
07.11.2022 - 00:40
![]() Magda Jensen ha scritto:
Magda Jensen ha scritto:
Udtagninger f.eks. Ærme - er det= omslag i begge sider + 4 m (i alt 6 m)? Og er det det samme med forstykke/bagstykke (mellem de 2 mønstre)? F.eks. Skal der på ryg/forstykke udtages (30gange x 4+2m =180 m), under ryg&forstykke står at der er 220m og under ærmer står der 360m . Vil det sige at der efter udtagninger er 580 m??Kan man ikke oplyse maskeantal på henholdsvis ærme og bagstykke/forstykke efter udtagninger?
12.06.2022 - 12:15DROPS Design ha risposto:
Hej Magda, Hvilken størrelse strikker du? Hvor langt er du kommet i opskriften? Hvad er dit spørgsmål?
17.06.2022 - 09:09
![]() Anne ha scritto:
Anne ha scritto:
Hi, I’m having trouble with the increases on yoke. The first row given says first increase for raglan is done (8 stitches increased) does this first row also show sleeve and front/back increases? If it does not, how do I knit the sleeve and front/back increases ? Thanks for your help
06.03.2022 - 11:23DROPS Design ha risposto:
Dear Anne, in the raglan you have all of the increases (sleeve/ front/ back) and are each marked and explained in the pattern. Happy knitting!
06.03.2022 - 13:52
![]() Nelleke ha scritto:
Nelleke ha scritto:
Meerderen ? VOORPAND EN ACHTERPAND: Meerder 4 steken elke nld 0-0-0-5-10-16 keer in totaal, dan om de naald 18-22-30-30-30-30 keer in totaal en tot slot elke 4e nld 4-4-0-0-0-0 keer in totaal. Wanneer begin je met meerderen bij maat M . Zijn de meerderingen meegenomen in het patroon A1? Ik begrijp niet waar ik met meerderen begin na de 1 e naald van patroon A1.
13.02.2022 - 17:57DROPS Design ha risposto:
Dag Nelleke,
Omdat je maat M breit kun je gelijk beginnen met om de naald meerderen, want bij elke naald staat 0 keer. De meerderingen staan niet in het telpatroon, de steken van het telpatroon blijven steeds hetzelfde en je meerdert voor de raglan steeds aan elke kant van A.1
17.02.2022 - 11:34
![]() Sandra ha scritto:
Sandra ha scritto:
Scusate, ma dove si mettono i marcapunti per determinare gli aumenti del raglan per le maniche? Sembra ci siano solo 4 aumenti ai lati delle 15 m delle maniche (1gett, 15m, 1gett). Gli altri 4 sono i gettati centrali tra i due motivi di 19+2m sia davanti che dietro? O non ho capito nulla? la spiegazione mi sembra un po' confusionaria... forse dipende dalla traduzione...
12.01.2021 - 09:48DROPS Design ha risposto:
Buongiorno Sandra, in questo modello non è previsto l'inserimento di segnapunti per gli aumenti, ma può inserirli seguendo la divisione indicata nel modello: le varie parti sono indicate tra le parentesi. Buon lavoro!
12.01.2021 - 10:02
![]() Marcia ha scritto:
Marcia ha scritto:
I understand that I need to increase 8 stitches for the A.1 sections. Do I also need to increase for the sleeves?
09.07.2019 - 17:25DROPS Design ha risposto:
Dear Marcia, you increase for raglan before 1 st + A.1 and/or after A.1 + 1 stitch - see RAGLAN. Depending on your size you will increase a different way on sleeve and body, you then increase 1 stitch at the beginning of body/sleeve after 1 st after A.1 and increase at the end of body/sleeve before 1 st before A.1, you will increase either 4 sts or 8 sts on each increase round. Happy knitting!
10.07.2019 - 09:04
![]() Marcia ha scritto:
Marcia ha scritto:
Hi. I'm making the XL size. For the increases in the yoke...if I increase on both sides of each A.1 pattern and there are 2 patterns on the front and 2 on the back, that makes 8 stitches. I also increase 4 stitches for the sleeves (every other round). Is this right? Thanks.
09.07.2019 - 06:54DROPS Design ha risposto:
Hi Marcia, A total of 8 stitches are increased on each increase-round for raglan, so you need to increase on the first side of the first A.1 and the far side of the second A.1 on both front and back pieces. Happy knitting!
09.07.2019 - 07:27
|
|||||||||||||||||||
Maren#marensweater |
|||||||||||||||||||
 |
 |
||||||||||||||||||
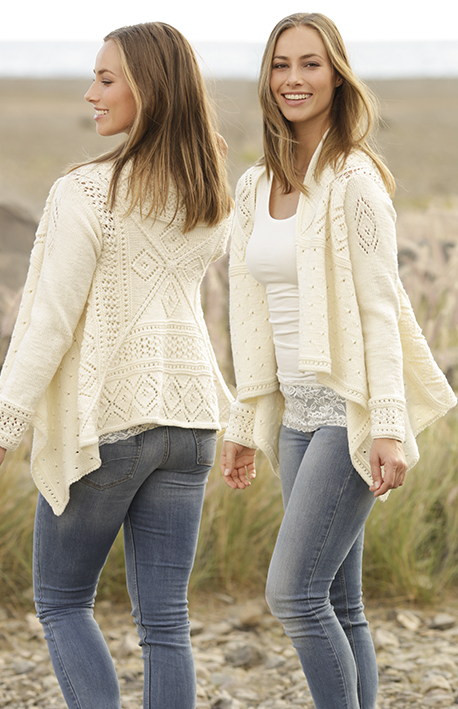
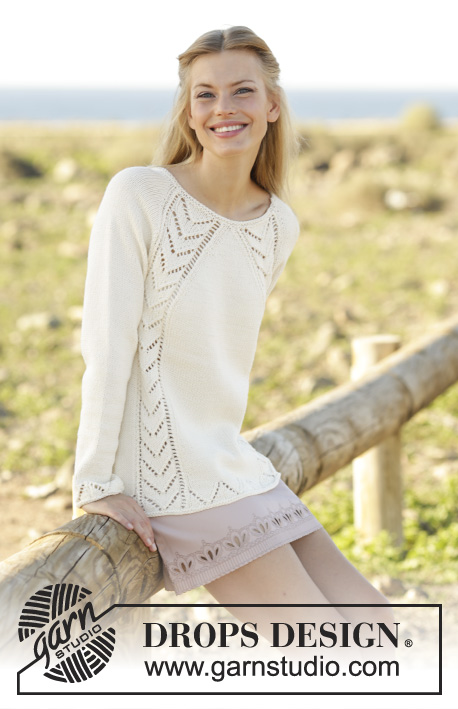
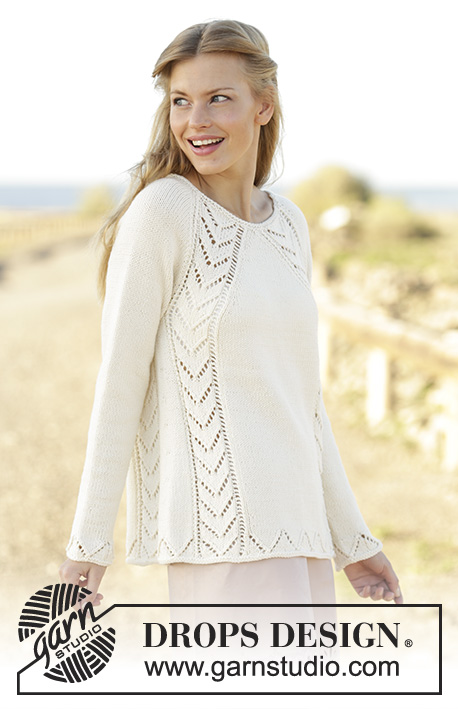
Maglione lavorato ai ferri con motivo traforato e raglan, lavorato dall’alto in basso (top down) in DROPS Cotton Merino. Taglie: S - XXXL
DROPS 176-27 |
|||||||||||||||||||
|
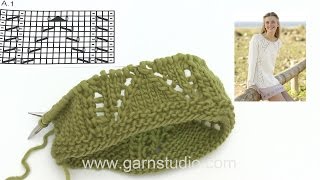
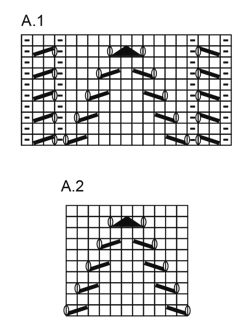
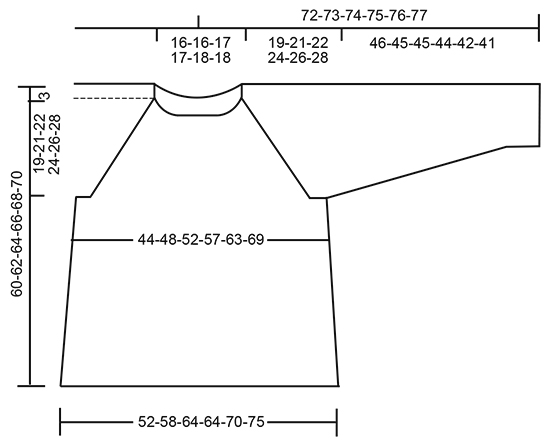
MAGLIA LEGACCIO (lavorata in tondo): 1 costa = 2 giri. Lavorare 1 giro diritto e 1 giro rovescio. MAGLIA LEGACCIO (avanti e indietro): 1 costa = lavorare 2 ferri diritto. MOTIVO: Vedere i diagrammi A.1 e A.2. I diagrammi mostrano tutti i ferri del motivo visti dal diritto del lavoro. RAGLAN: Aumentare per il raglan a ogni lato di A.1 + 1 maglia a maglia rasata a ogni lato (a ogni lato delle 21 maglie). Aumentare 1 maglia facendo 1 gettato, sul giro successivo lavorare il gettato a ritorto per evitare buchi. Lavorare gli aumenti a maglia rasata. NOTA: Aumentare in modo diverso sul corpo e sulle maniche come indicato nelle spiegazioni. SUGGERIMENTO PER LE DIMINUZIONI: Diminuire al centro sotto la manica come segue: iniziare 3 maglie prima del segnapunti e lavorare 2 maglie insieme a diritto, 1 maglia diritto (= maglia con il segnapunti), passare 1 maglia a diritto senza lavorarla, 1 maglia diritto, accavallare la maglia passata sopra quella appena lavorata (= 2 diminuzioni). SUGGERIMENTO PER GLI AUMENTI (applicato agli aumenti ai lati del corpo): Iniziare 1 maglia prima della maglia con il segnapunti, 1 gettato, 3 maglie diritto (il segnapunti si trova nella maglia centrale), 1 gettato (= 2 aumenti). Sul giro successivo lavorare i gettati a diritto ritorto per evitare buchi. ---------------------------------------------------------- MAGLIONE: Lavorato in tondo con i ferri circolari dall’alto in basso (top down). SPRONE: Avviare 102-102-102-102-106-106 maglie con i ferri circolari n° 4 mm con Cotton Merino. Lavorare 2 coste a MAGLIA LEGACCIO – leggere la spiegazione sopra. Lavorare 1 giro diritto e allo stesso tempo distribuire 14 aumenti in modo uniforme per tutte le taglie = 116-116-116-116-120-120 maglie. FARE ATTENZIONE ALLA TENSIONE DEL LAVORO! Lavorare il giro successivo come segue: 1 gettato, 15 maglie a maglia rasata, 1 gettato (= manica), 1 maglia a maglia rasata, A.1 (= 19 maglie), 1 maglia a maglia rasata, 1 gettato, 1-1-1-1-3-3 maglie a maglia rasata, 1 gettato, 1 maglia a maglia rasata, A.1, 1 maglia a maglia rasata (= davanti), 1 gettato, 15 maglie a maglia rasata, 1 gettato (= manica), 1 maglia a maglia rasata, A.1, 1 maglia a maglia rasata, 1 gettato, 1-1-1-1-3-3 maglie a maglia rasata, 1 gettato, 1 maglia a maglia rasata, A.1, 1 maglia a maglia rasata (= dietro). I primi aumenti per il RAGLAN ora sono finiti. Continuare verso l’alto con questa divisione con il motivo e a maglia rasata. Aumentare per il raglan come spiegato sopra. NOTA: Aumentare in modo diverso sullo sprone e sulle maniche come segue: DAVANTI E DIETRO: Aumentare 4 maglie su ogni giro 0-0-0-5-10-16 volte in totale, poi a giri alterni 18-22-30-30-30-30 volte in totale e infine ogni 4 giri 4-4-0-0-0-0 volte in totale. MANICHE: Aumentare 4 maglie su ogni giro 0-0-2-1-0-0 volte in totale, poi a giri alterni 20-24-29-32-35-35 volte in totale e infine ogni 4 giri 3-3-0-0-0-2 volte in totale. Alla fine di tutti gli aumenti ci sono 296-328-360-388-420-452 maglie sul giro. Il lavoro misura circa 22-24-25-27-29-31 cm dalla spalla (19-21-22-24-26-28 cm dal bordo di avvio). Ora lavorare come segue: avviare 7 nuove maglie sul ferro (inserire 1 segnapunti nella maglia centrale), trasferire le prime 61-69-77-81-85-89 maglie su un fermamaglie (= manica), lavorare il motivo e a maglia rasata come prima sulle 87-95-103-113-125-137 maglie successive (= davanti), trasferire le 61-69-77-81-85-89 maglie successive su un fermamaglie, avviare 7 nuove maglie sotto la manica, (inserire 1 segnapunti nella maglia centrale), lavorare il motivo e a maglia rasata come prima sulle 87-95-103-113-125-137 maglie rimaste (= dietro). ORA MISURARE IL LAVORO DA QUI. CORPO: = 188-204-220-240-264-288 maglie. Continuare con A.1 e a maglia rasata come prima. Quando il lavoro misura 3 cm, aumentare 1 maglia a ogni lato di entrambi i segnapunti – LEGGERE IL SUGGERIMENTO PER GLI AUMENTI (= 4aumenti), lavorare gli aumenti a maglia rasata. Aumentare ogni 4 cm 7 volte in totale = 216-232-248-268-292-316 maglie. Continuare a maglia rasata e A.1 fino a quando il lavoro misura 34-34-35-35-35-35 cm, aggiustarlo in modo che il giro successivo sia l’ultimo giro di A.1. Lavorare l’ultimo giro in A.1, ALLO STESSO TEMPO aggiustare il n° di maglie tra A.1 e A.1 al centro del davanti e al centro del dietro a 47-59-71-71-83-95 maglie (= 220-240-264-264-288-312 maglie in totale). Poi lavorare come segue – dall’inizio del lavoro: A.2 (= 11 maglie), 1 maglia rovescio, A.2, A.1 come prima, *A.2, 1 maglia rovescio *, lavorare *-* 3-4-5-5-6-7 volte in totale, A.2, A.1 come prima, A.2, 1 maglia rovescio, A.2, A.1 come prima, *A.2, 1 maglia rovescio *, lavorare *-* 3-4-5-5-6-7 volte in totale, A.2, A.1 come prima. Lavorare A.1/A.2 1 volta in verticale, poi lavorare 1 costa prima di intrecciare. MANICA: Riportare le maglie delle maniche sui ferri circolari corti/a doppia punta n° 4 mm, riprendere 1 maglia in ognuna delle 7 maglie avviate sotto le maniche = 68-76-84-88-92-96 maglie. Inserire 1 segnapunti nella maglia centrale sotto la manica – ORA MISURARE IL LAVORO DA QUI. Lavorare a maglia rasata in tondo con i ferri circolari/a doppia punta. Quando il lavoro misura 3 cm, diminuire 1 maglia a ogni lato dei segnapunti – LEGGERE IL SUGGERIMENTO PER LE DIMINUZIONI. Ripetere le diminuzioni ogni 3-2-2-1½-1½-1½ cm 13-16-19-20-21-22 volte in totale. Alla fine di tutte le diminuzioni, rimangono 42-44-46-48-50-52 maglie sul giro. Quando la manica misura 42-41-41-40-38-37 cm, aggiustare il n° di maglie a 48 per tutte le taglie. Poi lavorare come segue: * A.2, 1 maglia rovescio *, lavorare *-* 4 volte in totale. Quando A.1 è stato lavorato 1 volta in verticale, lavorare 1 costa e poi intrecciare. La manica misura circa 46-45-45-44-42-41 cm in totale. Lavorare l’altra manica nello stesso modo. |
|||||||||||||||||||
Spiegazioni del diagramma |
|||||||||||||||||||
|
|||||||||||||||||||
 |
|||||||||||||||||||
 |
|||||||||||||||||||
Avete terminato questo modello?Allora taggate le vostre foto con #dropspattern #marensweater o inviatele alla #dropsfan gallery. Avete bisogno di aiuto con questo modello?Troverete 30 video tutorial, una sezione per i commenti/domande e molto altro guardando il modello su www.garnstudio.com © 1982-2026 DROPS Design A/S. Ci riserviamo tutti i diritti. Questo documento, compreso tutte le sue sotto-sezioni, è protetto dalle leggi sul copyright. Potete leggere quello che potete fare con i nostri modelli alla fine di ogni modello sul nostro sito. |
|||||||||||||||||||


Con oltre 40 anni di esperienza nel design di modelli di maglia e uncinetto, DROPS Design offre la più estesa collezione di modelli gratuiti su internet - tradotti in 17 lingue. Ad oggi vi possiamo fornire 325 cataloghi e 12298 modelli - 9569 dei quali sono tradotti in Italiano.
Ci stiamo impegnando molto per darvi il meglio che vi possiamo offrire in termini di maglia e uncinetto, ispirazioni e consigli così come filati di grande qualità ad un prezzo incredibile! Volete utilizzare i nostri modelli per qualcosa d'altro oltre al vostro uso personale? Potete leggere tutto ciò che è consentito nel testo sul Copyright in basso su tutte le pagine dei nostri modelli. Buon lavoro!
Lasciare un commento sul modello DROPS 176-27
Noi saremmo felici di ricevere i tuoi commenti e opinioni su questo modello!
Se vuoi fare una domanda, fai per favore attenzione a selezionare la categoria corretta nella casella qui sotto per velocizzare il processo di risposta. I campi richiesti sono indicati da *.