
Categorie popolari
State cercando un filato?


Commenti / Domande (25)
![]() Hetty ha scritto:
Hetty ha scritto:
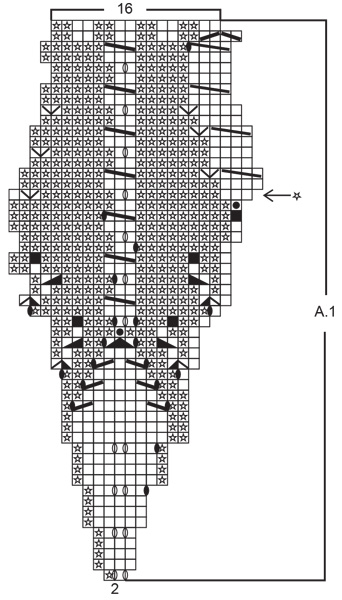
This mess concerning rows 36 and 37 is stressing me out. “The last stitch of the last report”?, “finish the round one stitch before”? Can you clarify what you mean please? How can I finish the row before the row is finished? What’s a report? Why didn’t you just alter the diagram? (I don’t know how you’d do that because I don’t understand what you’re trying to achieve).
26.04.2026 - 11:40DROPS Design ha risposto:
Dear Hetty, "Report" is a typo; it should be repeat. That is, when you work the last repeat of A.1 in that round, finish one stitch before the end of the round and start with the first symbol in the next round. So the last repeat of A.1 in round 36 of the chart should be purl 2 together and then you start directly with the 4 knit stitches of the first repeat of A.1 in round 37. We don't alter the chart because the knit stitch isn't omitted in all other repeats of A.1 in that same round, only at the very last repeat. At the same time, the chart in round 37 will need 4 knit stitches at the start of every repeat of A.1 in that round. So the best way to skip this stitch is to add a note to round 36 to skip the last stitch. Happy knitting!
27.04.2026 - 02:09
![]() Hetty ha scritto:
Hetty ha scritto:
Is there an alternative method to starting this beret? I can not, even trying dozens of times, to do this magic circle. Yes, I have watched the video, No, it is not working for me. It goes too quickly. I am left-handed. I do not know how to crochet. I am not from Europe or Scandinavia so I do not knit in the same way. I would be happy to have the hole if it meant I could begin this hat.
23.04.2026 - 13:16DROPS Design ha risposto:
Dear Hetty, you ca just cast on the 14 stitches onto 4 double pointed with your usual technique, at the very end of the beret, just thread the end through the cast on edge to tigthen/close hole. Happy knitting!
23.04.2026 - 16:15
![]() Asia ha scritto:
Asia ha scritto:
Dzień dobry, Przerobiłam okrążenie 20, które rozpoczyna się od narzutu. W okrążeniu 21 wg schematu trzeba najpierw przerobić oczko lewe a potem zrobić oczko przekręcone na prawo w narzucie.. tylko u mnie jest najpierw narzut a potem oczko lewe. Jak to rozwiązać? Pozdrawiam
12.03.2026 - 14:00DROPS Design ha risposto:
Witaj Asiu, okrążenie 20 zaczyna się od 1 oczka prawego, a następnie jest narzut. Pozdrawiamy!
16.03.2026 - 16:58
![]() Claire ha scritto:
Claire ha scritto:
Row 20 starts with a Yarn over then row 21 starts with the symbol '/' plus 'split square' which the instructions say "slip 1 P on cable needle behind piece, K YO twisted (= not hole), P 1 from cable needle". As my first stitch is the yarn over how does this work? I'd have to slip the YO to the cable needle? Thanks!
27.04.2023 - 15:53DROPS Design ha risposto:
Dear Claire, the 20th round starts with K1, Yarn over, so that you can work the cable as explained. Happy knitting!
27.04.2023 - 17:15
![]() Vanessa Bunton ha scritto:
Vanessa Bunton ha scritto:
I do not understand how the arrow code affects the working of row 37 and does this affect row 38. Thank you for your assistance
20.02.2023 - 19:29DROPS Design ha risposto:
Dear Mrs Bunton, this round (with a star) starts with the last stitch from last repeat, then work digaram as shown and start next repeat with last stitch 1st repeat etc. Happy knitting!
21.02.2023 - 10:04
![]() Kornelia Plitschka ha scritto:
Kornelia Plitschka ha scritto:
Ich weiß nicht warum aber in der 27. Runde komme ich einfach nicht weiter an der Stelle wo man mit der zopfnadel das erste Mal arbeiten must. Ich würde ja sagen da hat sich in der strickschrieft ein Fehler eingeschlichen weil mir aufgefallen ist dass die Erwachsenen Mütze genau an diese Stelle anders geschrieben ist
22.01.2022 - 16:01DROPS Design ha risposto:
Liebe Frau Plitschka, am Anfang der 27. Runde stricken Sie 1 Masche rechts (die 1. Masche A.1), dann die Zunahmen von vorrigen Runde + die nächste als Zopf (= 9. Symbol) und am Ende A.1 die letzte linke Masche + die Zunahmmen von vorrigen Runde als Zopf (= 10.Symbol) stricken. Viel Spaß beim stricken!
24.01.2022 - 10:52
![]() Sarah ha scritto:
Sarah ha scritto:
I'm having the same problem as everyone else with rows 36 & 37 -- there are 24 stitches in row 36 and then 23 stitches in row 37. It starts out well enough, but as I go around, the cable pattern gets more and more out of line, and the round ends in the middle of a repetition. Can you please direct me to a corrected pattern, or help me make sense of this discrepancy in stitches? Thanks.
25.01.2021 - 23:45DROPS Design ha risposto:
Hi Sarah, sorry for late answer, diagram has now been edited. Happy knitting!
26.04.2021 - 14:04
![]() Ana-Carin Eby ha scritto:
Ana-Carin Eby ha scritto:
Varv 36 och 37 i A1 beredde mig mycket problem. Det finns en tidigare kommentar om att mönstret skulle rättas men det är inte gjort. Ökningen i sista maskan på v 36 ska INTE göras. Första maskan på v 37 = sista maskan på v 36. Det måste kommenteras i mönstret annars går det inte att förstå.
04.01.2021 - 10:34
![]() Maria ha scritto:
Maria ha scritto:
Hej. Jag funderade på att sticka denna barnbasker, men förstår inte den magiska cirkeln alls. Skulle den kunna komma som instruktionsvideo? Hälsningar Maria
30.07.2020 - 20:59DROPS Design ha risposto:
Hej Maria, du hittar videon nederst i mönstret. Se här: Hur man lägger upp med en cirkel = magic loop
04.08.2020 - 10:41
![]() Gabriele ha scritto:
Gabriele ha scritto:
Ich meine den Fehler gefunden zu haben.In der 36.Runde darf nur 1x1Masche zugenommen werden,nicht 2x. LG.,Gabriele
09.12.2019 - 01:52
|
||||||||||||||||||||||||||||||||||||||||||||||||||||
Little Sunshine#littlesunshinehat |
||||||||||||||||||||||||||||||||||||||||||||||||||||
|
|
||||||||||||||||||||||||||||||||||||||||||||||||||||
Basco per bambini lavorato ai ferri, con motivo a foglie, lavorato dall’alto verso il basso, in DROPS Karisma.
DROPS Children 27-17 |
||||||||||||||||||||||||||||||||||||||||||||||||||||
|
MOTIVO: Vedere il diagramma A.1. CERCHIO MAGICO: Iniziare con questa tecnica per evitare di avere un buco al centro. Tenere l’estremità del filo con la mano sinistra e fare un anello intorno all’indice sinistro (da sinistra verso destra). Tenere l’anello con il pollice e l’indice della mano sinistra. Far passare il ferro nell’anello, prendere il filo dal gomitolo (quindi avvolgere il filo 1 volta intorno al ferro, dal davanti verso il dietro), estrarre il filo dall’anello, 1 m gettata (portare il filo da dietro verso il davanti) e passare la m gettata attraverso la m sul ferro, * far passare il ferro nell’anello, 1 m gettata (portare il filo da dietro verso il davanti), far passare la m gettata attraverso l’anello, 1 m gettata (da dietro verso il davanti) e far passare la m gettata attraverso l’ultima m del ferro di destra (quindi nell’ultima m fatta) *, ripetere da *-* finché non ci sono 14 m sul ferro. Distribuire le m sui 4 ferri a doppia punta n° 3 o n° 3,5 (a seconda della taglia) come indicato nelle spiegazioni. Lavorare ora come indicato nelle spiegazioni sotto – ALLO STESSO TEMPO, tirare l’estremità del filo per stringere l’anello e far sparire il buco. ---------------------------------------------------------- BASCO: Lavorare in tondo sui ferri a doppia punta; passare ai ferri circolari quando necessario. Iniziare con il filato Karisma e con la tecnica del CERCHIO MAGICO - vedere le spiegazioni sopra = 14 m. Distribuire le m sui 4 ferri a doppia punta n° 3 o n° 3,5 in modo che ci siano 4 m su ognuno dei primi 3 ferri e 2 m sull’ultimo ferro. Lavorare il motivo in tondo seguendo il diagramma A.1 (= 7 ripetizioni di 2 m). RICORDARSI DI MANTENERE LA CORRETTA TENSIONE DEL LAVORO! Quando rimane da lavorare 1 giro del diagramma A.1, sui ferri ci sono 112 m. Passare ai ferri circolari n° 2,5 o n° 3 e proseguire a coste in tondo come indicato nell’ultimo giro del diagramma A.1. Quando le coste misurano 4-5 cm, intrecciare le m lavorando a dir le m dir e a rov le m rov (assicurarsi che il bordo di chiusura delle m non sia troppo stretto). |
||||||||||||||||||||||||||||||||||||||||||||||||||||
Spiegazioni del diagramma |
||||||||||||||||||||||||||||||||||||||||||||||||||||
|
||||||||||||||||||||||||||||||||||||||||||||||||||||
 |
||||||||||||||||||||||||||||||||||||||||||||||||||||
Avete terminato questo modello?Allora taggate le vostre foto con #dropspattern #littlesunshinehat o inviatele alla #dropsfan gallery. Avete bisogno di aiuto con questo modello?Troverete 22 video tutorial, una sezione per i commenti/domande e molto altro guardando il modello su www.garnstudio.com © 1982-2026 DROPS Design A/S. Ci riserviamo tutti i diritti. Questo documento, compreso tutte le sue sotto-sezioni, è protetto dalle leggi sul copyright. Potete leggere quello che potete fare con i nostri modelli alla fine di ogni modello sul nostro sito. |
||||||||||||||||||||||||||||||||||||||||||||||||||||


Con oltre 40 anni di esperienza nel design di modelli di maglia e uncinetto, DROPS Design offre la più estesa collezione di modelli gratuiti su internet - tradotti in 17 lingue. Ad oggi vi possiamo fornire 324 cataloghi e 12290 modelli - 9561 dei quali sono tradotti in Italiano.
Ci stiamo impegnando molto per darvi il meglio che vi possiamo offrire in termini di maglia e uncinetto, ispirazioni e consigli così come filati di grande qualità ad un prezzo incredibile! Volete utilizzare i nostri modelli per qualcosa d'altro oltre al vostro uso personale? Potete leggere tutto ciò che è consentito nel testo sul Copyright in basso su tutte le pagine dei nostri modelli. Buon lavoro!
Lasciare un commento sul modello DROPS Children 27-17
Noi saremmo felici di ricevere i tuoi commenti e opinioni su questo modello!
Se vuoi fare una domanda, fai per favore attenzione a selezionare la categoria corretta nella casella qui sotto per velocizzare il processo di risposta. I campi richiesti sono indicati da *.