
Categorie popolari
State cercando un filato?


Commenti / Domande (33)
![]() Louise ha scritto:
Louise ha scritto:
Jag blir inte klok på er beskrivning! Den är rörig som bara den. Jag har satt markörer på 4 ställen men det blir ca 25cm över när de är satta. Är det fel i beskrivningen eller är detta tänkt till något annat? Är det själva halsen det beskrivs så är de helt fel på var 9e maska. Sedan undrar jag även över ökningen. Jag har ökat 8st med en på var sida omslag, men ska jag nu fortsätta göra det vartannat varv eller 4st på 6 varv? Så förvirrande!
05.04.2020 - 15:09DROPS Design ha risposto:
Hej Louise, ... forstår ikke hvad du mener med at det bliver 25 cm över.... Vi skal prøve at forklare men skal vide hvilken størrelse du vil strikke
21.04.2020 - 12:09
![]() Chelo ha scritto:
Chelo ha scritto:
Hola, sus patrónes son muy buenos pero muchos modelos vienen sin diagrama, pueden decirme como descagarlos?. Muchas gracias
17.11.2019 - 16:52DROPS Design ha risposto:
Hola Chelo. Bajo los materiales tienes un botón IMPRIMIR para descargar e imprimir gratis.
17.11.2019 - 18:46
![]() Eva ha scritto:
Eva ha scritto:
I am sorry to bother you again regarding this pattern please help me. I am at the stage of having knitted 160 sts and piece measures 44cm. Instruction stating to divide pieces back, front, and sleeves, which I did and cut the yarn as instructions. Now I need to work the back piece inc. every RS row 3 times = only 6 rows. If I do that the whole thing will not be long enough as an extra 6 rows will give appx 2" so it will be a neck warmer not a poncho, as I cut the yarn when it reached 44cm.
15.09.2018 - 20:57DROPS Design ha risposto:
Dear Eva, make sure your tension is right you should have 10 rows in seed stitch = 4" in height - and check your measurements with the measurement chart at the bottom of the pattern. Happy knitting!
17.09.2018 - 08:49
![]() Eva ha scritto:
Eva ha scritto:
I am still very confused, please help me I have started the poncho 4 times now Ie. On the first increase row when increasing 1 stitch on either side of the marker I keep getting the moss stitch muddled up and each time I am getting either 2 Knit or 2 Purl stitch together. (Somehow the numbers don't add up. Ie. start Knit one, p,k,p,k =...9 stitches put a marker on the 10th Knitt stitch, then p,k,p,k ..9, and put marker On next knitt stitch as instruction, )
13.09.2018 - 18:20DROPS Design ha risposto:
Dear Eva, the marker should be in one stitch, you will then increase in moss stitch before this stitch with marker (= P or K this stitch depending on your last st worked), knit the stitch with marker and increase in moss stitch after the stitch with marker (K or P this stitch depending on how you have to work the next stitch). This way, you may have K2 at the marker (including the st with marker) but on next round, the st with marker will be K and the other K will be worked P in moss st. Happy knitting!
14.09.2018 - 08:13
![]() Eva ha scritto:
Eva ha scritto:
Please help me, I am struggling to work out the gauge for this poncho because I am about to use ESKIMO yarn where the tension is 11 st & 15 rows in 10 cm knitted with size 8 mm needles. This poncho's tension is 7 st 10 rows in 10 cm. I don't know what to do should I double the yarn and needle size, or use the largest size to achieve the small size poncho? in that case how much yarn would I need to complete a s/m size poncho? I very much appreciate your help.
11.09.2018 - 14:20DROPS Design ha risposto:
Dear Eva, DROPS Cloud was yarn group E as Eskimo, ie you should get the same tension with 1 strand Eskimo - adjust the needle size if necessary. Happy knitting!
11.09.2018 - 14:41
![]() Mona ha scritto:
Mona ha scritto:
Hei. Hvis jeg skal benytte polaris i denne oppskriften, hvor mange nøster må jeg beregne? Og hvilken pinne størrelse bør jeg benytte?
31.08.2018 - 17:04DROPS Design ha risposto:
Hei Mona, Når du bruker et annet garn enn det i oppskriften, kan du bruke vår garnkalkulator. Det er også lurt å strikke en prøvelapp på 10 x 10 cm for å se om du har riktige strikkefasthet og riktige pinne størrelse. God fornøyelse!
01.09.2018 - 12:22Isabel Valenzuela Giovanetti ha scritto:
Terminé el poncho pero no sé hasta donde hay quecoser los costados. Si llego muy arriba queda muy estrecho.
25.05.2018 - 00:27Maria Cristina ha scritto:
No se tejer con agujas circulares ,hay alguna forma de convertirlo para tejer con agujas derechas gracias
16.05.2018 - 12:33DROPS Design ha risposto:
Hola María Cristina, sí, muchos de los patrones de DROPS se pueden trabajar con 2 agujas, pero tienes que hacer los cálculos adicionales tú misma o acudir a una tienda de DROPS para que te ayuden.
20.05.2018 - 19:31Susanne ha scritto:
I have knitted this sweater the end of the Back Piece instructions. I have not yet cast off though because the picture appears that the sweater is decreased to a point in the front and back yet the instructions have no mention of any decreasing....how then are the points formed? Your assistance is appreciated.
02.04.2018 - 23:02DROPS Design ha risposto:
Dear Suzanne, poncho is worked top down increasing in the middle of back and front piece. When working back piece back and forth, continue increasing in the middle of back piece as you did before, this will create the tip in the middle. Happy knitting!
03.04.2018 - 10:07
![]() Jette Andersen ha scritto:
Jette Andersen ha scritto:
Hej Drops. Er det rigtigt at man skal strikke rundt med 32 m på en 60 cm lang rundpind, det syntes jeg er umuligt. Venlig hilsen Jette
02.01.2018 - 14:08DROPS Design ha risposto:
Hei Jette. Dert skal strikkes med dobbelt tråd eller 4-dobbelt tråd, slik at det blir en ganske "tykk" tråd. Men det går fint å bruke en 60 cm lang rundpinne. God Fornøyelse!
03.01.2018 - 11:32
|
|
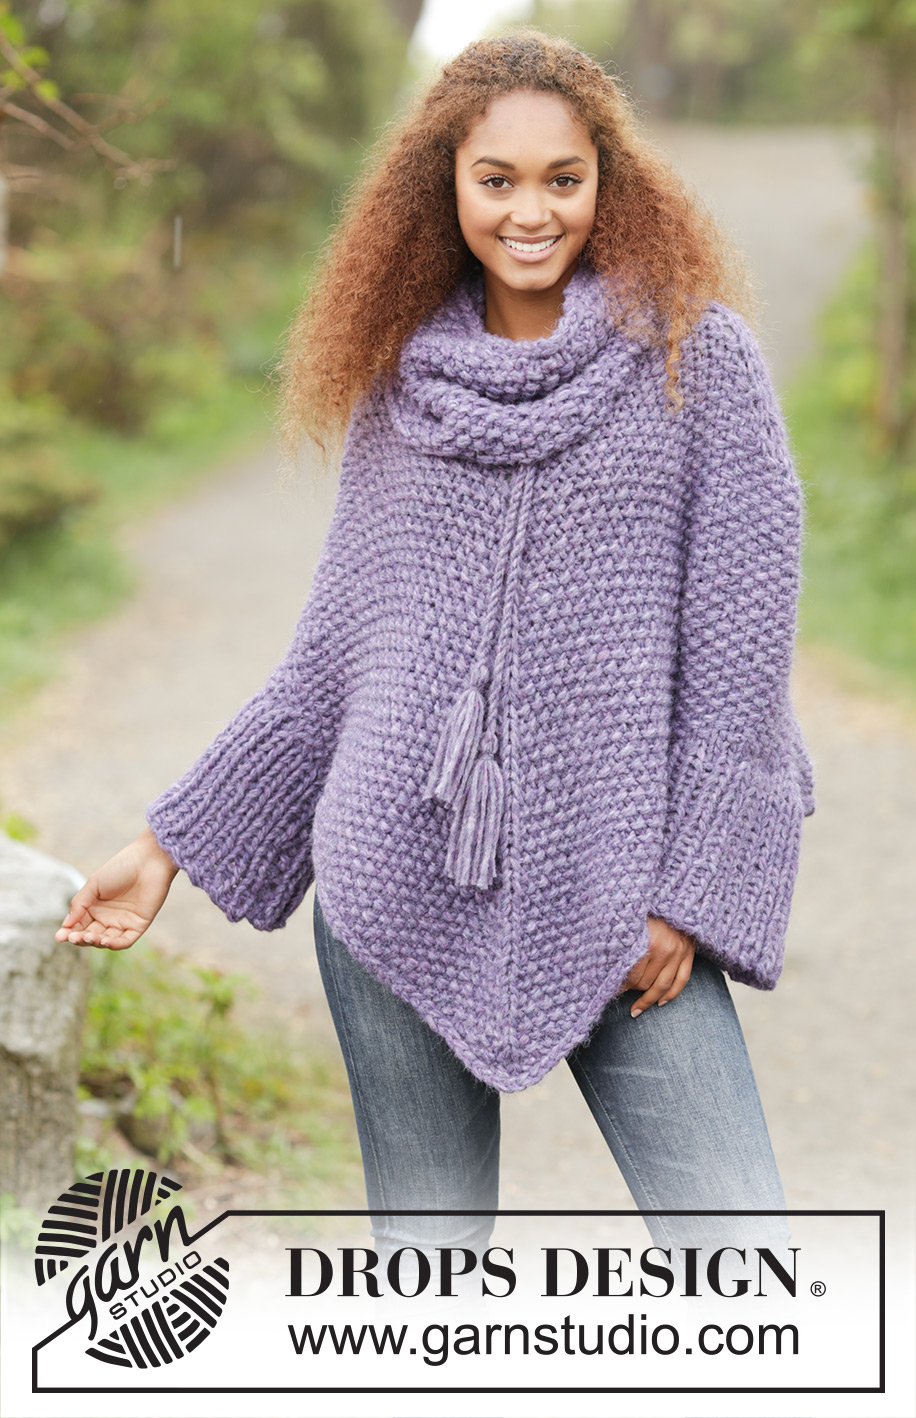
Lavender Grove#lavendergroveponcho |
|
|
|
|
Poncho DROPS lavorato a grana di riso, collo staccabile, lavorato dall’alto in basso (top down) con 2 capi di Cloud o 4 capi di Air. Taglie: S-XXXL.
DROPS 172-25 |
|
|
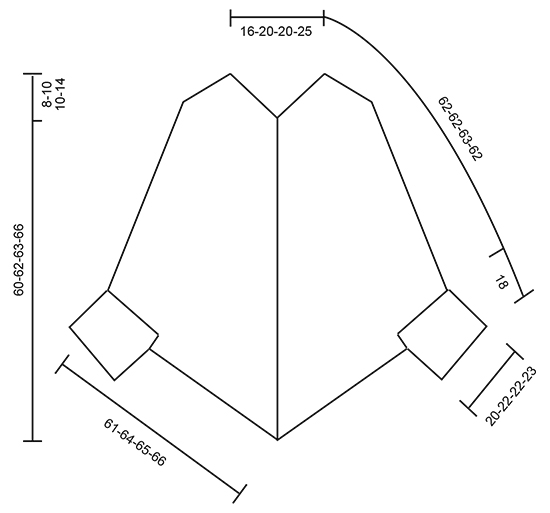
M LEGACCIO (lavorata in tondo): 1 “costa” a m legaccio = 2 giri. * 1 giro dir e 1 giro rov *, ripetere *-*. M LEGACCIO (avanti e indietro): Lavorare tutti i f a dir. 1 “costa” a m legaccio = 2 f dir. GRANA DI RISO: Giro/ferro 1: * 1 m dir, 1 m rov *, ripetere *-* e finire con 1 m dir. Giro/ferro 2: dir su rov e rov su dir. Ripetere il 2° giro/ferro. SUGGERIMENTO PER GLI AUMENTI: Per prima cosa aumentare 8 m sul giro. Quando sono finiti gli aumenti su ogni spalla/lato, aumentare 4 m sul giro. Aumentare 1 m facendo 1 gettato. Sul giro successivo lavorare i gettati a ritorto per evitare buchi. Lavorare il gettato a ritorto dir o ritorto rov in modo che le nuove m coincidano con la m a grana di riso. ---------------------------------------------------------- PONCHO: Lavorato in tondo con i f circolari, dall’alto in basso (top down). Avviare 32-40-40-48 m con 2 capi di Cloud o 4 capi di Air con i f circolari n° 15 mm. Lavorare 1 “costa” a M LEGACCIO – leggere la spiegazione sopra. Lavorare il giro successivo come segue * 2 m insieme a dir, 1 gettato *, ripetere *-* per il resto del giro. Sul giro successivo lavorare tutte le m e i gettati a dir e per fare buchi. Ora inserire 4 segnapunti nel lavoro e lavorare il motivo come segue: 1 m dir, inserire il 1° segnapunti in questa m (= spalla destra/lato), lavorare a GRANA DI RISO – leggere la spiegazione sopra, sulle 7-9-9-11 m successive, 1 m dir, inserire il 2° segnapunti in questa m (= centro davanti), grana di riso sulle 7-9-9-11 m successive, 1 m dir, inserire il 3° segnapunti in questa m (= spalla sinistra/lato), grana di riso sulle 7-9-9-11 m successive, 1 m dir, inserire il 4° segnapunti in questa m (= centro dietro), lavorare a grana di riso sulle 7-9-9-11 m rimaste. Continuare in questo modo in tondo. Sul giro successivo aumentare 1 m a ogni lato di ogni m dir con il segnapunti – leggere il SUGGERIMENTO PER GLI AUMENTI! Aumentare in questo modo a giri alterni 6 volte in totale = 80-88-88-96 m. FARE ATTENZIONE ALLA TENSIONE DEL LAVORO! Poi lavorare gli aumenti al centro davanti e al centro dietro a giri alterni altre 16-16-17-16 volte, ALLO STESSO TEMPO aumentare su ogni spalla/lato ogni 4 giri altre 2 volte = 152-160-164-168 m. Il lavoro ora misura circa 44-44-45-44 cm misurati lungo le m dir al centro davanti. Ora continuare ad aumentare a ogni lato delle m dir al centro davanti e al centro dietro e dividere il lavoro in davanti, dietro e maniche come segue: Lavorare le prime 10-11-11-12 m e trasferirle su un fermamaglie (= metà manica), lavorare le 57-59-61-61 m successive e trasferirle su un fermamaglie (= davanti), poi lavorare le 19-21-21-23 m successive prima di trasferirle su un fermamaglie (= manica), lavorare le 57-59-61-61 m successive (= dietro) e tenerle su f, lavorare le 9-10-10-11 m rimaste (= metà manica) e trasferirle sullo stesso fermamaglie delle prime 10-11-11-12 m sul giro (= manica). Tagliare il filo. DIETRO: = 59-61-63-63 m. Continuare avanti e indietro sulle m sul dietro come segue: iniziare dal rovescio del lavoro e lavorare a grana di riso avanti e indietro, continuare ad aumentare a ogni lato delle m dir con il segnapunti su ogni f dal diritto del lavoro altre 3 volte = 65-67-69-69 m. Lavorare 1 f rov dal rovescio del lavoro, e intrecciare a dir dal diritto del lavoro. DAVANTI: Riportare le 59-61-63-63 m dal fermamaglie sui f circolari n° 15 mm. Iniziare dal rovescio del lavoro e lavorare come per il dietro. POLSINO: Lavorato avanti e indietro sui f circolari. Ora misurare il lavoro da qui. Avviare 8 m con con 2 capi di Cloud o 4 capi di Air con i f circolari n° 15 mm. Lavorare le 19-21-21-23 m a grana di riso di uno dei fermamaglie per la manica sul f, avviare 8 nuove m alla fine del f = 35-37-37-39 m. Lavorare il f successivo dal rovescio del lavoro come segue: 1 m di vivagno a m legaccio, * 1 m rov, 1 m dir *, ripetere *-* fino a quando rimangono 2 m, 1 m rov, 1 m di vivagno a m legaccio. Continuare a coste con dir su dir e rov su rov con 1 m di vivagno a ogni lato fino a quando il lavoro misura 18 cm. Intrecciare le m con dir su dir e rov su rov. Lavorare l’altro polsino nello stesso modo. CONFEZIONE: Cucire il polsino all’interno della m di vivagno a m legaccio a ogni lato, poi cucire le nuove m che sono state avviate a ogni lato del davanti/dietro del poncho. Ripetere dall’altro lato. CORDINI CON NAPPINE: Tagliare 2 capi di Cloud o 4 capi di Air lunghi 3 m ognuno. Arrotolare i cordini fino a quando è possibile, piegare i cordini a metà in modo che si arrotolino ancora. Fare un nodo ad ogni estremità. Iniziare al centro davanti sul poncho e far passare il cordino dentro e fuori dal f con i buchini. Tagliare 10 capi di Cloud o 20 capi di Airfilo di 30 cm. Farli passare attraverso l’estremità dei cordini e distribuirli in modo che siano uniformi. Avvolgere un capo attorno alla nappina, tirare e fare un nodo. Ripetere all’altra estremità del cordino. COLLO STACCABILE: Lavorato in tondo con i f circolari. Avviare 49 m con con 2 capi di Cloud o 4 capi di Air con i f circolari n° 15 mm. Lavorare 1 giro dir. Ora lavorare a GRANA DI RISO – leggere la spiegazione sopra! Quando il lavoro misura 30 cm, lavorare 1 giro dir. Intrecciare a dir. |
|
 |
|
Avete terminato questo modello?Allora taggate le vostre foto con #dropspattern #lavendergroveponcho o inviatele alla #dropsfan gallery. Avete bisogno di aiuto con questo modello?Troverete 30 video tutorial, una sezione per i commenti/domande e molto altro guardando il modello su www.garnstudio.com © 1982-2026 DROPS Design A/S. Ci riserviamo tutti i diritti. Questo documento, compreso tutte le sue sotto-sezioni, è protetto dalle leggi sul copyright. Potete leggere quello che potete fare con i nostri modelli alla fine di ogni modello sul nostro sito. |


Con oltre 40 anni di esperienza nel design di modelli di maglia e uncinetto, DROPS Design offre la più estesa collezione di modelli gratuiti su internet - tradotti in 17 lingue. Ad oggi vi possiamo fornire 324 cataloghi e 12290 modelli - 9561 dei quali sono tradotti in Italiano.
Ci stiamo impegnando molto per darvi il meglio che vi possiamo offrire in termini di maglia e uncinetto, ispirazioni e consigli così come filati di grande qualità ad un prezzo incredibile! Volete utilizzare i nostri modelli per qualcosa d'altro oltre al vostro uso personale? Potete leggere tutto ciò che è consentito nel testo sul Copyright in basso su tutte le pagine dei nostri modelli. Buon lavoro!
Lasciare un commento sul modello DROPS 172-25
Noi saremmo felici di ricevere i tuoi commenti e opinioni su questo modello!
Se vuoi fare una domanda, fai per favore attenzione a selezionare la categoria corretta nella casella qui sotto per velocizzare il processo di risposta. I campi richiesti sono indicati da *.