
Categorie popolari
State cercando un filato?


Commenti / Domande (30)
![]() Lorena ha scritto:
Lorena ha scritto:
Ho un dubbio quando dice che si deve aumentare per il raglan ad ogni giro cosa faccio un giro faccio la gettata e il giro dopo lavoro la maglia gettata oppure devo lavorare la maglia gettata e fare contemporaneamente un’altra gettata ? E quando è ogni 2 giri? Grazie
12.07.2021 - 00:30DROPS Design ha risposto:
Buonasera Lorena, quando si aumenta su tutti i giri deve lavorare come indicato su tutti i giri. Ogni 2 giri si intende 1 giro si e 1 no. Buon lavoro!
14.07.2021 - 18:20
![]() Christine ha scritto:
Christine ha scritto:
I also am confused after placing markers. I do not see instructions as to how many times to increase every round and how many times to increase every other rounds for the raglan.
23.01.2021 - 19:06DROPS Design ha risposto:
Dear Christine, you then increase for raglan as explained under RAGLAN at the very beginning of the pattern. You will incrase with/without yarn overs and on a different rythm on body and sleeve. Happy knitting!
25.01.2021 - 08:55
![]() Janner ha scritto:
Janner ha scritto:
Size XL yoke has 106 stitches, first row with markers has 104 stitches (22 +22+8+22+22+8). What happened to the other 2 stitches?
17.01.2021 - 02:16DROPS Design ha risposto:
Dear Janner, your 2 missing stitches look to be the one on mid back and mid front, so that you have: 22 + 1 + 22 + 8 + 22 + 1 + 22 + 8 = 106 sts. Happy knitting!
18.01.2021 - 09:22
![]() Stacy ha scritto:
Stacy ha scritto:
I'm still working on the yoke, and the every row increases have made it way more full than it would need to lay flat if spread out and if I fold in in half and lay it down like it will be when it's worn, the shoulders are sticking up from the neck at a 45 degree angle. Is this as it should be, or am I ending up with too much fullness?
07.04.2020 - 23:09DROPS Design ha risposto:
Dear Stacy, this could be a good idea to show your work to your store - even sending them a picture per mail, so that you could be totally sure and this would be also much easier for them to help you. You can also ask other knitters in our DROPS Workshopo. Happy knitting!
09.04.2020 - 16:13
![]() Klein Clarisse ha scritto:
Klein Clarisse ha scritto:
Je suis assez débutante en tricot, j'ai déjà fait 2-3 pull selon les modèles drops mais là je ne comprends rien à vos explications. Comment commence-t-on ce tricot ? Combien de mailles faut-il monter ? Sur le schéma habituellement vous indiquez le sens du tricot mais là rien n'est indiqué. Merci d'avance pour votre aide...
13.10.2019 - 13:09DROPS Design ha risposto:
Bonjour Mme Klein, ce pull se tricote de haut en bas en commençant par le col; on va monter 62-66-70-74-78-82 m (cf taille), tricoter 2 côtes mousse puis augmenter à 86-90-98-106-110-118 m. On va ensuite augmenter pour le raglan des manches et en même temps au milieu devant et au milieu dos - cf RAGLAN (attention les augmentations sur le dos/le devant et celles des manches ne se font pas en même temps en fonction de la taille). Bon tricot!
14.10.2019 - 10:24
![]() Hadass ha scritto:
Hadass ha scritto:
What is the yardage/meterage needed for size M
13.11.2017 - 21:22DROPS Design ha risposto:
Dear Hadass, you will find total amount of yarn required in size M under tab "Materials", you can calculate the yardage for this size with the help of the informations in the shadecard and get some further assistance from your DROPS store in your country. Happy knitting!
14.11.2017 - 09:12
![]() Jen ha scritto:
Jen ha scritto:
I am having trouble understanding the Raglan increase instructions after placing the markers. Pattern says inc for Raglan see explanation above but that is explaining increases not the actual rows.
21.11.2016 - 02:49DROPS Design ha risposto:
Dear Jen, the inc for raglan will be different on body and on sleeve, on body you will inc on each side of 2nd and 5th marker (mid front + mid back every round then every other round (see your size for the number of times), and for sleeves you will inc after 3rd/6th marker + before 4th/1st marker every round/other round/4th round. Happy knitting!
21.11.2016 - 10:39Marta ha scritto:
Well, well - almost like the famous "Forbrydelsen/The Killing" sweater. Just several slight adjustments and it will be the same model. I'm gonna go for it, I think! :)
08.11.2016 - 13:45
![]() Hanne ha scritto:
Hanne ha scritto:
Jeg er nu igang med trøje nr. 2. Ang. Hulborten foran og bagpå, den bliver usymmetrisk, med større huller på venstre side, set som når man sidder og strikker på arbejdet. Kan det afhjælpes?
06.10.2016 - 12:39DROPS Design ha risposto:
Hej Hanne. Nu tager du ud med 1 slaa om paa begge sider af midtfor/midtbag i samme pind og strikker dem ogsaa begge ret. Jeg kan ikke forstaa hvordan du saa faar större huller paa den ene side i forhold til den anden - andet at det har noget at göre med hvor stramt de strikkes. Jeg har desvaerre ikke nogen ideer paa det.
06.10.2016 - 14:25
![]() Hanne ha scritto:
Hanne ha scritto:
Skal man ikke skifte til et pindenummer mindre på den nederste kant af kroppen? Det står ikke nævnt? Men på ærmerne skal man skifte pind?
03.10.2016 - 11:59DROPS Design ha risposto:
Hej Hanne. Nej, det tror jeg ikke. Jeg tror underkanten kan blive for stram hvis du skifter til en mindre p
03.10.2016 - 12:23
|
|
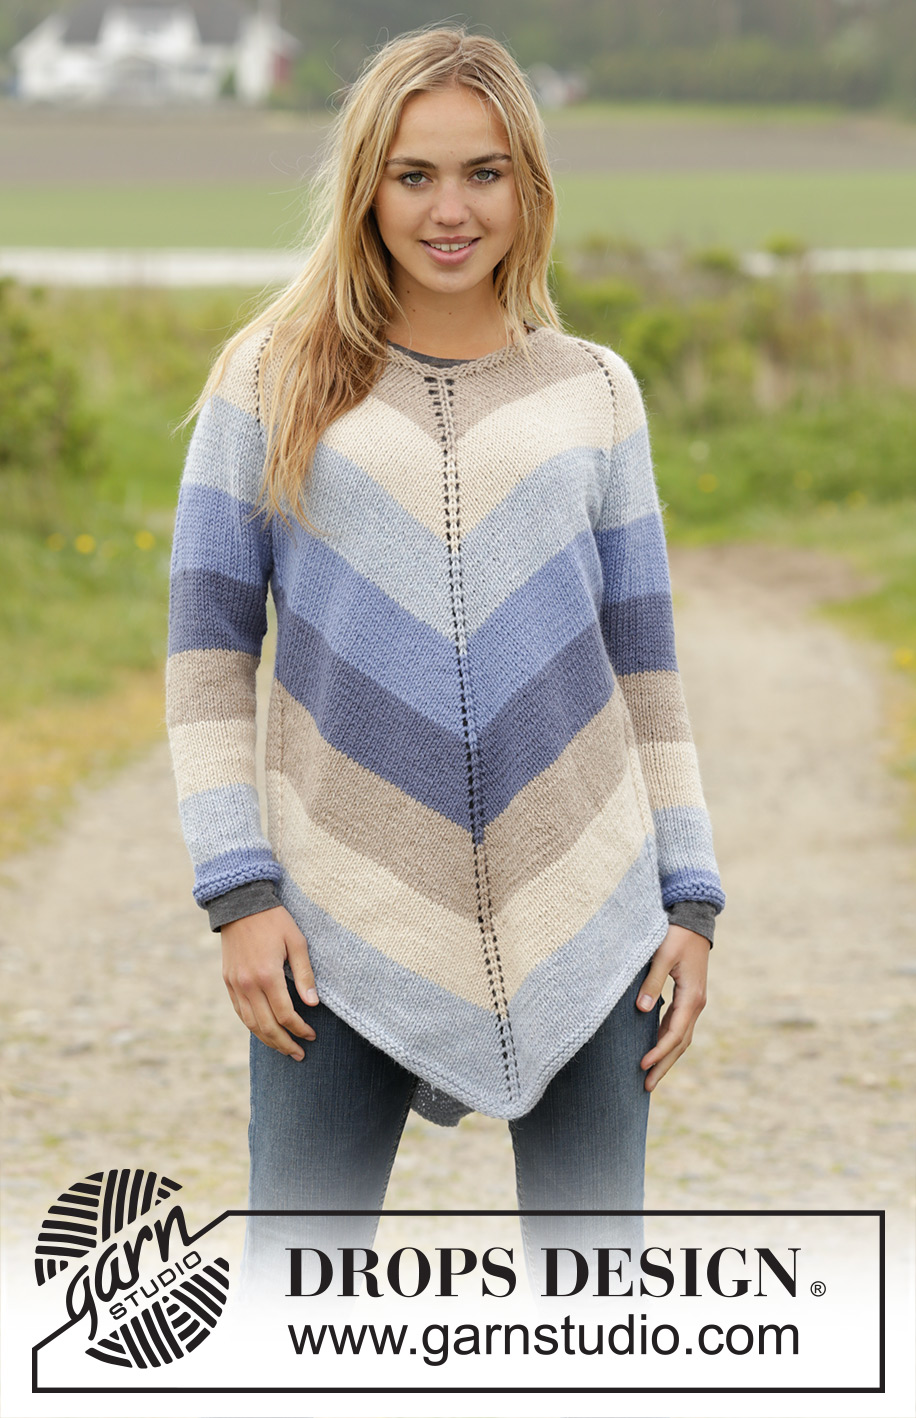
Ocean Stripes#oceanstripestunic |
|
|
|
|
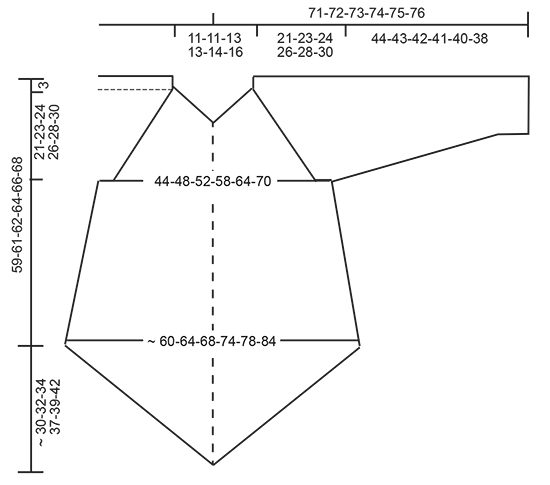
Tunica DROPS ai ferri, con raglan e a strisce, lavorata dall'alto verso il basso (top down), in "Nepal". Taglie: Dalla S alla XXXL.
DROPS 171-32 |
|
|
PUNTO LEGACCIO (in tondo): * Lavorare 1 giro a dir, 1 giro a rov *, ripetere da *-*. 1 costa a legaccio = 2 giri. STRISCE: STRISCIA 1: Lavorare 7 cm a maglia rasata con il colore beige. STRISCIA 2: Lavorare 7 cm a maglia rasata con il colore beige chiaro. STRISCIA 3: Lavorare 7 cm a maglia rasata con il colore nebbia. STRISCIA 4: Lavorare 7 cm a maglia rasata con il colore blu lavanda. STRISCIA 5: Lavorare 7 cm a maglia rasata con il colore blu denim. Ripetere le strisce dalla 1 alla 5 fino alla fine del lavoro. RAGLAN: Aumentare in modo diverso sulle maniche e sul davanti e dietro. Per aumentare fare delle m gettate. Quando si aumenta ad ogni giro, lavorare le m gettate come segue: lavorare una m gettata ogni 2 a dir ritorto, quindi lavorare la prima m gettata a dir (si deve formare un buco), lavorare la 2a m gettata a dir ritorto (NON si deve formare un buco). Quindi una maglia gettata ogni due forma un buco; una maglia gettata ogni due viene lavorata ritorta (= lavorare la m nel filo dietro e non in quello davanti). Quando si aumenta ogni 2 giri, lavorare tutte le m gettate a dir (si devono formare dei buchi). DAVANTI E DIETRO: Per aumentare, fare 1 m gettata da ciascun lato del 2° e del 5° segno come segue: Aumentare ad ogni giro 16-18-20-24-28-32 volte in tutto. Aumentare ogni 2 giri per un totale di 11-12-12-12-12-12 volte (= 27-30-32-36-40-44 volte in tutto). MANICHE: Per aumentare, fare 1 m gettata dopo il 3° e il 6° segno e prima del 4° e del 1° segno come segue: Aumentare ad ogni giro 0-0-2-2-0-0 volte in tutto. Aumentare ogni 2 giri 17-21-21-23-24-26 volte in tutto. Aumentare ogni 4 giri per un totale di 1-0-0-0-1-1 volta (= 18-21-23-25-25-27 volte in tutto). SUGGERIMENTO PER LE DIMINUZIONI: Diminuire come segue: Lavorare finché non rimangono 3 m prima del segno, lavorare le 2 m successive insieme a dir (= 1 m diminuita), 2 m a dir (il segno si trova al centro di queste m), passare 1 m a dir senza lavorarla, 1 m dir, accavallare la m passata sulla m lavorata (= 1 m diminuita). SUGGERIMENTO PER INTRECCIARE LE MAGLIE Per evitare un bordo di chiusura delle m troppo stretto, intrecciare le m usando un ferro di misura maggiore. ---------------------------------------------------------- SPRONE: Lavorare in tondo a STRISCE - vedere le spiegazioni sopra. Avviare 62-66-70-74-78-82 m sui ferri circolari n° 5,5 con il colore beige. Lavorare 2 coste a PUNTO LEGACCIO - vedere le spiegazioni sopra e aumentare 24-24-28-32-32-36 m a intervalli regolari durante l’ultimo giro a dir = 86-90-98-106-110-118 m. Passare ai ferri circolari n° 6. Al giro successivo, inserire 6 segni come segue (inserire il 2° e il 5° segno nella m, inserire gli altri segni tra le m) come segue: Inserire il 1° segno all’inizio del giro, lavorare 17-18-20-22-23-25 m, inserire il 2° segno nella m successiva (= centro, sul dietro), lavorare 17-18-20-22-23-25 m (= dietro), inserire il 3° segno, lavorare 8 m, inserire il 4° segno (= manica), lavorare 17-18-20-22-23-25 m, inserire il 5° segno nella m successiva (= centro, sul davanti), lavorare 17-18-20-22-23-25 m (= davanti), inserire il 6° segno, lavorare le ultime 8 m (= manica). Aumentare per il RAGLAN – vedere le spiegazioni sopra ! RICORDARSI DI MANTENERE LA CORRETTA TENSIONE DEL LAVORO! Completati gli aumenti per il raglan, ci sono 44-50-54-58-58-62 m per ognuna delle due maniche e 89-97-105-117-127-139 m per il dietro e il davanti (quindi 44-48-52-58-63-69 m da ciascun lato delle m con il segno) = 266-294-318-350-370-402 m. Lavorare il giro successivo come segue: Lavorare 44-48-52-58-63-69 m, 1 m gettata, lavorare la m con il 2° segno (= centro, sul dietro), 1 m gettata, lavorare 44-48-52-58-63-69 m, mettere in attesa le 44-50-54-58-58-62 m successive su un ferma maglie per la manica, avviare 6-6-8-8-10-10 m sotto la manica (inserire 1 segno al centro delle nuove m), lavorare 44-48-52-58-63-69 m, 1 m gettata, lavorare la m con il 5° segno (= centro, sul davanti), 1 m gettata lavorare 44-48-52-58-63-69 m, mettere in attesa su un ferma maglie le 44-50-54-58-58-62 m successive per la manica, avviare 6-6-8-8-10-10 m sotto la manica (inserire 1 segno al centro delle nuove m) = 194-210-230-254-278-302 m. DAVANTI E DIETRO: Inserire 1 segno nel lavoro. DA ADESSO IN AVANTI, MISURARE IL LAVORO DA QUESTO PUNTO ! GIRO 1: Lavorare tutte le m a dir. GIRO 2 (giro con m gettate e diminuzioni): Fare 1 m gettata da ciascun lato della m con il segno al centro sul davanti e al centro sul dietro (= 4 m aumentate) e diminuire 1 m da ciascun lato del segno sotto ognuna delle due maniche - VEDERE IL SUGGERIMENTO PER LE DIMINUZIONI (= 4 m diminuite, quindi il numero delle m non cambia). GIRO 3: Lavorare tutte le m a dir. GIRO 4 (giro con m gettate e diminuzioni): Lavorare come indicato per il giro 2. GIRO 5: Lavorare tutte le m a dir. GIRO 6 (giro con m gettate): aumentare 1 m gettata da ciascun lato della m con il segno al centro sul davanti e al centro sul dietro (= 4 m aumentate). GIRO 7: Lavorare tutte le m a dir. GIRO 8 (giro con m gettate): lavorare come indicato per il giro 6= 4 m aumentate. Ripetere i giri da 1 a 8 finché il lavoro non misura 35 cm dal segno (o proseguire fino alla misura necessaria) = ca.64-68-73-79-85-91 m da ciascun lato della m con il segno = ca.258-274-294-318-342-366 m in tutto. Lavorare 2 coste a punto legaccio. Intrecciare le m senza stringere troppo il filo - VEDERE IL SUGGERIMENTO PER INTRECCIARE LE MAGLIE. MANICHE: = 44-50-54-58-58-62 m. Lavorare le maniche a maglia rasata e a strisce come prima. Riportare sui ferri a doppia punta n° 6 le m messe in attesa sul ferma maglie e avviare 6-6-8-8-10-10 m sotto la manica = 50-56-62-66-68-72 m. Inserire 1 segno al centro delle nuove m sotto la manica. DA ADESSO IN AVANTI MISURARE IL LAVORO DA QUESTO PUNTO. Quando il lavoro misura 3 cm, diminuire 1 m da ciascun lato del segno. Diminuire in questo modo ca.ogni 4-3½-2½-2-2-2 cm 9-11-14-15-15-16 volte in tutto = 32-34-34-36-38-40 m. Quando la manica misura 44-43-42-41-40-38 cm (ATTENZIONE: misure più corte nelle taglie più grandi perché lo sprone è più lungo), passare ai ferri a doppia punta n° 5,5. Lavorare 2 coste a legaccio. Intrecciare le m. Lavorare l’altra manica in modo uguale. CONFEZIONE: Cucire le aperture sotto le maniche. |
|
 |
|
Avete terminato questo modello?Allora taggate le vostre foto con #dropspattern #oceanstripestunic o inviatele alla #dropsfan gallery. Avete bisogno di aiuto con questo modello?Troverete 24 video tutorial, una sezione per i commenti/domande e molto altro guardando il modello su www.garnstudio.com © 1982-2026 DROPS Design A/S. Ci riserviamo tutti i diritti. Questo documento, compreso tutte le sue sotto-sezioni, è protetto dalle leggi sul copyright. Potete leggere quello che potete fare con i nostri modelli alla fine di ogni modello sul nostro sito. |


Con oltre 40 anni di esperienza nel design di modelli di maglia e uncinetto, DROPS Design offre la più estesa collezione di modelli gratuiti su internet - tradotti in 17 lingue. Ad oggi vi possiamo fornire 324 cataloghi e 12290 modelli - 9561 dei quali sono tradotti in Italiano.
Ci stiamo impegnando molto per darvi il meglio che vi possiamo offrire in termini di maglia e uncinetto, ispirazioni e consigli così come filati di grande qualità ad un prezzo incredibile! Volete utilizzare i nostri modelli per qualcosa d'altro oltre al vostro uso personale? Potete leggere tutto ciò che è consentito nel testo sul Copyright in basso su tutte le pagine dei nostri modelli. Buon lavoro!
Lasciare un commento sul modello DROPS 171-32
Noi saremmo felici di ricevere i tuoi commenti e opinioni su questo modello!
Se vuoi fare una domanda, fai per favore attenzione a selezionare la categoria corretta nella casella qui sotto per velocizzare il processo di risposta. I campi richiesti sono indicati da *.