
Categorie popolari
State cercando un filato?


Commenti / Domande (135)
![]() NatJ ha scritto:
NatJ ha scritto:
Quel est le sens des 2 mailles en l'air au dessus des 2 ms du rang 2 du diagramme A2 ?
30.04.2021 - 20:49DROPS Design ha risposto:
Bonjour Natj, dans cette bride du 1er tour vous allez crocheter: 1 maille serrée, 2 mailles en l'air, 1 maille serrée. Bon crochet!
03.05.2021 - 07:25
![]() Beatriz ha scritto:
Beatriz ha scritto:
Buenos días. Estoy haciendo el canesú siguiendo el gráfico y ya lo llevo bastante avanzado, pero ahora he leído en las instrucciones escritas que para según que tallas hay que hacer determinados aumentos entre los marcadores. ¿ Si he seguido el gráfico, estos aumentos están ya hechos o tengo que deshacer y añadirlos? Gracias
11.04.2021 - 10:20DROPS Design ha risposto:
Hola Beatriz, los aumentos no están en el diagrama, sino que en el texto del canesú. Estos patrones se encuentran explicados con texto y diagramas complementariamente, por lo que tendrías que mirar donde se realizan los aumentos en el texto y añadirlos.
11.04.2021 - 20:41
![]() Laura ha scritto:
Laura ha scritto:
Ik heb al meerdere drops patronen gehaakt, maar vind deze toch wel erg ingewikkeld. Ik ben nu op toer 6 (maat S), is het de bedoeling dat ik patroon A1 (de 5 toeren tot A1a begint) blijf herhalen tot ik A2 volledig af heb of moet ik ook bij A1 gewoon verder omhoog door het A1a deel?
03.04.2021 - 20:53DROPS Design ha risposto:
Dag Laura,
Na de eerste 5 toeren van A.1 herhaal je alleen A.1a verder in de hoogte. Als A.2 helemaal klaar is in de hoogte, is de pas klaar voor maat S. Je gaat dan verder met het lijf en haakt A.1a steeds in de hoogte.
06.04.2021 - 19:18
![]() Cécile ha scritto:
Cécile ha scritto:
Bonjour, je fais le XL, je n'arrive pas à déterminer clairement ni sur A3, ni sur A1a, à quelle ligne commencer en XL. Merci beaucoup de votre aide !!
28.03.2021 - 08:54DROPS Design ha risposto:
Bonjour Cécile, en XL, la flèche dans A.1a est à l'avant-dernier rang et celle de A.3 ay 3ème rang. Bon crochet!
06.04.2021 - 08:09
![]() Cécile ha scritto:
Cécile ha scritto:
Bonjour, je fais le Xl et suis bloquée au 7ème rang. Je ne comprends pas ce que je dois faire entre les marqueurs 1et2, 3et4, 5et6, 7et8. Et que veut dire crocheter A2 comme avant ?la seule fois où j'ai suivi A2 c'est au rang où j'ai mis les marqueurs. Je suis perdue, pouvez vous m'aider s'il vous plaît ?? Je vous remercie
14.03.2021 - 20:18DROPS Design ha risposto:
Bonjour Cécile, l'empiècement se crochète entièrement en suivant les diagrammes A.1 et A.2 comme indiqué au tout premier rang. Autrement dit, vous crochetez ces diagrammes simultanément sur un même rang/tour; le nombre de mailles crocheté en A.1 reste le même mais celui de chaque A.2 doit augmenter comme dans le diagramme. Au 7ème rang, vous allez en plus des augmentations de A.2 augmenter dans les diagrammes A.1 (= 6 brides à intervalles réguliers entre les marqueurs - voir cette leçon. Bon crochet!
15.03.2021 - 08:56
![]() Liz ha scritto:
Liz ha scritto:
Bonjour, je pense bien comprendre mais deux choses ne me vont pas : en faisant comme indiqué, la jonction entre les rangs de l'empiècement se trouve à 1/3 d'une face, n'aurait il pas été plus judicieux de la placer au milieu? de plus, en taille M, 8ml pour les emmanchures me paraissent vraiment insuffisant, suis je la seule à faire ce retour? merci,, dernière demande, serait il possible de faire un filtre sur les questions en fonction des drapeaux ? GRAND MERCI POUR TOUT
03.11.2020 - 15:19DROPS Design ha risposto:
Bonjour Liz, nous n'avons effectivement eu aucun retour à ce propos - toutefois, si votre échantillon est juste, et que vous conservez la même tension pour le top, vous obtiendrez les mesures indiquées dans le schéma - vérifiez la taille ici si besoin. Le début des tours n'est effectivement pas au milieu dos. Votre suggestion de filtre sera transmise mais le drapeau n'est pas promesse de langue - vous pouvez consulter tous les commentaires et vous faire aider d'un logiciel de traduction en ligne pour essayer d'en saisir le sens. Bon crochet!
03.11.2020 - 15:57
![]() Valerie Jefferies ha scritto:
Valerie Jefferies ha scritto:
I think you need to check this pattern against the one submitted for the tunic with sleeves as the yoke for this top should technically be the same and the tunic with sleeves. But here you state to do triples in the first row not dc’s. It’s also very confusing as you instruct the maker to decrease instead of increasing at the yoke.
17.10.2020 - 06:21DROPS Design ha risposto:
Dear Mrs Jefferies, make sure you are reading the appropriate English since Uk end US do have different crochet terminology, ie at the beg of yoke you work 1 row with treble crochets (= Uk-English)/ double crochets (Us-English). Happy crocheting!
19.10.2020 - 10:28
![]() Meg ha scritto:
Meg ha scritto:
Is there not a round five for size small? and row 7 as well? I seem to be struggling with understanding the wy the pattern is written but am determined. Is there a link for a you tube tutorial??
28.07.2020 - 07:20DROPS Design ha risposto:
Dear Meg, on row 5 and 8 you will crochet row 5 and 8 as before, reason why they are not listed there, only 2-3 larger sizes are here explained since there will be extra increases that are not applying in smaller sizes (= not listed). Happy crocheting!
29.07.2020 - 11:24
![]() Diane Kelm ha scritto:
Diane Kelm ha scritto:
I figured it out. I am now at the end of 1st row of body. It says to work 8 -8 sts under sleeve. But I don't understand as there are only 4 sts left as i started with a sl st and 3 sc in 3 sts.
07.07.2020 - 01:11DROPS Design ha risposto:
Dear Mrs Kelm, fine :) Now start the body in the 5th chain st mid under one of the sleeve, 1 ch (= 1st sc on round), 1 sc in each of the next 3 sts (= 4 sc), work as A.1a as before to the next 8 chain mid under the other sleeve, 1 sc in each of the 8 chains, work A.1a as before the next sleeve and finish with 1 sc in each of the last 4 chains = there are now 8 sc mid under each sleeve. These 8 stitches are worked as the first stitch in A.1a, ie either 1 sc or 1 dc in each of these 8 sts until you increase evenly and work then A.1a over all stitches in the round. Happy crocheting!
07.07.2020 - 10:15
![]() Diane Kelm ha scritto:
Diane Kelm ha scritto:
I am on the row that starts...work A.1a (see arrow on where pattern.... Can you explain this row better? I do not understand the entire directions here.
05.07.2020 - 05:33DROPS Design ha risposto:
Dear Mrs Kelm, You will now divide piece for sleeves: work A.1a starting at the arrow for your size, and repeat these 6 sts a total of 3 times = over the first 18 sts (= to first marker), work now 8 chains and skip the sts between the markers, work A.1a (starting as in diagram with 1 dc) a total of 12 times in width (= over the next 72 sts), repeat armhole as before (= 8 chain, skip the sts between 2 markers) and work A.1a a total of 9 times in width (= over the last 54 sts). There are now 2 holes made from the sts skipped between markers and the 8 chains you worked over these stitches. These are for sleeves you will work the edge later around these stitches. Happy crocheting!
06.07.2020 - 08:53
|
||||||||||||||||||||||||||||
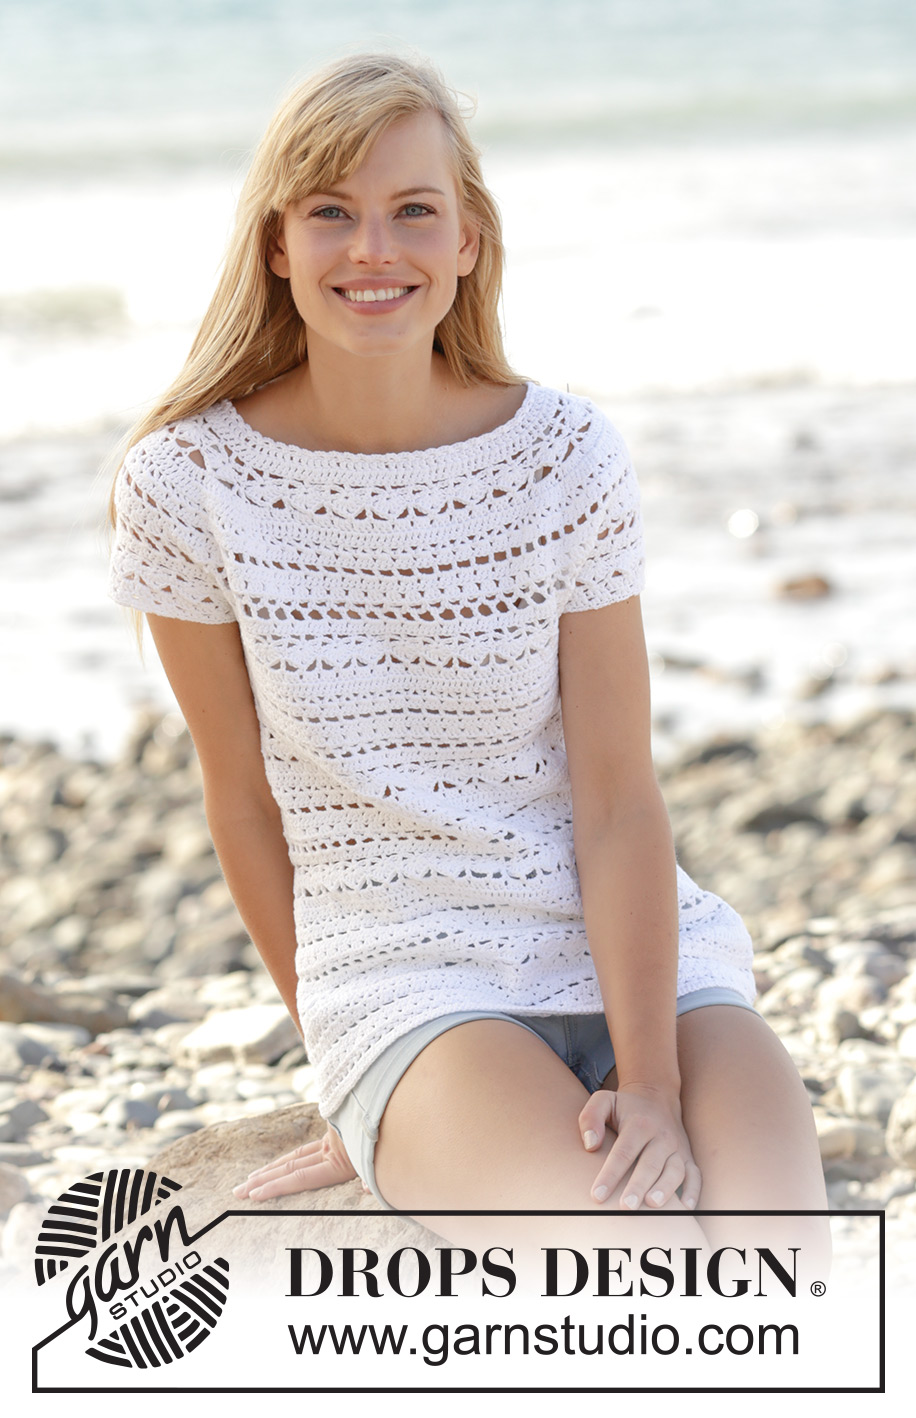
Seashore Bliss Top#seashoreblisstop |
||||||||||||||||||||||||||||
|
|
||||||||||||||||||||||||||||
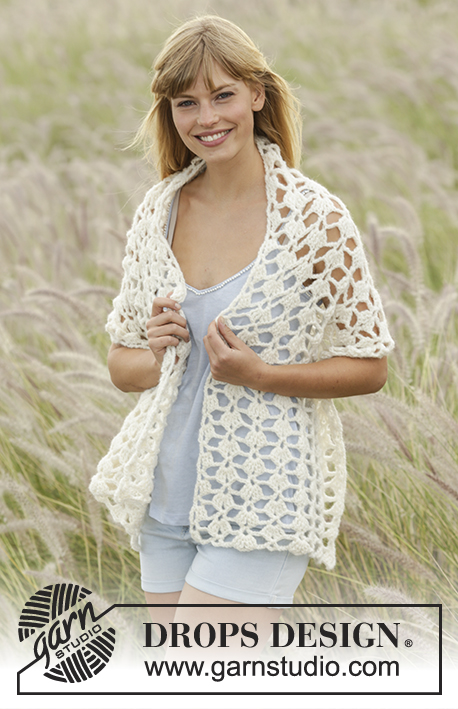
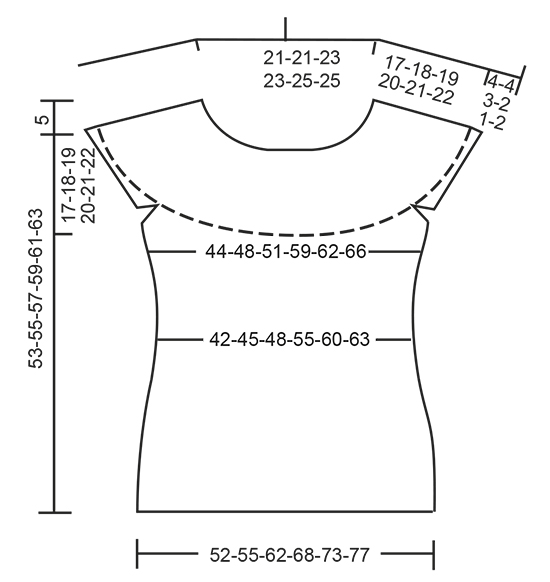
Maglia DROPS lavorata all’uncinetto con motivo traforato e sprone rotondo in ”Muskat”. Lavorato dall’alto in basso (top down). Taglie: S - XXXL.
DROPS 169-26 |
||||||||||||||||||||||||||||
|
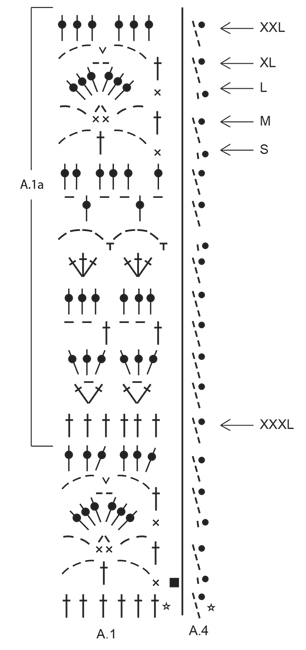
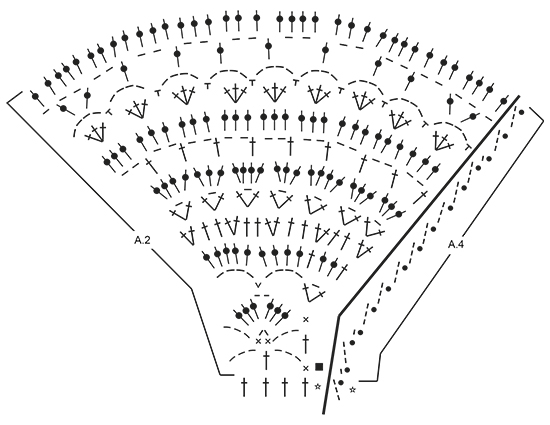
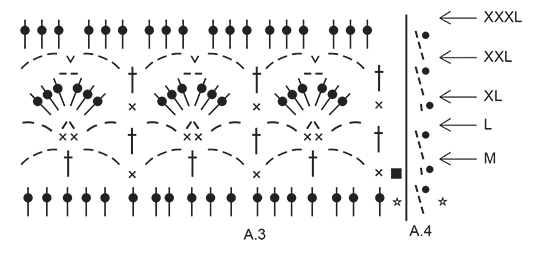
MOTIVO: Vedere i diagrammi A.1-A.4. Il diagramma A.4 mostra come inizia e finisce il giro. INFORMAZIONI PER IL LAVORO: Sostituire la 1° m.a all’inizio di ogni giro a m.a con 3 cat. Finire il giro con 1 m.bss nella 3° cat dall’inizio del giro. Sostituire la 1° m.b all’inizio di ogni giro a m.b con 1 cat. Finire il giro con 1 m.bss nella 1° cat all’inizio del giro. SUGGERIMENTO PER GLI AUMENTI: Aumentare 1 m.a lavorando 2 m.a nella stessa m.a. SUGGERIMENTO PER LE DIMINUZIONI: Diminuire 1 m.a lavorando 2 m.a insieme come segue: lavorare 1 m.a ma aspettare con l’ultimo passaggio (= 2 m sull’uncinetto), poi lavorare la m.a successiva ma sull’ultimo passaggio, far passare il filo attraverso tutte e 3 le m sull’uncinetto. SUGGERIMENTO PER LO SCALFO: Taglie S, M e XL: Nell'ultima ripetizione di A.1 prima dei segnapunti 1 e 3 (= inizio dello scalfo), sostituire l'ultima catenella con 1 maglia alta nell'ultima maglia della stessa ripetizione sulla riga precedente. -------------------------------------------------------- MAGLIA: Lavorata dall’alto in basso (top down). NOTA: E’ importante mantenere la corretta tensione in verticale, in modo che le misurazioni dello sprone siano corrette. SPRONE: Avviare 108-108-117-117-124-124 cat con l’uncinetto n° 4 mm con Muskat e formare un anello con 1 m.bss nella 1° cat. Lavorare il 1° giro come segue: lavorare 3 cat (= 1 m.a) - LEGGERE LE INFORMAZIONI PER IL LAVORO, 1 m.a in ognuna delle 3-3-5-5-5-5 cat successive, * saltare 1 cat, 1 m.a in ognuna delle 6 cat successive *, ripetere *-* per tutta la riga = 94-94-102-102-108-108 m.a. Lavorare 1 giro con 1 m.a in ogni m.a e aumentare 18-18-22-22-28-40 m.a in modo uniforme – LEGGERE IL SUGGERIMENTO PER GLI AUMENTI = 112-112-124-124-136-148 m.a. Lavorare il giro successivo e inserire 8 segnapunti nel lavoro come segue: A.4 mostra come inizia e finire il giro. Inserire il 1° segnapunti all’inizio del giro, lavorare A.2 sulle prime 4 m.a, inserire il 2° segnapunti, A.1 sulle 12 m.a successive (= 2 volte in larghezza), inserire il 3° segnapunti, A.2 sulle 4 m.a successive, inserire il 4° segnapunti, lavorare A.1 sulle 36-36-42-42-48-54 m.a successive (= 6-6-7-7-8-9 volte in larghezza), inserire il 5° segnapunti, A.2 sulle 4 m.a successive, inserire il 6° segnapunti, A.1 sulle 12 m.a successive (= 2 volte in larghezza), inserire il 7° segnapunti, A.2 sulle 4 m.a successive, inserire l’8° segnapunti, A.1 sulle ultime 36-36-42-42-48-54 m.a (=6-6-7-7-8-9 volte in larghezza). FARE ATTENZIONE ALLA TENSIONE DEL LAVORO! TAGLIE XXL-XXXL: Sul 5° giro (giro a m.a) in A.1 aumentare in modo uniforme come segue: tra il 2° e 3° segnapunti e il 6° e 7° segnapunti: aumentare 6-6 m.a. 12-12 m.a sono state aumentate in totale sul giro (= 18-18 m.a tra il 2° e 3° segnapunti e il 6° e 7° segnapunti). Ripetere A.1 3-3 volte tra il 2° e 3° segnapunti e il 6° e 7° segnapunti. TUTTE LE TAGLIE: Sul 6° giro (giro a m.a) in A.1 aumentare in modo uniforme come segue Tra il 2° e 3° segnapunti e tra il 6° e 7° segnapunti: aumentare 0-0-6-6-6-6 m.a (= 12-12-18-18-24-24 m.a tra questi segnapunti). Tra il 4° e 5° segnapunti e tra l’8° e il 1° segnapunti: aumentare 0-6-6-6-6-6 m.a (= 36-42-48-48-54-60 m.a tra questi segnapunti). Poi ripetere il diagramma A.1 2-2-3-3-4-4 volte tra il 2° e 3° segnapunti, 6-7-8-8-9-10 volte tra il 4° e 5° segnapunti, 2-2-3-3-4-4 volte tra il 6° e 7° segnapunti e 6-7-8-8-9-10 volte tra l’8° e il 1° segnapunti. Lavorare A.2 come prima. TAGLIE XL-XXL-XXXL: Sull’8° giro (giro a m.a) in A.1 aumentare in modo uniforme come segue Tra il 4° e 5° segnapunti e l’8° e il 1° segnapunti: aumentare 6-6-6 m.a (= 54-60-66 m.a tra ognuno di questi segnapunti). Sono state aumentare 12-12-12 m.a in totale sul giro. Ripetere A.1 9-10-11 volte tra il 4° e 5° segnapunti e tra l’8° e 1° segnapunti. Ripetere gli aumenti sul 10° giro in A.1 (= 60-66-72 m.a tra ognuno di questi segnapunti). Ripetere il diagramma A.1 10-11-12 volte tra il 4° e 5° segnapunti e tra l’8° e il 1° segnapunti. TUTTE LE TAGLIE: Sull’ultimo giro di A.2 inserire 1 nuovo segnapunti al centro di ogni A.2 (cioè 18 m.a a ogni lato del segnapunti in A.2 = 4 segnapunti). Togliere i vecchi segnapunti (= 4 segnapunti rimasti nel lavoro). Le m tra i segnapunti sono per le maniche (= 48-48-54-54-60-60 m.a su ogni manica). Quando A.2 è stato lavorato 1 volta in verticale, ci sono 240-252-276-300-324-336 m.a sulla giro. Lo sprone ora è finito per la taglia S. TAGLIE M-L-XL-XXL-XXXL: Continuare con il motivo A.1 come prima ma su la m.a in A.2 (= 36 m.a) lavorare A.3 2 volte in totale in larghezza (il segnapunti è al centro di queste ripetizioni). Lavorare 1-2-3-4-5 giri di A.3 (vedere la freccia nel diagramma per la taglia corretta). Il lavoro ora misura 17-18-19-20-21-22 cm in verticale. TUTTE LE TAGLIE: Lavorare A.1a (vedere la freccia su dove inizia il motivo per le diverse taglie) 3 volte in totale in larghezza fino al 1° segnapunti - leggere il SUGGERIMENTO PER LO SCALFO, lavorare 8-8-8-10-10-10 cat, saltare le m tra i 2 segnapunti (= manica), lavorare A.1a 12-13-14-16-17-18 volte in totale in larghezza fino al segnapunti successivo (= davanti), lavorare 8-8-8-10-10-10 cat, saltare le m tra i 2 segnapunti (= manica), lavorare A.1a 9-10-11-13-14-15 volte in totale in larghezza (= 160-172-184-212-224-236 m). Chiudere e affrancare. CORPO: Iniziare il giro al centro sotto la manica come segue: TAGLIE S-L: Lavorare 1 m.bss nella 5° cat, 1 cat, lavorare 1 m.b in ognuna delle 3-3 cat successive, lavorare A.1a come prima fino alla cat sotto la 2° manica, 1 m.b in ognuna delle 8-8 cat sotto la manica, lavorare A.1a come prima per il resto del giro. Lavorare le 8-8 m sotto ogni manica come la 1° m in A.1a. TAGLIE M-XL-XXL-XXXL: Lavorare 1 m.bss nella 5° cat, 3 cat, lavorare 1 m.a in ognuna delle 3-5-5-5 cat successive, lavorare A.1a come prima fino alla cat sotto la 2° manica, 1 m.a in ognuna delle 8-10-10-10 cat sotto la manica, lavorare A.1a come prima per il resto del giro. Lavorare le 8-10-10-10 m sotto ogni manica come la 1° m in A.1a. TUTTE LE TAGLIE: Inserire 1 segnapunti nel lavoro, ORA MISURARE IL LAVORO DA QUI. Sul 1° giro a m.a diminuire 4-4-4-2-2-2 m.a in modo uniforme – LEGGERE IL SUGGERIMENTO PER IL LAVORO = 156-168-180-210-222-234 m.a. Poi ripetere A.1a 26-28-30-35-37-39 volte in larghezza. Ripetere A.1a in verticale. Quando il lavoro misura 12 cm, aggiustarlo in modo che il giro successivo sia a m.a, diminuire 6 m.a in modo uniforme = 150-162-174-204-216-228 m.a. Ora ripetere A.1a 25-27-29-34-36-38 volte in larghezza. TAGLIA XL: Ripetere le diminuzioni quando il lavoro misura 16 cm dal segnapunti = 198 m.a. Ora ripetere A.1a 33 volte in larghezza. TUTTE LE TAGLIE: Quando il lavoro misura 20-21-22-23-24-25 cm dal segnapunti – aggiustarlo in modo che il giro successivo sia a m.a, aumentare 6 m.a in modo uniforme. Ripetere gli aumenti ogni 2-2-1½-1½-1½-1½ cm altre 5-5-7-7-7-7 volte = 186-198-222-246-264-276 m.a. Ripetere A.1a un’altra volta in larghezza ad ogni aumento. Alla fine di tutti gli aumenti, ripetere A.1a 31-33-37-41-44-46 volte in larghezza. Lavorare fino a quando il lavoro misura 36-37-38-39-40-41 cm dal segnapunti, aggiustarlo per finire secondo il motivo. Chiudere e affrancare. BORDO DELLA MANICA: TAGLIA S: Iniziare lavorando al centro sotto la manica come segue: lavorare 1 m.bss nella 4° cat delle 8 cat lavorate sullo scalfo sul corpo. Lavorare 1 cat (= 1 m.b). Poi lavorare 1 m.b in ognuna delle 4 cat successive, lavorare A.3 sulle 18 m.a successive, lavorare A.1 (aggiustare il motivo secondo A.3) 2 volte in totale in larghezza come prima, lavorare A.3 sulle 18 m.a successive, finire con 1 m.b in ognuna delle ultime 3 cat. Lavorare come la 1° m in A.3 nelle 8 m sotto la manica. Sull’ultimo giro di A.3 diminuire 10 m.a in modo uniforme = 46 m.a. TAGLIE M-XL-XXL: Iniziare lavorando al centro sotto la manica come segue: lavorare 1 m.bss nella 4° cat delle 8-10-10 cat lavorate sullo scalfo sul corpo. Lavorare 3 cat (= 1 m.a). Poi lavorare 1 m.a in ognuna delle 4-6-6 cat successive, lavorare A.3 come prima, lavorare A.1 (aggiustare il motivo secondo A.3) 2-3-4 volte in totale in larghezza come prima, lavorare A.3, finire con 1 m.a in ognuna delle ultime 3 cat. Lavorare 1 m.bss in A.3 nelle 8-10-10 m.a sotto la manica. Sull’ultimo giro di A.3 diminuire 10 m.a in modo uniforme = 46-54-60 m.a. TAGLIA L: Iniziare lavorando al centro sotto la manica come segue: lavorare 1 m.bss nella 4° cat delle 8 cat lavorate sullo scalfo sul corpo. Lavorare 1 cat (= 1 m.b). Poi lavorare 1 m.b in ognuna delle 4 cat successive, lavorare A.3 come prima, lavorare A.1 (aggiustare il motivo secondo A.3) 3 volte in totale in larghezza come prima, lavorare A.3, finire con 1 m.b in ognuna delle ultime 3 cat. Lavorare come la 1° m in A.3 nelle 8 m sotto la manica. Sull’ultimo giro di A.3 diminuire 10 m.a in modo uniforme = 52 m.a. TAGLIA XXXL: Iniziare lavorando al centro sotto la manica come segue: lavorare 1 m.bss nella 4° cat delle 10 cat lavorate sullo scalfo sul corpo. Lavorare 3 cat (= 1 m.a). Poi lavorare 1 m.a in ognuna delle 6 cat successive, lavorare A.1° sulle 60 m.a successive, finire con 1 m.a in ognuna delle ultime 3 cat. Lavorare 1 m.a in ogni m.a e diminuire 10 m.a in modo uniforme = 60 m.a. TUTTE LE TAGLIE: Lavorare * 1 m.b nella 1°/ successiva m.a, 1 catenella, saltare circa 1 cm *, ripetere *-* attorno a tutta la manica. Chiudere e affrancare. Lavorare l’altra manica nello stesso modo. BORDO DEL COLLO: Lavorare un bordo attorno al collo. Iniziare al centro dietro. Lavorare * 1 m.b nella 1°/successiva m.a, 3 cat, saltare circa 1 cm *, ripetere *-* attorno a tutto il collo. Assicurarsi di evitare un bordo del collo tirato, aggiustarlo per finire con 1 m.bss nella 1° cat. Chiudere e affrancare. |
||||||||||||||||||||||||||||
Spiegazioni del diagramma |
||||||||||||||||||||||||||||
|
||||||||||||||||||||||||||||
 |
||||||||||||||||||||||||||||
 |
||||||||||||||||||||||||||||
 |
||||||||||||||||||||||||||||
 |
||||||||||||||||||||||||||||
Avete terminato questo modello?Allora taggate le vostre foto con #dropspattern #seashoreblisstop o inviatele alla #dropsfan gallery. Avete bisogno di aiuto con questo modello?Troverete 10 video tutorial, una sezione per i commenti/domande e molto altro guardando il modello su www.garnstudio.com © 1982-2026 DROPS Design A/S. Ci riserviamo tutti i diritti. Questo documento, compreso tutte le sue sotto-sezioni, è protetto dalle leggi sul copyright. Potete leggere quello che potete fare con i nostri modelli alla fine di ogni modello sul nostro sito. |
||||||||||||||||||||||||||||


Con oltre 40 anni di esperienza nel design di modelli di maglia e uncinetto, DROPS Design offre la più estesa collezione di modelli gratuiti su internet - tradotti in 17 lingue. Ad oggi vi possiamo fornire 324 cataloghi e 12290 modelli - 9561 dei quali sono tradotti in Italiano.
Ci stiamo impegnando molto per darvi il meglio che vi possiamo offrire in termini di maglia e uncinetto, ispirazioni e consigli così come filati di grande qualità ad un prezzo incredibile! Volete utilizzare i nostri modelli per qualcosa d'altro oltre al vostro uso personale? Potete leggere tutto ciò che è consentito nel testo sul Copyright in basso su tutte le pagine dei nostri modelli. Buon lavoro!
Lasciare un commento sul modello DROPS 169-26
Noi saremmo felici di ricevere i tuoi commenti e opinioni su questo modello!
Se vuoi fare una domanda, fai per favore attenzione a selezionare la categoria corretta nella casella qui sotto per velocizzare il processo di risposta. I campi richiesti sono indicati da *.