
Categorie popolari
State cercando un filato?


Commenti / Domande (54)
![]() Sylvia Dreiser-Farnsworth ha scritto:
Sylvia Dreiser-Farnsworth ha scritto:
Die Photos und die Beschreibung sind verschieden. Das Muster das die Anleitung der Arme ergibt entspricht in keinster Weise dem Muster, das das Photo zeigt.
12.03.2025 - 00:22DROPS Design ha risposto:
Liebe Frau Dreiser-Farnsworth, Diagramme passt zum Modell, könnte vielleicht diese Lektion helfen? Dort wird erklärt, wie man Diagramme liest. Gerne können Sie sonnst hier genauch beschreiben, wo Sie Problemen haben, so können wir mal versuchen, Ihnen weiterzuhelfen. Danke im voraus Für Ihr Verständnis.
12.03.2025 - 10:21
![]() Sylvia Dreiser-Farnsworth ha scritto:
Sylvia Dreiser-Farnsworth ha scritto:
Die Photos entsprechen nicht dem Pullover. Das Muster der Arme beispielsweise ist vollkommen anders in der Beschreibung - entgegen den Photos. - The photos don't show the pullover that you get when you follow the instructions. The pattern of the arms are completely different from the photo.
12.03.2025 - 00:22
![]() Susan ha scritto:
Susan ha scritto:
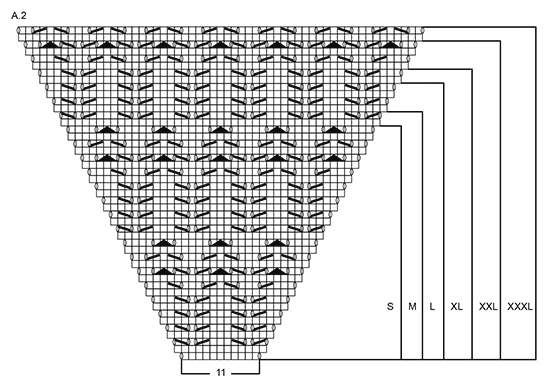
Sea Nymph Cardigan:I am just about to start working on the A2 graph but the pattern (4th row of text) says A2(=11sts). I have no idea what to do here. At the bottom of the A2 graph there is an indicator for 11 stitches. Do I use the 11stitches in the same area for my size and then work outward from those 11? I’m very confused because if I do that the 11 th stitch is half of a ‘slip 1 knitways, K1, psso.. Please help. 😩
06.06.2024 - 22:06DROPS Design ha risposto:
Dear Susan, you work the first row in A.2 just as shown in diagram over the 11 stitches stated in the pattern, on the first row in A.2 you will work (YO (increase for raglan), work the 11 sts A.2 = K11, YO (increase for raglan)) there are now 13 sts in both A.2 for sleeves. Happy knitting!
07.06.2024 - 07:52
![]() Teri ha scritto:
Teri ha scritto:
Follow up on my previous question- I now am on the k2tog, yo row of A1. When I set aside 5 first and 5 last st for garter st, there are 87 st left to do the k2tog which leaves 1 odd st at the end. What do I do with it?
02.04.2021 - 06:00DROPS Design ha risposto:
Dear Teri, leave the very last stitch before the garter stitch band as a knit stitch, thus the two sides will be almost symmetric (have a stitch beside the garter stitch band before the "hole" created by the pattern). Happy Knitting!
02.04.2021 - 09:56
![]() Teri ha scritto:
Teri ha scritto:
Hi, What are the “band st” mentioned at the start of the jacket instruction? Also, I have knitted 4 rows of A1 and so far no differences between the 5 st at either ends and the rest of the work. Am I reading the chart correctly ? Thank you
02.04.2021 - 05:13DROPS Design ha risposto:
Dear Teri, the band stotches are the first and last 5 stitches on the rows, these will form the button- and buttonhole bands later. You are right, in the first rows of A.1, there is no difference between the band and the pattern, the fifference will show up in the 5th row. Happy Knitting!
02.04.2021 - 09:53
![]() Karin Hansen ha scritto:
Karin Hansen ha scritto:
Bluse model 689 str 36 Jeg har hele tiden 4ekstra masker når jeg strikker raglan , håber du kan give mig en forklaring Jeg tager 4masker ud som der står men de 2m til ærmet er jo i mønsteret jeg tror det er der jeg gør forkert . Med venlig hilsen
24.01.2021 - 16:41DROPS Design ha risposto:
Hej Karin, vi er ikke helt sikker på at vi forstår dit spørgsmål, vi har ikke den model eller størrelse du henviser til. Men i denne opskrift DROPS 169-5 på nettet er alle udtagninger til raglan er tegnet ind i diagrammet. Læs også gerne stykket "RAGLAN" igen, det kan være du får svar på dit spørgsmål her.
29.01.2021 - 13:16
![]() Maja ha scritto:
Maja ha scritto:
Hallo. Ich verstehe die 5. Reihe in A.1 leider nicht. In meiner Größe L habe ich 105 Maschen angeschlagen, Minus die zweimal 5 Maschen für die Blenden, ergibt das 95 Maschen für das Muster. Dafür braucht man doch aber eigentlich eine gerade Anzahl von Maschen oder? So sind jetzt 6 Maschen in meiner Blende am Ende der Reihe. Da wäre das muster auch nicht symmetrisch zur Blende.
11.06.2020 - 22:30DROPS Design ha risposto:
Liebe Maja, A.1 beginnt mit 2 M re zusammen, und wird dann mit 1 Masche recht enden, so dass das Muster symetrisch wird: 5 Blende Maschen, 47 Mal (2 M re zs, 1 Umschlag), 1 M re, 5 Blende Maschen = 105 - und so haben Sie 5 Blendemaschen + 1 M recht innenfor den 1. Umschlag beidseitig. Viel Spaß beim stricken!
12.06.2020 - 07:55
![]() Eva ha scritto:
Eva ha scritto:
Bei den Raglan-Zunahmen sollen Markierer angebracht werden... Habe ich gemacht. Okay. In der nächsten Hinreihe schon stimmen die Markierer nicht mehr, da im Muster doch zugenommen wird. Wofür braucht man dann die Markierer? Schon in der 1. Musterreihe (Lochmuster über 13 M)komme ich mit den Angaben nicht mehr klar.
03.03.2019 - 11:35DROPS Design ha risposto:
Liebe Eva, die Markierer werden in den Raglanmaschen eingesetzt - siehe RAGLANZUNAHMEN. Viel Spaß beim stricken!
04.03.2019 - 10:05
![]() Eva ha scritto:
Eva ha scritto:
Ich habe eine Frage zu den "Raglanzunahmen": Muss ich am Rücken- und Vorderteil noch zusätzlich zu den Umschlägen zunehmen? Nach meiner "Rechnung" müsste ich so in jeder 2. Reihe im Rückenteil 2 Maschen und im Vorderteil je 1 Masche zunehmen, damit die Zunahme 12 Maschen beträgt. Ich bitte dringend um Hilfe und bedanke mich für Ihre Mühe.
01.03.2019 - 13:57DROPS Design ha risposto:
Liebe Eva, je nach der Größe sollen Sie zuerst 4 M am Rückenteil + je 2 M an jedem Vorderteil + 2 M an jedem Ärmel (=12 M) 1-3-4-8-11-15 x insgesamt zunehmen und dann 2 M am Rückenteil + 1 M an jedem Vorderteil + 2 M an jedem Ärmel (= 8 M) insgesamt 16-15-16-13-12-9 x zunehmen. Viel Spaß beim stricken!
01.03.2019 - 14:56
![]() Eija ha scritto:
Eija ha scritto:
Kysymys raglan lisäyksistä: "Aloita 3 s:n päässä piirroksen A.2 jokaisesta mallikerrasta ja neulo näin: 1 langankierto, 1 o, 1 langankierto, 2 s oikein (merkkilanka on näiden silmukoiden keskellä), A.2, 2 o (merkkilanka on näiden silmukoiden keskellä), 1 langankierto, 1 o, 1 langankierto. " Onko tässä virhe, kun eihän tässä muodostu lisäykset samalla tavalla kuin kuvassa, eli silmukan molemmin puolin reijät?
27.07.2018 - 14:20
|
|||||||||||||||||||
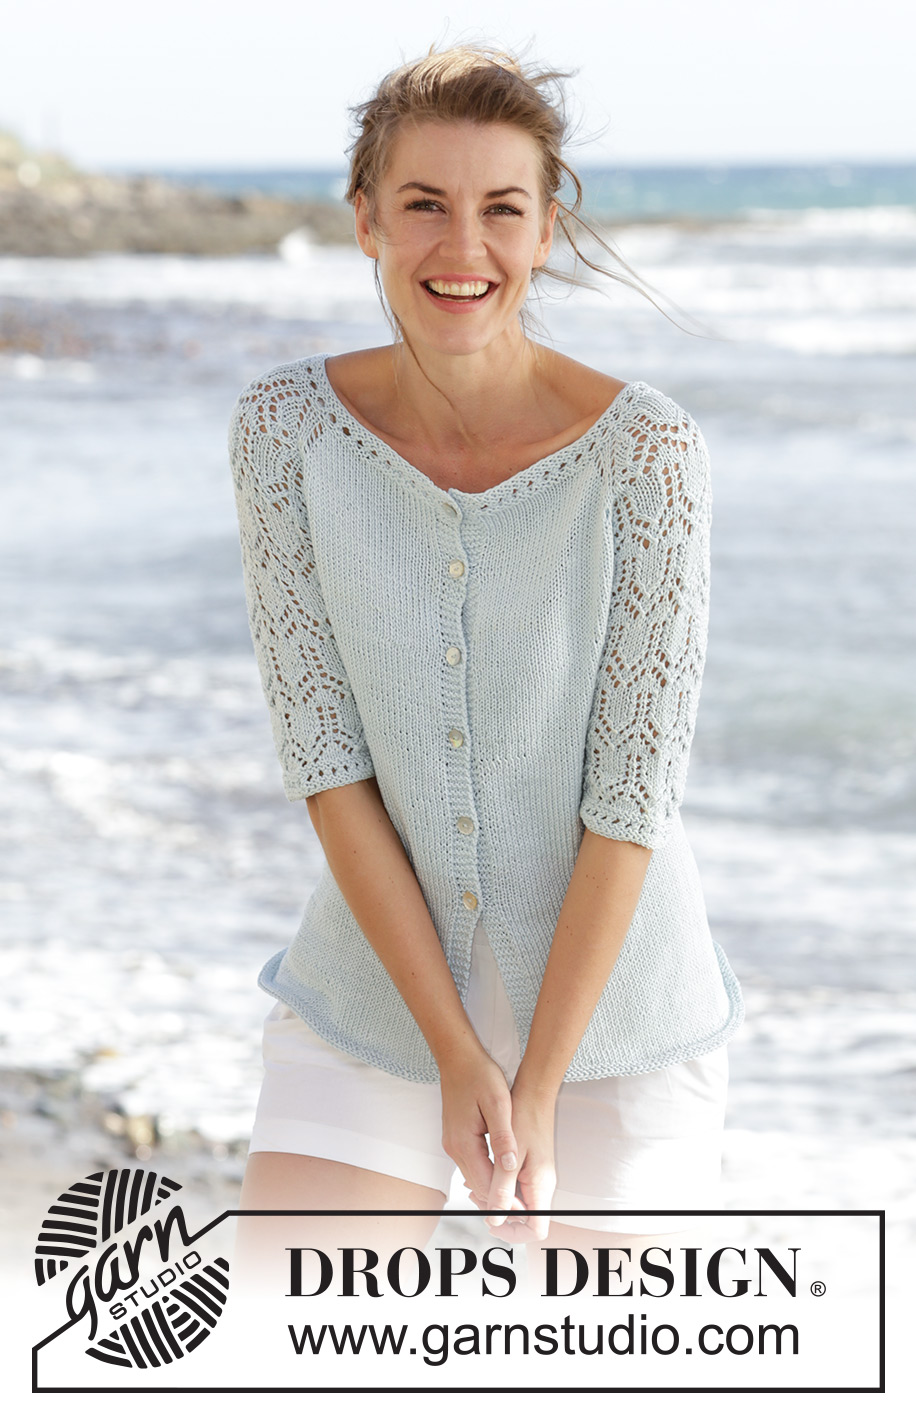
Sea Nymph Cardigan#seanymphcardigan |
|||||||||||||||||||
|
|
|||||||||||||||||||
Cardigan DROPS lavorato ai ferri con raglan, motivo traforato e maniche a ¾ in "Muskat". Lavorato dall’alto in basso (top down). Taglie: S - XXXL.
DROPS 169-5 |
|||||||||||||||||||
|
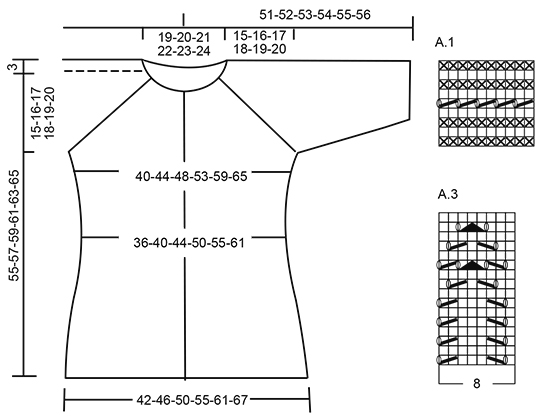
M LEGACCIO (avanti e indietro): Lavorare tutti i f a dir. 1 “costa” a m legaccio = 2 f dir. MOTIVO: Vedere i diagrammi A.1-A.3. I diagrammi mostrano tutti i f del motivo visti dal diritto del lavoro. Scegliere il diagramma per la vostra taglia. RAGLAN: Aumentare su ogni f dal diritto del lavoro (a f alterni) come segue: Aumentare 4 m sul dietro, 2 m su ogni davanti e 2 m su ogni manica (= 12 aumenti, gli aumenti sulla manica sono disegnati nel motivo) – iniziare 3 m prima di ogni A.2 e lavorare come segue: 1 gettato, 1 m dir, 1 gettato, 2 m dir (il segnapunti è al centro di queste m), A.2, 2 m dir (il segnapunti è al centro di queste m), 1 gettato, 1 m dir, 1 gettato. Lavorare a rov i gettati più vicini al segnapunti sul giro successivo per fare i buchi, lavorare a rov ritorto i gettati verso il davanti/dietro per evitare i buchi. Aumentare 12 m in questo modo altre 0-2-3-7-10-14 volte (= 1-3-4-8-11-15 volte in totale, il 1° aumento è spiegato nel testo). Poi aumentare su ogni f dal diritto del lavoro (a f alterni) come segue: Aumentare 2 m sul dietro, 1 m su ogni davanti e 2 m su ogni manica (= 8 aumenti, gli aumenti sulle maniche sono disegnati nel motivo) – iniziare 2 m prima di ogni A.2 e lavorare come segue: 1 gettato, 2 m dir (il segnapunti è al centro di queste m), A.2, 2 m dir (il segnapunti è al centro di queste m), 1 gettato. Lavorare a rov i gettati sul f successivo per fare i buchi. Aumentare 8 m in questo modo 16-15-16-13-12-9 volte in totale. ASOLE: Diminuire per le asole sul bordo destro. 1 asola = lavorare insieme a dir la 2° e la 3° m dal bordo e fare 1 gettato. Diminuire per le asole quando il lavoro misura (misurati dal bordo di avvio): TAGLIA S-M-L: 2, 9, 16, 23, 30 e 37 cm. TAGLIA XL-XXL-XXXL: 2, 9, 16, 23, 30, 37 e 44 cm ---------------------------------------------------------- CARDIGAN: Lavorato avanti e indietro sui f circolari, dall’alto in basso (top down). Avviare 97-101-105-109-113-117 m (comprese 5 m per il bordo a ogni lato verso il centro davanti) con i f circolari n° 4 mm con Muskat. Lavorare 1 ferro dir dal diritto del lavoro, poi lavorare A.1, (1° ferro = dal rovescio del lavoro) con 5 m a m legaccio a ogni lato sull’ultimo ferro di A.1 distribuire 15 aumenti in modo uniforme = 112-116-120-124-128-132 m. Poi lavorare come segue dal centro davanti e dal diritto del lavoro: 5 m a m legaccio, 17-18-19-20-21-22 m a m rasata, 1 gettato, 1 m a m rasata, 1 gettato, 2 m a m rasata (inserire un segnapunti tra queste m), A.2 (= 11 m), 2 m a m rasata (inserire un segnapunti tra queste m), 1 gettato, 1 m a m rasata, 1 gettato, 34-36-38-40-42-44 m a m rasata, 1 gettato, 1 m a m rasata, 1 gettato, 2 m a m rasata (inserire un segnapunti tra queste m), A.2, 2 m a m rasata (inserire un segnapunti tra queste m), 1 gettato, 1 m a m rasata, 1 gettato, 17-18-19-20-21-22 m a m rasata, 5 m a m legaccio. Continuare questo motivo, e aumentare per il RAGLAN come spiegato sopra, il 1° aumento ora è finito. FARE ATTENZIONE ALLA TENSIONE DEL LAVORO! Quando A.2 è stato lavorato in verticale – vedere i segni per la vostra taglia, ci sono 252-272-296-324-356-384 m sul giro, ora gli aumenti sono finiti. Lavorare il f successivo come segue dal rovescio del lavoro: Lavorare 43-47-51-57-63-69 m (= davanti destro), trasferire le 45-47-51-53-57-59 m successive su un fermamaglie (= manica), avviare 8 m sotto la manica, lavorare le 76-84-92-104-116-128 m successive (= dietro), trasferire le 45-47-51-53-57-59 m successive su un fermamaglie (= manica), avviare 8 nuove m sotto la manica, lavorare le ultime 43-47-51-57-63-69 m (= davanti sinistro). CORPO: Ora ci sono 178-194-210-234-258-282 m sul corpo. Continuare a m rasata e a m legaccio come prima. Inserire un segnapunti a ogni lato, al centro delle 8 nuove m che sono state avviate. ORA MISURARE IL LAVORO DA QUI. Quando il lavoro misura 4 cm, diminuire 1 m a ogni lato del segnapunti (= 4 diminuzioni), ripetere le diminuzioni ogni 4-4-4-5-5-5 cm 3 volte in totale = 162-178-194-218-242-266 m. Quando il lavoro misura 22-23-24-25-26-27 cm, aumentare 1 m a ogni lato di tutti i segnapunti (= 4 aumenti), ripetere gli aumenti ogni 2 cm altre 5 volte = 186-202-218-242-266-290 m. Quando il lavoro misura 36-37-38-39-40-41 cm, lavorare 2 coste su tutte le m. Intrecciare 1 m dir/1 m rov (per evitare un bordo di chiusura ondulato), il lavoro misura circa 55-57-59-61-63-65 cm dal bordo di avvio. MANICA: Lavorata in tondo. Riportare le m delle maniche sui f a doppia punta n° 4 mm, riprendere 1 m in ognuna delle 8 m sotto la manica = 53-55-59-61-65-67 m. Inserire 1 segnapunti al centro sotto la manica = inizio del giro. ORA MISURARE IL LAVORO DA QUI! Poi lavorare come segue: 6-7-1-2-4-6 m a m rasata, A.3 sulle 40-40-56-56-56-56 m successive (iniziare A.3 dove finisce A.2 per la vostra taglia), 7-8-2-3-5-7 m a m rasata. Quando il lavoro misura 4 cm, diminuire 1 m a ogni lato del segnapunti. Lavorare le m che non rientrano nel motivo a m rasata, assicurarsi che il n° di diminuzioni e aumenti del motivo sia corretto. Ripetere le diminuzioni ogni 7-7-5-5-3-3 cm altre 2-2-3-3-4-4 volte = 47-49-51-53-55-57 m. Quando il lavoro misura 24-23-23-22-22-21 cm, lavorare A.1 su tutte le m, poi intrecciare. Lavorare l’altra manica nello stesso modo. Attaccare i bottoni sul davanti sinistro. |
|||||||||||||||||||
Spiegazioni del diagramma |
|||||||||||||||||||
|
|||||||||||||||||||
 |
|||||||||||||||||||
 |
|||||||||||||||||||
Avete terminato questo modello?Allora taggate le vostre foto con #dropspattern #seanymphcardigan o inviatele alla #dropsfan gallery. Avete bisogno di aiuto con questo modello?Troverete 23 video tutorial, una sezione per i commenti/domande e molto altro guardando il modello su www.garnstudio.com © 1982-2026 DROPS Design A/S. Ci riserviamo tutti i diritti. Questo documento, compreso tutte le sue sotto-sezioni, è protetto dalle leggi sul copyright. Potete leggere quello che potete fare con i nostri modelli alla fine di ogni modello sul nostro sito. |
|||||||||||||||||||


Con oltre 40 anni di esperienza nel design di modelli di maglia e uncinetto, DROPS Design offre la più estesa collezione di modelli gratuiti su internet - tradotti in 17 lingue. Ad oggi vi possiamo fornire 324 cataloghi e 12290 modelli - 9561 dei quali sono tradotti in Italiano.
Ci stiamo impegnando molto per darvi il meglio che vi possiamo offrire in termini di maglia e uncinetto, ispirazioni e consigli così come filati di grande qualità ad un prezzo incredibile! Volete utilizzare i nostri modelli per qualcosa d'altro oltre al vostro uso personale? Potete leggere tutto ciò che è consentito nel testo sul Copyright in basso su tutte le pagine dei nostri modelli. Buon lavoro!
Lasciare un commento sul modello DROPS 169-5
Noi saremmo felici di ricevere i tuoi commenti e opinioni su questo modello!
Se vuoi fare una domanda, fai per favore attenzione a selezionare la categoria corretta nella casella qui sotto per velocizzare il processo di risposta. I campi richiesti sono indicati da *.