
Categorie popolari
State cercando un filato?


Commenti / Domande (55)
![]() Anna Plummer ha scritto:
Anna Plummer ha scritto:
Why is there no crochet gauge given for Drops yarns? There's a huge difference between knitting & crochet gauge, especially the rows. I did a swatch for Paris, and I was off by 8 rows, and # of rows should not not change much, not like horizontal sts do. I compared to 3 yarns from other brands, my gauge was perfect. I want to use Paris, though. but I can't find any crochet gauge. Thank You!
18.05.2020 - 08:37DROPS Design ha risposto:
Dear Mrs Plummer, gauge will change depending on the fabric required, you will find the matching tension in each pattern, for example here you need 14 dc x 8.5 rows = 4'' x 4'' (10 x 10 cm) - read more about tension here. Happy crocheting!
18.05.2020 - 08:49
![]() Ada ha scritto:
Ada ha scritto:
Goedemiddag, ben de poncho in maat M/L aan het maken. Nu bij de 3e herhaling t/m toer 7 en ben 67 cm hoog (dus bijna bij de 71 cm). Zag dat je in ieder geval bij een toer met stokjes moet stoppen. 2 vragen: 1. Ik neem aan dat dit ook halverwege het patroon kan? 2. Maakt het nog uit of dit dan toer 12 of 13 is? Alvast bedankt voor de reactie. Groet, Ada
21.03.2020 - 14:41DROPS Design ha risposto:
Dag Ada,
Ja hoor, dit kan halverwege het patroon en toer 12 of 13 maakt ook niet uit want het zijn beide toeren met stokjes.
22.03.2020 - 16:53
![]() Cathie ha scritto:
Cathie ha scritto:
I have been crocheting for 50 years. I do not know how to read a diagram. I only use written instructions. However, I have no clue what you are talking about after the 2nd row. What is A.4 over the next 4 stitches, etc? What is the A. ? Help please. I am so lost!
08.03.2020 - 03:40DROPS Design ha risposto:
Dear Cathie, it is well worth the time and effort to figure out how to read pattern diagrams, because they not only tell you what to do at the very next step, but also show you how the stitches AND the rows relate to each other. In this case pattern A.4 shows you the trebles stitches at the right of the diagram. HERE you can find a lesson on how to read crochet diagrams, and do not forget, that you can always ask for help (in person or over teh phone) for help in the store where you bought your DROPS yarn from. Happy Crafting!
08.03.2020 - 22:56
![]() Imelda Parra Suarez ha scritto:
Imelda Parra Suarez ha scritto:
Quisiera elaborar el poncho con patron de calados en Paris pero no entiendo las abreviasiones que colocan me gustaría algo más claro o una fotografia donde se observe claramente las puntadas. Muchas gracias por su atención quedo atenta.
14.11.2019 - 21:03DROPS Design ha risposto:
Hola Imelda. No disponemos de más fotos que las que están publicadas de este modelo. Tienes bajo el patrón varios vídeos explicativos y el diccionario de abreviaturas está en este link https://www.garnstudio.com/dictionary.php?lang=es
17.11.2019 - 19:34
![]() Phoebe Musa ha scritto:
Phoebe Musa ha scritto:
Kindly give us the pattern in writing, diagrams are kind of confusing
15.10.2019 - 10:15DROPS Design ha risposto:
Dear Mrs Musa, when there are only diagrams in a pattern, such as this one for example, you will find help with crochet diagrams here. Happy crocheting!
15.10.2019 - 10:25
![]() Birgitta ha scritto:
Birgitta ha scritto:
Hej. Jag skulle vilja veta bredden på "halsduken". Mvh Birgitta
26.08.2019 - 11:08DROPS Design ha risposto:
Hej. Du hittar alla mått i de olika storlekarna på måttskissen längst ner på mönstret. Lycka till!
27.08.2019 - 08:15
![]() SAROJ ha scritto:
SAROJ ha scritto:
Hi there Is there any way I can get this pattern fully written out, I get extremely confused reading a diagram. Please assist.
23.07.2019 - 11:20DROPS Design ha risposto:
Dear Mrs Saroj, there are only diagrams to this pattern but you will find here how to read crochet diagrams, should you need any further assistance reading diagrams, feel free to contact your DROPS store even per mail or telephone. Happy crocheting!
06.08.2019 - 09:45
![]() Carrie ha scritto:
Carrie ha scritto:
Hello again! I’m just about to finish the first part of the diagram. When starting the diagram again, to get the length, do I start with the rows of single crochets at the very bottom, or do I start with the second row of 3 dc, chain 3 on top of the top most row of dc? Thank you! I think I’m going to like diagrams much better than the US way of writing every line out! :)
14.06.2019 - 02:57DROPS Design ha risposto:
Dear Carrie, when repeating the diagrams in height, start from 2nd row in diagram, ie skip the single crochets row from the very bottom. Happy crocheting!
14.06.2019 - 07:27
![]() Carrie ha scritto:
Carrie ha scritto:
I have gotten up to the 4th row above the row of single crochets and have torn it out 3 times. Where does the 4th DC in stitch go? The first of the chain 3 below? I am assuming that this row goes from A4-A5. I can’t tell where single crochets go between A1 and A2. Do they go into each of the DC around chain below? The diagram looks like one DC in the first DC around and the second in the first of chain 3. That just doesn’t seem right. Thank you, Carrie
11.06.2019 - 02:20DROPS Design ha risposto:
Dear Carrie, on row 3 (5, 7..) in A.4/A.5 the 4th dc (in A.4) and the first dc (in A.5) will be worked in the first chain (A.4)/last chain (= next to the dc) in A.5. So that there are either 3 or 4 dc in A.4/A.5. Happy crocheting!
11.06.2019 - 12:32
![]() Hedi ha scritto:
Hedi ha scritto:
Ich möchte wissen wie ich dieses teil zusammen nähe
02.05.2019 - 21:49DROPS Design ha risposto:
Liebe Hedi, dieses Video zeigt wie man einen gestrickten Poncho zusammennäht - beim gehäkelten wird es die gleiche Technik. Viel Spaß beim häkeln!
03.05.2019 - 09:00
|
|||||||||||||||||||||||||||||||
Sky Love#skyloveponcho |
|||||||||||||||||||||||||||||||
 |
 |
||||||||||||||||||||||||||||||
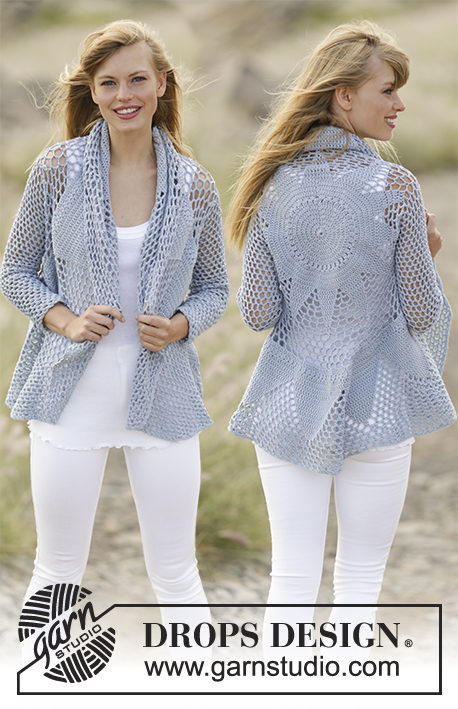
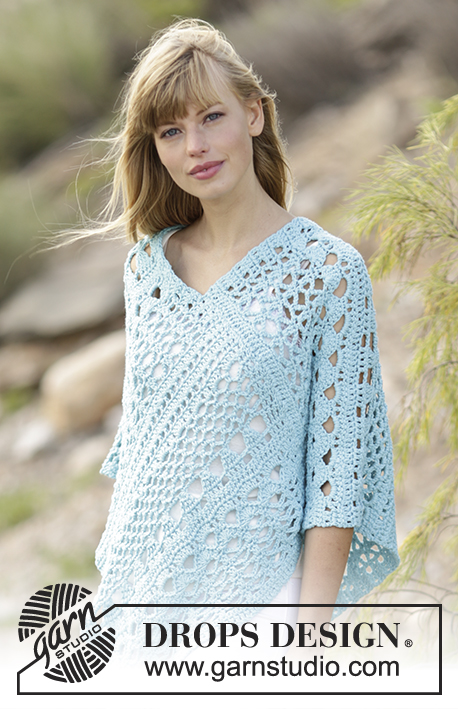
Poncho DROPS all’uncinetto, con motivo traforato, in "Paris". Taglie: Dalla S alla XXXL.
DROPS 168-13 |
|||||||||||||||||||||||||||||||
|
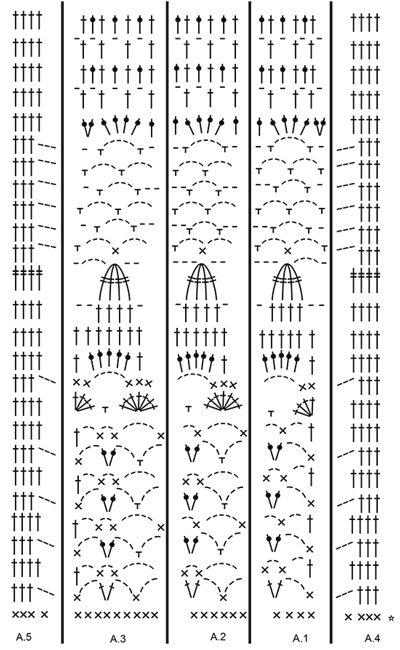
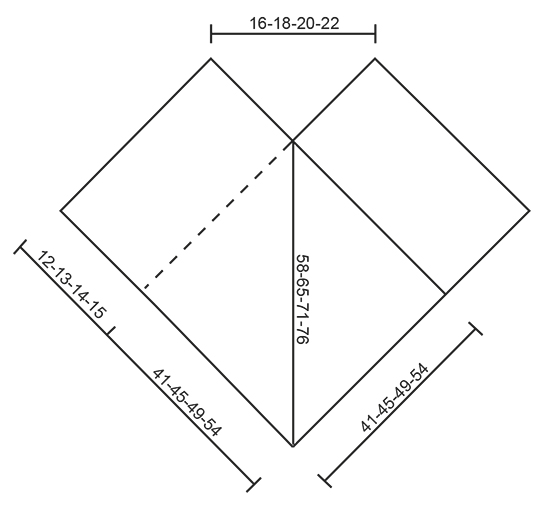
INFORMAZIONI PER IL LAVORO: Iniziare ogni riga di m.b con 1 cat (sostituisce la prima m.b). Iniziare ogni riga di m.a con 3 cat (sostituiscono la prima m.a). Iniziare ogni riga di m.a.d con 4 cat (sostituiscono la prima m.a.d). MOTIVO: Vedere i diagrammi da A.1 a A.5. ---------------------------------------------------------- PONCHO: Si lavora come fossero 2 sciarpe unite insieme alla fine per formare un poncho. Con l’uncinetto n° 5 ed il filato Paris, avviare 77-85-93-101 cat. Lavorare 1 m.a nella 4a cat dall’uncinetto (= 2 m.a), 1 m.a nella cat successiva, * saltare 1 cat, 1 m.a in ognuna delle 3 cat successive *, ripetere da *-* su tutto il ferro = 57-63-69-75 m.a. Lavorare 1 m.b in ogni m.a (= sul rovescio del lavoro) – vedere le INFORMAZIONI PER IL LAVORO = 57-63-69-75 m.b. Proseguire come segue: diagramma A.4 sulle prime 4 m.b, diagramma A.1 sulle 4 m.b successive, diagramma A.2 sulle 36-42-48-54 m.b successive (= 6-7-8-9 volte in larghezza), diagramma A.3 sulle 9 m.b successive, finire con il diagramma A.5 sulle ultime 4 m.b. Proseguire con il motivo in questo modo. RICORDARSI LA TENSIONE DEL LAVORO! Proseguire finché il lavoro non misura 65-71-77-84 cm; finire con una riga di m.a del diagramma. Tagliare il filo. Lavorare una seconda parte in modo uguale. CONFEZIONE: Mettere l’ultima riga della prima parte contro il lato lungo destro della seconda parte – dal basso, a partire dalla catenella di base e risalire per 41-45-49-54 cm – assicurarsi di non tirare troppo il lavoro. Cucire le 2 parti insieme con piccoli punti. Poi cucire in modo uguale l’ultima riga della seconda parte al lato destro della prima parte. |
|||||||||||||||||||||||||||||||
Spiegazioni del diagramma |
|||||||||||||||||||||||||||||||
|
|||||||||||||||||||||||||||||||
 |
|||||||||||||||||||||||||||||||
 |
|||||||||||||||||||||||||||||||
Avete terminato questo modello?Allora taggate le vostre foto con #dropspattern #skyloveponcho o inviatele alla #dropsfan gallery. Avete bisogno di aiuto con questo modello?Troverete 8 video tutorial, una sezione per i commenti/domande e molto altro guardando il modello su www.garnstudio.com © 1982-2026 DROPS Design A/S. Ci riserviamo tutti i diritti. Questo documento, compreso tutte le sue sotto-sezioni, è protetto dalle leggi sul copyright. Potete leggere quello che potete fare con i nostri modelli alla fine di ogni modello sul nostro sito. |
|||||||||||||||||||||||||||||||


Con oltre 40 anni di esperienza nel design di modelli di maglia e uncinetto, DROPS Design offre la più estesa collezione di modelli gratuiti su internet - tradotti in 17 lingue. Ad oggi vi possiamo fornire 324 cataloghi e 12291 modelli - 9562 dei quali sono tradotti in Italiano.
Ci stiamo impegnando molto per darvi il meglio che vi possiamo offrire in termini di maglia e uncinetto, ispirazioni e consigli così come filati di grande qualità ad un prezzo incredibile! Volete utilizzare i nostri modelli per qualcosa d'altro oltre al vostro uso personale? Potete leggere tutto ciò che è consentito nel testo sul Copyright in basso su tutte le pagine dei nostri modelli. Buon lavoro!
Lasciare un commento sul modello DROPS 168-13
Noi saremmo felici di ricevere i tuoi commenti e opinioni su questo modello!
Se vuoi fare una domanda, fai per favore attenzione a selezionare la categoria corretta nella casella qui sotto per velocizzare il processo di risposta. I campi richiesti sono indicati da *.