
Categorie popolari
State cercando un filato?


Commenti / Domande (173)
![]() Marthe Stine ha scritto:
Marthe Stine ha scritto:
Hei! Jeg forstår ikke hvordan halsen strikkes, for på bildet ser det ut som rillestrikk før det blir 1 omgang hullmønster. Ut fra diagrammet A.1 får jeg hullmønster på annenhver omgang, mulig jeg misforstår diagrammet? Kan dere forklare hver av omgangene rundt halsen? Jeg har lagt opp 87 masker (str.S) og strikket 1 omgang rette masker, hva gjør jeg videre for å få halsen rett?
24.08.2018 - 20:27DROPS Design ha risposto:
Hej Marthe, Det stemmer, du strikker 1.omgang vrang. 2.omgang rett, 3.omgang vrang, 4.omgang rett (du har nu 2 riller). 5.omgang "2rett sammen, 1kast". 6.omgang rett, osv. God fornøjelse!
30.08.2018 - 15:00
![]() Martine Z. ha scritto:
Martine Z. ha scritto:
Bonjour Pour les augmentations du raglan, taille XL par exemple, doit on comprendre qu'on augmente tous les deux tours d 'abord 8 fois 12 mailles et ensuite 13 fois 8 mailles ? Merci pour votre réponse
02.08.2018 - 15:41DROPS Design ha risposto:
Bonjour Martine Z., tout à fait, c'est bien ainsi que l'on augmente en taille XL. Bon tricot!
02.08.2018 - 16:01
![]() Susan ha scritto:
Susan ha scritto:
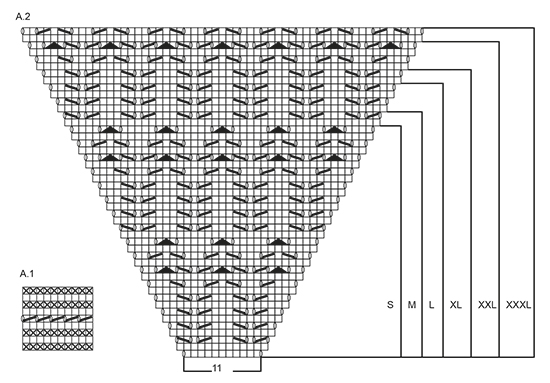
Chart A1 is a repeat of an even number of stitches. The cast on for yoke in all sizes is an odd number. What should be done with the extra stitch?
25.06.2018 - 03:22DROPS Design ha risposto:
Hi Susan, To increase evenly, count the total number of stitches to be increased over on the last row in A.1 - 87-91-95-99-103-107 stitches and divide by the number of increases to be mede - 15. This means you make a yarn over after every 6th -6th-6th-7th-7th-7th stitch (approx.) on this row. I hope this helps and happy knitting!
25.06.2018 - 06:12
![]() Jutta Bott ha scritto:
Jutta Bott ha scritto:
Hallo hier noch einmal Jutta.Leider war die Beschreibung für A1 sehr unübersichtlich. Aber nach langem probieren geschafft. Für alle anderen. Die ersten 4 Reihen werden kraus rechts gestrickt.
07.06.2018 - 10:05
![]() Jutta Bott ha scritto:
Jutta Bott ha scritto:
Vielen Dank für die Antwort. Leider habe ich mich nicht richtig ausgedrückt. Ich meine nicht die 5 Reihe. Mir geht es um die ersten 4 Reihen. Danke
06.06.2018 - 19:07DROPS Design ha risposto:
Liebe Frau Bott, bei A.1 werden die 4 ersten Reihen in A.1 so gestrickt: 1 Runde links, 1 Runde rechts, 1 Runde links, 1 Runde rechts - dann kommt die Löcherrunde (= 2 M re zs, 1 Umschlag), dann stricken Sie 1 Runde re, 1 Runde li, 1 Runde re, und 1 Runde li = 9 Reihe in A.1 insgesamt. Die Maschenanzahl muß immer die gleiche sein, nun bei der letzte Runde in A.1 (= die Runde li) werden Sie regelmäßig verteilt 15 Maschen zunehmen. Viel Spaß beim stricken!
07.06.2018 - 08:38
![]() Jutta Bott ha scritto:
Jutta Bott ha scritto:
Ich habe eine Frage zum Modell r-699. Wenn ich Mustersatz A1 stricke 1 Masche Umschlag usw. habe ich die doppelte Anzahl an Maschen. Wie stricke ich die Rückreihe ohne die Doppelte Anzahl an Maschen habe. Wo liegt mein Fehler. Ich komme nicht klar. Danke
06.06.2018 - 11:58DROPS Design ha risposto:
Liebe Frau Bott, bei der 5. Reihe in A.1 stricken Sie (2 M re zs, 1 Umschlag) und von (bis) wiederholen, dh die Maschenanzahl bleibt wie zuvor. Viel Spaß beim stricken!
06.06.2018 - 15:01
![]() Amanda ha scritto:
Amanda ha scritto:
When I'm working the yoke after first Inc round with the raglan incs, the next round we follow the other round. Says we inc sleeves 2 sts but the chart doesn't show YOs (Working row 2 of A2). Do I add in YOs? Arethe raglan increases on the rows we are not doing lace stitches? Do I only work the raglan sleeve increases three times and the remainder of the yoke in the 8-st inc pattern?
05.05.2018 - 01:47DROPS Design ha risposto:
Dear Amanda, the increase in sleeve are drawn in A.2: on 1st row in A.2 you work: 1 YO, K11, 1 YO, on round 2 in A.2 there are 13 sts, and so on, you will increase 2 sts in A.2 every other row in diagram (= 1 YO at the very beg of diagram + 1 YO at the very end of diagram). Happy knitting!
07.05.2018 - 08:42
![]() Barb ha scritto:
Barb ha scritto:
Where are the diagram explanations for A.1? I understand row 5, but can't figure out the other rows. Thanks.
20.02.2018 - 02:20DROPS Design ha risposto:
Hi Barb, The diagram for A.1 is at the bottom of the page, to the left of the diagram for A.2. There are 9 rounds, knit, purl, knit, purl. Then a round of knit 2 together make a yarn over alternately to end of round and then knit, purl, knit, purl to finish. Hope this helps and happy knitting!
20.02.2018 - 06:12
![]() Zusanne Ryge ha scritto:
Zusanne Ryge ha scritto:
Jeg synes i mangler “slå om” i jeres diagram forklaring. Samtidig burde i have vendt ærmet en halv omgang i opskriften, da man sjældent læser et diagram oppe fra og ned.
09.01.2018 - 22:23Lorraine Herlick ha scritto:
I have knit many of your lovely patterns over the last three years. May I suggest that there have been many instances when the instructions could have been much clearer. Example, ...1 YO, k1, 1 YO, k2, place marker between these stitches. Instead if it stated k1, place marker, k1, if would also reduce the number of requests for clarification. Thank you.
21.12.2017 - 04:13
|
|||||||||||||||||||
Sea Nymph#seanymphsweater |
|||||||||||||||||||
 |
 |
||||||||||||||||||
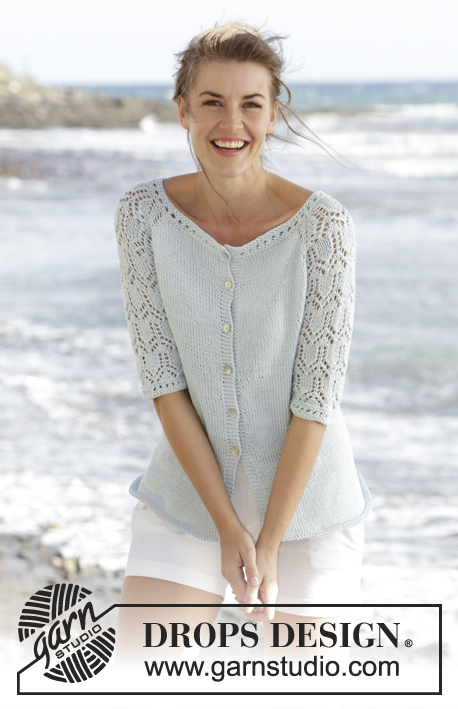
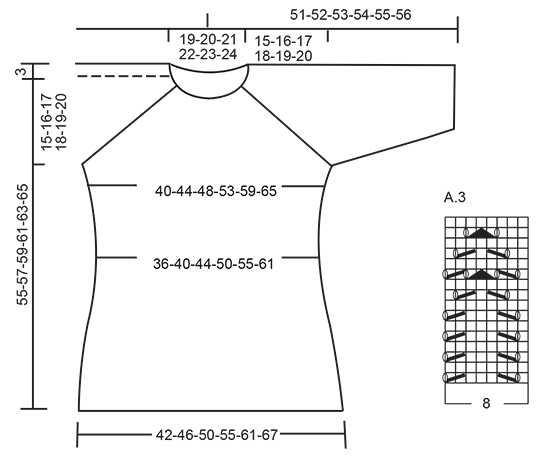
Maglione DROPS lavorato ai ferri con raglan, motivo traforato e maniche a ¾ in "Muskat". Lavorato dall’alto in basso (top down). Taglie: S - XXXL.
DROPS 168-1 |
|||||||||||||||||||
|
M LEGACCIO (in tondo): 1 “costa” a m legaccio = 2 giri. * 1 giro dir e 1 giro rov *, ripetere *-*. MOTIVO: Vedere i diagrammi A.1-A.3. Vedere il diagramma per la vostra taglia! RAGLAN: Aumentare a giri alterni come segue: Aumentare 4 m sul dietro, 4 m sul davanti e 2 m su ogni manica (= 12 aumenti, gli aumenti sulla manica sono disegnati nel motivo) – iniziare 3 m prima di ogni A.2 e lavorare come segue: 1 gettato, 1 m dir, 1 gettato, 2 m dir (il segnapunti è al centro di queste m), A.2, 2 m dir (il segnapunti è al centro di queste m), 1 gettato, 1 m dir, 1 gettato. Lavorare a dir i gettati più vicini al segnapunti sul f successivo per fare i buchi, lavorare a dir ritorto i gettati verso il davanti/dietro per evitare i buchi. Aumentare 12 m in questo modo altre 0-2-3-7-10-14 volte (= 1-3-4-8-11-15 volte in totale, il 1° aumento è spiegato nel testo). Poi aumentare a giri alterni come segue: Aumentare 2 m sul dietro, 2 m sul davanti e 2 m su ogni manica (= 8 aumenti, gli aumenti sulle maniche sono disegnati nel motivo) – iniziare 2 m prima di ogni A.2 e lavorare come segue: 1 gettato, 2 m dir (il segnapunti è al centro di queste m), A.2, 2 m dir (il segnapunti è al centro di queste m), 1 gettato. Lavorare a dir i gettati sul giro successivo per fare i buchi. Aumentare 8 m in questo modo 16-15-16-13-12-9 volte in totale. ---------------------------------------------------------- MAGLIONE: Lavorato in tondo con i f circolari, dall’alto in basso (top down). SPRONE: Avviare 87-91-95-99-103-107 m con i f circolari n° 4 mm con Muskat. Lavorare 1 giro dir, poi lavorare A.1, sull’ultimo giro di A.1 distribuire 15 aumenti in modo uniforme = 102-106-110-114-118-122 m. Poi lavorare come segue dal centro dietro: 17-18-19-20-21-22 m dir, 1 gettato, 1 m dir, 1 gettato, 2 m dir (inserire un segnapunti tra queste m), A.2 (= 11 m), 2 m dir (inserire un segnapunti tra queste m), 1 gettato, 1 m dir, 1 gettato, 34-36-38-40-42-44 m dir, 1 gettato, 1 m dir, 1 gettato, 2 m dir (inserire un segnapunti tra queste m), A.2, 2 m dir (inserire un segnapunti tra queste m), 1 gettato, 1 m dir, 1 gettato, 17-18-19-20-21-22 m dir. Continuare questo motivo, e aumentare per il RAGLAN come spiegato sopra, il 1° aumento ora è finito. FARE ATTENZIONE ALLA TENSIONE DEL LAVORO! Quando A.2 è stato lavorato in verticale – vedere i segni per la vostra taglia, ci sono 242-262-286-314-346-374 m sul giro, ora gli aumenti sono finiti. Lavorare il giro successivo come segue: Lavorare 38-42-46-52-58-64 m (= metà dietro), trasferire le 45-47-51-53-57-59 m successive su un fermamaglie (= manica), avviare 8 m sotto la manica, lavorare le 76-84-92-104-116-128 m successive (= davanti), trasferire le 45-47-51-53-57-59 m successive su un fermamaglie (= manica), avviare 8 nuove m sotto la manica, lavorare le ultime 38-42-46-52-58-64 m (= metà dietro). CORPO: Ora ci sono 168-184-200-224-248-272 m sul corpo. Continuare a m rasata. Inserire un segnapunti a ogni lato, al centro delle 8 nuove m che sono state avviate. ORA MISURARE IL LAVORO DA QUI. Quando il lavoro misura 4 cm, diminuire 1 m a ogni lato del segnapunti (= 4 diminuzioni), ripetere le diminuzioni ogni 4-4-4-5-5-5 cm altre 3 volte = 152-168-184-208-232-256 m. Quando il lavoro misura 22-23-24-25-26-27 cm, aumentare 1 m a ogni lato di tutti i segnapunti (= 4 aumenti), ripetere gli aumenti ogni 2 cm altre 5 volte = 176-192-208-232-256-280 m. Quando il lavoro misura 36-37-38-39-40-41 cm, lavorare 2 coste a M LEGACCIO – leggere la spiegazione sopra, su tutte le m. Intrecciare 1 m dir/1 m rov (per evitare un bordo di chiusura ondulato), il lavoro misura circa 55-57-59-61-63-65 cm dal bordo di avvio. MANICA: Lavorata in tondo. Riportare le m delle maniche sui f a doppia punta n° 4 mm, riprendere 1 m in ognuna delle 8 m sotto la manica = 53-55-59-61-65-67 m. Inserire 1 segnapunti al centro sotto la manica = inizio del giro. ORA MISURARE IL LAVORO DA QUI! Poi lavorare come segue: 6-7-1-2-4-5 m a m rasata, A.3 sulle 40-40-56-56-56-56 m successive (iniziare A.3 dove finisce A.2 per la vostra taglia), 7-8-2-3-5-6 m a m rasata. Quando il lavoro misura 4 cm, diminuire 1 m a ogni lato del segnapunti. Lavorare le m che non rientrano nel motivo a m rasata, assicurarsi che il n° di diminuzioni e aumenti del motivo sia corretto. Ripetere le diminuzioni ogni 7-7-5-5-3-3 cm altre 2-2-3-3-4-4 volte = 47-49-51-53-55-57 m. Quando il lavoro misura 24-23-23-22-22-21 cm, lavorare A.1 su tutte le m, poi intrecciare. Lavorare l’altra manica nello stesso modo. |
|||||||||||||||||||
Spiegazioni del diagramma |
|||||||||||||||||||
|
|||||||||||||||||||
 |
|||||||||||||||||||
 |
|||||||||||||||||||
Avete terminato questo modello?Allora taggate le vostre foto con #dropspattern #seanymphsweater o inviatele alla #dropsfan gallery. Avete bisogno di aiuto con questo modello?Troverete 25 video tutorial, una sezione per i commenti/domande e molto altro guardando il modello su www.garnstudio.com © 1982-2026 DROPS Design A/S. Ci riserviamo tutti i diritti. Questo documento, compreso tutte le sue sotto-sezioni, è protetto dalle leggi sul copyright. Potete leggere quello che potete fare con i nostri modelli alla fine di ogni modello sul nostro sito. |
|||||||||||||||||||


Con oltre 40 anni di esperienza nel design di modelli di maglia e uncinetto, DROPS Design offre la più estesa collezione di modelli gratuiti su internet - tradotti in 17 lingue. Ad oggi vi possiamo fornire 324 cataloghi e 12290 modelli - 9561 dei quali sono tradotti in Italiano.
Ci stiamo impegnando molto per darvi il meglio che vi possiamo offrire in termini di maglia e uncinetto, ispirazioni e consigli così come filati di grande qualità ad un prezzo incredibile! Volete utilizzare i nostri modelli per qualcosa d'altro oltre al vostro uso personale? Potete leggere tutto ciò che è consentito nel testo sul Copyright in basso su tutte le pagine dei nostri modelli. Buon lavoro!
Lasciare un commento sul modello DROPS 168-1
Noi saremmo felici di ricevere i tuoi commenti e opinioni su questo modello!
Se vuoi fare una domanda, fai per favore attenzione a selezionare la categoria corretta nella casella qui sotto per velocizzare il processo di risposta. I campi richiesti sono indicati da *.