
Categorie popolari
State cercando un filato?


Commenti / Domande (173)
![]() Patrizia ha scritto:
Patrizia ha scritto:
Non mi sono chiari gli aumenti per il dietro e davanti, partendo dallo sprone di fanno a giro alterni?? Tutti i giri dispari?? 😞
24.05.2019 - 19:15DROPS Design ha risposto:
Buongiorno Patrizia. Aumenta un giro sì, un giro no. Dopo aver completato il diagramma A.1, sul giro successivo inizia ad aumentare. Il primo aumento è spiegato nel testo. Per gli aumenti successivi segue le indicazioni del paragrafo Raglan. Buon lavoro!
25.05.2019 - 06:47
![]() Lorena Johnson ha scritto:
Lorena Johnson ha scritto:
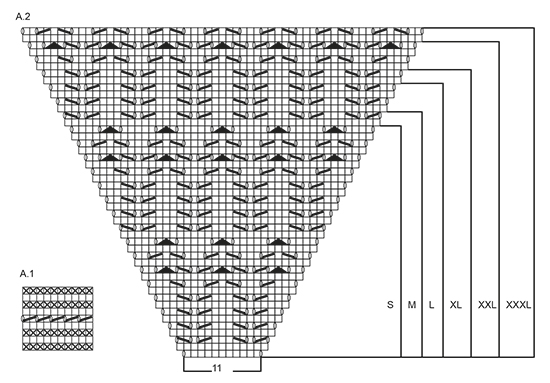
I am knitting Sea Nymph and am having trouble with instructions. In diagram A2, is each row in diagram to be knit as a separate row or only as every other row with plain knit row between each diagrammed row?
06.03.2019 - 01:51DROPS Design ha risposto:
Dear Lorena the diagrams show all the rows. If you are knitting in round, just always read The diagrams right to left, from bottom to top. Happy knitting!
06.03.2019 - 09:18
![]() Lorena Johnson ha scritto:
Lorena Johnson ha scritto:
In the instruction diagram A2, is each row pictured an actual row or do I knit the design row in every other row?
06.03.2019 - 01:46DROPS Design ha risposto:
Dear Lorena the diagrams show all the rows. If you are knitting in round, just always read The diagrams right to left, from bottom to top. Happy knitting!
06.03.2019 - 09:18
![]() Eva ha scritto:
Eva ha scritto:
Bei den Raglan-Zunahmen steht: am Rücken und Vorderteil werden in jeder 2. R. 4 Maschen zugenommen. Wenn ich mich nicht irre, nimmt man am Vorderteil je 1 Masche und am Rücken 2 Maschen durch die Umschläge zu... Heißt das nun, dass im Vorderteil 3 Maschen und im Rückenteil in jeder 2. Reihe noch zusätzlich 2 Maschen zugenommen werden müssen? Ich bin verwirrt...
28.02.2019 - 17:34DROPS Design ha risposto:
Liebe Eva, es werden zuerst 12 M in jeder 2. Rd zugenommen: 4 M am Rückenteil + 4 M am Vorder teil + 2 M an jedem Ärmel. siehe RAGLANZUNAHMEN. Viel Spaß beim stricken!
01.03.2019 - 09:35
![]() Radia ha scritto:
Radia ha scritto:
Merci 😊
07.01.2019 - 12:57
![]() Radia ha scritto:
Radia ha scritto:
Bonjour, Je suis très contente de découvrir votre site. Moi qui rêve depuis longtemps de débuter dans l’ar Du tricot. Je serai heureuse, s’il vous plaît si vous pourriez me dire quel tricot serait facile à réaliser pour une débutante... sachant que j’ai déjà tricoter des écharpes basiques, un petit pul avec l’ai De qqn mais sans plus. Merci 😊
06.01.2019 - 08:18DROPS Design ha risposto:
Bonjour Radia, regardez bien les différents modèles et lisez attentivement les explications, si vous avez une question, n'hésitez pas à la poser ici, pour toute assistance individuelle, votre magasin DROPS saura vous conseiller. Vous trouverez ici un large éventail de modèles dits "basiques". Bon tricot!
07.01.2019 - 11:12
![]() Sylvie ha scritto:
Sylvie ha scritto:
Bonjour, pour reaugmenter le corps du pull, on mesure à partir de l'emmanchure? 25 cm pour une taille 44. Merci
30.09.2018 - 20:57DROPS Design ha risposto:
Bonjour Sylvie! Exactement, on mesure à partir de l'emmanchure. Bon tricot!
01.10.2018 - 08:43
![]() Sinne Kold ha scritto:
Sinne Kold ha scritto:
Jeg kan ikke få de 87 masker i str s til at passe med række 5 i A1? Det giver jo et lige antal - ikke ulige?
30.09.2018 - 18:44DROPS Design ha risposto:
Hei Sinne. På 5 omgang blir du nødt til å strikke den siste masken uten felling siden det er et ugjevnt masketall, som du sier. Så strikk den bare vanlig rett. God fornøyelse.
01.10.2018 - 15:22
![]() Jeanette ha scritto:
Jeanette ha scritto:
Dank voor jullie antwoord . Ik begrijp dat het patroon door moet lopen , dat kan ik goed op foto van de trui zien. Maar mijn probleem is dat ik nooit precies kan zien waar 2 steken samen zijn gebreid . Het terug kijken van een telpatroon in een breiwerk vind ik gewoon erg lastig . De laatste naald in A2 bij maat S is de naald met het patroon.Nadat ik de 8 steken onder de mouw heb opgenomen , deze naald recht uitbreien tot de marker . Dan 6 steken in tricosteek , dan A3 ?
05.09.2018 - 12:51DROPS Design ha risposto:
Dag Jeanette, Ik heb nog even goed gekeken en de 6 steken is vanaf de markeerdraad, dus je moet nog 2 steken in tricot erbij breien als je al 4 steken op de naald hebt. Om te controleren of het patroon goed doorloopt, kan je bij voorbeeld ook kijken naar of het zwarte driehoekje in het telpatroon boven elkaar zit (dus waar je 1 steek afhaalt, 2 steken samen breit en de afgehaalde steek overhaalt), maar volgens mij moet het goed komen als je de 6 steken na de markeerdraad aanhoudt.
06.09.2018 - 10:43
![]() Jeanette ha scritto:
Jeanette ha scritto:
Ik weet niet hoe ik verder moet met de mouw. Mijn maat is S. Als ik de 8 steken onder de mouw heb opgenomen en de markeerder in het midden van die 8 steken zet , heb ik dus al 4 steken op de eerste naald staan . Moet ik nu nog 2 steken breien voordat ik met A3 begin ? of 6 steken zoals in het patroon staat.
04.09.2018 - 19:57DROPS Design ha risposto:
Dag Jeanette, Waar het om gaat is dat je het patroon door laat lopen, dus de 2 recht samen in A.3 moet boven de 2 recht samen in A.2 komen. (Onder de oksel heb je een stukje tricotsteek zitten, waar je straks steken mindert)
05.09.2018 - 09:10
|
|||||||||||||||||||
Sea Nymph#seanymphsweater |
|||||||||||||||||||
 |
 |
||||||||||||||||||
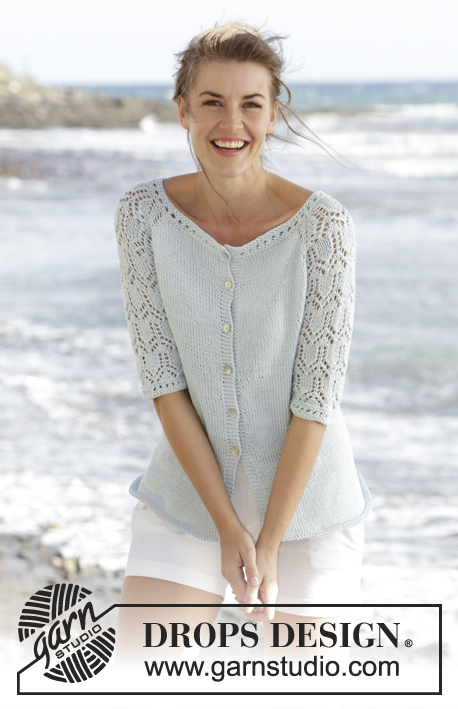
Maglione DROPS lavorato ai ferri con raglan, motivo traforato e maniche a ¾ in "Muskat". Lavorato dall’alto in basso (top down). Taglie: S - XXXL.
DROPS 168-1 |
|||||||||||||||||||
|
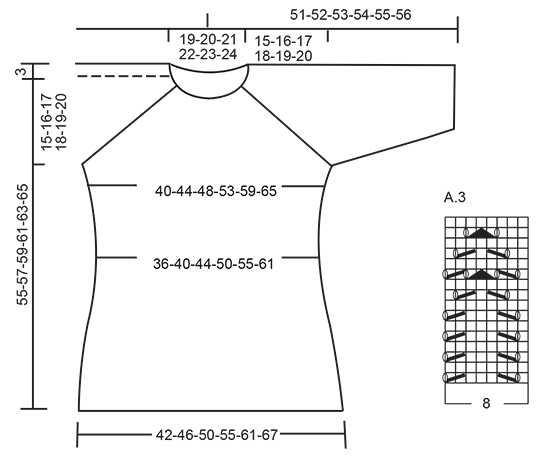
M LEGACCIO (in tondo): 1 “costa” a m legaccio = 2 giri. * 1 giro dir e 1 giro rov *, ripetere *-*. MOTIVO: Vedere i diagrammi A.1-A.3. Vedere il diagramma per la vostra taglia! RAGLAN: Aumentare a giri alterni come segue: Aumentare 4 m sul dietro, 4 m sul davanti e 2 m su ogni manica (= 12 aumenti, gli aumenti sulla manica sono disegnati nel motivo) – iniziare 3 m prima di ogni A.2 e lavorare come segue: 1 gettato, 1 m dir, 1 gettato, 2 m dir (il segnapunti è al centro di queste m), A.2, 2 m dir (il segnapunti è al centro di queste m), 1 gettato, 1 m dir, 1 gettato. Lavorare a dir i gettati più vicini al segnapunti sul f successivo per fare i buchi, lavorare a dir ritorto i gettati verso il davanti/dietro per evitare i buchi. Aumentare 12 m in questo modo altre 0-2-3-7-10-14 volte (= 1-3-4-8-11-15 volte in totale, il 1° aumento è spiegato nel testo). Poi aumentare a giri alterni come segue: Aumentare 2 m sul dietro, 2 m sul davanti e 2 m su ogni manica (= 8 aumenti, gli aumenti sulle maniche sono disegnati nel motivo) – iniziare 2 m prima di ogni A.2 e lavorare come segue: 1 gettato, 2 m dir (il segnapunti è al centro di queste m), A.2, 2 m dir (il segnapunti è al centro di queste m), 1 gettato. Lavorare a dir i gettati sul giro successivo per fare i buchi. Aumentare 8 m in questo modo 16-15-16-13-12-9 volte in totale. ---------------------------------------------------------- MAGLIONE: Lavorato in tondo con i f circolari, dall’alto in basso (top down). SPRONE: Avviare 87-91-95-99-103-107 m con i f circolari n° 4 mm con Muskat. Lavorare 1 giro dir, poi lavorare A.1, sull’ultimo giro di A.1 distribuire 15 aumenti in modo uniforme = 102-106-110-114-118-122 m. Poi lavorare come segue dal centro dietro: 17-18-19-20-21-22 m dir, 1 gettato, 1 m dir, 1 gettato, 2 m dir (inserire un segnapunti tra queste m), A.2 (= 11 m), 2 m dir (inserire un segnapunti tra queste m), 1 gettato, 1 m dir, 1 gettato, 34-36-38-40-42-44 m dir, 1 gettato, 1 m dir, 1 gettato, 2 m dir (inserire un segnapunti tra queste m), A.2, 2 m dir (inserire un segnapunti tra queste m), 1 gettato, 1 m dir, 1 gettato, 17-18-19-20-21-22 m dir. Continuare questo motivo, e aumentare per il RAGLAN come spiegato sopra, il 1° aumento ora è finito. FARE ATTENZIONE ALLA TENSIONE DEL LAVORO! Quando A.2 è stato lavorato in verticale – vedere i segni per la vostra taglia, ci sono 242-262-286-314-346-374 m sul giro, ora gli aumenti sono finiti. Lavorare il giro successivo come segue: Lavorare 38-42-46-52-58-64 m (= metà dietro), trasferire le 45-47-51-53-57-59 m successive su un fermamaglie (= manica), avviare 8 m sotto la manica, lavorare le 76-84-92-104-116-128 m successive (= davanti), trasferire le 45-47-51-53-57-59 m successive su un fermamaglie (= manica), avviare 8 nuove m sotto la manica, lavorare le ultime 38-42-46-52-58-64 m (= metà dietro). CORPO: Ora ci sono 168-184-200-224-248-272 m sul corpo. Continuare a m rasata. Inserire un segnapunti a ogni lato, al centro delle 8 nuove m che sono state avviate. ORA MISURARE IL LAVORO DA QUI. Quando il lavoro misura 4 cm, diminuire 1 m a ogni lato del segnapunti (= 4 diminuzioni), ripetere le diminuzioni ogni 4-4-4-5-5-5 cm altre 3 volte = 152-168-184-208-232-256 m. Quando il lavoro misura 22-23-24-25-26-27 cm, aumentare 1 m a ogni lato di tutti i segnapunti (= 4 aumenti), ripetere gli aumenti ogni 2 cm altre 5 volte = 176-192-208-232-256-280 m. Quando il lavoro misura 36-37-38-39-40-41 cm, lavorare 2 coste a M LEGACCIO – leggere la spiegazione sopra, su tutte le m. Intrecciare 1 m dir/1 m rov (per evitare un bordo di chiusura ondulato), il lavoro misura circa 55-57-59-61-63-65 cm dal bordo di avvio. MANICA: Lavorata in tondo. Riportare le m delle maniche sui f a doppia punta n° 4 mm, riprendere 1 m in ognuna delle 8 m sotto la manica = 53-55-59-61-65-67 m. Inserire 1 segnapunti al centro sotto la manica = inizio del giro. ORA MISURARE IL LAVORO DA QUI! Poi lavorare come segue: 6-7-1-2-4-5 m a m rasata, A.3 sulle 40-40-56-56-56-56 m successive (iniziare A.3 dove finisce A.2 per la vostra taglia), 7-8-2-3-5-6 m a m rasata. Quando il lavoro misura 4 cm, diminuire 1 m a ogni lato del segnapunti. Lavorare le m che non rientrano nel motivo a m rasata, assicurarsi che il n° di diminuzioni e aumenti del motivo sia corretto. Ripetere le diminuzioni ogni 7-7-5-5-3-3 cm altre 2-2-3-3-4-4 volte = 47-49-51-53-55-57 m. Quando il lavoro misura 24-23-23-22-22-21 cm, lavorare A.1 su tutte le m, poi intrecciare. Lavorare l’altra manica nello stesso modo. |
|||||||||||||||||||
Spiegazioni del diagramma |
|||||||||||||||||||
|
|||||||||||||||||||
 |
|||||||||||||||||||
 |
|||||||||||||||||||
Avete terminato questo modello?Allora taggate le vostre foto con #dropspattern #seanymphsweater o inviatele alla #dropsfan gallery. Avete bisogno di aiuto con questo modello?Troverete 25 video tutorial, una sezione per i commenti/domande e molto altro guardando il modello su www.garnstudio.com © 1982-2026 DROPS Design A/S. Ci riserviamo tutti i diritti. Questo documento, compreso tutte le sue sotto-sezioni, è protetto dalle leggi sul copyright. Potete leggere quello che potete fare con i nostri modelli alla fine di ogni modello sul nostro sito. |
|||||||||||||||||||


Con oltre 40 anni di esperienza nel design di modelli di maglia e uncinetto, DROPS Design offre la più estesa collezione di modelli gratuiti su internet - tradotti in 17 lingue. Ad oggi vi possiamo fornire 324 cataloghi e 12290 modelli - 9561 dei quali sono tradotti in Italiano.
Ci stiamo impegnando molto per darvi il meglio che vi possiamo offrire in termini di maglia e uncinetto, ispirazioni e consigli così come filati di grande qualità ad un prezzo incredibile! Volete utilizzare i nostri modelli per qualcosa d'altro oltre al vostro uso personale? Potete leggere tutto ciò che è consentito nel testo sul Copyright in basso su tutte le pagine dei nostri modelli. Buon lavoro!
Lasciare un commento sul modello DROPS 168-1
Noi saremmo felici di ricevere i tuoi commenti e opinioni su questo modello!
Se vuoi fare una domanda, fai per favore attenzione a selezionare la categoria corretta nella casella qui sotto per velocizzare il processo di risposta. I campi richiesti sono indicati da *.