
Categorie popolari
State cercando un filato?


Commenti / Domande (173)
![]() Gwen ha scritto:
Gwen ha scritto:
How much ease is there in pattern 168/1 Sea Nymph?
14.04.2021 - 20:48DROPS Design ha risposto:
Dear Gwen, our model wears the sweater with a slight positive ease. You can find teh exact measurements of the finished piece on the schematic drawing at the bottom of the pattern. Happy Knitting!
15.04.2021 - 02:51
![]() Manon ha scritto:
Manon ha scritto:
Bonjour, Est-ce que le patron en taille XXXL sera corrigé bientôt ? Voir mon message plus bas. Merci
02.04.2021 - 00:34DROPS Design ha risposto:
Bonjour Manon, fort probablement mais la correction interviendra plus tard, suivez les indications de la réponse précédente, et n'hésitez pas si vous avez une autre question. Bon tricot!
06.04.2021 - 11:29
![]() Maika ha scritto:
Maika ha scritto:
El aumento para el ranglan pone cada 2 vueltas, cómo se cuentan ? una de l derecho de la labor y otra del revés de la labor o serían dos vueltas del derecho de labor.
29.03.2021 - 21:08DROPS Design ha risposto:
Hola Maika, cuando trabajas en redondo, toda las vueltas son al derecho de labor. Como aumentar cada 2 vueltas: tejes 1 vuelta, aumentas en la 2ᵃ vuelta, tejes 1 vuelta, aumentas en la vuelta siguiente, etc. Buen trabajo!
30.03.2021 - 13:02
![]() Anabela ha scritto:
Anabela ha scritto:
Boa tarde , no reglan fazem -se dois aumentos da cada lado ?! ou seja em cada volta de aumentos são 4 malhas !
29.03.2021 - 15:39DROPS Design ha risposto:
Bom dia, Depende de onde está. No princípio aumentam-se 12 malhas ao todo. RAGLAN: Aumentar a cada 2 carreiras da seguinte maneira: Aumentar 4 ms/pts para as costas, 4 ms/pts para a frente e 2 ms/pts para cada manga (= 12 aumentos – os aumentos das mangas figuram no diagrama) Aqui, aumenta-se de cada lado da frente, de cada lado das costas e de cada lado de cada uma das mangas. Depois, os aumentos do raglan mudam. Está explicado na secção RAGLAN do modelo. Bons tricôs!
26.04.2021 - 10:28
![]() Manon ha scritto:
Manon ha scritto:
Bonjour, Je tricote la taille XXL. Jai 59 m en attente. Après avoir relevé 8 mailles sous la manche, j'ai 67 mailles. On me demande de: Tricoter ensuite ainsi: 6 m jersey, A.3 sur les 56 m suivantes (commencer A.3 où A.2 s'est arrêté en fonction de la taille), 7 m jersey. Ce qui fait 69 mailles. Il y aurait il une erreur ?
18.03.2021 - 00:30DROPS Design ha risposto:
Bonjour Manon, effectivement, il semble qu'il y ait une erreur en XXXL (en XL, le compte est bon), tricotez les 56 mailles de A.3 comme indiqué, et tricotez les autres mailles sous la manche en jersey (probablement 5 m jersey avant et 6 m jersey à la fin), une correction sera faite prochainement, merci. Bon tricot!
18.03.2021 - 09:55
![]() Gwen Clark ha scritto:
Gwen Clark ha scritto:
Can you give me the sleeve diameter measurements at the armhole, and cuff? Thank you, Gwen
15.03.2021 - 18:00DROPS Design ha risposto:
Dear Mrs Clark, the 53-55-59-61-65-67 stitches at the beg of sleeve will measure approx. 25-26-27-29-31-32 cm and the 47-49-51-53-55-57 sts at the end of sleeve approx. 22-23-24-25-26-27 cm. We currently have issues with the loading of pictures and are working to solve this problem, so that y ou will be able to see soon all measurements from the chart. Thanks for your patience and comprehension. Happy knitting!
16.03.2021 - 08:32
![]() Theresa Spruyt ha scritto:
Theresa Spruyt ha scritto:
I am doing the second size where it says to cast on 91 sts. Is this correct as it doesn't seem big enough to go over the head?
10.02.2021 - 10:47DROPS Design ha risposto:
Dear Theresa, yes, the number of stitches is correct. According to Ravelry a number of sweaters were done with the stitchcount. Please do check your gauge and compare the numbers given in the pattern. Happy Knitting!
10.02.2021 - 11:47
![]() Caroline ha scritto:
Caroline ha scritto:
I don't understand if i should be knitting any of the y/overs without being twisted after the first round of A2 and the first knit row. I've done as pattern k not twisted nearest markers and k twisted the rest. Does this mean i k all future YO's twisted as well, or just this row? Thank you size m
09.07.2020 - 18:31DROPS Design ha risposto:
Dear Caroline, when you first increase 12 sts per round, you will increase 4 sts on back piece and 4 sts on front piece, 2 of these 2 sts (the 1 towards the K2 for raglan line) are worked to make holes but the 2 yarn overs towards mid front/back piece are worked twisted, ie at the beg of front/back piece work K2 (raglan), K yarn over, K1, K next yarn over twisted, knit to next yarn over, K yarn over twisted, K1, K yarn over, K2 (raglan line). When you increase 2 sts only then knit all yarn overs. Happy knitting!
10.07.2020 - 07:50
![]() Solange ha scritto:
Solange ha scritto:
Pour ma part je tricote les manches en aller et retour aussitôt après l'empiècement, c'est plus facile qu'avec 4 aiguilles lorsqu'il s'agit de points dentelle, je reprends en circulaire pour le corps.
20.06.2020 - 12:21
![]() Calley ha scritto:
Calley ha scritto:
Is there a recommended style of INC for the last row of A.1 in the yoke? I can't decide if KFB or M1 would look better. If M1 is recommended, would M1R or M1L look better?
11.06.2020 - 20:11DROPS Design ha risposto:
Dear Calley, all increases for raglan are worked with a yarn over and on last row in A.1 you also work yarn overs - feel free to knit a small swatch and check which method you would rather knit instead. Happy knitting!
12.06.2020 - 07:49
|
|||||||||||||||||||
Sea Nymph#seanymphsweater |
|||||||||||||||||||
 |
 |
||||||||||||||||||
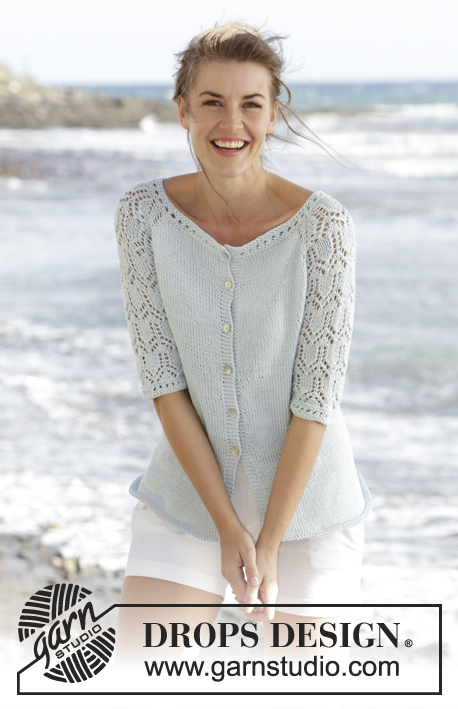
Maglione DROPS lavorato ai ferri con raglan, motivo traforato e maniche a ¾ in "Muskat". Lavorato dall’alto in basso (top down). Taglie: S - XXXL.
DROPS 168-1 |
|||||||||||||||||||
|
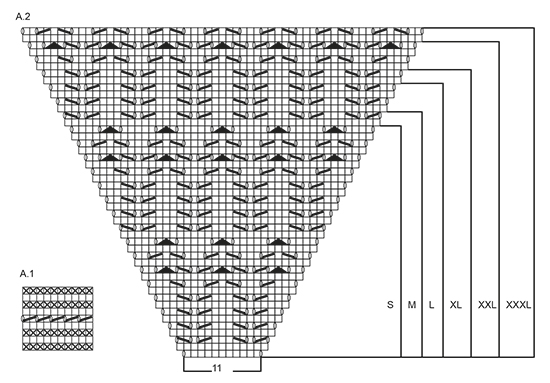
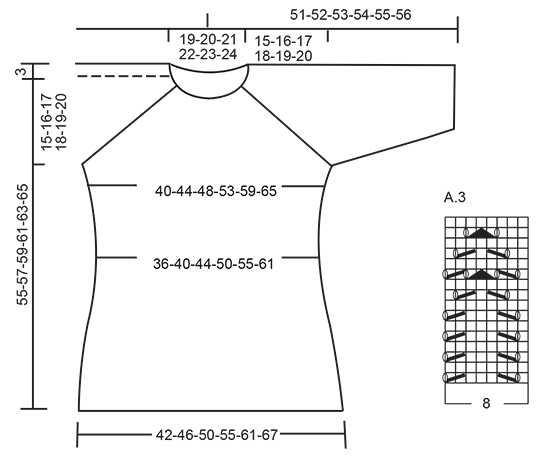
M LEGACCIO (in tondo): 1 “costa” a m legaccio = 2 giri. * 1 giro dir e 1 giro rov *, ripetere *-*. MOTIVO: Vedere i diagrammi A.1-A.3. Vedere il diagramma per la vostra taglia! RAGLAN: Aumentare a giri alterni come segue: Aumentare 4 m sul dietro, 4 m sul davanti e 2 m su ogni manica (= 12 aumenti, gli aumenti sulla manica sono disegnati nel motivo) – iniziare 3 m prima di ogni A.2 e lavorare come segue: 1 gettato, 1 m dir, 1 gettato, 2 m dir (il segnapunti è al centro di queste m), A.2, 2 m dir (il segnapunti è al centro di queste m), 1 gettato, 1 m dir, 1 gettato. Lavorare a dir i gettati più vicini al segnapunti sul f successivo per fare i buchi, lavorare a dir ritorto i gettati verso il davanti/dietro per evitare i buchi. Aumentare 12 m in questo modo altre 0-2-3-7-10-14 volte (= 1-3-4-8-11-15 volte in totale, il 1° aumento è spiegato nel testo). Poi aumentare a giri alterni come segue: Aumentare 2 m sul dietro, 2 m sul davanti e 2 m su ogni manica (= 8 aumenti, gli aumenti sulle maniche sono disegnati nel motivo) – iniziare 2 m prima di ogni A.2 e lavorare come segue: 1 gettato, 2 m dir (il segnapunti è al centro di queste m), A.2, 2 m dir (il segnapunti è al centro di queste m), 1 gettato. Lavorare a dir i gettati sul giro successivo per fare i buchi. Aumentare 8 m in questo modo 16-15-16-13-12-9 volte in totale. ---------------------------------------------------------- MAGLIONE: Lavorato in tondo con i f circolari, dall’alto in basso (top down). SPRONE: Avviare 87-91-95-99-103-107 m con i f circolari n° 4 mm con Muskat. Lavorare 1 giro dir, poi lavorare A.1, sull’ultimo giro di A.1 distribuire 15 aumenti in modo uniforme = 102-106-110-114-118-122 m. Poi lavorare come segue dal centro dietro: 17-18-19-20-21-22 m dir, 1 gettato, 1 m dir, 1 gettato, 2 m dir (inserire un segnapunti tra queste m), A.2 (= 11 m), 2 m dir (inserire un segnapunti tra queste m), 1 gettato, 1 m dir, 1 gettato, 34-36-38-40-42-44 m dir, 1 gettato, 1 m dir, 1 gettato, 2 m dir (inserire un segnapunti tra queste m), A.2, 2 m dir (inserire un segnapunti tra queste m), 1 gettato, 1 m dir, 1 gettato, 17-18-19-20-21-22 m dir. Continuare questo motivo, e aumentare per il RAGLAN come spiegato sopra, il 1° aumento ora è finito. FARE ATTENZIONE ALLA TENSIONE DEL LAVORO! Quando A.2 è stato lavorato in verticale – vedere i segni per la vostra taglia, ci sono 242-262-286-314-346-374 m sul giro, ora gli aumenti sono finiti. Lavorare il giro successivo come segue: Lavorare 38-42-46-52-58-64 m (= metà dietro), trasferire le 45-47-51-53-57-59 m successive su un fermamaglie (= manica), avviare 8 m sotto la manica, lavorare le 76-84-92-104-116-128 m successive (= davanti), trasferire le 45-47-51-53-57-59 m successive su un fermamaglie (= manica), avviare 8 nuove m sotto la manica, lavorare le ultime 38-42-46-52-58-64 m (= metà dietro). CORPO: Ora ci sono 168-184-200-224-248-272 m sul corpo. Continuare a m rasata. Inserire un segnapunti a ogni lato, al centro delle 8 nuove m che sono state avviate. ORA MISURARE IL LAVORO DA QUI. Quando il lavoro misura 4 cm, diminuire 1 m a ogni lato del segnapunti (= 4 diminuzioni), ripetere le diminuzioni ogni 4-4-4-5-5-5 cm altre 3 volte = 152-168-184-208-232-256 m. Quando il lavoro misura 22-23-24-25-26-27 cm, aumentare 1 m a ogni lato di tutti i segnapunti (= 4 aumenti), ripetere gli aumenti ogni 2 cm altre 5 volte = 176-192-208-232-256-280 m. Quando il lavoro misura 36-37-38-39-40-41 cm, lavorare 2 coste a M LEGACCIO – leggere la spiegazione sopra, su tutte le m. Intrecciare 1 m dir/1 m rov (per evitare un bordo di chiusura ondulato), il lavoro misura circa 55-57-59-61-63-65 cm dal bordo di avvio. MANICA: Lavorata in tondo. Riportare le m delle maniche sui f a doppia punta n° 4 mm, riprendere 1 m in ognuna delle 8 m sotto la manica = 53-55-59-61-65-67 m. Inserire 1 segnapunti al centro sotto la manica = inizio del giro. ORA MISURARE IL LAVORO DA QUI! Poi lavorare come segue: 6-7-1-2-4-5 m a m rasata, A.3 sulle 40-40-56-56-56-56 m successive (iniziare A.3 dove finisce A.2 per la vostra taglia), 7-8-2-3-5-6 m a m rasata. Quando il lavoro misura 4 cm, diminuire 1 m a ogni lato del segnapunti. Lavorare le m che non rientrano nel motivo a m rasata, assicurarsi che il n° di diminuzioni e aumenti del motivo sia corretto. Ripetere le diminuzioni ogni 7-7-5-5-3-3 cm altre 2-2-3-3-4-4 volte = 47-49-51-53-55-57 m. Quando il lavoro misura 24-23-23-22-22-21 cm, lavorare A.1 su tutte le m, poi intrecciare. Lavorare l’altra manica nello stesso modo. |
|||||||||||||||||||
Spiegazioni del diagramma |
|||||||||||||||||||
|
|||||||||||||||||||
 |
|||||||||||||||||||
 |
|||||||||||||||||||
Avete terminato questo modello?Allora taggate le vostre foto con #dropspattern #seanymphsweater o inviatele alla #dropsfan gallery. Avete bisogno di aiuto con questo modello?Troverete 25 video tutorial, una sezione per i commenti/domande e molto altro guardando il modello su www.garnstudio.com © 1982-2026 DROPS Design A/S. Ci riserviamo tutti i diritti. Questo documento, compreso tutte le sue sotto-sezioni, è protetto dalle leggi sul copyright. Potete leggere quello che potete fare con i nostri modelli alla fine di ogni modello sul nostro sito. |
|||||||||||||||||||


Con oltre 40 anni di esperienza nel design di modelli di maglia e uncinetto, DROPS Design offre la più estesa collezione di modelli gratuiti su internet - tradotti in 17 lingue. Ad oggi vi possiamo fornire 324 cataloghi e 12290 modelli - 9561 dei quali sono tradotti in Italiano.
Ci stiamo impegnando molto per darvi il meglio che vi possiamo offrire in termini di maglia e uncinetto, ispirazioni e consigli così come filati di grande qualità ad un prezzo incredibile! Volete utilizzare i nostri modelli per qualcosa d'altro oltre al vostro uso personale? Potete leggere tutto ciò che è consentito nel testo sul Copyright in basso su tutte le pagine dei nostri modelli. Buon lavoro!
Lasciare un commento sul modello DROPS 168-1
Noi saremmo felici di ricevere i tuoi commenti e opinioni su questo modello!
Se vuoi fare una domanda, fai per favore attenzione a selezionare la categoria corretta nella casella qui sotto per velocizzare il processo di risposta. I campi richiesti sono indicati da *.