
Categorie popolari
State cercando un filato?


Commenti / Domande (173)
![]() Coosje Schol ha scritto:
Coosje Schol ha scritto:
Of is het meteen 11steken en een omslag aan beide kanten? Dus meteen het telpatroon? Alvast bedankt , Groetjes Coosje
14.07.2016 - 18:51DROPS Design ha risposto:
Hoi Coosje. Je breit de raglanmeerdering als volgt: begin 3 st voor elke A.2 aan elke kant en brei als volgt: 1 omsl, 1 r, 1 omsl, 2 r (markeerder staat in midden tussen deze st), A.2 (= 11 st = 1 omslag, 11 r, 1 omslag = dus volgende nld heb je hier 13 st), 2 r (markeerder staat in midden tussen deze st), 1 omsl, 1 r, 1 omsl.
15.07.2016 - 16:15
![]() Coosje Schol ha scritto:
Coosje Schol ha scritto:
Prachtig patroon, alleen begrijp ik de eerste toer waarbij je de markeerders plaatst niet helemaal. Als ik het volgens de beschrijving doe kom ik op 8 meerderingen uit maar bij de beschrijving van de raglan begin je met 12?
14.07.2016 - 17:41DROPS Design ha risposto:
Hoi Coosje. Ja, maar je meerdert meer op de voorpanden dan op de mouwen = 4 st op elke pand en 2 op elke mouw.
15.07.2016 - 16:13
![]() EVEN ha scritto:
EVEN ha scritto:
Merci de ne plus tenir compte de mon message du 09/07, en poursuivant mon tricot j'ai résolu mon problème.
11.07.2016 - 14:29
![]() EVEN ha scritto:
EVEN ha scritto:
Bonjour, encore moi, les diminutions du diagramme 3 sont inversées par rapport a celui du 2, ça commence par un jeté puis une maille glissée, est-ce que j'aurai la même continuité de dessin qu'au début de ma manche? D'autre part me conseillez vous de finir ma manche en diagramme 2 ne Serait-ce pas plus logique?Merci encore bon week-end
09.07.2016 - 11:10DROPS Design ha risposto:
Bonjour Mme Even, il vous faut effectivement commencer A.3 en fonction de là où vous avez arrêté A.2 pour que le motif se suive à la transition empiècement/manche. A.3 est le même motif que A.2 mais sans les augmentations du raglan, ajustez simplement pour commencer A.3 sur le nbe de m indiqué pour votre taille tout en continuant le motif des manches de l'empiècement. Bon tricot!
11.07.2016 - 09:03
![]() EVEN ha scritto:
EVEN ha scritto:
Bonjour, les 8 Mailles reprise sous les manches doivent elles être tricotées en jersey ou Continuer les jours, diagramme 3 qui correspond aux nombres de mailles. Merci
08.07.2016 - 14:57DROPS Design ha risposto:
Bonjour Mme Even, en fonction de la taille, les 8 m sous la manche vont se tricoter soit en jersey, soit en point fantaisie (A.2), c'est-à-dire que l'on a, à partir du milieu sous la manche: 6-7-1-2-4-6 m jersey, A.3 et on termine par 7-8-2-3-5-7 m jersey. Soit 13-15-3-5-9-13 m jersey au milieu sous la manche, les autres mailles se tricotent en A.3. Bon tricot!
08.07.2016 - 15:07
![]() Toetie ha scritto:
Toetie ha scritto:
Ik heb dit truitje een maand geleden gemaakt en ben er enorm blij mee. Muscat is zalig om te breien, gemakkelijk om te wassen en het model is erg leuk om te dragen. Groetjes .
07.07.2016 - 22:09
![]() Hanna ha scritto:
Hanna ha scritto:
Hei! Ohjeessa on selitetty sanallisesti A2-kuvion ensimmäinen kerros. Lisääntyykö silmukoiden lukumäärä 8:lla vai 12:lla? Minä en saanut lisättyä kuin 8s ja raglan lisäys-ohjeessa sanotaan, että pitäisi lisätä 12s. Onko A2:n ensimmäisellä rivillä siis vain 11 oikeaa silmukkaa, vai pitääkö mallikuvion molemmin puolin tehdä langankierrot? Näin saisin silmukkamäärän täsmäämään. Kiitoksia avusta!!! Ihana malli :)
27.06.2016 - 10:14DROPS Design ha risposto:
Hei! Ohjeessa selitetään vain etu- ja takakappaleen raglanlisäykset. Lisäksi kumpaankin hihaan lisätään 2 s, eli juuri nämä 2 langankiertoa, joita näet piirroksen reunoissa. Kaikki hihojen lisäykset on merkitty piirrokseen.
29.06.2016 - 17:02
![]() Aud Berge ha scritto:
Aud Berge ha scritto:
Har strikket første omg.etter A1. Skal da neste omg strikkes rett.alle masker. Syns det var mye uklart i denneoppskriften
23.06.2016 - 20:05DROPS Design ha risposto:
Hei Aud. Der staar i opskriften: "Videre strikkes det slik – fra midt bak: Strikk 17-18-19-20-21-22 m rett, 1 kast, 1 m rett, 1 kast, 2 m rett (sett en merketråd mellom disse m), A.2 (= 11 m), 2 m rett (sett en merketråd mellom disse m), 1 kast, 1 m rett, 1 kast, 34-36-38-40-42-44 m rett, 1 kast, 1 m rett, 1 kast, 2 m rett (sett en merketråd mellom disse m), A.2, 2 m rett (sett en merketråd mellom disse m), 1 kast, 1 m rett, 1 kast, 17-18-19-20-21-22 m rett. Fortsett dette mønsteret, og øk til RAGLAN som forklart over..." Du kan se hvordan du strikker diagrammene i symbolforklaringen nederst. Og husk naar du strikker rett rundt som her = glatstrikk
24.06.2016 - 10:42
![]() Humbert ha scritto:
Humbert ha scritto:
Bonjour, Explications raglan compliquées. À chaque rang pair, tous les jetés sont tricotés à l'endroit quand on augmente pas les 4m dos et devant ou faut il faire avec torse Merci d'avance
08.06.2016 - 16:39DROPS Design ha risposto:
Bonjour Mme Humbert, quand on augmente 4 m pour le dos et le devant, on tricote ainsi: 1 jeté (à tricoter torse au tour suivant), 1 m end, 1 jeté (à tricoter à l'end au tour suivant = jour), 2 m end (le marqueur est entre ces m), A.2, 2 m end (marqueur), 1 jeté (à tricoter à l'end au tour suivant = jour), 1 m end, 1 jeté (= à tricoter torse au tour suivant). c'est-à-dire que les jetés les plus près des marqueurs vont se tricoter à l'endroit pour former des jours, les 2 autres se tricoteront torse à l'end pour éviter les trous. Pour les manches, on tricote les jetés à l'end = jours. Bon tricot!
08.06.2016 - 18:52
![]() Mariolina Motta ha scritto:
Mariolina Motta ha scritto:
Buongiorno, sono arrivata alle maniche, ma non riesco a capire come fare: una volta riprese le 8 maglie sotto la manica e rimesse sul ferro le maniche già lavorate, da dove comincio a lavorare? Io sto lavorando la taglia L e quindi dovrei cominciare a lavorare una maglia dritta (dopo ilsegnapunti?) e poi A3, ma così A3 comincia 3maglie prima di A2 (manicha già lavorata) e non è quindi dove comincia A2 (come è scritto nelle spiegazioni)... Non riesco proprio a capire....
04.06.2016 - 13:09DROPS Design ha risposto:
Buongiorno Mariolina. Posiziona il segnapunti al centro delle 8 m riprese e inizia il giro dalla m dopo il segnapunti. Lavora 1 m dir e poi inizia il diagramma A3. Deve sovrapporre il diagramma A3 con il diagramma A2 iniziando il diagramma A3 da dove ha finito il diag A2, in modo che il motivo prosegua correttamente in verticale. Buon lavoro!
04.06.2016 - 14:18
|
|||||||||||||||||||
Sea Nymph#seanymphsweater |
|||||||||||||||||||
 |
 |
||||||||||||||||||
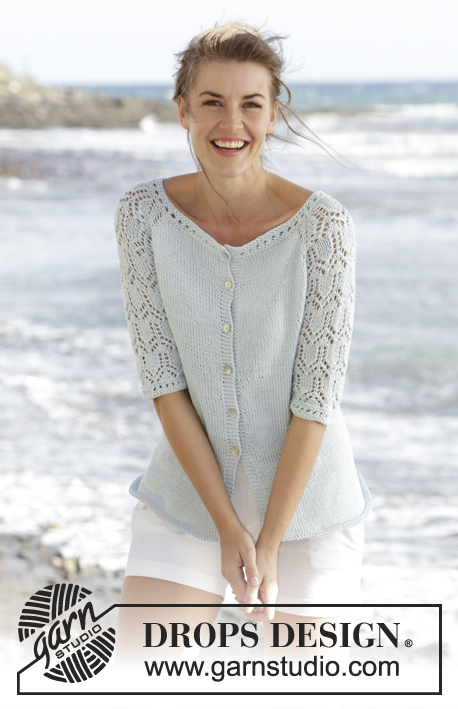
Maglione DROPS lavorato ai ferri con raglan, motivo traforato e maniche a ¾ in "Muskat". Lavorato dall’alto in basso (top down). Taglie: S - XXXL.
DROPS 168-1 |
|||||||||||||||||||
|
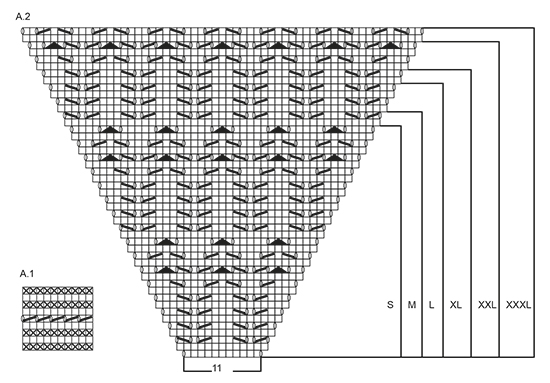
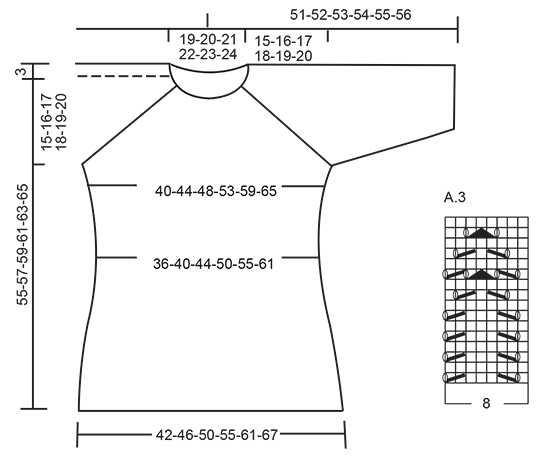
M LEGACCIO (in tondo): 1 “costa” a m legaccio = 2 giri. * 1 giro dir e 1 giro rov *, ripetere *-*. MOTIVO: Vedere i diagrammi A.1-A.3. Vedere il diagramma per la vostra taglia! RAGLAN: Aumentare a giri alterni come segue: Aumentare 4 m sul dietro, 4 m sul davanti e 2 m su ogni manica (= 12 aumenti, gli aumenti sulla manica sono disegnati nel motivo) – iniziare 3 m prima di ogni A.2 e lavorare come segue: 1 gettato, 1 m dir, 1 gettato, 2 m dir (il segnapunti è al centro di queste m), A.2, 2 m dir (il segnapunti è al centro di queste m), 1 gettato, 1 m dir, 1 gettato. Lavorare a dir i gettati più vicini al segnapunti sul f successivo per fare i buchi, lavorare a dir ritorto i gettati verso il davanti/dietro per evitare i buchi. Aumentare 12 m in questo modo altre 0-2-3-7-10-14 volte (= 1-3-4-8-11-15 volte in totale, il 1° aumento è spiegato nel testo). Poi aumentare a giri alterni come segue: Aumentare 2 m sul dietro, 2 m sul davanti e 2 m su ogni manica (= 8 aumenti, gli aumenti sulle maniche sono disegnati nel motivo) – iniziare 2 m prima di ogni A.2 e lavorare come segue: 1 gettato, 2 m dir (il segnapunti è al centro di queste m), A.2, 2 m dir (il segnapunti è al centro di queste m), 1 gettato. Lavorare a dir i gettati sul giro successivo per fare i buchi. Aumentare 8 m in questo modo 16-15-16-13-12-9 volte in totale. ---------------------------------------------------------- MAGLIONE: Lavorato in tondo con i f circolari, dall’alto in basso (top down). SPRONE: Avviare 87-91-95-99-103-107 m con i f circolari n° 4 mm con Muskat. Lavorare 1 giro dir, poi lavorare A.1, sull’ultimo giro di A.1 distribuire 15 aumenti in modo uniforme = 102-106-110-114-118-122 m. Poi lavorare come segue dal centro dietro: 17-18-19-20-21-22 m dir, 1 gettato, 1 m dir, 1 gettato, 2 m dir (inserire un segnapunti tra queste m), A.2 (= 11 m), 2 m dir (inserire un segnapunti tra queste m), 1 gettato, 1 m dir, 1 gettato, 34-36-38-40-42-44 m dir, 1 gettato, 1 m dir, 1 gettato, 2 m dir (inserire un segnapunti tra queste m), A.2, 2 m dir (inserire un segnapunti tra queste m), 1 gettato, 1 m dir, 1 gettato, 17-18-19-20-21-22 m dir. Continuare questo motivo, e aumentare per il RAGLAN come spiegato sopra, il 1° aumento ora è finito. FARE ATTENZIONE ALLA TENSIONE DEL LAVORO! Quando A.2 è stato lavorato in verticale – vedere i segni per la vostra taglia, ci sono 242-262-286-314-346-374 m sul giro, ora gli aumenti sono finiti. Lavorare il giro successivo come segue: Lavorare 38-42-46-52-58-64 m (= metà dietro), trasferire le 45-47-51-53-57-59 m successive su un fermamaglie (= manica), avviare 8 m sotto la manica, lavorare le 76-84-92-104-116-128 m successive (= davanti), trasferire le 45-47-51-53-57-59 m successive su un fermamaglie (= manica), avviare 8 nuove m sotto la manica, lavorare le ultime 38-42-46-52-58-64 m (= metà dietro). CORPO: Ora ci sono 168-184-200-224-248-272 m sul corpo. Continuare a m rasata. Inserire un segnapunti a ogni lato, al centro delle 8 nuove m che sono state avviate. ORA MISURARE IL LAVORO DA QUI. Quando il lavoro misura 4 cm, diminuire 1 m a ogni lato del segnapunti (= 4 diminuzioni), ripetere le diminuzioni ogni 4-4-4-5-5-5 cm altre 3 volte = 152-168-184-208-232-256 m. Quando il lavoro misura 22-23-24-25-26-27 cm, aumentare 1 m a ogni lato di tutti i segnapunti (= 4 aumenti), ripetere gli aumenti ogni 2 cm altre 5 volte = 176-192-208-232-256-280 m. Quando il lavoro misura 36-37-38-39-40-41 cm, lavorare 2 coste a M LEGACCIO – leggere la spiegazione sopra, su tutte le m. Intrecciare 1 m dir/1 m rov (per evitare un bordo di chiusura ondulato), il lavoro misura circa 55-57-59-61-63-65 cm dal bordo di avvio. MANICA: Lavorata in tondo. Riportare le m delle maniche sui f a doppia punta n° 4 mm, riprendere 1 m in ognuna delle 8 m sotto la manica = 53-55-59-61-65-67 m. Inserire 1 segnapunti al centro sotto la manica = inizio del giro. ORA MISURARE IL LAVORO DA QUI! Poi lavorare come segue: 6-7-1-2-4-5 m a m rasata, A.3 sulle 40-40-56-56-56-56 m successive (iniziare A.3 dove finisce A.2 per la vostra taglia), 7-8-2-3-5-6 m a m rasata. Quando il lavoro misura 4 cm, diminuire 1 m a ogni lato del segnapunti. Lavorare le m che non rientrano nel motivo a m rasata, assicurarsi che il n° di diminuzioni e aumenti del motivo sia corretto. Ripetere le diminuzioni ogni 7-7-5-5-3-3 cm altre 2-2-3-3-4-4 volte = 47-49-51-53-55-57 m. Quando il lavoro misura 24-23-23-22-22-21 cm, lavorare A.1 su tutte le m, poi intrecciare. Lavorare l’altra manica nello stesso modo. |
|||||||||||||||||||
Spiegazioni del diagramma |
|||||||||||||||||||
|
|||||||||||||||||||
 |
|||||||||||||||||||
 |
|||||||||||||||||||
Avete terminato questo modello?Allora taggate le vostre foto con #dropspattern #seanymphsweater o inviatele alla #dropsfan gallery. Avete bisogno di aiuto con questo modello?Troverete 25 video tutorial, una sezione per i commenti/domande e molto altro guardando il modello su www.garnstudio.com © 1982-2026 DROPS Design A/S. Ci riserviamo tutti i diritti. Questo documento, compreso tutte le sue sotto-sezioni, è protetto dalle leggi sul copyright. Potete leggere quello che potete fare con i nostri modelli alla fine di ogni modello sul nostro sito. |
|||||||||||||||||||


Con oltre 40 anni di esperienza nel design di modelli di maglia e uncinetto, DROPS Design offre la più estesa collezione di modelli gratuiti su internet - tradotti in 17 lingue. Ad oggi vi possiamo fornire 324 cataloghi e 12290 modelli - 9561 dei quali sono tradotti in Italiano.
Ci stiamo impegnando molto per darvi il meglio che vi possiamo offrire in termini di maglia e uncinetto, ispirazioni e consigli così come filati di grande qualità ad un prezzo incredibile! Volete utilizzare i nostri modelli per qualcosa d'altro oltre al vostro uso personale? Potete leggere tutto ciò che è consentito nel testo sul Copyright in basso su tutte le pagine dei nostri modelli. Buon lavoro!
Lasciare un commento sul modello DROPS 168-1
Noi saremmo felici di ricevere i tuoi commenti e opinioni su questo modello!
Se vuoi fare una domanda, fai per favore attenzione a selezionare la categoria corretta nella casella qui sotto per velocizzare il processo di risposta. I campi richiesti sono indicati da *.