
Categorie popolari
State cercando un filato?


Commenti / Domande (24)
![]() Lise ha scritto:
Lise ha scritto:
Je suis dans le modèle 170-12 ,dans la séquence A5 et cela fait trois fois que je détricote le troisième rang. Je comprends qu’il ne faut pas faire les augmentations,mais dans A4, A6 et A7 il y a des mailles glissé et des mailles tricoter ensemble. Donc ma question est les augmentations ont les fait plus mais les diminutions elles oui?
07.06.2018 - 12:00DROPS Design ha risposto:
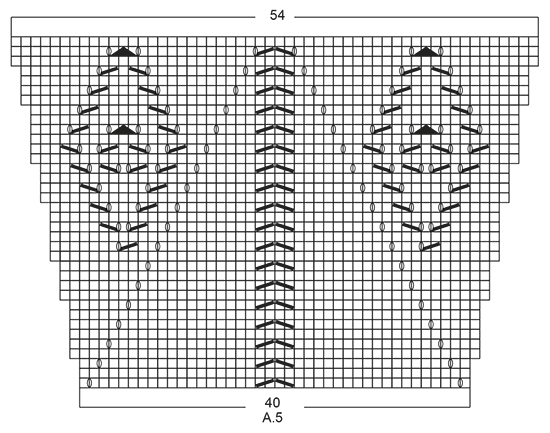
Bonjour Lise, tricotez les diagrammes comme indiqué: 3 m point mousse, A.4 (= 3 m), *A.5 (= 40 m), A.6 (= 5 m) *, répétez de *-* encore 4 fois, terminez par A.5, A.7 (= 3 m) et 3 m point mousse. Les augmentations vont se faire dans A.4, A.6 et A.7 mais sont reportées au rang suivant sur les diagrammes A.5. Veillez à toujours bien tricoter A.4 et A.7 sur les mêmes 3 mailles et A.6 sur les mêmes 5 mailles (= pour que les jours soient bien alignés). Bon tricot!
07.06.2018 - 13:26
![]() Lorraine ha scritto:
Lorraine ha scritto:
Autre question 170-12 je suis à la section A.5 première section il me faut 48 mailles et j'en ai que 45 comment j'intègre le A.4 car il me faut 45 mailles pour le A.5A.6 et j'aurai le même problème à la fin pour A.7 merci
19.08.2017 - 04:14DROPS Design ha risposto:
Bonjour Lorraine. Avant de commencer le diagramme A.5, vous avez 277 m. Vous tricotez le rang suivant ainsi: 3 m point mousse, A.4 1 fois (=3 m), vous répétez A.5 (=40m) + A.6 (=5 m) 5 fois en total, puis A.5 (40 m), A.7 (3m) et enfin 3 m point mousse. En total : 3+3+(40+5)*5+40+3+3= 277 m. Bon tricot.
20.08.2017 - 17:14
![]() Lorraine ha scritto:
Lorraine ha scritto:
Je fais le modèle 170-12 présentement et je voulais savoir si je comprends bien je suis à la séquence A.5 je pense que l'on exécute A.4 A.5A.6 A.5A.6 A.5A.6 A.5A.6 A.5A.6 A.5 A.7 alors ma question que si je calcule le nombre de mailles je n'arrive pas au même nombre qu'indiqué à la fin ceci doit me donner 361 et j'ai 301 je voudrais savoir ce qui me manque merci.
19.08.2017 - 02:06DROPS Design ha risposto:
Bonjour Lorraine. Après avoir tricoté le diagramme A.5 1 fois en verticale, vous avez 54 m dans le diagramme A.5. Vous avez pourtant: 3 m point mousse, A.4 (=3 m), A.5 (= 54 m) + A.6 (=5 m) 5 fois en total, A.5 (54 m), A.7 (3m) et enfin 3 m point mousse. En total : 3+3+(54+ 5)*5+54+3+3= 361 m. Bon tricot.
20.08.2017 - 17:21
![]() Bonita ha scritto:
Bonita ha scritto:
I am having trouble starting A10 and A11
11.06.2017 - 00:45DROPS Design ha risposto:
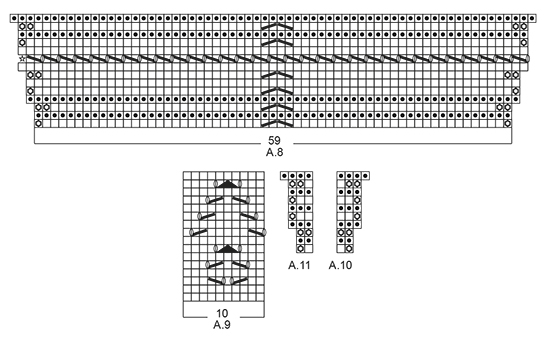
Hi Bonita, A.10 and A.11 are only 2 stitches in width on the first row, knit from right side and purl from wrong side (in A.10 you start with knit from the right side and in A.11 you start with purl from wrong side. To start A.10, work 3 stitches in garter stitch, then A.10, then garter stitch until 2 stitches are left before the marker, decrease as before, garter stitch until 2 stitches before marker, the A.11 (2 stitches) followed by A.10 as you have started on your repeat and so on....Continue like this upwards according to A.10 and A.11. I hope this helps, Kind regards, Deirdre
12.06.2017 - 12:58Eleni Sideri ha scritto:
Where we use A5 in this pattern?
23.11.2016 - 10:16DROPS Design ha risposto:
Hi Eleni, the English version should be corrected. Please see the US language version. When the piece measures approx. 38 cm, you will start A.5. Happy knitting!
24.11.2016 - 18:48
![]() Kathy Griffin ha scritto:
Kathy Griffin ha scritto:
Thank you for your answers to my questions. They were most helpful. My misunderstanding was to do with the explanation at the beginning of the pattern which states: INCREASE TIP: Inc 1 St by making 1 YO, on next row work YO twisted to avoid holes. I assumed that I should follow this, even when following the charts. I guess that it simply applied to the start of the chart as you increased from 6 St to 18 St.
04.10.2016 - 18:55Kathy Griffin ha scritto:
When working 2 stitches in one stitch, do you knit and then purl the same stitch? Thanks, Kathy from Canada
03.10.2016 - 19:43DROPS Design ha risposto:
Dear Mrs Griffin, if you click on the video tab, on the top under the pattern title, next to the materials, you can find all the video related to this pattern. In particular, you can work 2 sts in 1 st knitting the same st in the front and in the back loop. Happy knitting!
04.10.2016 - 08:37Vicki ha scritto:
There is an error late in this pattern when starting the section with A.9. It says " Inc made in A.4/A.6/A.7 are drawn as extra sts in **A.5** so that the patterns align.". There is no A.5 is this section. Can you please confirm that directions should read : inc made in A.4/A.6/A.7 are drawn in as extra sts on each side of the 60 stitch blocks of A.9 as stocking stitch. Thanks.
19.09.2016 - 17:27DROPS Design ha risposto:
Dear Vicki, you are correct, the extra sts not included in A.4/A.6 and A.7 should be worked in stocking st. Happy knitting!
06.10.2016 - 13:06
![]() Gardien ha scritto:
Gardien ha scritto:
Bonjour Comme Christine, je suis bloquée dans la même section. Si je comprends bien, je ne m'occupe pas des augmentations faites dans A4,A6 et A7. Elles sont tricotées en jersey le rang suivant. Merci de m'eclairer. Ça fait 3 fois que je detricote le 3ème rang de A9
15.06.2016 - 18:28DROPS Design ha risposto:
Bonjour Mme Gardien, les augmentations faites dans A.4/A.6 et dans A.6/A.7 (= de chaque côté d'un motif de A.5) sont dans le diagramme A.5, vous pouvez placer un marqueur entre chaque diagramme pour bien vous repérer et ainsi continuer les diagrammes comme indiqués. Bon tricot!
16.06.2016 - 08:42
![]() Christine ha scritto:
Christine ha scritto:
Bonjour, ce modèle de châle est magnifique, j'ai quasiment fini de le tricoter, le résultat est splendide mais je ne comprends pas l'explications de l'avant dernière section, celle qui utilise les diagrammes A4, A9, A6 et A7. Pouvez-vous me donner leur succession de manière claire ? Je vous remercie d'avance pour votre réponse et vos superbes modèles :-)
16.02.2016 - 11:20DROPS Design ha risposto:
Bonjour Christine et merci. Tricotez les diagrammes dans l'ordre indiqué, en alignant bien tous les diagrammes les uns au-dessus des autres au fur et à mesure, c'est-à-dire que les augmentations faites dans A.4/A.6 et A.7 vont s'intercaler entre les diagrammes (tricotez les en jersey). Placez un marqueur entre chaque diagramme pour bien repérer ces augm. et bien aligner les motifs les uns au-dessus des autres sans les décaler. Bon tricot!
16.02.2016 - 12:58
|
|||||||||||||||||||||||||
Spring Splendor#springsplendorscarf |
|||||||||||||||||||||||||
|
|
|||||||||||||||||||||||||
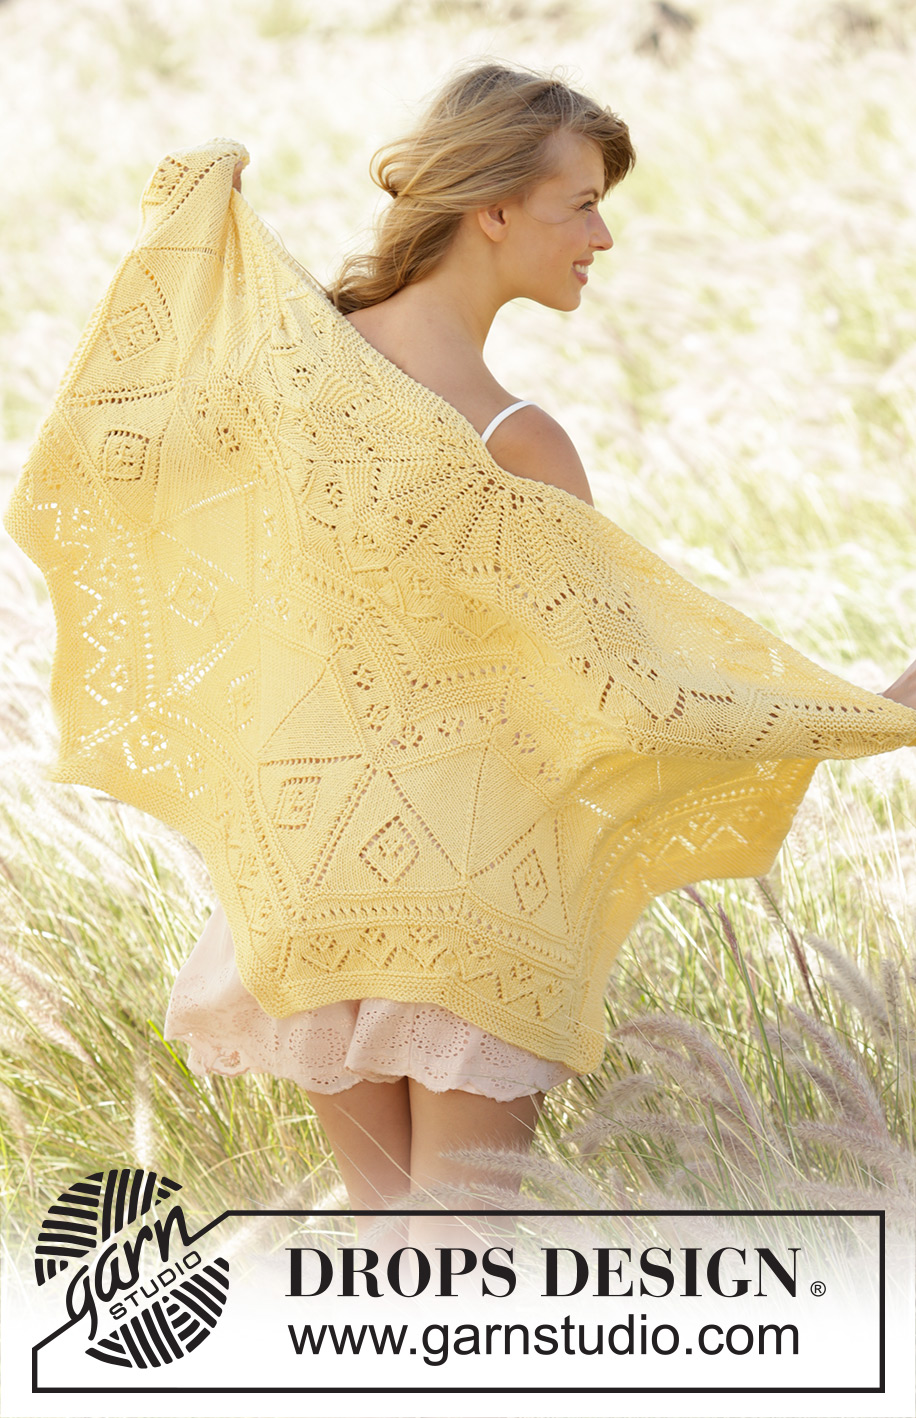
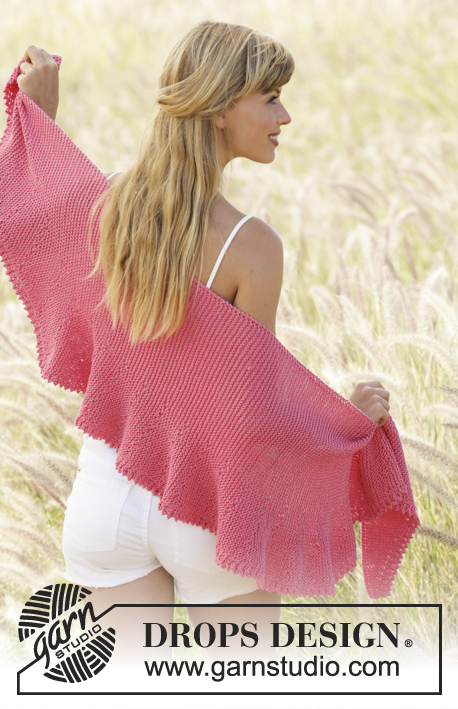
Scialle DROPS lavorato ai ferri a maglia legaccio con motivo traforato e a zig zag in ”Cotton Merino”.
DROPS 170-12 |
|||||||||||||||||||||||||
|
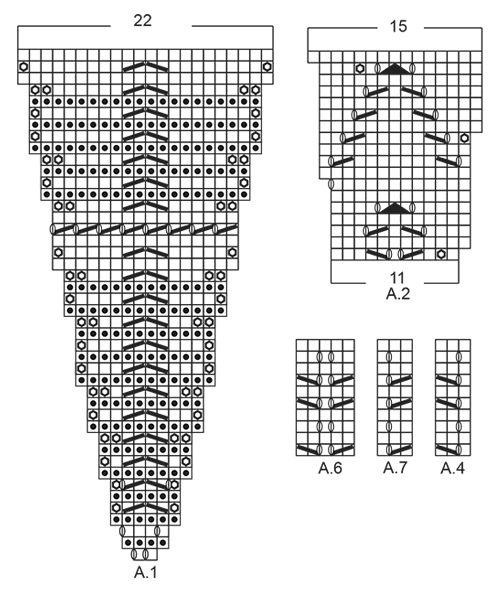
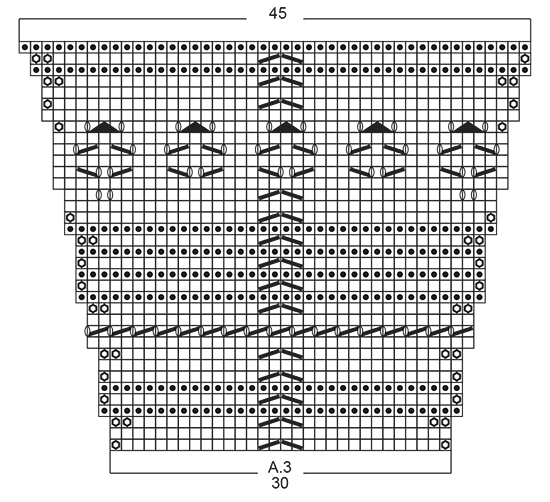
MOTIVO: Vedere i diagrammi A.1-A.11. I diagrammi mostrano tutti i ferri del motivo visti dal diritto del lavoro. M LEGACCIO (avanti e indietro): Lavorare tutti i f a dir. 1 “costa” a m legaccio = 2 f dir. SUGGERIMENTO PER GLI AUMENTI: Aumentare 1 m facendo 1 gettato, sul f successivo lavorare il gettato a ritorto per evitare buchi. ---------------------------------------------------------- SCIALLE: Lavorato avanti e indietro, dall’alto verso il basso. Avviare 6 m sui f circolari n° 4,5 mm con Cotton Merino. Lavorare 3 “coste” a M LEGACCIO – leggere la spiegazione sopra, e distribuire 4 aumenti in modo uniforme su ogni f dal diritto del lavoro – LEGGERE IL SUGGERIMENTO PER GLI AUMENTI = 18 m. Lavorare il f successivo come segue dal diritto del lavoro: lavorare 3 m a M LEGACCIO – leggere la spiegazione sopra, inserire 1 segnapunti, * A.1 (= 2 m), inserire 1 segnapunti *, ripetere *-* altre 5 volte, finire con 3 m a m legaccio = 7 segnapunti nel lavoro. Spostare i segnapunti verso l’alto durante il lavoro. Continuare con A.1 e 3 m a m legaccio a ogni lato del lavoro. FARE ATTENZIONE ALLA TENSIONE DEL LAVORO! Quando A.1 è stato lavorato 1 volta in verticale, ci sono 138 m sul f. Lavorare il f successivo come segue dal diritto del lavoro: 3 m a m legaccio, A.2 (= 11 m) fino a quando rimangono 3 m (= 12 volte in larghezza), finire con 3 m a m legaccio. Quando A.2 è stato lavorato 1 volta in verticale, ci sono 186 m sul f. Lavorare il f successivo come segue dal diritto del lavoro: 3 m a m legaccio, A.3 (= 30 m) fino a quando rimangono 3 m (= 6 volte in larghezza), finire con 3 m a m legaccio. Sull’ultimo f dal diritto del lavoro in A.3 aumentare 1 m con 1 gettato dopo le 3 m a m legaccio all’inizio del f. Quando A.3 è stato lavorato 1 volta in verticale, ci sono 277 m sul f. Il lavoro misura circa 38 cm nella parte più lunga (misurati al centro). Lavorare il f successivo come segue dal diritto del lavoro: 3 m a m legaccio, lavorare A.4 (= 3 m), * A.5 (= 40 m), A.6 (= 5 m) *, ripetere *-* altre 4 volte, lavorare A.5, A.7 (= 3 m), finire con 3 m a m legaccio. L’aumento A.4/A.6/A.7 è disegnato in A.5 in modo che il motivo combaci. Ripetere A.4/A.6/A.7 in verticale fino a quando A.5 è stato lavorato 1 volta in verticale. Quando A.5 è stato lavorato 1 volta in verticale, ci sono 361 m sul f. Il lavoro misura circa 53 cm nel punto più lungo (misurati al centro). Lavorare come segue dal diritto del lavoro: 3 m a m legaccio, 1 m a m legaccio (questa m è lavorata a m legaccio quando si lavora a m legaccio in A.8 e a m rasata quando si lavora a m rasata in A.8), ripetere A.8 (= 59 m) fino a quando rimangono 3 m (= 6 volte in larghezza), finire con 3 m a m legaccio. NOTA: Il ferro con i buchini in A.8 non combacia nel diagramma ma combacia in totale sul f, la 1° n dopo le 3 m a m legaccio dev’essere lavorata a m rasata da diritto del lavoro. Sull’ultimo f dal diritto del lavoro inserire 1 segnapunti al centro di tutte le ripetizioni di A.8, cioè tra: passare 1 m a dir senza lavorarla, 1 m dir, accavallare la m passata sopra quella appena lavorata, inserire 1 segnapunti e lavorare 2 m insieme a dir. Spostare il segnapunti verso l’alto durante il lavoro. Quando A.8 è stato lavorato 1 volta in verticale, ci sono 397 m sul f. Il lavoro misura circa 58 cm nel punto più lungo (misurati al centro). Lavorare come segue sul f successivo dal diritto del lavoro: 3 m a m legaccio, A.4 sulle 3 m successive, * ripetere A.9 (= 10 m) 6 volte in totale in larghezza, A.6 sulle 5 m successive *, ripetere *-* altre 4 volte, ripetere A.9 (= 10 m) 6 volte in totale, A.7 sulle 3 m successive, finire con 3 m a m legaccio. Lavorare gli aumenti fatti in A.4/A.6/A.7 a maglia rasata. Ripetere A.4/A.6/A.7 in verticale (assicurarsi che A.4/A.6/A.7 siano uno sull’altro) fino a quando A.9 è stato lavorato 1 volta in verticale. Quando A.9 è stato lavorato 1 volta in verticale, ci sono 433 m sul f. Il lavoro misura circa 65 cm nel punto più lungo (misurati al centro). Poi lavorare a m legaccio come segue dal diritto del lavoro: lavorare 3 m a m legaccio, * A.10 (= 2 m), lavorare a m legaccio fino a quando rimangono 2 m prima del segnapunti, diminuire come prima (cioè passare 1 m a dir senza lavorarla, 1 m dir, accavallare la m passata sopra quella appena lavorata, lavorare insieme a dir le 2 m successive), lavorare a m legaccio fino a quando rimangono 2 m prima del segnapunti, lavorare A.11 sulle 2 m successive *, ripetere *-* fino a quando rimangono 3 m, finire con 3 m a m legaccio. Continuare in questo modo fino a quando il lavoro misura 70 cm nel punto più lungo. Intrecciare senza stringere. |
|||||||||||||||||||||||||
Spiegazioni del diagramma |
|||||||||||||||||||||||||
|
|||||||||||||||||||||||||
 |
|||||||||||||||||||||||||
 |
|||||||||||||||||||||||||
 |
|||||||||||||||||||||||||
 |
|||||||||||||||||||||||||
Avete terminato questo modello?Allora taggate le vostre foto con #dropspattern #springsplendorscarf o inviatele alla #dropsfan gallery. Avete bisogno di aiuto con questo modello?Troverete 18 video tutorial, una sezione per i commenti/domande e molto altro guardando il modello su www.garnstudio.com © 1982-2026 DROPS Design A/S. Ci riserviamo tutti i diritti. Questo documento, compreso tutte le sue sotto-sezioni, è protetto dalle leggi sul copyright. Potete leggere quello che potete fare con i nostri modelli alla fine di ogni modello sul nostro sito. |
|||||||||||||||||||||||||


Con oltre 40 anni di esperienza nel design di modelli di maglia e uncinetto, DROPS Design offre la più estesa collezione di modelli gratuiti su internet - tradotti in 17 lingue. Ad oggi vi possiamo fornire 324 cataloghi e 12290 modelli - 9561 dei quali sono tradotti in Italiano.
Ci stiamo impegnando molto per darvi il meglio che vi possiamo offrire in termini di maglia e uncinetto, ispirazioni e consigli così come filati di grande qualità ad un prezzo incredibile! Volete utilizzare i nostri modelli per qualcosa d'altro oltre al vostro uso personale? Potete leggere tutto ciò che è consentito nel testo sul Copyright in basso su tutte le pagine dei nostri modelli. Buon lavoro!
Lasciare un commento sul modello DROPS 170-12
Noi saremmo felici di ricevere i tuoi commenti e opinioni su questo modello!
Se vuoi fare una domanda, fai per favore attenzione a selezionare la categoria corretta nella casella qui sotto per velocizzare il processo di risposta. I campi richiesti sono indicati da *.