
Categorie popolari
State cercando un filato?


Commenti / Domande (24)
![]() Lena ha scritto:
Lena ha scritto:
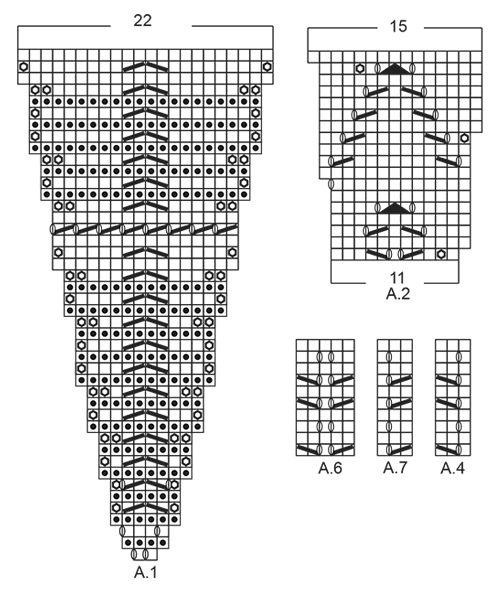
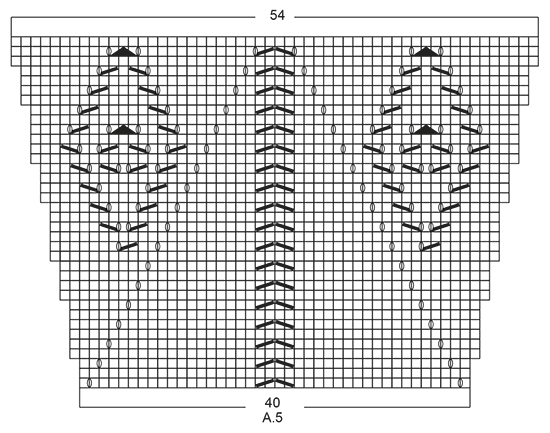
Har stickat färdigt A3, så varje stycke har 45 maskor. Sen står det att man ska sticka 3 räta, A4 (3m), A5 (40m) och A6 (5m). Men det blir ju 48 maskor (3+40+5) och har ju bara 45 maskor per sektion.
16.07.2024 - 21:11DROPS Design ha risposto:
Hej Lena. När du stickat färdigt A.3 har du 277 maskor totalt. Du stickar då såhär: 3 m rätstickning, A.4, sedan stickar du * A.5 , A.6* och detta (inom stjärnorna) upprepas 4 gånger till (totalt 5 gånger), sticka sedan A.5, A.7 och avsluta med 3 m rätstickning. Mvh DROPS Design
17.07.2024 - 11:50
![]() Lena ha scritto:
Lena ha scritto:
Ska sticka A4, A5 och A6. Men dessa blir ju 48 m tillsammans och jag har bara 45 m. Förstår verkligen inte hur jag ska göra!
13.07.2024 - 22:48DROPS Design ha risposto:
Hej Lena. Jag förstår inte riktigt var i mönstret du är. Kan du förklara lite mer hur långt du har kommit? Mvh DROPS Design
16.07.2024 - 14:52
![]() Amanda Karlsson ha scritto:
Amanda Karlsson ha scritto:
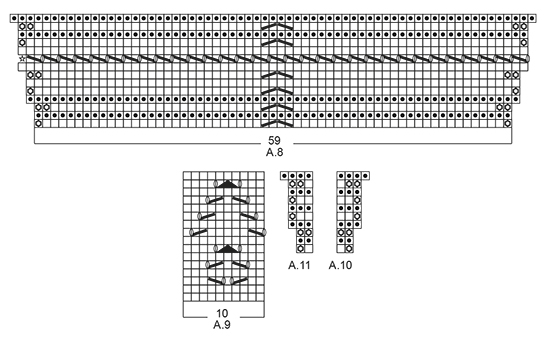
I have just started A9 but i think i have the wrong number of st. Shuld i include the 3 first and last st in the ammount, because if not i still have 12 left after doing everything but the last A7 and i dont understand what i am doing wrong
19.03.2023 - 11:47DROPS Design ha risposto:
Dear Amanda, work the first row as follows. Start with 3 stitches in garter stitch and 3 stitches in A.4. Now, work the next section 5 times in total: 6 repeats of A.9, 5 stitches in A.5. At this point, you should have worked 331 stitches (3+3+(6x10+5)x5). Work 6 repeats of A.9 (=60 stitches), 3 stitches in A.7 and 3 stitches in garter stitch. Now, you have worked over all 397 stitches (331+60+3+3=397). Happy knitting!
19.03.2023 - 19:15
![]() Amanda Karlsson ha scritto:
Amanda Karlsson ha scritto:
I am now starting A5. In the pattern it says that A4 and so on is included in A5, how do you mean? Do I follow all stitches as shown in the pattern or do I need to accommodate for anything?
07.03.2023 - 11:28DROPS Design ha risposto:
Dear Mrs Karlsson, when working A.4; A.6 and A.7 there are yarn overs not compensated by a decrease (see row 3 and 9), these increases are drawn in A.5, so that you can just consider A.4 and A.7 are always worked over 3 sts and A.6 over 5 sts, and A.5 will then increase by 2 sts as shown in diagram. Happy knitting!
07.03.2023 - 14:34
![]() Magda ha scritto:
Magda ha scritto:
Dzień dobry, chyba właśnie o to chodzi. Markerów powinno być więcej, co na końcu nie jest wyjaśnione. Popróbowałam i wyszło mi, że powinno być tak:3 o. francuskie, A 10, o. dżersejem do markera (po dwa oczka razem z każdej strony), o. dżersejem do schematu A6 i nad nim, po obu stronach środkowego oczka schematu A6, schematy A11 i A10. itd. Na końcu, przed 3 o. oczka schemat A 11. Inaczej kształt chusty nie będzie odpowiedni. Pozdrawiam
25.10.2021 - 08:54DROPS Design ha risposto:
Dziękuję za feedback Magdo. Już zgłaszam korektę. Pozdrawiamy
25.10.2021 - 09:53
![]() Magda ha scritto:
Magda ha scritto:
Dzień dobry, nie rozumiem ostatniej części. Markerów jest 6, więc wzór nie wychodzi równo. Zaczyna się od A10, potem do markera i po 2 razem z każdej strony markera, do następnego markera i z jednej strony A11, a z drugiej A10 itd. Przy ostatnim markerze z obu jego stron są schematy A11 i A10, potem dżersej do końca. A co przed 3 ostatnimi oczkami francuskimi? Pozdrawiam
21.10.2021 - 17:57DROPS Design ha risposto:
Witaj Magdo, może chodzić o to, że na początku było włożonych 7 markerów, a później jeszcze 6 nitek markerów (na środku każdego schematu A.8). Wcześniejsze markery nie zostały usunięte. Wydaje mi się, że tu powstał błąd terminologiczny. Powinnaś powtarzać następującą sekwencję: ...*A.10 (= 2 o.), przer. ściegiem francuskim aż zostaje 2 o. przed NITKĄ MARKEREM, zamykać o. jak wcześniej (…..), przer. ściegiem francuskim aż zostaje 2 o. przed MARKEREM, przer. A.11 ponad 2 nast. o.*, powt. od *-*. Napisz czy jest ok. Pozdrawiamy!
24.10.2021 - 20:43
![]() Minu ha scritto:
Minu ha scritto:
Hallo liebes Drops Team. Wie viele markierer müssen es bei A 10 und A 11 sein ?
16.09.2020 - 22:04DROPS Design ha risposto:
Liebe Minu, die Markierungen werden in der Mitte von jedem A.8 eingesetzt = es sind 6 Markierungen (je in der Mitte von A.6/A.7). Viel Spaß beim stricken!
17.09.2020 - 10:11
![]() Chebot Michèle ha scritto:
Chebot Michèle ha scritto:
Bonjour,\\r\\nPourrais je avoir la traduction en français pour ce modèle \\r\\nMerci infiniment \\r\\nMChebot
19.07.2018 - 13:06DROPS Design ha risposto:
Bonjour Mme Chebot, tous nos modèles sont disponibles en français, cliquez sur le menu déroulant sous la photo pour sélectionner "français". Bon tricot!
19.07.2018 - 14:38Genevieve ha scritto:
I'm on row 5 of A5. Started with 3 sts in garter st. Followed by A5 40 stitches and left with on 3 stitches for A6 instead of 5 stitches. Can enlighten what I've done wrong?
17.06.2018 - 06:30DROPS Design ha risposto:
Dear Genevieve, work A.5 as shown in diagram, ie the decreases in the middle of A.5 should be always worked over the middle sts, on row 4 you see the increases made in the other diagrams - just continue working row 5 as shown staring with K4 before YO (and ending with K4 after last YO) and working the decreases in the middle of repeat as before. Happy knitting!
18.06.2018 - 08:34
![]() Genevieve ha scritto:
Genevieve ha scritto:
Work next row as follows from RS: 3 sts in garter st, work A.4 (= 3 sts), * A.5 (= 40 sts), A.6 (= 5 sts) *, repeat from *-* 4 more times, work A.5, A.7 (= 3 sts), finish with 3 sts in garter st. Inc in A.4/A.6/A.7 is drawn in A.5 so that the pattern fits. I'm stuck here. Starting this section and can advise where do i do the increase? The pattern chart doesn\'t state any increase.
17.06.2018 - 06:20DROPS Design ha risposto:
Dear Genevieve, you are increasing in A.4, A.6 and A.7 (= see rows with YOs but without dec = row 3 and 9). These decrease are shown in A.5 - make sure you will always have the correct number of sts in A.4/A.7 (= 3 sts) and A.6 (= 5 sts), and that the YO's in these diagrams will always lined up. Happy knitting!
18.06.2018 - 08:31
|
|||||||||||||||||||||||||
Spring Splendor#springsplendorscarf |
|||||||||||||||||||||||||
|
|
|||||||||||||||||||||||||
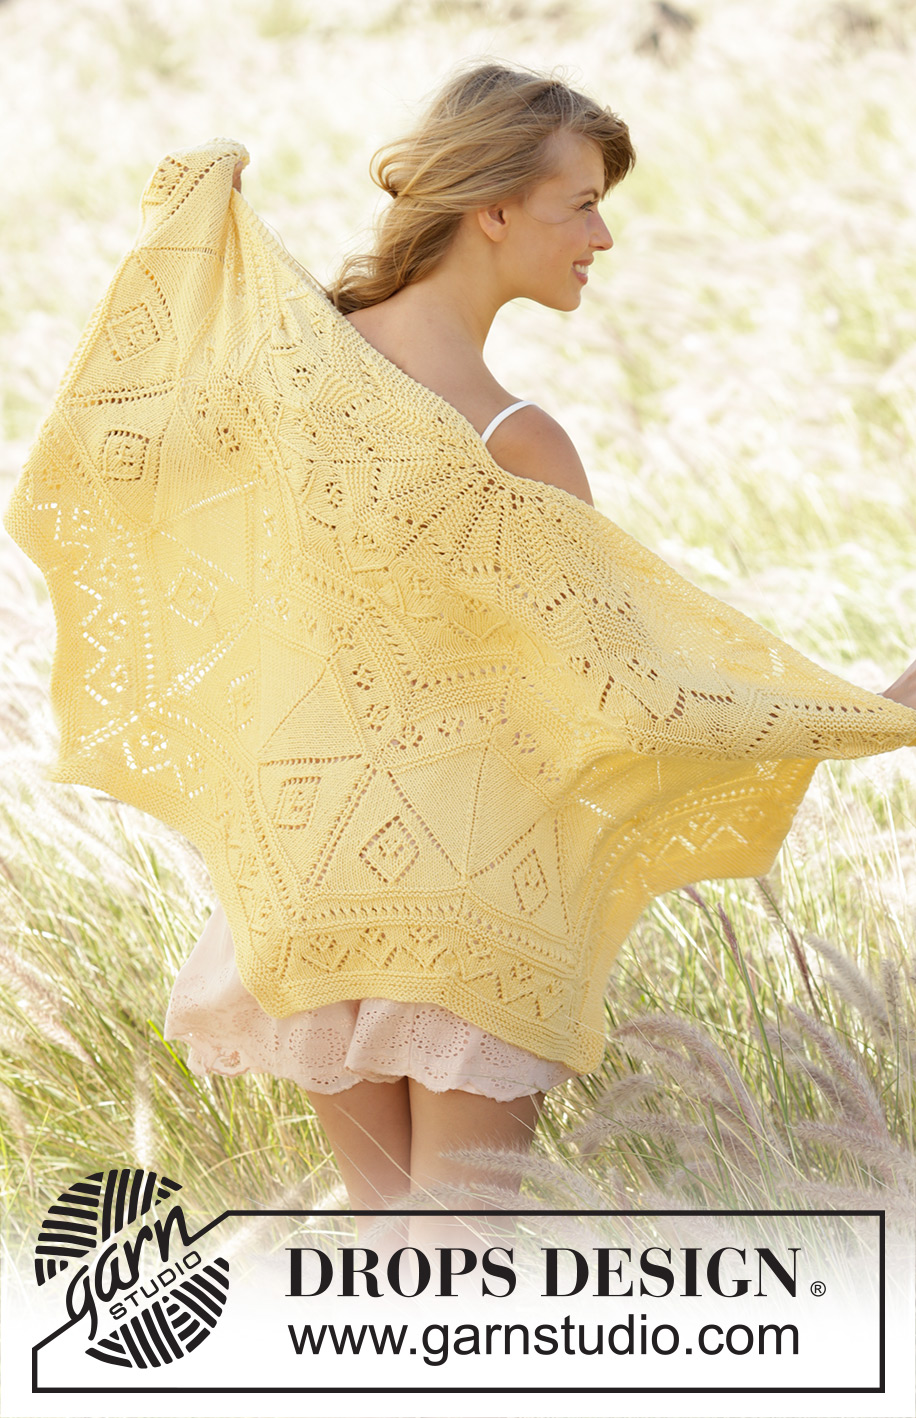
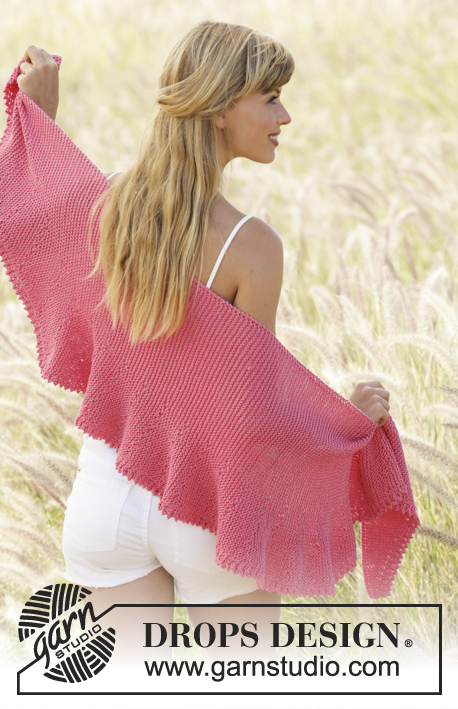
Scialle DROPS lavorato ai ferri a maglia legaccio con motivo traforato e a zig zag in ”Cotton Merino”.
DROPS 170-12 |
|||||||||||||||||||||||||
|
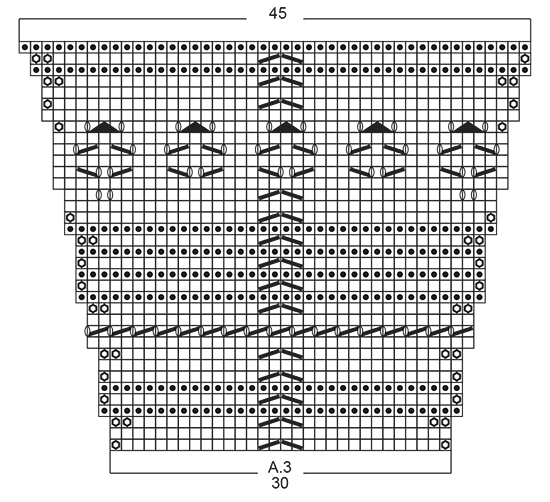
MOTIVO: Vedere i diagrammi A.1-A.11. I diagrammi mostrano tutti i ferri del motivo visti dal diritto del lavoro. M LEGACCIO (avanti e indietro): Lavorare tutti i f a dir. 1 “costa” a m legaccio = 2 f dir. SUGGERIMENTO PER GLI AUMENTI: Aumentare 1 m facendo 1 gettato, sul f successivo lavorare il gettato a ritorto per evitare buchi. ---------------------------------------------------------- SCIALLE: Lavorato avanti e indietro, dall’alto verso il basso. Avviare 6 m sui f circolari n° 4,5 mm con Cotton Merino. Lavorare 3 “coste” a M LEGACCIO – leggere la spiegazione sopra, e distribuire 4 aumenti in modo uniforme su ogni f dal diritto del lavoro – LEGGERE IL SUGGERIMENTO PER GLI AUMENTI = 18 m. Lavorare il f successivo come segue dal diritto del lavoro: lavorare 3 m a M LEGACCIO – leggere la spiegazione sopra, inserire 1 segnapunti, * A.1 (= 2 m), inserire 1 segnapunti *, ripetere *-* altre 5 volte, finire con 3 m a m legaccio = 7 segnapunti nel lavoro. Spostare i segnapunti verso l’alto durante il lavoro. Continuare con A.1 e 3 m a m legaccio a ogni lato del lavoro. FARE ATTENZIONE ALLA TENSIONE DEL LAVORO! Quando A.1 è stato lavorato 1 volta in verticale, ci sono 138 m sul f. Lavorare il f successivo come segue dal diritto del lavoro: 3 m a m legaccio, A.2 (= 11 m) fino a quando rimangono 3 m (= 12 volte in larghezza), finire con 3 m a m legaccio. Quando A.2 è stato lavorato 1 volta in verticale, ci sono 186 m sul f. Lavorare il f successivo come segue dal diritto del lavoro: 3 m a m legaccio, A.3 (= 30 m) fino a quando rimangono 3 m (= 6 volte in larghezza), finire con 3 m a m legaccio. Sull’ultimo f dal diritto del lavoro in A.3 aumentare 1 m con 1 gettato dopo le 3 m a m legaccio all’inizio del f. Quando A.3 è stato lavorato 1 volta in verticale, ci sono 277 m sul f. Il lavoro misura circa 38 cm nella parte più lunga (misurati al centro). Lavorare il f successivo come segue dal diritto del lavoro: 3 m a m legaccio, lavorare A.4 (= 3 m), * A.5 (= 40 m), A.6 (= 5 m) *, ripetere *-* altre 4 volte, lavorare A.5, A.7 (= 3 m), finire con 3 m a m legaccio. L’aumento A.4/A.6/A.7 è disegnato in A.5 in modo che il motivo combaci. Ripetere A.4/A.6/A.7 in verticale fino a quando A.5 è stato lavorato 1 volta in verticale. Quando A.5 è stato lavorato 1 volta in verticale, ci sono 361 m sul f. Il lavoro misura circa 53 cm nel punto più lungo (misurati al centro). Lavorare come segue dal diritto del lavoro: 3 m a m legaccio, 1 m a m legaccio (questa m è lavorata a m legaccio quando si lavora a m legaccio in A.8 e a m rasata quando si lavora a m rasata in A.8), ripetere A.8 (= 59 m) fino a quando rimangono 3 m (= 6 volte in larghezza), finire con 3 m a m legaccio. NOTA: Il ferro con i buchini in A.8 non combacia nel diagramma ma combacia in totale sul f, la 1° n dopo le 3 m a m legaccio dev’essere lavorata a m rasata da diritto del lavoro. Sull’ultimo f dal diritto del lavoro inserire 1 segnapunti al centro di tutte le ripetizioni di A.8, cioè tra: passare 1 m a dir senza lavorarla, 1 m dir, accavallare la m passata sopra quella appena lavorata, inserire 1 segnapunti e lavorare 2 m insieme a dir. Spostare il segnapunti verso l’alto durante il lavoro. Quando A.8 è stato lavorato 1 volta in verticale, ci sono 397 m sul f. Il lavoro misura circa 58 cm nel punto più lungo (misurati al centro). Lavorare come segue sul f successivo dal diritto del lavoro: 3 m a m legaccio, A.4 sulle 3 m successive, * ripetere A.9 (= 10 m) 6 volte in totale in larghezza, A.6 sulle 5 m successive *, ripetere *-* altre 4 volte, ripetere A.9 (= 10 m) 6 volte in totale, A.7 sulle 3 m successive, finire con 3 m a m legaccio. Lavorare gli aumenti fatti in A.4/A.6/A.7 a maglia rasata. Ripetere A.4/A.6/A.7 in verticale (assicurarsi che A.4/A.6/A.7 siano uno sull’altro) fino a quando A.9 è stato lavorato 1 volta in verticale. Quando A.9 è stato lavorato 1 volta in verticale, ci sono 433 m sul f. Il lavoro misura circa 65 cm nel punto più lungo (misurati al centro). Poi lavorare a m legaccio come segue dal diritto del lavoro: lavorare 3 m a m legaccio, * A.10 (= 2 m), lavorare a m legaccio fino a quando rimangono 2 m prima del segnapunti, diminuire come prima (cioè passare 1 m a dir senza lavorarla, 1 m dir, accavallare la m passata sopra quella appena lavorata, lavorare insieme a dir le 2 m successive), lavorare a m legaccio fino a quando rimangono 2 m prima del segnapunti, lavorare A.11 sulle 2 m successive *, ripetere *-* fino a quando rimangono 3 m, finire con 3 m a m legaccio. Continuare in questo modo fino a quando il lavoro misura 70 cm nel punto più lungo. Intrecciare senza stringere. |
|||||||||||||||||||||||||
Spiegazioni del diagramma |
|||||||||||||||||||||||||
|
|||||||||||||||||||||||||
 |
|||||||||||||||||||||||||
 |
|||||||||||||||||||||||||
 |
|||||||||||||||||||||||||
 |
|||||||||||||||||||||||||
Avete terminato questo modello?Allora taggate le vostre foto con #dropspattern #springsplendorscarf o inviatele alla #dropsfan gallery. Avete bisogno di aiuto con questo modello?Troverete 18 video tutorial, una sezione per i commenti/domande e molto altro guardando il modello su www.garnstudio.com © 1982-2026 DROPS Design A/S. Ci riserviamo tutti i diritti. Questo documento, compreso tutte le sue sotto-sezioni, è protetto dalle leggi sul copyright. Potete leggere quello che potete fare con i nostri modelli alla fine di ogni modello sul nostro sito. |
|||||||||||||||||||||||||


Con oltre 40 anni di esperienza nel design di modelli di maglia e uncinetto, DROPS Design offre la più estesa collezione di modelli gratuiti su internet - tradotti in 17 lingue. Ad oggi vi possiamo fornire 324 cataloghi e 12290 modelli - 9561 dei quali sono tradotti in Italiano.
Ci stiamo impegnando molto per darvi il meglio che vi possiamo offrire in termini di maglia e uncinetto, ispirazioni e consigli così come filati di grande qualità ad un prezzo incredibile! Volete utilizzare i nostri modelli per qualcosa d'altro oltre al vostro uso personale? Potete leggere tutto ciò che è consentito nel testo sul Copyright in basso su tutte le pagine dei nostri modelli. Buon lavoro!
Lasciare un commento sul modello DROPS 170-12
Noi saremmo felici di ricevere i tuoi commenti e opinioni su questo modello!
Se vuoi fare una domanda, fai per favore attenzione a selezionare la categoria corretta nella casella qui sotto per velocizzare il processo di risposta. I campi richiesti sono indicati da *.