
Categorie popolari
State cercando un filato?


Commenti / Domande (174)
![]() Elisabeth ha scritto:
Elisabeth ha scritto:
Hej! Skulle vilja sticka denna Sweet Olivia som tröja på rundsticka. Kan ni ge förslag hur jag gör detta? Skulle behöva lite vägledning för att starta upp!
01.04.2023 - 08:39DROPS Design ha risposto:
Hej Elisabeth, det kan du gøre, bare sørg for at du har lige mange masker på forstykket som på bagstykket (og altså ikke de ekstra masker du har i forkanten) :)
13.04.2023 - 10:24
![]() Genevieve ha scritto:
Genevieve ha scritto:
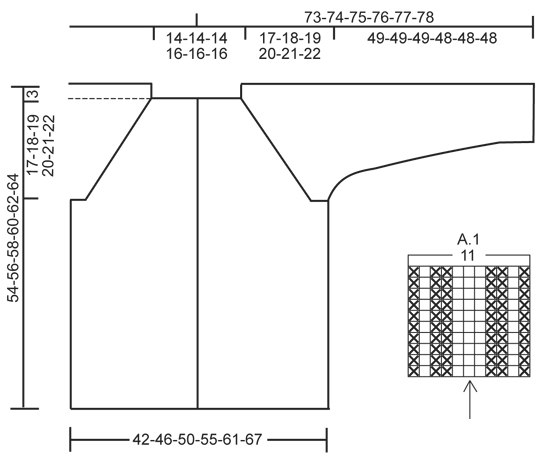
In the instructions under "Yoke", it might give some clarity if a sentence was added after instruction to place the 4 markers, that explained that each of the 4 markers mark the centre of the A.1 pattern. (The A1 becomes the 4 raglan "seams", with increases on either side of the A1 pattern). I had to read the instructions several times before I understood exactly where the A.1 pattern should be since my printout picture was very small and didn't show it.
09.01.2023 - 00:40
![]() Jennifer ha scritto:
Jennifer ha scritto:
Pattern is confusing in the English version, having to reference several sections for the same row. Suggest providing 1 or 2 lines of instruction after placement of markers that set us on the correct path eg. (if I've interpreted the disparate instructions correctly) P5, K19, M1, K15, M1, insert 11st pattern, M1, K28, M1, insert 11st pattern, M1, K15,M1, K19, P5. Next Inc row: P5, K20, M1, K15, M1, K1, insert 11st pattern, K1, M1, K30, M1, K1 insert 11st pattern, k1, M1, K15, M1, K20, P5 ??
08.01.2023 - 00:49
![]() Danila Piazzi ha scritto:
Danila Piazzi ha scritto:
Non capisco come fare le coste a legaccio. Potete essere un po' più chiari della spiegazione nel modello?
16.12.2022 - 12:22DROPS Design ha risposto:
Buonasera Danilla, la spiegazione delle coste a legaccio è nel paragrafo "M. LEGACCIO" all'inizio delle spiegazioni: deve semplicemente lavorare 2 ferri a legaccio. Buon lavoro!
17.12.2022 - 21:32
![]() Eva-Lena ha scritto:
Eva-Lena ha scritto:
Förstår inte svaren som beskriver att man får 4 till maskor genom att sätta en markör i nästa maska. Hur kan en markör skapa en extra maska? Det behövs en tydligare beskrivning.
03.12.2022 - 22:20DROPS Design ha risposto:
Hei Eva-Lena. Litt usikker på hva du mener, men du skal sette 4 markører i arbeidet (ikke øke i masken med markør). Les i oppskriften hvor de skal settes i den str. du strikker. På nest pinne fra retten strikkes det etter diagram A.1, pass på at midtmasken i diagrammet stemmer med en maske med en markør du allerede har satt i arbeidet. Nå skal det økes med 1 maske på hver side av diagrammene/de 11 raglan maskene, LES raglan i oppskriften. Du øker da med 8 masker på hver pinne det skal økes. mvh DROPS Design
05.12.2022 - 13:19
![]() Carol ha scritto:
Carol ha scritto:
I am just about to start this jacket. Does it knit up true to size as I would like it a little loose to wear it as a 'Jacket' with a black shirt and skirt for work, therefore not snug so I may need to go up a size. I am using the Drops Alpaca in Golden Rod with dark buttons
23.11.2022 - 16:54DROPS Design ha risposto:
Dear Carol, to find the right size, measure a similar jacket you have and like the shape and compare these measurements to the chart at the end of the pattern; read more about the size and chart here. Happy knitting!
24.11.2022 - 09:20
![]() Ulla Hauser ha scritto:
Ulla Hauser ha scritto:
I just started knitting this pattern and have run into a problem with the markers. I'm allowing for the 5 stitches for the button band. I increased stitches to total 130 sts. After knitting 5 sts for band I knit 19 sts, placed marker, knit 20, placed marker, knit 38, placed marker, knit 20, placed marker, knit 19, placed marker and was then left with 9 stitches which includes the 5 for the button band. I have read the instructions several times but I still don't understand it.
28.10.2022 - 07:57DROPS Design ha risposto:
Dear Mrs Hauser, the markers are inserted in a stitch, not between stitches, so work as follows: 5 front band sts, 19 sts (front piece), insert 1 marker in next st, 20 sts (= sleeve), insert 1 marker in next st, 38 (= back piece), insert 1 marker in next st, 20 sts (= sleeve), insert 1 marker in next st, 19 (= left front piece), 5 front band sts = 5+19+1+20+1+38+1+20+1+19+5= 130 sts. Happy knitting!
28.10.2022 - 10:23
![]() Christine ha scritto:
Christine ha scritto:
Thank you for your help with this pattern. I am enjoying working it.
02.08.2022 - 21:29
![]() Christine ha scritto:
Christine ha scritto:
I have finished the yoke. The pattern does not state how many of the 402 stitches are front back or sleeve. I have 404 stitches so don't know where to loose them. Please can you help. Thanks
31.07.2022 - 11:20DROPS Design ha risposto:
Dear Christine, the detailed stitch count for each part is given in the pattern: After all inc for raglan there are 354-382-402-438-458-498 sts on row and piece measures approx. 20-21-22-23-24-25 cm from shoulder. Work next row as follows from WS: Work 52-57-61-68-73-80 sts (= right front piece), slip the next 78-82-84-88-88-94 sts on 1 stitch holder (= sleeve), ... etc. So you can check and adjust to the right number of sts. Happy knitting!
31.07.2022 - 12:21
![]() Christine ha scritto:
Christine ha scritto:
Thank you for your help with the marker problem I was having with sweet Olivia cardigan markers. I have read other problems and it seems a lot of people ask about this. Maybe it would help to make this clearer. /thanks
08.07.2022 - 00:34
|
|||||||
Sweet Olivia Cardigan#sweetoliviacardigan |
|||||||
|
|
|||||||
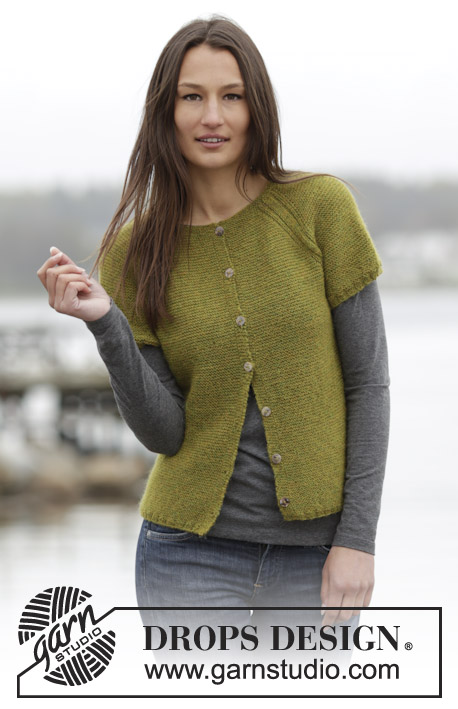
Cardigan DROPS lavorato ai ferri a maglia legaccio con raglan, lavorato dall’alto in basso (top down) in "Alpaca". Taglie: S - XXXL.
DROPS 164-42 |
|||||||
|
M LEGACCIO (avanti e indietro): Lavorare tutti i f a dir. 1 "costa" a m legaccio = 2 f dir. MOTIVO: Vedere il diagramma A.1. Il diagramma mostra tutti i f del motivo visti dal diritto del lavoro. ASOLE: Diminuire per le asole sul bordo destro. 1 asola = lavorare fino a quando rimangono 3 m sul f (visto dal diritto del lavoro), fare 1 gettato, 2 m insieme a dir e lavorare a dir l’ultima m. Diminuire per le asole quando il lavoro misura: TAGLIA S: 2, 9, 16, 24, 32, 40 e 48 cm TAGLIA M: 2, 10, 18, 26, 34, 42 e 50 cm TAGLIA L: 2, 10, 18, 26, 34, 42 e 50 cm TAGLIA XL: 2, 10, 18, 26, 34, 43 e 52 cm TAGLIA XXL: 2, 10, 18, 27, 36, 45 e 54 cm TAGLIA XXXL: 2, 11, 20, 29, 38, 47 e 56 cm RAGLAN: Aumentare 1 m a ogni lato delle 11 m del raglan. Aumentare lavorando 2 m nella m prima e dopo le 11 m del raglan (= 2 aumenti per ogni A.1). Tutti gli aumenti vengono fatti dal diritto del lavoro. SUGGERIMENTO PER LE MISURE: A causa della m legaccio il capo risulterà più lungo quando indossato. Tutte le misure di lunghezza devono essere tenendo l’indumento appeso. ---------------------------------------------------------- CARDIGAN: Lavorato avanti e indietro sui f circolari dal centro davanti, lavorato dall’alto in basso (top down). SPRONE: Avviare 106-106-106-114-114-114 m (comprese 5 m per il bordo a ogni lato verso il centro davanti) con i f circolari n° 2,5 mm con Alpaca. Lavorare 3 coste a M LEGACCIO – leggere la spiegazione sopra. Passare ai f circolari n° 3 mm e lavorare 1 f dir dal diritto del lavoro e ALLO STESSO TEMPO distribuire 24 aumenti in modo uniforme - NOTA: Lavorare a rov le 5 m più esterne a ogni lato verso il centro davanti e non aumentare su queste m (= m del bordo) = 130-130-130-138-138-138 m sul f. Inserire 4 segnapunti nel lavoro come segue (dal rovescio del lavoro): 5 m rov (= m del bordo), 19-19-19-21-21-21 m dir (= davanti destro), inserire 1 segnapunti nella m successiva, 20 m dir (= manica), inserire 1 segnapunti nella m successiva, 38-38-38-42-42-42 m dir (= dietro), inserire 1 segnapunti nella m successiva, 20 m dir (= manica), inserire 1 segnapunti nella m successiva, 19-19-19-21-21-21 m dir (= davanti sinistro) e finire con 5 m rov (= m del bordo). LEGGERE TUTTA LA SEZIONE SEGUENTE PRIMA DI CONTINUARE: Poi lavorare a "coste" a m legaccio (1° f = diritto del lavoro) ma in ogni punto di passaggio tra il corpo e le maniche lavorare A.1 (= 11 m - NOTA: La m con il segnapunti deve combaciare con la m con la freccia nel diagramma), lavorare a rov le 5 del bordo a ogni lato verso il centro davanti su ogni f fino alla fine del lavoro. FARE ATTENZIONE ALLA TENSIONE DEL LAVORO! E ricordarsi di diminuire per le ASOLE sul bordo destro – leggere la spiegazione sopra. ALLO STESSO TEMPO sul 1° f dal diritto del lavoro aumentare per il RAGLAN – leggere la spiegazione sopra. NOTA: Aumentare in modo diverso sul corpo e sulle maniche: CORPO: Aumentare a f alterni (cioè su ogni f dal diritto del lavoro) per un totale di 13-21-26-34-42-53 volte e poi ogni 4 f (cioè a f alterni dal diritto del lavoro) per un totale di 14-11-10-7-4-0 volte. MANICA: aumentare a f alterni per un totale di 17-19-18-20-18-21 volte, e ogni 4 f per un totale di 12-12-14-14-16-16 volte. Alla fine di tutti gli aumenti per il raglan ci sono 354-382-402-438-458-498 m sul f e il lavoro misura circa 20-21-22-23-24-25 cm dalla spalla. Lavorare il f successivo come segue dal rovescio del lavoro: lavorare 52-57-61-68-73-80 m (= davanti destro), trasferire le 78-82-84-88-88-94 m successive su un fermamaglie (= manica), avviare 6-6-8-8-10-10 nuove m (= sotto manica), lavorare 94-104-112-126-136-150 m (= dietro), trasferire le 78-82-84-88-88-94 m successive su un fermamaglie (= manica), avviare 6-6-8-8-10-10 m (= sotto manica), lavorare le 52-57-61-68-73-80 m rimaste (= davanti sinistro). CORPO: = 210-230-250-278-302-330 m. Continuare a lavorare a m legaccio avanti e indietro e lavorare a rov le m del bordo – ricordarsi delle asole sul bordo destro. Quando il lavoro misura 33-34-35-36-37-38 cm, misurati da dove sono state divise le maniche sotto le manica (o la lunghezza desiderata) – LEGGERE IL SUGGERIMENTO PER LE MISURE, lavorare 1 f rov dal rovescio del lavoro e allo stesso tempo distribuire 2 aumenti in modo uniforme = 212-232-252-280-304-332 m sul f. Passare ai f circolari n° 2,5 mm e lavorare 3 f a coste (= 2 m dir/2 m rov) con 5 m per il bordo a m legaccio e lavorare 2 m dir a ogni lato verso il centro davanti (visto dal diritto del lavoro). Poi intrecciare le m SENZA STRINGERE con dir su dir e rov su rov. Tutto il cardigan misura circa 54-56-58-60-62-64 cm dalla spalla. MANICA: Lavorata in tondo con i f a doppia punta. Riportare le 78-82-84-88-88-94 m dal fermamaglie a un lato del lavoro sui f a doppia punta n° 3 mm e inoltre avviare 6-6-8-8-10-10 nuove m al centro sotto la manica = 84-88-92-96-98-104 m. Inserire 1 segnapunti – ORA MISURARE IL LAVORO DA QUI. Lavorare a m rasata in tondo. ALLO STESSO TEMPO dopo 3 giri diminuire 2 m al centro sotto la manica. Ripetere le diminuzioni ogni 4 giri 4-4-4-5-5-5 volte in totale e poi ogni 4½-3½-3-3-3-2 cm 9-11-12-13-13-16 volte in totale = 58-58-60-60-62-62 m. Quando le maniche misurano 48-48-48-47-47-47 cm (o alla lunghezza desiderata), lavorare 1 giro dir e ALLO STESSO TEMPO distribuire 2-2-4-0-2-2 diminuzioni in modo uniforme = 56-56-56-60-60-60 m sul f. Lavorare a m 3 giri a coste (= 2 m dir/2 m rov). Poi intrecciare SENZA STRINGERE con dir su dir e rov su rov. Lavorare l’altra manica nello stesso modo. CONFEZIONE: Cucire le aperture sotto le maniche. Attaccare i bottoni sul bordo sinistro. |
|||||||
Spiegazioni del diagramma |
|||||||
|
|||||||
 |
|||||||
Avete terminato questo modello?Allora taggate le vostre foto con #dropspattern #sweetoliviacardigan o inviatele alla #dropsfan gallery. Avete bisogno di aiuto con questo modello?Troverete 21 video tutorial, una sezione per i commenti/domande e molto altro guardando il modello su www.garnstudio.com © 1982-2026 DROPS Design A/S. Ci riserviamo tutti i diritti. Questo documento, compreso tutte le sue sotto-sezioni, è protetto dalle leggi sul copyright. Potete leggere quello che potete fare con i nostri modelli alla fine di ogni modello sul nostro sito. |
|||||||


Con oltre 40 anni di esperienza nel design di modelli di maglia e uncinetto, DROPS Design offre la più estesa collezione di modelli gratuiti su internet - tradotti in 17 lingue. Ad oggi vi possiamo fornire 324 cataloghi e 12290 modelli - 9561 dei quali sono tradotti in Italiano.
Ci stiamo impegnando molto per darvi il meglio che vi possiamo offrire in termini di maglia e uncinetto, ispirazioni e consigli così come filati di grande qualità ad un prezzo incredibile! Volete utilizzare i nostri modelli per qualcosa d'altro oltre al vostro uso personale? Potete leggere tutto ciò che è consentito nel testo sul Copyright in basso su tutte le pagine dei nostri modelli. Buon lavoro!
Lasciare un commento sul modello DROPS 164-42
Noi saremmo felici di ricevere i tuoi commenti e opinioni su questo modello!
Se vuoi fare una domanda, fai per favore attenzione a selezionare la categoria corretta nella casella qui sotto per velocizzare il processo di risposta. I campi richiesti sono indicati da *.