
Categorie popolari
State cercando un filato?


























Commenti / Domande (94)
Eirini ha scritto:
Hello, I wanted to ask about the left side; it says "Now turn in the middle of a row from WS and work 3 rows over all sts at the end of diagram." Does it mean at the end of A6(even after the last 3 rows on the diagram for size M?) or at the end of the entire piece with garter stitch? On a side note, A1 should include one more row above, or A2 starts from WS :)
28.10.2015 - 22:28DROPS Design ha risposto:
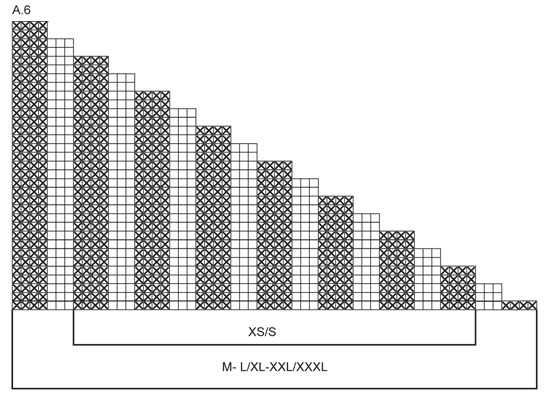
Dear Mrs Eirini, on left front piece and A.6 short rows are worked from WS, ie you will start short rows from WS - see also A.6: 1st row is worked from RS (read from the right towards the left), and 2nd row (1st short row) is worked from WS turn when you have worked the number of sts for this row. When all short rows are worked, finish with the last 3 rows in A.6 (last row in A.6 is worked from WS). Happy knitting!
29.10.2015 - 09:13
 Eva ha scritto:
Mein soeben fertig gestellter Bolero ist sehr schön geworden und sieht exakt so aus wie auf der Abbildung. Etwas problematisch war das Zusammennähen. Es hat ein wenig gedauert, bis ich es geschafft hatte, die beiden Teile korrekt übereinander zu legen und richtig zu verkreuzen. Eine Zeichung wäre hierfür recht hilfreich gewesen. Auch das Anziehen des Kleidungsstückes will erst einmal gelernt sein, aber dann sieht es sehr schick aus.
21.10.2015 - 12:10
Vallik ha scritto:
...mal was anderes, hat nicht jeder. Werde ich sicher demnächst stricken.
17.10.2015 - 15:00
 Amber Troyer ha scritto:
Is there a tutorial video or a written pattern for the charts? I am very confused.
13.10.2015 - 17:33DROPS Design ha risposto:
Dear Mrs Troyer, please click here to read more about diagrams: start at the bottom corner on the right side and read towards the left from RS and from the left towards the right from WS. Happy knitting!
14.10.2015 - 08:43
 DROPS Design ha scritto:
Hoi Marianne. Ik heb de vraag neergelegd bij ons Design Team of wij een maattekening kunnen krijgen. Maar het is ook ongeveer te berekenen met de stekenverhouding: 17 st per 10 cm = 54 st is dan ongeveer 31 cm in tricotosteek. Met motieven zal het waarschijnlijk wat meer sammentrekken.
13.10.2015 - 15:23
 Silvana Floris ha scritto:
È veramente Carino,lo realizzerò sicuramente come dono di Natale. GRAZIE !!!
04.10.2015 - 13:03Linda ha scritto:
Work A.4 1-2-2-2 times vertically, last time finish when 2 rows remain in A.4 Do you mean I must finish A.4 without knitting the last two rows of the pattern template for A.4? A.4 doesn't get used anywhere else that I can see, so I don't understand. Could you please explain? I love this pattern :)
25.09.2015 - 16:10DROPS Design ha risposto:
Dear Linda, that's correct, when repeating A.4 the last time, do not work the last 2 rows in A.4 and continue as in pattern with A.3. Happy knitting!
25.09.2015 - 18:02
 Sylvie ha scritto:
Hi, I would like to have the dimension of the 2 pieces. I can't knit but would like to try a crochet version of this garment, that's why I would like to have the dimension (in inches or centimetres) to try it in crochet. Thanks a lot :)
22.09.2015 - 13:18DROPS Design ha risposto:
Dear Sylvie, we are unfortunately not able to answer each individual request but for any further individual assistance you are welcome to contact your DROPS store. Happy knitting!
02.03.2016 - 10:06
 Febe ha scritto:
I diagrammet är blank ruta beskrivet fel. Om det är ett klipp/klistra-fel.
24.08.2015 - 12:31
 Veronique31 ha scritto:
Bonjour, Merci beaucoup, le graphique A2 porte à confusion..mais vos explications éclaire...!
14.08.2015 - 10:13
|
|||||||||||||||||||
Infinity#infinityshoulderpiece |
|||||||||||||||||||
 |
 |
||||||||||||||||||
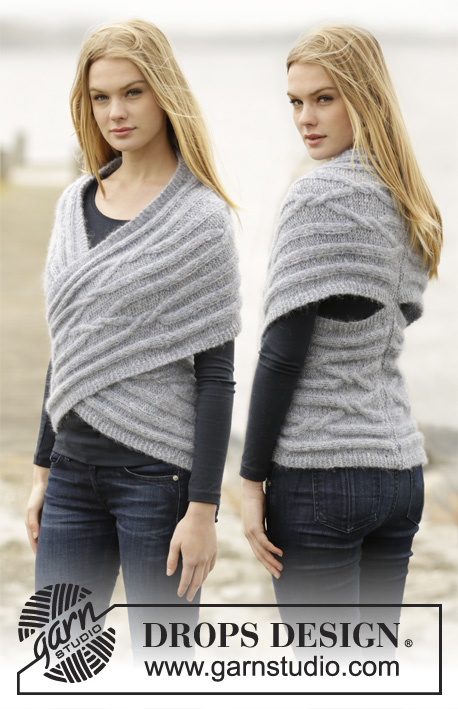
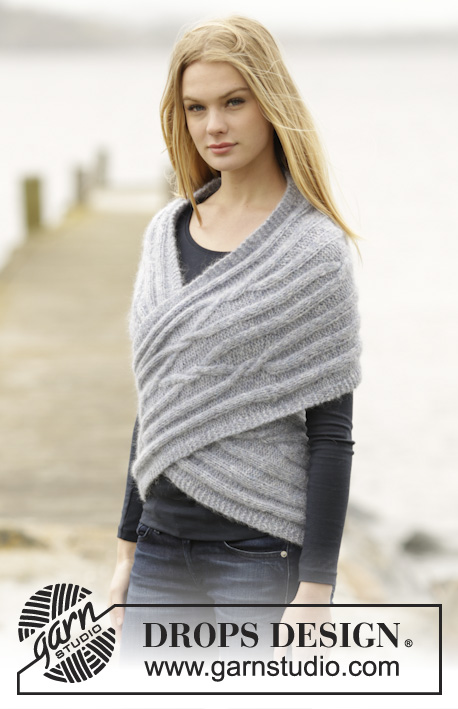
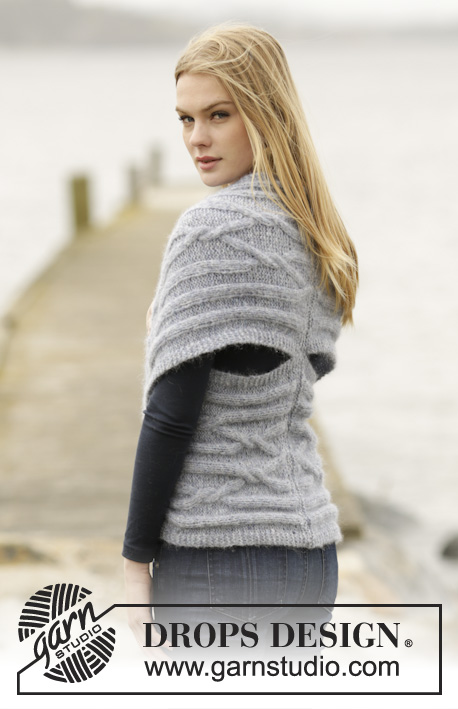
Copri spalle DROPS ai ferri, con trecce e a ferri accorciati, in "Air". Taglie: Dalla XS alla XXXL.
DROPS 165-47 |
|||||||||||||||||||
|
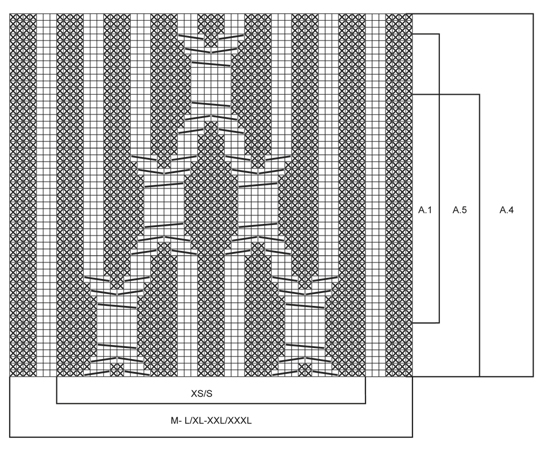
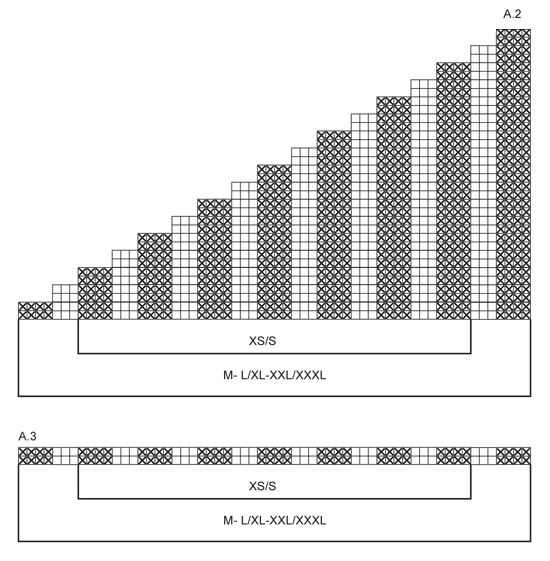
PUNTO LEGACCIO (avanti e indietro sui ferri): Lavorare tutti i ferri a dir. 1 “costa” a legaccio = 2 ferri a dir. MOTIVO: Vedere i diagrammi da A.1 a A.6. I diagrammi mostrano tutti i ferri del motivo, visti sul diritto del lavoro. ---------------------------------------------------------- COPRI SPALLE: Si lavora in due parti cucite tra loro al centro, sul dietro. LATO DESTRO: Si lavora iniziando dal centro dello scollo sul dietro, poi intorno al davanti, per finire al centro, nella parte inferiore del dietro. Avviare 46-60-60-60 m sui ferri n° 5 con il filato Air. Lavorare 2 coste a PUNTO LEGACCIO - vedere le spiegazioni sopra; nel corso dell’ultimo ferro, aumentare 8 m in modo uniforme = 54-68-68-68 m. Proseguire come segue, sul diritto del lavoro: 4 m a punto legaccio, diagramma A.1 (= 46-60-60-60 m) e 4 m a punto legaccio. RICORDARSI LA TENSIONE DEL LAVORO! Dopo aver lavorato il diagramma A.1 una volta in verticale, lavorare il diagramma A.3 per 0-0-4-8 cm. Proseguire a ferri accorciati, come segue: 4 m a punto legaccio, diagramma A.2 e 4 m a punto legaccio. Lavorare il diagramma A.2 come segue: Lavorare i primi 2 ferri, poi lavorare il ferro successivo sul diritto del lavoro ma girare quando rimangono 8 m (le ultime 4 m del diagramma A.2 + le 4 m a punto legaccio), stringere il filo e lavorare il ferro di ritorno. Lavorare il 5° ferro del diagramma A.2, ma girare quando rimangono 11 m sul ferro, stringere il filo e lavorare il ferro di ritorno. Proseguire in questo modo finché non sono stati lavorati 2 ferri solo sulle prime 8 m (le 4 m a punto legaccio + le prime 4 m del diagramma A.2). Lavorare il diagramma A.3 su tutte le m per 1-1-4-8 cm. Proseguire come segue sul diritto del lavoro: 4 m a punto legaccio, diagramma A.4 e 4 m a punto legaccio. Lavorare il diagramma A.4 1-2-2-2 volte in verticale; l’ultima volta fermarsi quando rimangono da lavorare 2 ferri del diagramma A.4. Lavorare il diagramma A.3 per 0-0-4-8 cm. Proseguire come segue: 4 m a punto legaccio, diagramma A.2, 4 m a punto legaccio (lavorare il diagramma A.2 a ferri accorciati come l’ultima volta). Dopo aver lavorato il diagramma A.2 una volta in verticale, lavorare il diagramma A.3 per 1-1-4-8 cm. Proseguire come segue: 4 m a punto legaccio, diagramma A.5 e 4 m a punto legaccio. Dopo aver lavorato il diagramma A.5 una volta in verticale, lavorare 2 coste a legaccio; allo stesso tempo, nel corso del primo ferro, diminuire 8 m in modo uniforme = 46-60-60-60 m. Intrecciare le m. LATO SINISTRO: Avviare le m e lavorare come indicato per il lato destro, ma lavorare il diagramma A.6 al posto del diagramma A.2 in modo che i ferri accorciati siano sul lato opposto. ATTENZIONE: Lavorare 1 ferro sul rovescio del lavoro su tutte le m dopo il diagramma A.6 prima di lavorare il diagramma A.3. CONFEZIONE: Cucire il bordo di avvio del lato destro al bordo di avvio del lato sinistro, incrociare le due parti e cucire tra loro i bordi di chiusura delle m. Fare un piccolo punto sul dietro, in modo che le due parti siano unite tra loro. |
|||||||||||||||||||
Spiegazioni del diagramma |
|||||||||||||||||||
|
|||||||||||||||||||
 |
|||||||||||||||||||
 |
|||||||||||||||||||
 |
|||||||||||||||||||
Avete terminato questo modello?Allora taggate le vostre foto con #dropspattern #infinityshoulderpiece o inviatele alla #dropsfan gallery. Avete bisogno di aiuto con questo modello?Troverete 5 video tutorial, una sezione per i commenti/domande e molto altro guardando il modello su www.garnstudio.com © 1982-2026 DROPS Design A/S. Ci riserviamo tutti i diritti. Questo documento, compreso tutte le sue sotto-sezioni, è protetto dalle leggi sul copyright. Potete leggere quello che potete fare con i nostri modelli alla fine di ogni modello sul nostro sito. |
|||||||||||||||||||






Con oltre 40 anni di esperienza nel design di modelli di maglia e uncinetto, DROPS Design offre la più estesa collezione di modelli gratuiti su internet - tradotti in 17 lingue. Ad oggi vi possiamo fornire 333 cataloghi e 12532 modelli - 9806 dei quali sono tradotti in Italiano.
Ci stiamo impegnando molto per darvi il meglio che vi possiamo offrire in termini di maglia e uncinetto, ispirazioni e consigli così come filati di grande qualità ad un prezzo incredibile! Volete utilizzare i nostri modelli per qualcosa d'altro oltre al vostro uso personale? Potete leggere tutto ciò che è consentito nel testo sul Copyright in basso su tutte le pagine dei nostri modelli. Buon lavoro!
Lasciare un commento sul modello DROPS 165-47
Noi saremmo felici di ricevere i tuoi commenti e opinioni su questo modello!
Se vuoi fare una domanda, fai per favore attenzione a selezionare la categoria corretta nella casella qui sotto per velocizzare il processo di risposta. I campi richiesti sono indicati da *.