
Categorie popolari
State cercando un filato?


Commenti / Domande (77)
![]() Vania ha scritto:
Vania ha scritto:
Hi jacket coming along nicely ☺️I was curious why for left front piece there is no decrease after you knit 8 3/4 length and there is a decrease evenly on right side?
26.07.2018 - 02:51DROPS Design ha risposto:
Dear Vania, when piece measures 8 3/4" you cast on 2 new sts on each side on back piece and only on one side (towards back piece) on each front piece. I may misunderstand your meaning seing no decrease at 8 3/4". Happy knitting!
26.07.2018 - 10:12
![]() V Wengel ha scritto:
V Wengel ha scritto:
When it says bind off 3 st one time, 2 st one time and 1 stitch 1 time, do you bind off 3 at the beginning of the RS after I slipped the stitches on holder then at the beginning of the ws row bind off 2 one time then on RS row bind off 1 st 1 time and then repeat until there are 30stitcnes?
06.07.2018 - 03:24DROPS Design ha risposto:
Deear Mrs Wengel, these sts are bound off for neck: work 1 row from RS (right front piece) slipping the first 14 sts on a st holder, then work row to the end, turn and work row from WS. At the beg of next row from RS bind off 3 sts, work row to the end, turn and work next row from WS. At the beg of next row from RS bind off 2 sts, and so on. i.e. you will bind off the sts for neck at the beg of each row from RS (towards neck) on right front piece (= at the beg of each row from WS for the left front piece). Happy knitting!
06.07.2018 - 08:27
![]() V Wengel ha scritto:
V Wengel ha scritto:
I’m finishing up the right front piece. I’m on RS. Do I slip the14 st into my holder or do I knit the 14 in pattern then put them on a holder? Thank you 🌷
04.07.2018 - 20:23DROPS Design ha risposto:
Dear Mrs Wengel, to avoid cutting the yarn, work these 14 sts first at the beg of the round and slip them on a st holder, then continue row as before. Happy knitting!
05.07.2018 - 07:34
![]() Vania ha scritto:
Vania ha scritto:
On right front piece, I did first row perfect, when doing ribbing on wrong side do I start with p1, *k2p1* in order for the ribbing to come out proper? Thank you
13.06.2018 - 16:35DROPS Design ha risposto:
Dear Vania, read diagram from the left towards the right from RS and work ribbing K over K and P over P, ie, the P2/K1 from RS will be worked P1/K2 from RS. Happy knitting!
14.06.2018 - 08:20
![]() Vania ha scritto:
Vania ha scritto:
Thank you very much. I wrote out exactly all 4 rows and I couldn’t fit it in this comment box . If row 1 is correct I can do row 1 first and then go from there. Let’s clarify row 1. 1 garter,yo purlwise,A3,knit 2 together,stockinette, slip knit wise, knit one,pass over stitch, yo knitwise, 1 garter?
23.05.2018 - 14:41DROPS Design ha risposto:
Dear Vania, you increase twice on row 1 with a YO and work this YO on row 2 as first st in A.1 (= P from WS), on row 2 you will work the first st in A.4 = K from RS. On row 3 you will work the new st as 1st st in A.4 (= P from RS) and on row 4 you will work this st P from WS. On row 5 you will inc one more st on each side and this st will be worked as 2nd st in A.4 (= K from RS and P from WS) and increase again 4 rows higher and these new sts will be now worked as the 1st st in A.4 (= new repeat of A.4), on next increase row you will work the 4th increase st as 2nd st in A.4 and so on. Happy knitting!
23.05.2018 - 14:55
![]() Vania ha scritto:
Vania ha scritto:
On row 3 are the one yo’s on Each side worked as purl.? Then when I get 2 or more yo’s on the sides do I work chart a 4 like this: 1 garter st, purl 1, k1,A3,stockinette,a3,k1 purl 1, 1garter st? I’m just thinking it will look the same. I’m just having trouble how A4 is worked on both sides. thank you 😊 hopefully I will have no more questions for a while
23.05.2018 - 00:59DROPS Design ha risposto:
Dear Vania, oops I think I was wrong yesterday, the first increase will be worked as the first st in A.4 = K from WS (= twisted to avoid a hole). The 2nd increase will be worked as the 2nd st in A.4, ie on row 3 you will K the first st in A.4, YO (= increase) and on row 4 you will work the YO as the 2nd st in A.4 (= P from WS ) and P the first st in A.4 (from WS read diagram from the left towards the right). Next increase will be worked as 1st st in A.4 and next increase will be worked as the 2nd st in A.4 and so on. Happy knitting!
23.05.2018 - 08:33
![]() Vania ha scritto:
Vania ha scritto:
So you said the increased stitches are worked In a4. So I’m assuming the first and all displacements are worked like this, 1 garter stitch, yo purlwise, work next 9 stitches of chart a3, knit 2 tog, knit until 2 stitches before and slip stitch knit wise, knit next stitch, pass over slipped stitch, a3, then yo knitwise as in chart a4. I really like this pattern 🌺
19.05.2018 - 11:37DROPS Design ha risposto:
Dear Vania, correct on first row from WS after first displacement row, then continue increasing inside the edge st and work A.4 as in diagram. Happy knitting!
22.05.2018 - 10:22
![]() Vania ha scritto:
Vania ha scritto:
So I’m repeating displacement every 4 rows? If I start a displacement on a right side, the 4th lands on a wrong side, do I do the displacement on the 5th row which is a right side? Thank you 🌷
18.05.2018 - 13:47DROPS Design ha risposto:
Dear Vania, that's right, you work 3 rows after first displacement and displace patterns on next row (= 4th row). Happy knitting!
18.05.2018 - 15:27
![]() Vania ha scritto:
Vania ha scritto:
In sigrid jacket do I start displacement on right side row? Also, if displacement is done on every 4 th row (17 times) that would land on a wrong side row. And it states all decreases done on RS. The jacket is looking great so far 🌻
18.05.2018 - 12:46DROPS Design ha risposto:
Dear Vania, displacement will be worked from RS, ie on a RS row increase 1 st before A.3 and dec 1 st after A.3 at the beg of row and dec 1 st before last A.3 and inc 1 st after last A.3 at the end of row. The new sts increased will be then worked in A.4 see INCREASE-TIP. Happy knitting!
18.05.2018 - 13:32
![]() Vania ha scritto:
Vania ha scritto:
Hi, I have added on the two stitches at the end and have 84:stitches. I was continuing on doing 1 garter stitch, A9 and then stockinette. I have been following the rules of the chart. What am I doing wrong? The pattern on the end sides looks like it is the opposite. I have pictures but not sure how to submit them. Thank you 😊
16.05.2018 - 00:16DROPS Design ha risposto:
Dear Vania, when you have the 84 sts (first size), work next row from RS as follows: 1 edge st in garter st, A.3 (= 9 sts) then stockinette st until A.2, work A.3 over A.2 and next to last st and finish with 1 edge st in garter st. Happy knitting!
16.05.2018 - 09:34
|
|||||||
Sigrid Jacket#sigridjacket |
|||||||
|
|
|||||||
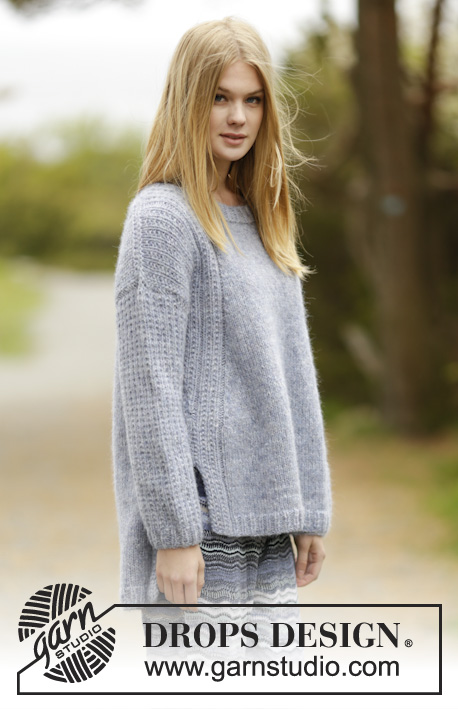
Cardigan DROPS lavorato ai ferri con falso raglan, spacco e motivo a punto fantasia sulle spalle e maniche in ”Air”. Taglie: S - XXXL.
DROPS 166-11 |
|||||||
|
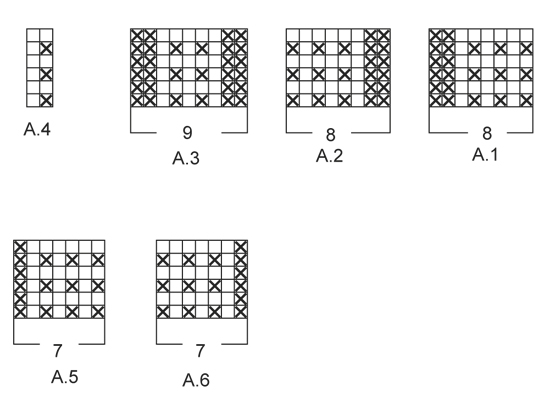
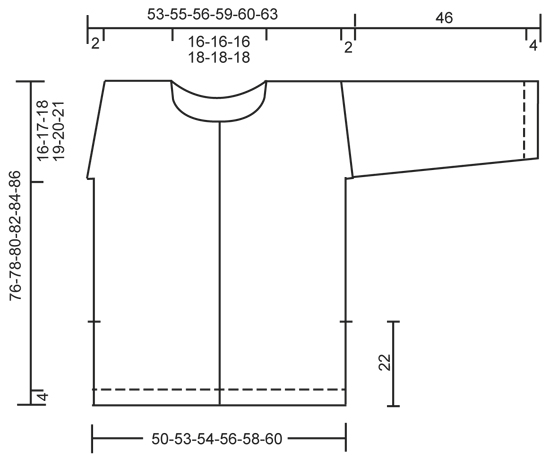
M LEGACCIO (avanti e indietro): Lavorare tutti i f a dir. 1 “costa” a m legaccio = 2 f dir. MOTIVO: Vedere i diagrammi A.1-A.6. I diagrammi mostrano tutti i f del motivo visti dal diritto del lavoro. SUGGERIMENTO PER GLI AUMENTI: Aumentare 1 m facendo 1 gettato. Sul f successivo lavorare i gettati a ritorto, cioè lavorarli nel filo dietro della m invece di quello davanti per evitare buchi. NOTA: Lavorare gli aumenti in modo graduale con il diagramma A.4. SUGGERIMENTO PER LE DIMINUZIONI: Diminuire 1 m come segue: tutte le diminuzioni vengono fatte dal diritto del lavoro! Diminuire come segue dopo A.3: lavorare 2 m insieme a dir. Diminuire come segue prima di A.3: lavorare fino a quando rimangono 2 m prima di A.3, passare 1 m a dir senza lavorarla, 1m dir, accavallare la m passata sopra quella appena lavorata. ASOLE: Diminuire per le asole sul bordo destro. 1 asola = lavorare insieme a dir la 3° e la 4° m dal bordo e fare 1 gettato. Diminuire per le asole quando il lavoro misura: TAGLIA S: 25, 33, 41, 49, 57 e 65 cm. TAGLIA M: 25, 33, 42, 50, 59 e 67 cm. TAGLIA L: 27, 35, 44, 52, 61 e 69 cm. TAGLIA XL: 28, 37, 45, 54, 62 e 71 cm. TAGLIA XXL: 28, 37, 46, 55, 64 e 73 cm. TAGLIA XXXL: 30, 39, 48, 57, 66 e 75 cm. ---------------------------------------------------------- CARDIGAN: Lavorato avanti e indietro sui f circolari e cucito alla fine. DIETRO: Avviare 95-98-101-107-113-116 m con i f circolari n° 5 mm con Air. Lavorare a coste come segue: A.1 (= 8 m), 1 m dir, * 2 m rov, 1 m dir *, ripetere *-* fino a quando rimangono 8 m sul f, A.2 (= 8 m). Continuare in questo modo avanti e indietro fino a quando il lavoro misura 4 cm. Sul f successivo dal diritto del lavoro, passare ai f circolari n° 5,5 mm e lavorare come segue: A.1, m rasata sulle 79-82-85-91-97-100 m successive, ALLO STESSO TEMPO distribuire 15-14-15-17-21-20 diminuzioni in modo uniforme, A.2 = 80-84-86-90-92-96 m sui f in totale. Continuare a m rasata, lavorare A.1 e A.2 a ogni lato come prima fino a quando il lavoro misura 22 cm per tutte le taglie. FARE ATTENZIONE ALLA TENSIONE DEL LAVORO! Alla fine dei 2 f successivi avviare 2 nuove m (indicano lo spacco) = 84-88-90-94-96-100 m. Ora lavorare come segue: 1m di vivagno a M LEGACCIO – leggere la spiegazione sopra, A.3 (= 9 m) m rasata fino a A.2, lavorare A.3 su A.2 e la penultima m e finire con 1 m di vivagno a m legaccio. Quando il lavoro misura 26-24-24-23-23-23 cm, iniziare lo spostamento di A.3 verso il centro dietro. Lavorare 1 m di vivagno a m legaccio, aumentare 1 m – LEGGERE IL SUGGERIMENTO PER GLI AUMENTI, A.3, diminuire 1 m – LEGGERE IL SUGGERIMENTO PER LE DIMINUZIONI, m rasata fino a quando rimangono 2 m prima di A.3, diminuire 1 m, A.3, aumentare 1 m, 1 m di vivagno a m legaccio. Ripetere lo spostamento di A.3 ogni 4 f altre 17-19-20-21-22-24 volte. NOTA: Gli aumenti sono sempre all’interno prima della m di vivagno a ogni lato. ALLO STESSO TEMPO quando il lavoro misura 60-61-62-63-64-65 cm, avviare 1 nuova m alla fine dei 2 f successivi per gli scalfi = 86-90-92-96-98-102 m. Ora continuare il motivo come prima all’interno della m di vivagno a m legaccio e della m a m rasata a ogni lato. Lavorare le 82-86-88-92-94-98 m centrali con il motivo come prima. Quando il lavoro misura 74-76-78-80-82-84 cm, intrecciare le 24-24-24-26-26-26 m centrali per il collo e finire ogni spalla in modo separato. Sul f successivo dal collo, intrecciare 1 m = 30-32-33-34-35-37 m rimaste su ogni spalla. Quando il lavoro misura 76-78-80-82-84-86 cm, lavorare 1 “costa” su tutte le m. Intrecciare. Lavorare l’altra spalla nello stesso modo. DAVANTI DESTRO: Avviare 55-55-58-61-64-64 m con i f circolari n° 5 mm con Air. Lavorare a coste come segue: A.5 (= bordo, 1 m dir, * 2 m rov, 1 m dir *, ripetere *-* fino a quando rimangono 8 m, A.2. Continuare in questo modo avanti e indietro fino a quando il lavoro misura 4 cm. Sul f successivo dal diritto del lavoro passare ai f circolari n° 5,5 mm e lavorare come segue: A.5 (= 7 m), m rasata fino a quando rimangono 8 m, ALLO STESSO TEMPO distribuire 8-6-8-9-11-9 diminuzioni in modo uniforme su queste m, A.2 = 47-49-50-52-53-55 m. Continuare a m rasata, lavorare A.5 sul bordo e A.2 a lato come prima fino a quando il lavoro misura 22 cm. Ora avviare 2 nuove m a lato (= indicano lo spacco) = 49-51-52-54-55-57 m. RICORDARSI DELLE ASOLE! Ora lavorare A.3 su A.2 e la penultima m sul f e lavorare 1 m di vivagno a m legaccio a lato. Quando il lavoro misura 26-24-24-23-23-23 cm, iniziare lo spostamento di A.3 verso il centro davanti. Diminuire 1 m prima di A.3 e aumentare 1 m prima dell’ultima m sul f. Ripetere lo spostamento di A.3 ogni 4 f altre 17-19-20-21-22-24 volte. NOTA: l’aumento è sempre all’interno della m di vivagno a m legaccio a lato. ALLO STESSO TEMPO quando il lavoro misura 60-61-62-63-64-65 cm, avviare 1 nuova m alla fine del f successivo dal diritto del lavoro per lo scalfo = 50-52-53-55-56-58 m. Continuare il motivo come prima con 1 m di vivagno a m legaccio e 1 m a m rasata a lato. Quando il lavoro misura 64-66-68-69-71-73 cm, trasferire le prime 14-14-14-15-15-15 m su un fermamaglie per il collo. Poi intrecciare su ogni f dal collo come segue: 3 m 1 volta, 2 m 1 volta e 1 m 1 volta = 30-32-33-34-35-37 m rimaste per la spalla. Lavorare la m di vivagno verso il collo a m legaccio. Quando il lavoro misura 76-78-80-82-84-86 cm, lavorare 1 costa su tutte le m. Intrecciare. DAVANTI SINISTRO: Avviare e lavorare come sul davanti destro ma a specchio. Cioè lavorare come segue sul 1° f: A.1, 1 m dir, * 2 m rov, 1 m dir *, ripetere *-* fino a quando rimangono 7 m, A.6 (= bordo). Quando il lavoro misura 22 cm, avviare 2 nuove m a lato (indica lo spacco). Ora lavorare A.3 sulla 2° m sul f e A.1. Quando il lavoro misura 26-24-24-23-23-23 cm, iniziare lo spostamento di A.3 verso il centro davanti. Aumentare 1 m dopo la m di vivagno a m legaccio a lato e diminuire 1 m dopo A.3. Continuare lo spostamento nello stesso modo del davanti destro e ALLO STESSO TEMPO avviare 1 nuova m per lo scalfo e diminuire per il collo – aggiustarlo secondo il davanti destro. Quando il lavoro misura 64-66-68-69-74-73 cm, trasferire le prime 14-14-14-15-15-15 m viste dal rovescio del lavoro su un fermamaglie per il collo. Poi intrecciare le m su ogni f dal collo come segue: 3 m 1 volta, 2 m 1 volta e 1 m 1 volta = 30-32-33-34-35-37 m. Lavorare la m di vivagno verso il collo a m legaccio. Quando il lavoro misura 76-78-80-82-84-86 cm, lavorare 1 coste su tutte le m. Intrecciare. MANICA: Lavorata avanti e indietro sui f circolari. Avviare 39-41-43-43-43-45 m con i f circolari n° 5 mm con Air. Lavorare a coste come segue: 1 m di vivagno a m legaccio, 1 m dir, * 1 m rov, 1 m dir *, ripetere *-* fino a quando rimane 1 m, 1 m di vivagno a m legaccio. Quando le coste misurano 4 cm, passare ai f circolari n° 5,5 mm e continuare il motivo come segue: 1 m di vivagno a m legaccio, lavorare l’ultima m di A.4, ripetere A.4 fino a quando rimane 1 m, 1 m di vivagno a m legaccio. Quando il lavoro misura 10 cm, aumentare 1 m all’interno della m di vivagno a m legaccio a ogni lato. Lavorare gli aumenti con il motivo A.4. Ripetere gli aumenti ogni 5½-4½-4½-3½-3-3 cm altre 6-7-7-9-11-11 volte = 53-57-59-63-67-69 m. Quando la manica misura 46 cm per tutte le taglie, lavorare l’arrotondamento della manica a f accorciati come segue dal diritto del lavoro: lavorare fino a quando rimangono 8-9-9-10-11-12 m, girare e lavorare fino a quando rimangono 8-9-9-10-11-12 m, girare e lavorare fino a quando rimangono 17-19-19-21-22-23 m, girare e lavorare fino a quando rimangono 17-19-19-21-22-23 m. Girare e lavorare tutte le m sul f, girare e lavorare su tutte le m. Intrecciare a dir dal diritto del lavoro. Lavorare un’altra manica. CONFEZIONE: Cucire i margini delle spalle. Cucire le maniche al corpo all’interno della m di vivagno a m legaccio. Cucire sotto le braccia e i margini dei lati all’interno della m di vivagno a m legaccio ma lasciare 22 cm per lo spacco sulla parte inferiore del corpo. Attaccare i bottoni sul bordo sinistro. BORDO DEL COLLO: Iniziare dal diritto del lavoro sul davanti destro e riprendere circa 120-130 m (comprese le m sui fermamaglie sul davanti). Lavorare 1 giro dir dal rovescio del lavoro e allo stesso tempo aggiustare il n° di m a 90-90-90-96-96-96 – ma non sulle m del bordo, lavorarle come prima. Poi lavorare a coste (= 1 m dir/2 m rov) all’interno delle m del bordo a ogni lato, finire con 1 m dir prima dell’ultimo bordo. Quando le coste misurano 3 cm, intrecciare con dir su dir e rov su rov. |
|||||||
Spiegazioni del diagramma |
|||||||
|
|||||||
 |
|||||||
 |
|||||||
Avete terminato questo modello?Allora taggate le vostre foto con #dropspattern #sigridjacket o inviatele alla #dropsfan gallery. Avete bisogno di aiuto con questo modello?Troverete 24 video tutorial, una sezione per i commenti/domande e molto altro guardando il modello su www.garnstudio.com © 1982-2026 DROPS Design A/S. Ci riserviamo tutti i diritti. Questo documento, compreso tutte le sue sotto-sezioni, è protetto dalle leggi sul copyright. Potete leggere quello che potete fare con i nostri modelli alla fine di ogni modello sul nostro sito. |
|||||||


Con oltre 40 anni di esperienza nel design di modelli di maglia e uncinetto, DROPS Design offre la più estesa collezione di modelli gratuiti su internet - tradotti in 17 lingue. Ad oggi vi possiamo fornire 324 cataloghi e 12290 modelli - 9561 dei quali sono tradotti in Italiano.
Ci stiamo impegnando molto per darvi il meglio che vi possiamo offrire in termini di maglia e uncinetto, ispirazioni e consigli così come filati di grande qualità ad un prezzo incredibile! Volete utilizzare i nostri modelli per qualcosa d'altro oltre al vostro uso personale? Potete leggere tutto ciò che è consentito nel testo sul Copyright in basso su tutte le pagine dei nostri modelli. Buon lavoro!
Lasciare un commento sul modello DROPS 166-11
Noi saremmo felici di ricevere i tuoi commenti e opinioni su questo modello!
Se vuoi fare una domanda, fai per favore attenzione a selezionare la categoria corretta nella casella qui sotto per velocizzare il processo di risposta. I campi richiesti sono indicati da *.