
Categorie popolari
State cercando un filato?


Commenti / Domande (24)
![]() Louise ha scritto:
Louise ha scritto:
I am 5'7" tall and will need to knit the skirt longer without making it wider. Where should I add the rows, of which pattern, and how many? For size XL, how many more 50g balls will be needed? Thank you for answering my question online, as there is no store available to me.
02.02.2017 - 06:53DROPS Design ha risposto:
Dear Louise, we are unfortunately not able to adjust each pattern to each individual request, but feel free to contact your DROPS store in/to US (see list and telephone/email here for any individual assistance. Happy crocheting!
02.02.2017 - 10:13
![]() Wieke Hoogland ha scritto:
Wieke Hoogland ha scritto:
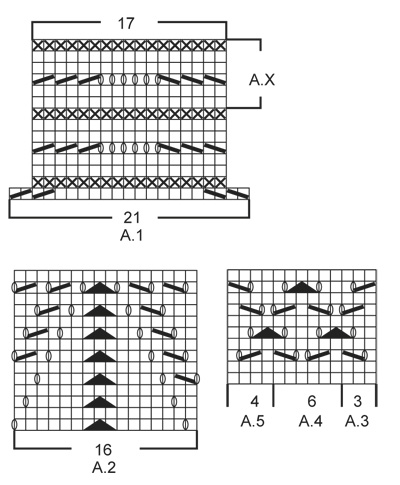
Ik heb het idee dat teltekening A3,A4,A5 niet klopt. Moet erbij zeggen dat ik niet rondbrei maar met twee rondbreinaalden, dan krijg je één naad. Volgens beschrijving moet je eerst A3 en A4 breien en op het einde A5. Maar ik denk dat je gewoon A3,A4,A5 achter elkaar moet breien. De laatste patroonpen klopt ook niet. De twee tezamen aan het begin van het patroon en de overhaling aan het einde moeten samengebreid worden. (één afhalen, twee tezamen, afgehaalde steek over de twee tezamen)
28.11.2016 - 15:40DROPS Design ha risposto:
Hoi Wieke. Ja, dat is ook wat er staat; Brei nu in patroon als volgt: A.3 (= 3 st), A.4 (= 6 st) tot er 4 st over zijn op de nld, A.5 (= 4 st). Let op dat in nld 5 zal de overgang tussen A.3/A.4 aan begin en van A.4/A.5 aan het eind overlappen. Ik zie ook niet dat de laatste nld verkeerd zou moeten zijn. Je hebt 2 r samen aan het begin en je moet eindigen met 1 r afh, 1 r overhalen.
28.11.2016 - 16:52Sophia ha scritto:
I start skirt again with 63st less.do you think it will be ok or now it will be small?
29.12.2015 - 10:36DROPS Design ha risposto:
Dear Sophia, for any individual assistance, you are welcome to contact the store where you bought your yarn. They will help you with tips & advices. Happy knitting!
02.01.2016 - 15:13Sophia ha scritto:
I start to knit size s ,i follow all the directions but i think is very big. How can i make the write size? Thank you.
29.12.2015 - 10:16DROPS Design ha risposto:
Dear Sophia, remember to check and keep correct gauge, ie 21 sts x 28 rows in stocking st = 10 x 10 cm. You then match the measurement in chart at the end of the pattern. Happy knitting!
02.01.2016 - 15:12Sophia ha scritto:
To pattern a1 say k2 tog then knit and then slip 1 st as if to k,k1 psso.is it write? Because the video is k2tog then knit and then k2tog again. Thank you.
23.11.2015 - 14:35DROPS Design ha risposto:
Dear Sofia, work 1st row in A.1 as follows: k2 tog, K2 tog, K17, (slip 1 as if to K, K1, psso) x 2. Then work K2 tog 3 times at the beg of repetition and (slip 1 as if to K, K1, psso) 3 times at the end of repeat, as in diagram. Video to wave pattern shows the technic, there may be some difference with patterns. Happy knitting!
24.11.2015 - 09:02
![]() VERONIQUE ha scritto:
VERONIQUE ha scritto:
Magnifique , j'ai réalisé ce modèle en noir et je suis enchantée du résultat , pensez à doubler la jupe pour un meilleur rendu. Bon tricot
15.11.2015 - 11:11
![]() Christina Füller ha scritto:
Christina Füller ha scritto:
S.O.S. :) Ich verstehe den Ablauf von A3/4/5 nicht. Laut Anleitung mit A3 beginnen, aber dann beginne ich doch in Reihe 3 des Musters mitten in einer zusammengestrickten Masche?! Die Anleitung ist super und sonst super klar und nachvollziehbar. Aber an der Stelle... ? Freue mich auf einen Tipp.
12.11.2015 - 10:05DROPS Design ha risposto:
Betrachten Sie die Muster als zusammengehörig. A.3 zeigt den Anfang und A.5 das Ende des Musters, d.h. Sie beginnen und beenden die R mit 2 M re und stricken dazwischen das Muster wie gezeigt (also die 3 zusammengestrickten M mit den Umschlägen davor und danach und dazwischen jeweils 3 M re).
19.11.2015 - 10:17
![]() Frieda ha scritto:
Frieda ha scritto:
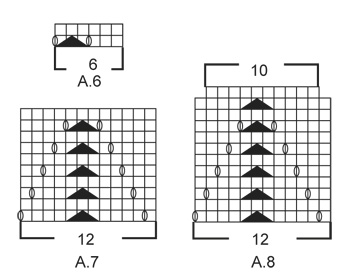
En t schema is ook niet 7 steken opgeschoven op de foto. Doe je dat wel dan blijven de golven veel mooier
21.10.2015 - 17:37
![]() Frieda ha scritto:
Frieda ha scritto:
Schema A2 ziet er anders uit dan de voorbeeldfoto. Volgens mij begint het met enkele toeren recht en dan schema. En in laatste toer lijkt het of er op foto 3 steken tussen de extra gaatjes zitten. In schema is dat er 1. Maakt voor uitvoering niet zoveel uit maar t is net iets anders :)
21.10.2015 - 17:32DROPS Design ha risposto:
Hoi Frieda. Na het breien van A.X brei je ook 3 nld tricotsteken waarin je mindert in de laatste nld, hierna begin je met A.2. Dit is het stukje tricotsteek je ziet op de voorbeeldfoto. In de laatste toer heb je maar 1 st in het midden, ook lijkt het zo op de foto.
23.10.2015 - 13:16
![]() Mariann Skog ha scritto:
Mariann Skog ha scritto:
Hvordan strikker jeg mønsterrapport A.3 , A.4 til det er 4 masker igjen på omgang før jeg skal strikke A.5 ? På omgang 5 vil mønsteret bli delt?
13.10.2015 - 20:07DROPS Design ha risposto:
Hej Mariann, Jo på 5.pind strikker du 3ret imellem hver mønster med kast og indtagning, hele pinden ud. God fornøjelse!
16.10.2015 - 15:45
|
|||||||||||||||||||
Madison#madisonskirt |
|||||||||||||||||||
 |
 |
||||||||||||||||||
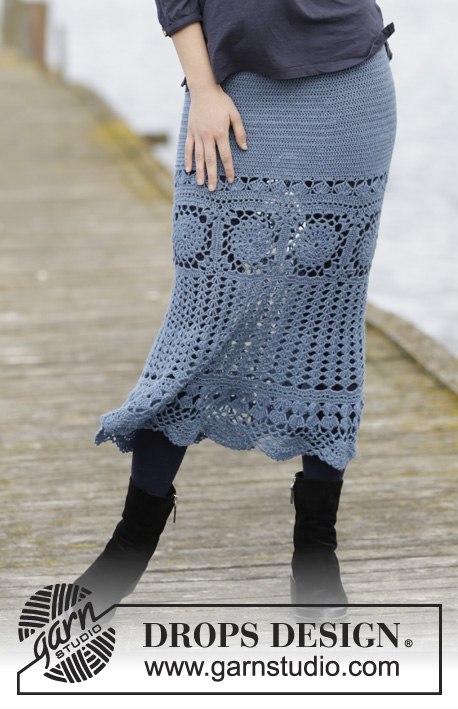
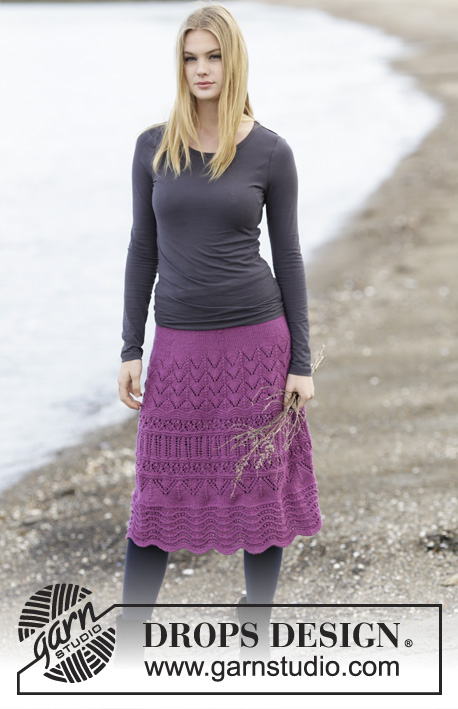
Gonna DROPS lavorata ai ferri con motivo traforato in ”Cotton Merino”. Taglie: S - XXXL.
DROPS 164-18 |
|||||||||||||||||||
|
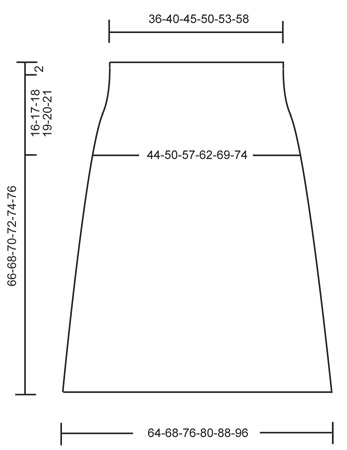
M LEGACCIO (lavorato in tondo): * 1 giro dir e 1 giro rov *, ripetere *-*. 1 “costa” a m legaccio = 2 giri. MOTIVO: Vedere i diagrammi A.1-A.8. SUGGERIMENTO PER LE DIMINUZIONI 1: Quando si diminuisce in una costa, diminuire sempre su un giro a dir. Diminuire 1 m lavorando 2 m insieme a dir. SUGGERIMENTO PER LE DIMINUZIONI 2: Diminuire come segue prima del segnapunti: lavorare fino a quando rimangono 2 m prima del segnapunti, 2 m insieme a dir. Diminuire come segue dopo il segnapunti: passare 1 m a dir senza lavorarla, 1 m dir, accavallare la m passata sopra quella appena lavorata. ---------------------------------------------------------- GONNA: Lavorata in tondo con i f circolari dal basso verso l’alto. Avviare 336-357-399-420-462-504 m con i f circolari n° 4 mm con Cotton Merino. Lavorare 1 costa a M LEGACCIO – leggere la spiegazione sopra. Poi lavorare A.1 (= 21 m) 16-17-19-20-22-24 volte in larghezza. Quando A.1 è stato lavorato 1 volta in verticale, ci sono 272-289-323-340-374-408 m sul giro. Ripetere A.X altre 4 volte in verticale per tutte le taglie. FARE ATTENZIONE ALLA TENSIONE DEL LAVORO! Ora lavorare 2 giri a m rasata, sull’ultimo giro diminuire come segue: * 2 m insieme a dir, lavorare a m rasata sulle 15 m successive *, ripetere *-* altre 15-16-18-19-21-23 volte = 256-272-304-320-352-384 m. Lavorare 7 m a m rasata - NOTA: ORA IL GIRO INIZIA QUI. Continuare con A.2 (= 16 m) 16-17-19-20-22-24 volte in larghezza. Il lavoro misura circa 17 cm. Lavorare 2 coste e ALLO STESSO TEMPO distribuire 3-1-3-1-3-5 diminuzioni in modo uniforme – LEGGERE IL SUGGERIMENTO PER LE DIMINUZIONI 1 = 253-271-301-319-349-379 m. Ora lavorare il motivo come segue: A.3 (= 3 m), A.4 (= 6 m) fino a quando rimangono 4 m sul giro, A.5 (= 4 m). Quando A.3-A.5 sono stati lavorati, lavorare 2 coste e ALLO STESSO TEMPO diminuire 1 m in tutte le taglie = 252-270-300-318-348-378 m. Lavorare 1 giro a m rasata, poi lavorare A.6 (= 6 m) su tutte le m sul giro. Quando A.6 è stato lavorato 7-8-10-11-13-14 volte in verticale, il lavoro misura circa 27-28-29-30-31-32 cm. Ora lavorare 2 coste e ALLO STESSO TEMPO distribuire 23-17-11-5-5-5 diminuzioni in modo uniforme = 229-253-289-313-343-373 m. Poi lavorare il motivo come segue: A.3 (= 3 m), A.4 fino a quando rimangono 4 m, A.5 (= 4 m). Quando sono stati lavorati A.3-A.5 in verticale, continuare con 4 coste. Lavorare 1 giro a m rasata e ALLO STESSO TEMPO aggiustare il n° di m a 228-252-288-312-348-372. Lavorare 2 giri a m rasata. Poi continuare con A.7 (= 12 m) su tutte le m sul giro. Ripetere A.7 2 volte in verticale, poi lavorare A.8 su ogni ripetizione con A.7. Alla fine di A.8, rimangono 190-210-240-260-290-310 m sul giro. Continuare a m rasata. Sul giro successivo, distribuire 3-0-3-2-3-2 diminuzioni in modo uniforme = 187-210-237-258-287-308 m. Ora inserire 6 segnapunti nel lavoro come segue: lavorare 16-18-21-21-26-26 m, inserire un segnapunti, poi inserire 5 segnapunti a 31-35-39-43-47-51 m di distanza. Rimangono 16-17-21-22-26-27 m dopo l’ultimo segnapunti. Sul giro successivo diminuire 1 m prima di ogni segnapunti – LEGGERE IL SUGGERIMENTO PER LE DIMINUZIONI 2. Ripetere le diminuzioni in modo alternato sul lato destro e sinistro di tutti i segnapunti ogni 7 giri altre 5-5-3-3-1-1 volte, e poi ogni 5 giri 0-1-4-4-9-9 volte = 151-168-189-210-221-242 m. Quando il lavoro misura 66-68-70-72-74-76 cm, lavorare 1 giro rov (= bordo da piegare), poi continuare a m rasata per 2 cm. Intrecciare. CONFEZIONE: Piegare il bordo in alto verso il rovescio del lavoro e affrancarlo in modo ordinato. Lasciare una piccola apertura per far passare l’elastico. |
|||||||||||||||||||
Spiegazioni del diagramma |
|||||||||||||||||||
|
|||||||||||||||||||
 |
|||||||||||||||||||
 |
|||||||||||||||||||
 |
|||||||||||||||||||
Avete terminato questo modello?Allora taggate le vostre foto con #dropspattern #madisonskirt o inviatele alla #dropsfan gallery. Avete bisogno di aiuto con questo modello?Troverete 20 video tutorial, una sezione per i commenti/domande e molto altro guardando il modello su www.garnstudio.com © 1982-2026 DROPS Design A/S. Ci riserviamo tutti i diritti. Questo documento, compreso tutte le sue sotto-sezioni, è protetto dalle leggi sul copyright. Potete leggere quello che potete fare con i nostri modelli alla fine di ogni modello sul nostro sito. |
|||||||||||||||||||


Con oltre 40 anni di esperienza nel design di modelli di maglia e uncinetto, DROPS Design offre la più estesa collezione di modelli gratuiti su internet - tradotti in 17 lingue. Ad oggi vi possiamo fornire 324 cataloghi e 12290 modelli - 9561 dei quali sono tradotti in Italiano.
Ci stiamo impegnando molto per darvi il meglio che vi possiamo offrire in termini di maglia e uncinetto, ispirazioni e consigli così come filati di grande qualità ad un prezzo incredibile! Volete utilizzare i nostri modelli per qualcosa d'altro oltre al vostro uso personale? Potete leggere tutto ciò che è consentito nel testo sul Copyright in basso su tutte le pagine dei nostri modelli. Buon lavoro!
Lasciare un commento sul modello DROPS 164-18
Noi saremmo felici di ricevere i tuoi commenti e opinioni su questo modello!
Se vuoi fare una domanda, fai per favore attenzione a selezionare la categoria corretta nella casella qui sotto per velocizzare il processo di risposta. I campi richiesti sono indicati da *.