
Categorie popolari
State cercando un filato?


Commenti / Domande (141)
![]() Hannah ha scritto:
Hannah ha scritto:
When decreasing for the sleeve on the main dress how do i decrease before the marker?
11.08.2020 - 16:09DROPS Design ha risposto:
Dear Hannah, when decrease at each A.3 you will decrease as explained under DECREASE TIP, is before A.3 with K2 together - and after A.3 with slip 1 as if to K, K1, psso. Happy knitting!
11.08.2020 - 16:29
![]() Sara ha scritto:
Sara ha scritto:
I am a bit confused about the A2 pattern do I use the purl stitch on the first line since it’s the wrong side and then line 2 do all K? I tried it and it doesn’t seem right please advise. Thanks
20.07.2020 - 21:17DROPS Design ha risposto:
Hi Sara, A.2 is worked in the round on the dress, so round 2 is knitted. Happy crafting!
21.07.2020 - 07:26
![]() Eileen Doucette ha scritto:
Eileen Doucette ha scritto:
I'm am so confused about A.3 .I get moving marker and using last stitch of previous row. I think a video would help with this pattern where to start decreasing to show what row to form the A line. I'm frustrated and have knitted for years! please help me with this section. I do read the questions and answers that others have asked in English language. After the very first row of A.3 I end up with 191 stitches instead of 192 is this correct? Please help me. thanks Eileen
16.02.2020 - 15:21DROPS Design ha risposto:
Dear Eileen, A.3 is worked over 3 stitches: 1 yarn over, slip 1 st as if to K, K 2 tog, psso, (you have decreased 2 stitches) 1 yarn over = there are always 3 stitches - make sure you didn't forget a yarn over on first round. Then start to decrease, you are repeating A.3 a total of 6 times in the round and you should decrease 6 stitches on each decrease round. On first decrease round, work *A.3, dec 1 st - see DECREASE TIP, 27 sts in stocking st*, repeat from *-*; on next decrease round work: *A.3, 26 sts in stocking st, dec 1 st*, repeat from *-* around. Happy knitting!
17.02.2020 - 09:21
![]() Eileen Doucette ha scritto:
Eileen Doucette ha scritto:
Could you please help me figure out A.2 pattern. For the 2nd row of pattern, it shows to knit 13, YO sl 1 st, k2 tog. Psso st then Yo again. For size 2 then repeat pattern. 6 times? or all around the dress? Thanks, Eileen
12.02.2020 - 20:57DROPS Design ha risposto:
Hi Eileen, The 2nd round of A.2 is knit all stitches. Round 3, from right to left is : K2, 1 YO, slip 1 stitch, knit 1 and pass the slipped stitch over, K7, K2 together, 1 YO, K7, 1 YO, slip 1 stitch, knit 1 and pass the slipped stitch over, K7, K2 together, 1 YO, K1 and repeat this pattern to end of round. Happy knitting!
13.02.2020 - 10:34
![]() Martina Nikodemová ha scritto:
Martina Nikodemová ha scritto:
¨Dobrý den, potřebovala bych poradit, s pletením těchto krásných šatiček. Pochopila jsem, že se plete v kruhových řadách bez švu, ale nevím jak mám plést tu rubovou stranu :-(........zkoušela jsem najít na netu nějaký návod, ale nic jsem nenašla..... mohla byste mi poradit nebo někam nasměrovat děkuji Nikodemová
04.01.2020 - 20:59DROPS Design ha risposto:
Milá Martino, při pletení v kruhových řadách pleteme vlastně stále jen lícovou stranu. Rubové (a lícové) řady budete plést jen v místě, kde je pletenina rozdělená na jednotlivé díly - tj. v horní části hrudníku, po uzavření ok pro průramky. Hodně zdaru! Hana
05.01.2020 - 12:56
![]() Brigitte ha scritto:
Brigitte ha scritto:
Très joli modèle tricoté deux fois en 6 ans : la première fois en coton mérinos bleu jeans avec un fil glitter argent, la seconde fois en lilas et agrémenté de sequins de couleur. Ma petite-fille aime beaucoup ces 2 robes.
02.01.2020 - 16:22
![]() Merete ha scritto:
Merete ha scritto:
Jeg skjønner ikke hvordan jeg skal få til å gjøre dette. Feller jeg først på retten og så tilbake på vrangen. Jeg har 60 masker og skal sitte igjen med 52. Det er åtte masker felt. Det virker som om det er mange flere BAKSTK: = 56-60-64-68-74 m. Fortsett fellingene til ermhull i hver side på beg av hver p slik: 2 m 1 gang og 1 m 2-2-1-1-2 ganger = 48-52-58-62-66 m.
18.11.2019 - 23:23DROPS Design ha risposto:
Hej Merete, Vi vil gerne hjælpe dig, men vi skal vide hvilken størrelse du strikker, hvor langt du er i opskriften, og hvad du ikke får til at stemme :)
04.12.2019 - 11:41
![]() Olga Baranová ha scritto:
Olga Baranová ha scritto:
Dobrý den,z návodu na pletené šatky jsem nepochopila, zda pracovat na kruhových jehlicích dokola bez švu, nebo rub´-líc a nakonec sešít. Děkuji za odpověď Olga Baranová
14.10.2019 - 11:57DROPS Design ha risposto:
Dobrý den, paní Baranová, šatičky jsou pletené v kruhu dohromady, bez sešívání. Pouze je potřeba nakonec vsadit/všít rukávy, zapošít otvor v podpaží a lem u krku. Hodně zdaru! Hana
14.10.2019 - 12:46
![]() Sisko ha scritto:
Sisko ha scritto:
Tilasin langat wendy darling by drops deisin pitsimekkoon.vaidoin langan toiseen lankasuosikoissa olevaan drops cotton light, mutta nyt on ogelma kun kudottu neulos venyy kauheasti ja ei saa neulottua kuin 6cm yhdellä kerällä. lankahan ei riitä mihinkään ja mekostahan tulee painava . Lapsi jolle neulon on 5v. pienikokoinen ja hyvin hoikka . miten saan mittasuhteet oikein ja mitä olen tehnyt väärin?
10.10.2019 - 09:59DROPS Design ha risposto:
Hei, aina kun ohjeen lanka vaihdetaan johonkin toiseen lankaan tulee ottaa huomioon lankojen eri ominaisuudet ja juoksevuus. Cotton Merino -langassa on 110 m/kerä ja Cotton Light -langassa on 105 m/kerä, joten menekin tulisi olla melkein sama kuin ohjeessa, voit tarvita yhden kerän enemmän. Polyesteri on raskaampaa kuin villa, joten varmaan tästä syystä neule venyy. Ennen kuin aloitat neulomisen, sinun tulee myös tarkistaa neuletiheys. Mikäli tiheys eroaa ohjeen tiheydestä, sinun tulee vaihtaa ohuempiin/paksumpiin puikkoihin. Saat aina parhaimman tuloksen, kun käytät ohjeessa mainittua lankaa.
17.12.2019 - 17:09
![]() Dorthe ha scritto:
Dorthe ha scritto:
Hej. Jeg undre mig over at jeg skal starte en maske før, efter mønster A2 så kommer A3 jo ikke til at følges opad Er det en fejl i opskriften?
03.10.2019 - 10:18DROPS Design ha risposto:
Hej Dorthe, det har du allerede gjort over de sidste 8 pinde i A.2, så ja det stemmer at A.3 skal komme over de andre masker i A.2. God fornøjelse!
03.10.2019 - 11:41
|
|||||||||||||||||||
Wendy Darling#wendydarlingdress |
|||||||||||||||||||
 |
 |
||||||||||||||||||
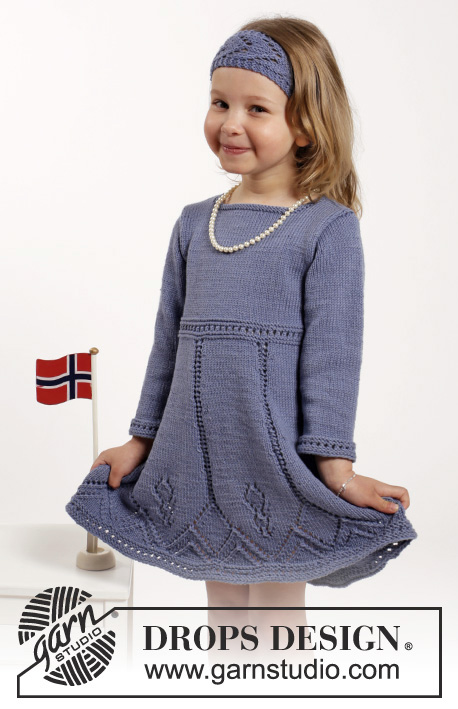
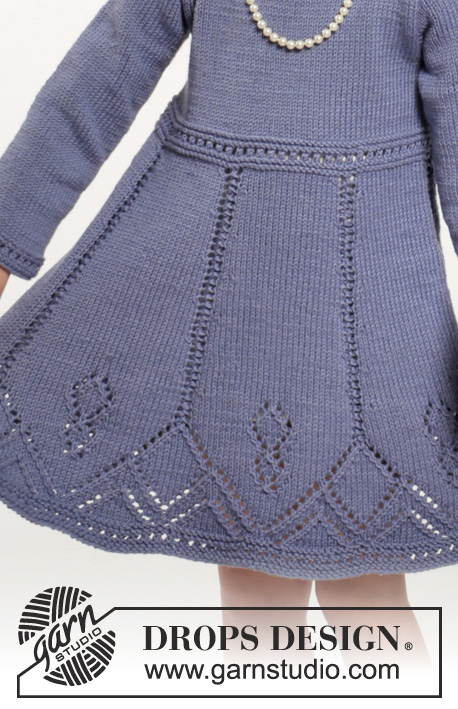
Vestito DROPS lavorato ai ferri e fascia per capelli con motivo traforato in DROPS Cotton Merino. Taglie: 2 - 10 anni.
DROPS Children 26-6 |
|||||||||||||||||||
|
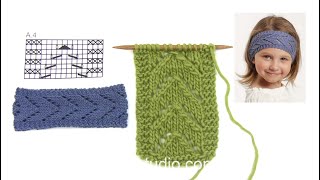
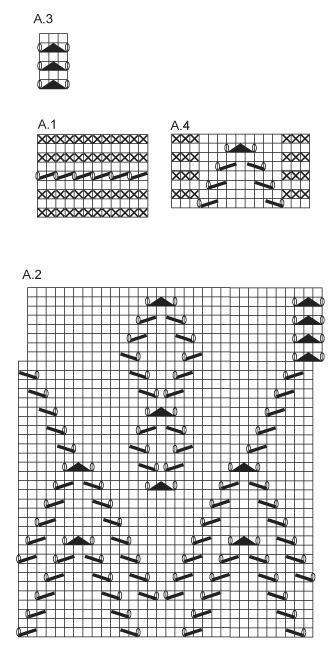
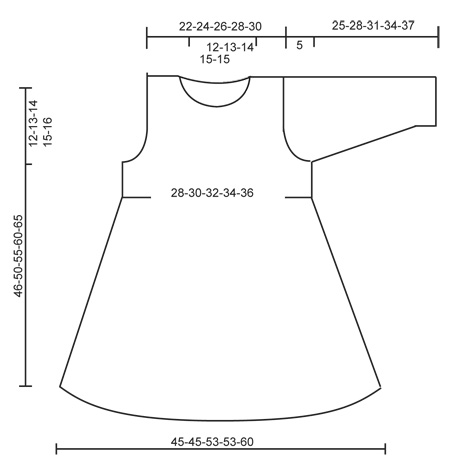
MOTIVO: Vedere i diagrammi A.1-A.4. SUGGERIMENTO PER LE DIMINUZIONI: Diminuire come segue prima di A.3: lavorare 2 m insieme a dir. Diminuire come segue dopo A.3: passare 1 m a dir senza lavorarla, 1 m dir, accavallare la m passata sopra quella appena lavorata. ASOLE: Diminuire per le asole sul dietro sinistro. Diminuire lavorando insieme la 2° e la 3° m dal centro dietro, poi fare un gettato. Diminuire per le asole quando il bordo misura 2 e 4 cm. M LEGACCIO (avanti e indietro): Lavorare tutti i f a dir. 1 “costa” a m legaccio = 2 f dir. ---------------------------------------------------------- VESTITO: Lavorato in tondo con i ferri circolari dal basso verso l’alto. Avviare 192-192-224-224-256 m con i f circolari n° 3,5 mm con Cotton Merino. Lavorare A.1. Poi lavorare A.2 (= 6-6-7-7-8 ripetizioni in larghezza). Quando A.2 è stato lavorato 1 volta in verticale, lavorare come segue – iniziare 1 m prima della 1° m sul giro: * A.3 (= 3 m), 29 m a m rasata *, ripetere *-* 6-6-7-7-8 volte. ALLO STESSO TEMPO quando il lavoro misura 15 cm, diminuire 1 m prima di ogni A.3 – LEGGERE IL SUGGERIMENTO PER LE DIMINUZIONI (= 6-6-7-7-8 diminuzioni). Ripetere le diminuzioni in modo alternato prima e dopo A.3 ogni 1-1½-1½-2-2 cm per un totale di 12-10-12-10-12 volte = 120-132-140-154-160 m. Continuare a m rasata e A.3 fino a quando il lavoro misura 27-29-32-35-37 cm. Ora lavorare A.1 su tutte le m, sul 1° f in A.1 aggiustare il n° di m a 124-132-140-148-160. Inserire 2 segnapunti nel lavoro; uno all’inizio del giro e 1 dopo 62-66-70-74-80 m = lati. Continuare a m rasata su tutte le m. Quando il lavoro misura 34-37-41-45-49 cm, intrecciare 6 m a ogni lato per gli scalfi (cioè 3 m a entrambi i lati di tutti i segnapunti) e finire ogni parte in modo separato. DIETRO: = 56-60-64-68-74 m. Continuare a intrecciare per gli scalfi a ogni lato all’inizio di tutti i f come segue: 2 m 1 volta e 1 m 2-2-1-1-2 volte = 48-52-58-62-66 m. Quando il lavoro misura 38-42-47-52-57 cm, trasferire le prime 22-24-27-29-31 m (dal diritto del lavoro) su un fermamaglie per la spalla destra (lavorarle prima) e finire ogni spalla in modo separato. SPALLA SINISTRA: = 26-28-31-33-35 m. Continuare a m rasata ma lavorare le prime 4 m sul f (verso il centro) a m legaccio (= bordo per i bottoni). Diminuire per le ASOLE – leggere la spiegazione sopra. Quando il lavoro misura 44-48-53-58-63 cm, trasferire le prime 4 m su un fermamaglie (lavorarle prima), poi intrecciare le 10-11-12-13-13 m successive per il collo. Poi intrecciare 1 m sul f successivo verso il collo = 11-12-14-15-17 m rimaste sulla spalla. Intrecciare quando il lavoro misura 46-50-55-60-65 cm. SPALLA DESTRA: Riportare le 22-24-27-29-31 m dal fermamaglie sui f di lavoro e avviare 4 nuove m alla fine del 1° f dal diritto del lavoro = bordo per i bottoni = 26-28-31-33-35 m. Lavorare come per la spalla sinistra ma a specchio, non diminuire per le asole. DAVANTI: = 56-60-64-68-74 m. Intrecciare per lo scalfo ai lati come sul dietro = 48-52-58-62-66 m. Quando il lavoro misura 41-45-50-55-60 cm, trasferire le 18-20-22-24-24 m centrali su un fermamaglie per il collo e finire ogni spalla in modo separato. Poi intrecciare su ogni f verso il collo: 2 m 1 volta e 1 m 2 volte = 11-12-14-15-17 m rimaste sulla spalla. Intrecciare quando il lavoro misura 46-50-55-60-65 cm. MANICA: Lavorata in tondo sui f a doppia punta. Avviare 40-42-44-46-48 m con i f a doppia punta n° 3,5 mm con Cotton Merino. Lavorare A.1 su tutte le m, poi lavorare a m rasata. Inserire 1 segnapunti all’inizio del giro = centro sotto la manica. Quando il lavoro misura 6 cm, aumentare 1 m a ogni lato del segnapunti. Aumentare ogni 6-3½-3-3-3 cm altre 2-4-6-7-8 volte = 46-52-58-62-66 m. Quando il lavoro misura 20-23-26-29-32 cm, intrecciare 6 m al centro sotto la manica per l’arrotondamento della manica. Poi lavorare la manica avanti e indietro e ALLO STESSO TEMPO diminuire per l’arrotondamento della manica a ogni lato come segue: Diminuire 2 m a ogni lato fino a quando il lavoro misura 24-27-30-33-36 cm. Intrecciare 3 m a ogni lato, poi intrecciare le m rimaste. Il lavoro misura circa 25-28-31-34-37 cm. CONFEZIONE: Cucire i margini delle spalle. Attaccare le maniche. Attaccare i bottoni al bordo destro. Poi mettere le 4 m dal dietro destro dietro le 4 m sul dietro sinistro e affrancare con piccoli punti. BORDO DEL COLLO: Riprendere circa 72-88 m (comprese le m sui fermamaglie) attorno al collo con i f circolari n° 3,5 mm. Lavorare 2 coste. Intrecciare. ---------------------------------------------------------- FASCIA PER CAPELLI: Avviare 15 m con i f n° 3,5 mm con Cotton Merino. Lavorare 1 costa a M LEGACCIO – leggere la spiegazione sopra, poi lavorare A.4 su tutte le m. Continuare con A.4 fino a quando il lavoro misura 41-42-43-44 cm (tirare leggermente il lavoro durante la misurazione), lavorare una costa, intrecciare. Cucire il bordo di avvio al bordo di chiusura a punto maglia. |
|||||||||||||||||||
Spiegazioni del diagramma |
|||||||||||||||||||
|
|||||||||||||||||||
 |
|||||||||||||||||||
 |
|||||||||||||||||||
Avete terminato questo modello?Allora taggate le vostre foto con #dropspattern #wendydarlingdress o inviatele alla #dropsfan gallery. Avete bisogno di aiuto con questo modello?Troverete 31 video tutorial, una sezione per i commenti/domande e molto altro guardando il modello su www.garnstudio.com © 1982-2026 DROPS Design A/S. Ci riserviamo tutti i diritti. Questo documento, compreso tutte le sue sotto-sezioni, è protetto dalle leggi sul copyright. Potete leggere quello che potete fare con i nostri modelli alla fine di ogni modello sul nostro sito. |
|||||||||||||||||||


Con oltre 40 anni di esperienza nel design di modelli di maglia e uncinetto, DROPS Design offre la più estesa collezione di modelli gratuiti su internet - tradotti in 17 lingue. Ad oggi vi possiamo fornire 325 cataloghi e 12298 modelli - 9569 dei quali sono tradotti in Italiano.
Ci stiamo impegnando molto per darvi il meglio che vi possiamo offrire in termini di maglia e uncinetto, ispirazioni e consigli così come filati di grande qualità ad un prezzo incredibile! Volete utilizzare i nostri modelli per qualcosa d'altro oltre al vostro uso personale? Potete leggere tutto ciò che è consentito nel testo sul Copyright in basso su tutte le pagine dei nostri modelli. Buon lavoro!
Lasciare un commento sul modello DROPS Children 26-6
Noi saremmo felici di ricevere i tuoi commenti e opinioni su questo modello!
Se vuoi fare una domanda, fai per favore attenzione a selezionare la categoria corretta nella casella qui sotto per velocizzare il processo di risposta. I campi richiesti sono indicati da *.