
Categorie popolari
State cercando un filato?


Commenti / Domande (32)
![]() Barbara ha scritto:
Barbara ha scritto:
There don't seem to be any instructions for buttonholes....am I missing something?
13.03.2026 - 12:41DROPS Design ha risposto:
Dear Barbara, there is no buttonholes worked extra here, buttons will be buttoned through the holes in front band stitches. Happy knitting!
13.03.2026 - 15:35
![]() Grazyna Koster ha scritto:
Grazyna Koster ha scritto:
Goede dag, het truitje is gebreid van boven naar beneden. Moet ik ook telpatronen van boven naar beneden beginnen? Is de eerste naald de onderste of bovenste? Met vriendelijke groet Grazyna
17.05.2025 - 22:58DROPS Design ha risposto:
Dag Grazyna,
Nee, de telpatronen lees je altijd van onder naar boven, onafhankelijk van welke richting het kledingstuk op wordt gebreid. Dus de eerste naald is de onderste rij.
18.05.2025 - 08:20
![]() Kerstin Marquardt ha scritto:
Kerstin Marquardt ha scritto:
Var i beskrivningen står det var man ska glra knapphål ?
07.04.2023 - 20:49DROPS Design ha risposto:
Hej Kerstin, under montering: Knapparna sys i så att de kan knäppas i hålen på höger framkant.
13.04.2023 - 11:39
![]() Anna Sabelli ha scritto:
Anna Sabelli ha scritto:
Bonjour, Je ne suis pas claire, ci-dessous les instructions. ..... Continuer ainsi, EN MÊME TEMPS, augmenter pour le RAGLAN en commençant au rang suivant - voir ci-dessus: Augmentations devants/dos: 14-16-18-20-26-30 fois 1 m tous les rangs (c\'est-à-dire à la fois sur l\'endroit et sur l\'envers), puis 7-8-9-10-9-9 fois tous les 2 rangs. Merci de votre aide
22.08.2022 - 22:43DROPS Design ha risposto:
Bonjour Mme Sabelli,k vous tricotez les points fantaisie/diagrammes dans l'ordre indiqué précédemment, et en même temps vous allez augmenter pour le raglan, les augmentations du raglan se font à un rythme différent pour le dos/les devants et pour les manches; autrement dit vous allez augmenter soit 8 mailles (dos/devants + manches) soit 4 mailles seulement (quand on augmente pour le dos/les devants tous les rangs mais tous les 2 rangs pour les manches par exemple). Est-ce plus clair ainsi? Bonne continuation!
23.08.2022 - 08:13
![]() Bridget Curran ha scritto:
Bridget Curran ha scritto:
Sorry, I should've been more specific. So if I have 17 stitches for the right front, then a marker, then the 19 sts for the first A.3, etc. Should I do the raglan increase as follows - (1) K 17, YO, move marker, work 19 sts A.3, etc.; - or - (2) K 16, YO, K1, move marker, work 19 sts. A.3; etc.? I hope that makes sense. Some patterns specify the YO should be x amount of stitches away from the marker, but this pattern doesn't specify. Thanks a million!
11.05.2022 - 22:19DROPS Design ha risposto:
Dear Mrs Curran, you have to increase on each side of A.3, this means to increase on left front piece, you will work the 1st time the 17 sts, then YO, and work A.3. On the next row from WS you will increase on left front piece (on every row) after A.3 and the 18 sts (17+1 st incrased). Note that you will increase sometimes 8 sts (body + sleeves) and sometimes only 4 sts (body only when increasing on every row on body but on every other row on sleeves). Happy knitting!
12.05.2022 - 08:48
![]() Bridget Curran ha scritto:
Bridget Curran ha scritto:
Hiya, for the raglan increases on the body, should they be done right before/after the stitch marker, or one stitch away from the stitch marker? Thanks a million!
11.05.2022 - 21:18DROPS Design ha risposto:
Dear Bridget, the increases are worked before and after the A.3 repeat (for the raglan), which consists of 19 stitches. The marker is between the stitches of the sections of the piece and the beginning or ending of a repeat of A.3. Happy knitting!
11.05.2022 - 21:49
![]() Barbara Pörschmann ha scritto:
Barbara Pörschmann ha scritto:
Vielen Dank für die prompte Antwort. VT habe ich mittlerweile verstanden, Raglanzunahme leider nicht, jetzt habe ich eine Mittelmasche mitten im Ärmel, aber das stört mich nicht. im Gegenteil! Anders bei der doppelten Zunahmen (Hin- und Rückreihe) da hatte ich riesige Löcher, das hat mir nicht gefallen. So habe ich eine Masche hochgehäkelt und diese als Zunahme berechnet. Löcher weg.
09.04.2022 - 07:06
![]() Barbara Pörschmann ha scritto:
Barbara Pörschmann ha scritto:
"Die nächste Hin-R wie folgt str: 43-47-51-55-61-66 M re (= Vorderteil), " Ist das incl. der 6 Maschen (Blende) oder werden die 6 M erst gestrickt , dann 47 M re Ferner habe ich die Zunahmen an den Ärmeln nicht richtig verstanden: 19+1+19 Grundeinteilung. 1. Zunahme 19+(1.Zun)+1+(1. Zun)+19 2. Zun.: 19+2.zun.+3+2.Zun+19 oder 20+2.Zun+1+2.Zun+20 (????) Wo kommen die Zunahmen hin?
08.04.2022 - 09:53DROPS Design ha risposto:
Liebe Frau Pörschmann, für den Raglan nehmen Sie beidseiting von jedem A.3 zu (siehe RAGLANZUNAHMEN), dh bei den Ärmeln stricken Sie: A.3, Zunahme, glatt rechts (1 bei der 1. Reihe), Zuinahme, A.3. Die BlendeMaschen sind in den 43-47-51-55-61-66 Maschen dazugezählt. Viel Spaß beim stricken!
08.04.2022 - 11:30
![]() Gudrun Norström ha scritto:
Gudrun Norström ha scritto:
Jag förstår inte hur raglan ska ökas. Ska man öka mellan alla A3 dvs 6 ökningar eller är det 4 som menas alltså mellan framstycke och ärm, ärm och bakstycke, bakstycke och ärm, ärm och framstycke. Hur ökas maskorna på ärmarna, Är det mellan 2 A3 och hur gör jag i såfall. Det ska ökas 1 m men om jag läser ökningstips blir det 2 m.
17.02.2022 - 12:23DROPS Design ha risposto:
Hei Gudrun. Du øker på hver side av A.3 og du strikker A.3 fire ganger pr pinne = 8 økninger. Det er 4 økninger mellom overgangene: venstre forstykke/erm, erm/bakstykket, bakstykke/erm og erm/ høyre forstykke. Det økes også 2 masker midt oppå ermet/ hver side av A.3 = 4 økte masker. Det økes ulikt på bol og ermer, se forklaringen i oppskriften til din str på hvor ofte det skal økes / på hvilken pinner, husk det økes både fra retten og vrangen på forstykket og bakstykket. Øketipse gjelder ikke for raglan, men når du skal øke i sidene = 2 økte masker i hver side = 4 økte masker på hver pinne. mvh DROPS Design
21.02.2022 - 09:58
![]() Kate ha scritto:
Kate ha scritto:
Hi! I don’t understand where I need to increase for sleeves. And for raglan increase before A3 and after A3. Is it right?
11.12.2019 - 23:12DROPS Design ha risposto:
Dear Kate, you increase for the raglan on each side of each A.3: at the end of right front piece just before A.3, then on each sleeve: after A.3 at the beg of sleeve + before A.3 at the end of sleeve; on back piece: after A.3 at beg of back piece and before A.3 at the end of back piece and after A.3 on left front piece. You will increase sometimes 8 stitches (= sleeves and body) or sometimes 4 stitches (= only on body) - see your size. Happy knitting!
12.12.2019 - 09:31
|
||||||||||||||||||||||
Esther Cardigan#esthercardigan |
||||||||||||||||||||||
 |
 |
|||||||||||||||||||||
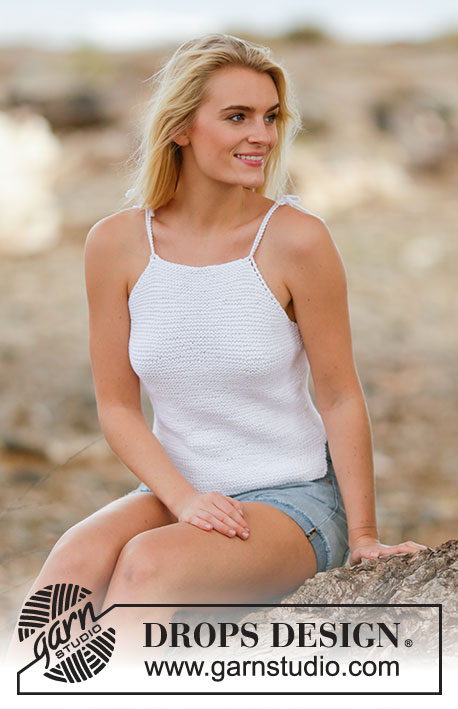
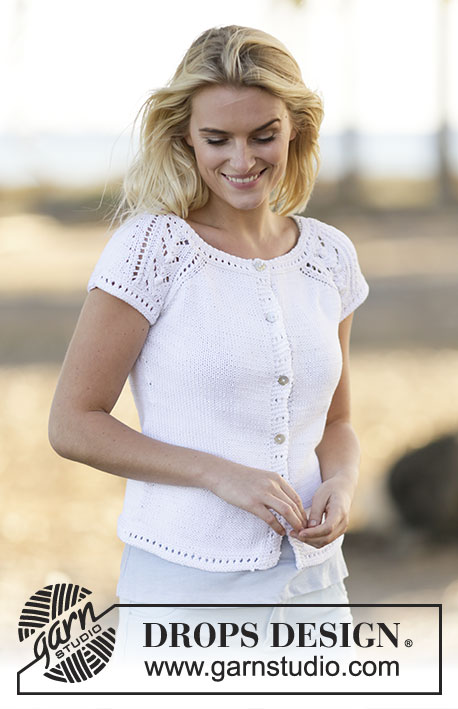
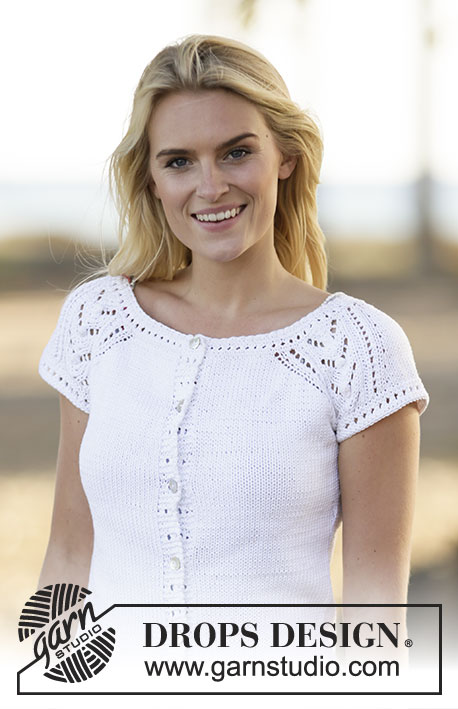
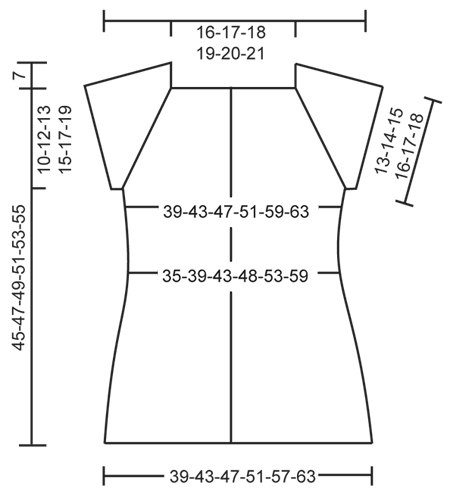
Cardigan DROPS lavorato ai ferri con raglan e motivo traforato, lavorato dall’alto in basso (top down) a maniche corte in ”Muskat”. Taglie: S - XXXL.
DROPS 159-32 |
||||||||||||||||||||||
|
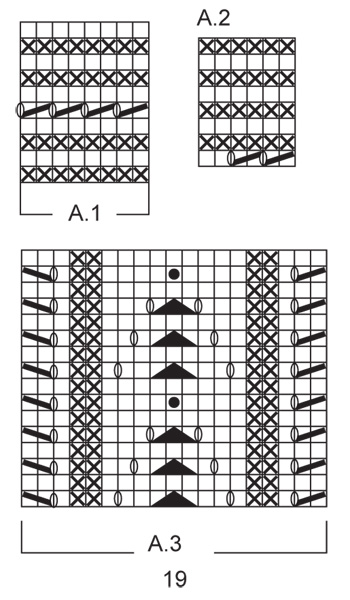
MOTIVO: Vedere i diagrammi A.1, A.2 e A.3. RAGLAN: Aumentare per il raglan a ogni lato di A.3. Aumentare con un gettato, lavorare il gettato a ritorto sul f successivo per evitare buchi. Gli aumenti per il corpo e le maniche non sono omogenei come spiegato nel modello. SUGGERIMENTO PER GLI AUMENTI-2: Iniziare 1 m prima del segnapunti e aumentare come segue: 1 gettato, 2 m dir (il segnapunti è tra queste 2 m), 1 gettato. Sul giro successivo lavorare i gettati a dir ritorto per evitare buchi. SUGGERIMENTO PER LE DIMINUZIONI: Diminuire come segue prima del segnapunti: 2 m insieme a dir. Diminuire come segue dopo il segnapunti: passare 1 m a dir senza lavorarla, 1 m dir, accavallare la m passata sopra quella appena lavorata. ---------------------------------------------------------- CARDIGAN: Lavorato avanti e indietro sui f circolari, dall’alto in basso (top down). SPRONE: LEGGERE TUTTA LA SEZIONE SEGUENTE PRIMA DI CONTINUARE! Avviare 156-160-164-168-172-176 m con i f circolari n° 3 mm con Muskat. Lavorare 6 m a m legaccio, A.1 fino a quando rimangono 6 m, 6 m a m legaccio. Lavorare 4 f in questo modo, poi lavorare A.2 sulle 6 m a ogni lato (= bordo), continuare con A.1 sulle m rimaste. Quando A.1 è stato lavorato, passare ai f circolari n° 4 mm. Lavorare il f successivo come segue: A.2 (= bordo), lavorare 16-17-18-19-20-21 m a m rasata (= davanti), lavorare A.3 (= 19 m), 1 m a m rasata, A.3 (= 19 m) (= 39 m per le maniche), lavorare 34-36-38-40-42-44 m a m rasata (= dietro), lavorare A.3, 1 m a m rasata e A.3 (= 39 m sulla manica) e finire con 16-17-18-19-20-21 m a m rasata (= davanti), finire con A.2 (= bordo). Continuare il motivo in questo modo e ALLO STESSO TEMPO aumentare per il RAGLAN iniziando sul f successivo – leggere la spiegazione sopra. Aumentare sul davanti/dietro: 1 m in ogni f (cioè sia dal diritto che dal rovescio del lavoro) per un totale di 14-16-18-20-26-30 volte, poi a f alterni 7-8-9-10-9-9 volte. Aumentare sulle maniche: 1 m a f alterni per un totale di 2-4-6-8-10-12 volte e poi ogni 4 f per un totale di 6 volte in tutte le taglie. Alla fine di tutti gli aumenti ci sono 272-296-320-344-376-404 m sul f e il lavoro misura circa 17-19-20-22-24-26 cm dalla spalla in giù. Lavorare il f successivo come segue: 43-47-51-55-61-66 m dir (= davanti), trasferire le 55-59-63-67-71-75 m successive su un fermamaglie per la manica, avviare 6-6-6-8-8-10 nuove m, inserire 1 segnapunti al centro delle nuove m, 76-84-92-100-112-122 m di (= dietro), trasferire le 55-59-63-67-71-75 m successive su un fermamaglie per la manica, avviare 6-6-6-8-8-10 nuove m, inserire 1 segnapunti al centro delle nuove m e lavorare a dir le 43-47-51-55-61-66 m rimaste ( = davanti) = 174-190-206-226-250-274 m sul f – ORA MISURARE IL LAVORO DA QUI. CORPO: Continuare a m rasata e con il bordo (in A.2). Quando il lavoro misura 4 cm, diminuire 1 m a ogni lato dei segnapunti a lato – LEGGERE IL SUGGERIMENTO PER LE DIMINUZIONI (= 4 diminuzioni). Ripetere le diminuzioni ogni 4 cm per un totale di 4 volte = 158-174-190-210-234-258 m. Quando il lavoro misura 22 cm per tutte le taglie, aumentare 1 m a ogni lato di tutti i segnapunti a lato – LEGGERE IL SUGGERIMENTO PER GLI AUMENTI-2 (= 4 aumenti). Ripetere gli aumenti ogni 2 1/2 cm per un totale di 4 volte = 174-190-206-226-250-274 m. Quando il lavoro misura 33-33-34-34-34-34 cm, passare ai f circolari n° 3 mm. Lavorare il motivo seguendo il diagramma A.1 (continuare il bordo in A.2), poi intrecciare senza stringere. Il cardigan misura circa 52-54-56-58-60-62 cm dalla spalla in giù. BORDO DELLA MANICA: Lavorato in tondo con i f a doppia punta. Riportare le 55-59-63-67-71-75 m dal fermamaglie sui f a doppia punta n° 3 mm e avviare 6-6-6-8-8-10 nuove m sotto la manica = 61-65-69-75-79-85 m. Lavorare il motivo in tondo seguendo il diagramma A.1 e poi intrecciare senza stringere. Lavorare l’altro bordo della manica nello stesso modo. CONFEZIONE: Cucire sotto le maniche. Attaccare i bottoni sul bordo sinistro, il bottone più in alto a circa 1 cm in giù del collo, il bottone più in basso a circa 12 cm dal bordo inferiore. Distribuire i bottoni rimasti in modo uniforme tra questi due. Cucire i bottoni per allacciarli nei buchi sul bordo destro. |
||||||||||||||||||||||
Spiegazioni del diagramma |
||||||||||||||||||||||
|
||||||||||||||||||||||
 |
||||||||||||||||||||||
 |
||||||||||||||||||||||
Avete terminato questo modello?Allora taggate le vostre foto con #dropspattern #esthercardigan o inviatele alla #dropsfan gallery. Avete bisogno di aiuto con questo modello?Troverete 22 video tutorial, una sezione per i commenti/domande e molto altro guardando il modello su www.garnstudio.com © 1982-2026 DROPS Design A/S. Ci riserviamo tutti i diritti. Questo documento, compreso tutte le sue sotto-sezioni, è protetto dalle leggi sul copyright. Potete leggere quello che potete fare con i nostri modelli alla fine di ogni modello sul nostro sito. |
||||||||||||||||||||||


Con oltre 40 anni di esperienza nel design di modelli di maglia e uncinetto, DROPS Design offre la più estesa collezione di modelli gratuiti su internet - tradotti in 17 lingue. Ad oggi vi possiamo fornire 324 cataloghi e 12290 modelli - 9561 dei quali sono tradotti in Italiano.
Ci stiamo impegnando molto per darvi il meglio che vi possiamo offrire in termini di maglia e uncinetto, ispirazioni e consigli così come filati di grande qualità ad un prezzo incredibile! Volete utilizzare i nostri modelli per qualcosa d'altro oltre al vostro uso personale? Potete leggere tutto ciò che è consentito nel testo sul Copyright in basso su tutte le pagine dei nostri modelli. Buon lavoro!
Lasciare un commento sul modello DROPS 159-32
Noi saremmo felici di ricevere i tuoi commenti e opinioni su questo modello!
Se vuoi fare una domanda, fai per favore attenzione a selezionare la categoria corretta nella casella qui sotto per velocizzare il processo di risposta. I campi richiesti sono indicati da *.