
Categorie popolari
State cercando un filato?


Commenti / Domande (68)
![]() Pirkko ha scritto:
Pirkko ha scritto:
I just finished the back square and I am in the part that you go to knitting 1 garter sts,k5,A2,k5,1garter.The instructions then say until finished measurement. How long is that finished measurement?
26.01.2024 - 19:29
![]() Jeeva ha scritto:
Jeeva ha scritto:
Hi, thank you so much for the pattern, as a beginner, this pattern is my first attempt at an apparel. And i got to learn many new techniques and tips. But i only had 1 problem and that was the size. I did a xxl but it looks smaller than the mentioned dimensions, not sure why. Though i made sure the stitches and tension were correctly managed. Any suggestions for improvement?
04.12.2023 - 15:51
![]() Lorraine Stephens ha scritto:
Lorraine Stephens ha scritto:
Drops 160-25 pattern to finish edge it says to pick up 20 stitches, then knit 63 stitches from holder, then pick up 40 stitches and knit next 63 stitches from holder and finally pick up 20 more stitches. I am so confused. Where do you pick up the 20,40 and 20 stitches from?
13.06.2023 - 04:30DROPS Design ha risposto:
See answer below :)
13.06.2023 - 08:40
![]() Lorraine New Stephens ha scritto:
Lorraine New Stephens ha scritto:
On the drops 160-25 pattern for the edge instructions it says to pick up 20 stitches then knit the 63 stitches then pick up 40 stitches and knit next 63 stitches then pick up another 20 stitches. Where do you pick up the 20, then 40 then another 20 from?
13.06.2023 - 04:22DROPS Design ha risposto:
Dear Mrs New Stephens, start picking up stitches straight after the seam on the sleeve (you left 9 cm left on sleeve seam - see chart), pick up 20 sts along these 9 cm, then work the 63 sts, pick up 40 sts along the 9 cm x 2 sides on top of next sleeve, pick up 63 sts along the other side of square and finish picking up 20 sts along the 9 cm on top of sleeve. Happy knitting!
13.06.2023 - 08:39
![]() Fanni ha scritto:
Fanni ha scritto:
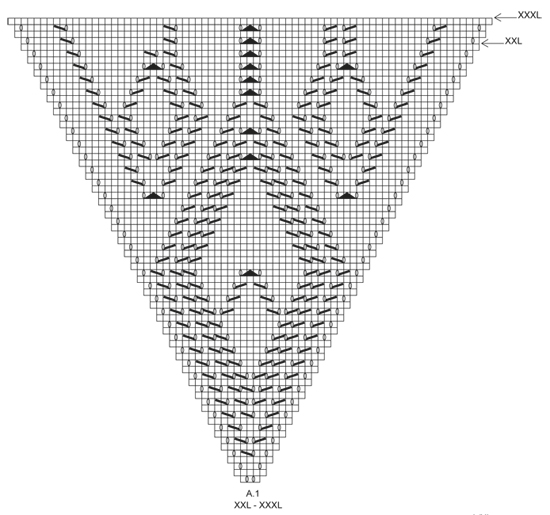
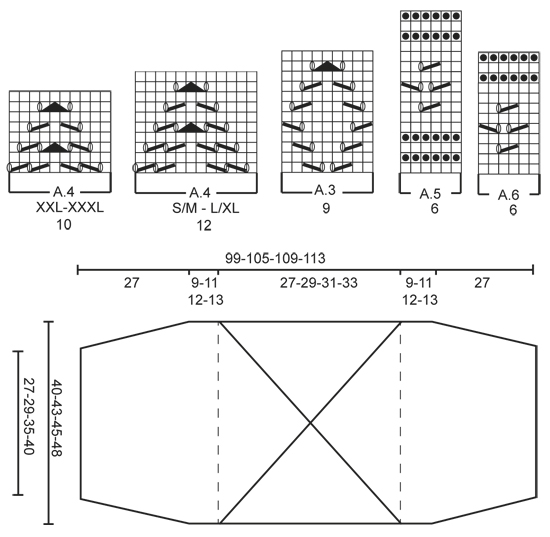
Hi, I think you have an error on the A1 diagrom for size xxl-xxxl. In the last 4 row on the left side a yarn over and a decrease is missing. Otherwise, it's a nice pattern, thank you.
24.04.2023 - 18:03
![]() Vania Monaco ha scritto:
Vania Monaco ha scritto:
Thank you for this great design and for your website full of tips. Unfortunately it appears that the schemes A3 to A6 have disappeared from this page. Could you please have a look? Thanks!
06.10.2022 - 01:26DROPS Design ha risposto:
Dear Mrs Monaco, you should find diagrams A.3 to A.6 just above the measurement chart (below A.1 in size S/M -LXL). Happy knitting!
06.10.2022 - 09:06
![]() Isabelle REYT ha scritto:
Isabelle REYT ha scritto:
Merci pour le retour mais cela ne répond pas à ma question. Sur le premier tour de AU, il ne faut pas augmenter entre les marqueurs. Est que quand on tricote A6, une deuxième fois est qu'il ne faut pas augmenter entre les marqueurs également ? Ce n'est pas précisé. Merci
07.09.2022 - 08:40DROPS Design ha risposto:
Bonjour Mme Reyt, effectivement, quand vous augmentez dans A.6 vous ne devez pas augmenter entre le 1er et le 2ème marqueur ni entre le 3ème et le 4ème marqueur - les augmentations doivent donc être réparties entre le 2ème et le 3ème marqueur et entre le 4ème et le 1er marqueur. Bon tricot!
07.09.2022 - 09:55
![]() Isabelle ha scritto:
Isabelle ha scritto:
Bonjour Concernant les dernières augmentations sur A6. Dois je aussi ne pas augmenter sur les mailles milieu dos du haut et bas ? Merci
06.09.2022 - 09:02DROPS Design ha risposto:
Bonjour Isabelle, les augmentations de la bordure dans A.6 se font à intervalles réguliers réparties sur tout le tour, pas uniquement à quelques endroits du tour. Découvrez ici comment répartir des augmentations régulièrement. Bon tricot!
06.09.2022 - 09:32
![]() Amal ha scritto:
Amal ha scritto:
Hi this a follow up to my previous question about the A 6 chart. Unless I misunderstood the directions for the edge border I am knitting in the round so it’s impossible to get the garter stitch ridge by knitting all the rows. Please recheck the edge directions and clarify if you can. I purled the rows 10 and 12 to get the ridge effect. Thank you
30.05.2022 - 17:38DROPS Design ha risposto:
Dear Amal, to work garter stitch in the round you will have to work 2 rounds (knit 1 round, purl 1 round), see video; that's what you have to work in A.6, ie knit (including lace pattern) rows 1 to 9, then Purl 1 round, K1 round and P 1 round = there are now 2 ridges in garter stitch. Can this help? Happy knitting!
31.05.2022 - 08:31
![]() Amal ha scritto:
Amal ha scritto:
Thank you for the response to my questions. I just want to ask about the A6 chart. We will be working on the right side on all the rows, shouldn’t the dark circle be purl on the right side so we get the garter stitch ridge?
30.05.2022 - 04:09DROPS Design ha risposto:
Hi Amal, When working garter stitch back and forth you knit from both the right and wrong side to give the ridge pattern. So at the top of A.6, rows 10-12 you knit from the wrong side, knit from the right side and knit from the wrong side to finish. Happy knitting!
30.05.2022 - 06:57
|
|||||||||||||||||||
Kamelia#kameliashoulderpiece |
|||||||||||||||||||
 |
 |
||||||||||||||||||
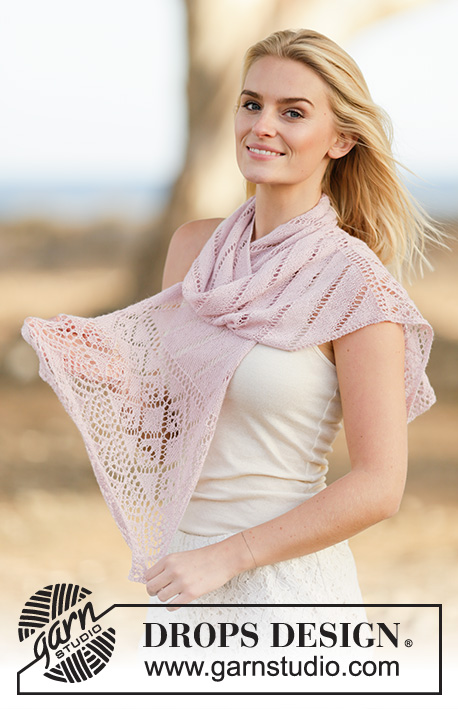
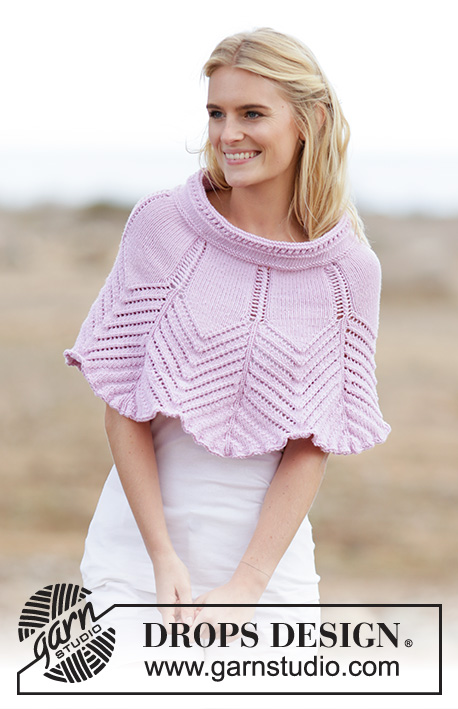
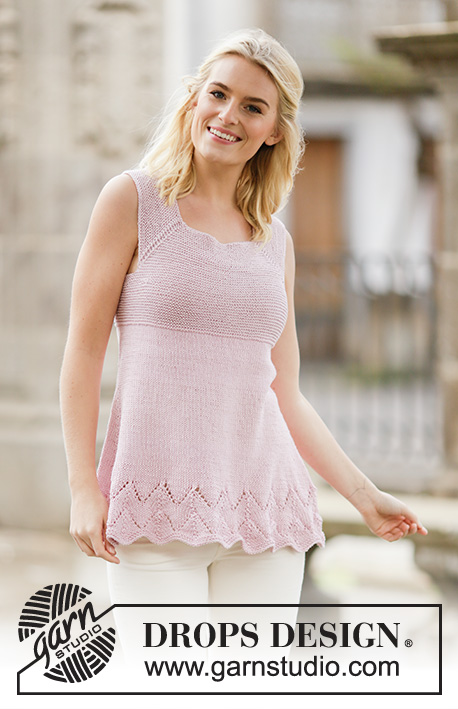
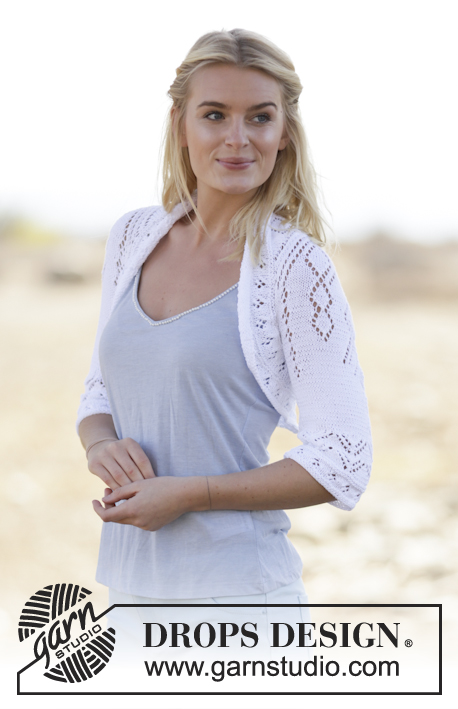
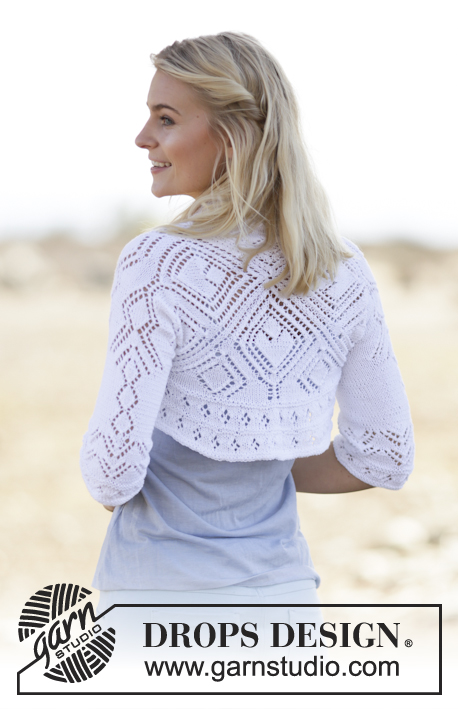
Bolero DROPS ai ferri, con motivo traforato, in "Safran". Taglie: Dalla S alla XXXL.
DROPS 160-25 |
|||||||||||||||||||
|
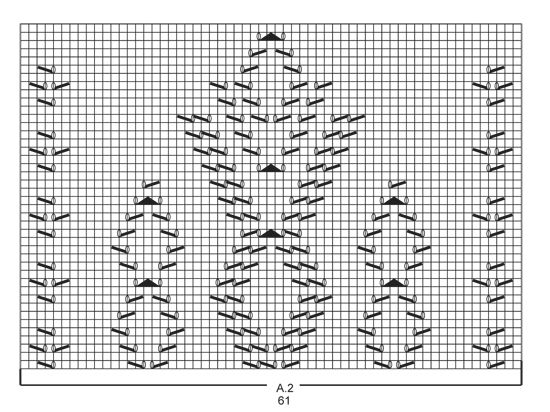
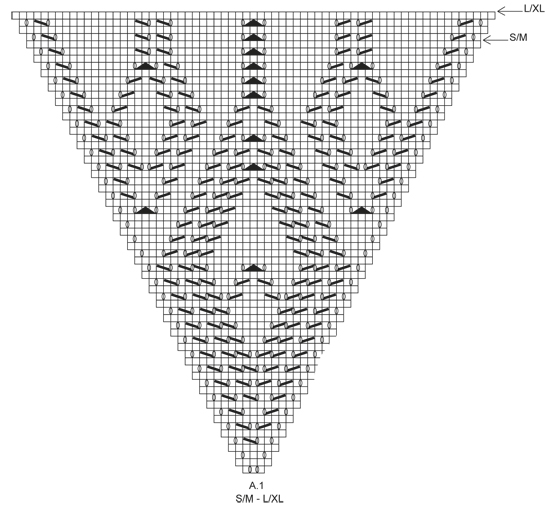
PUNTO LEGACCIO (avanti e indietro): Lavorare tutti i ferri a dir. 1 “costa” a legaccio = 2 ferri a dir. SUGGERIMENTO PER GLI AUMENTI: Per aumentare 1 m fare 1 m gettata; al ferro successivo, lavorare la m gettata a rov ritorto (quindi lavorarla nel filo posteriore e non in quello anteriore) per evitare che si formi un buco. MOTIVO: Vedere i diagrammi da A.1 a A.6. I diagrammi mostrano tutti i ferri del motivo, visti sul diritto del lavoro. ---------------------------------------------------------- BOLERO: Iniziare con un quadrato lavorato in tondo; lavorare poi ogni manica avanti e indietro. DIETRO: Lavorare in tondo sui ferri a doppia punta, passare ai ferri circolari quando necessario. Avviare 12 m con il filato Safran e distribuire le m sui 4 ferri a doppia punta n° 3,5 (= 3 m per ogni ferro). Inserire ora 4 segni come segue: Inserire il 1° segno tra la 3a e la 4a m, il 2° segno tra la 6a e la 7a m, il 3° segno tra la 9a e la 10a m e il 4° segno tra la 12a e la 1a m. Lavorare ora seguendo il diagramma A.1 – seguire il diagramma corrispondente alla propria taglia (= 4 volte in larghezza). Le m con i segni sono le m degli angoli, spostare i segni man mano che si procede con il lavoro. RICORDARSI LA TENSIONE DEL LAVORO! Dopo aver lavorato il diagramma A.1 1 volta in verticale (vedere la freccia corrispondente alla propria taglia), lavorare ogni parte separatamente = 63-67-71-75 m lungo ciascun lato e 252-268-284-300 m in tutto sui ferri. Lavorare ora solo sulle prime 63-67-71-75 m (= un lato, quindi le m tra il 4° ed il 1° segno); mettere in attesa su un ferma maglie le m degli altri lati; le m tra il 2° ed il 3° segno verranno lavorate in un secondo momento. Lavorare ora avanti e indietro. Nel corso del ferro successivo sul diritto del lavoro, lavorare come segue: Lavorare 2 m nella prima m, 0-2-4-6 m dir, diagramma A.2 (= 61 m), 0-2-4-6 m dir, lavorare 2 m nell’ultima m = 65-69-73-77 m. Proseguire come segue: 1 m vivagno a PUNTO LEGACCIO - vedere le spiegazioni sopra, 1-3-5-7 m a maglia rasata, diagramma A.2, 1-3-5-7 m a maglia rasata, 1 m vivagno a punto legaccio. Lavorare le m vivagno a punto legaccio fino alla fine del lavoro. TAGLIE L/XL-XXL-XXXL: Al ferro successivo sul diritto del lavoro, aumentare 1 m da ciascun lato all’interno di 1 m vivagno – VEDERE IL SUGGERIMENTO PER GLI AUMENTI; ripetere questi aumenti ad ogni ferro sul diritto del lavoro, altre 2-4-8 volte = 75-83-95 m. Lavorare le m aumentate a maglia rasata. PER TUTTE LE TAGLIE: = 65-75-83-95 m. Dopo aver lavorato il diagramma A.2 1 volta in verticale, lavorare come segue, sul diritto del lavoro: 1 m vivagno a punto legaccio, 27-32-36-42 m a maglia rasata, diagramma A.3 (= 9 m), 27-32-36-42 m a maglia rasata, 1 m vivagno a punto legaccio. Lavorare il diagramma A.3 in tutto 2 volte in verticale. Lavorare ora 0-6-0-4 ferri a maglia rasata. Al ferro successivo, sul diritto del lavoro, diminuire 3-1-1-3 m in modo uniforme = 62-74-82-92 m. Lavorare 1 ferro a rov sul rovescio del lavoro. Lavorare ora il diagramma A.4 – vedere il diagramma per la taglia che state seguendo (= 12-12-10-10 m) 5-6-8-9 volte in larghezza. Lavorare il diagramma A.4 in tutto 2-2-3-3 volte in verticale. Lavorare ora il diagramma A.5 (= 6 m) 10-12-13-15 volte in larghezza e, ALLO STESSO TEMPO, nel corso del primo ferro, diminuire 0-0-2-0 m in modo uniforme = 62-74-80-92 m. Intrecciare le m dopo aver lavorato il diagramma A.5 1 volta in verticale. Lavorare le m tra il 2° ed il 3° segno in modo uguale. CONFEZIONE: Cucire insieme i lati all’interno di 1 m vivagno: iniziare dal bordo inferiore delle maniche e risalire per 27 cm. Ripetere sull’altro lato. BORDO: Si lavora in tondo sui ferri circolari. Iniziare dalla cucitura di una delle maniche e lavorare con i ferri circolari n° 3,5 ed il filato Safran sul diritto del lavoro, come segue: riprendere 20-25-28-30 m all’interno di 1 m vivagno a punto legaccio del bordo, lavorare a dir le 63-67-71-75 m messe in attesa sul ferma maglie, riprendere 40-50-56-60 m all’interno di 1 m vivagno, lavorare a dir le 63-67-71-75 m messe in attesa sul ferma maglie, riprendere 20-25-28-30 m = 206-234-254-270 m. Lavorare 1 giro a rov - ALLO STESSO TEMPO, inserire 4 segni nel lavoro come segue: lavorare 40-47-52-56 m a rov, inserire il 1° segno, 23 m rov, inserire il 2° segno, 80-94-104-112 m rov, inserire il 3° segno, 23 m rov, inserire il 4° segno, lavorare le restanti m del giro (= 40-47-52-56 m rov). Quando si aumentano le m, non aumentare tra il 1° ed il 2° segno (scollo) e tra il 3° ed il 4° segno (parte centrale, in basso, sul dietro). Lavorare 1 giro a dir e, ALLO STESSO TEMPO, aumentare 14-15-18-22 m in modo uniforme = 220-249-272-292 m. Lavorare 1 giro a rov. Lavorare ora il diagramma A.6 (= 6 m) e, ALLO STESSO TEMPO, nel corso del primo giro, aumentare 14-15-16-20 m in modo uniforme = 234-264-288-312 m. Il diagramma A.6 è stato ora lavorato 39-44-48-52 volte in larghezza. Ripetere il diagramma A.6 ancora 1 volta in verticale e, ALLO STESSO TEMPO, nel corso del primo giro, aumentare 24-30-36-36 m in modo uniforme = 258-294-324-348 m. Il diagramma A.6 è stato ora lavorato 43-49-54-58 volte in tondo. Dopo aver completato il diagramma A.6, intrecciare le m senza stringere troppo il filo. |
|||||||||||||||||||
Spiegazioni del diagramma |
|||||||||||||||||||
|
|||||||||||||||||||
 |
|||||||||||||||||||
 |
|||||||||||||||||||
 |
|||||||||||||||||||
 |
|||||||||||||||||||
Avete terminato questo modello?Allora taggate le vostre foto con #dropspattern #kameliashoulderpiece o inviatele alla #dropsfan gallery. Avete bisogno di aiuto con questo modello?Troverete 27 video tutorial, una sezione per i commenti/domande e molto altro guardando il modello su www.garnstudio.com © 1982-2026 DROPS Design A/S. Ci riserviamo tutti i diritti. Questo documento, compreso tutte le sue sotto-sezioni, è protetto dalle leggi sul copyright. Potete leggere quello che potete fare con i nostri modelli alla fine di ogni modello sul nostro sito. |
|||||||||||||||||||


Con oltre 40 anni di esperienza nel design di modelli di maglia e uncinetto, DROPS Design offre la più estesa collezione di modelli gratuiti su internet - tradotti in 17 lingue. Ad oggi vi possiamo fornire 324 cataloghi e 12290 modelli - 9561 dei quali sono tradotti in Italiano.
Ci stiamo impegnando molto per darvi il meglio che vi possiamo offrire in termini di maglia e uncinetto, ispirazioni e consigli così come filati di grande qualità ad un prezzo incredibile! Volete utilizzare i nostri modelli per qualcosa d'altro oltre al vostro uso personale? Potete leggere tutto ciò che è consentito nel testo sul Copyright in basso su tutte le pagine dei nostri modelli. Buon lavoro!
Lasciare un commento sul modello DROPS 160-25
Noi saremmo felici di ricevere i tuoi commenti e opinioni su questo modello!
Se vuoi fare una domanda, fai per favore attenzione a selezionare la categoria corretta nella casella qui sotto per velocizzare il processo di risposta. I campi richiesti sono indicati da *.