
Categorie popolari
State cercando un filato?


Commenti / Domande (33)
![]() Maja ha scritto:
Maja ha scritto:
Hallo, ich arbeite den Cardigan in Größe S. Wenn ich über die 68 Maschen des Ärmel das Muster A1 arbeiten soll, bleiben 8 Maschen übrig. Was mache ich mit diesen? Schon einmal vielen Dank!
03.10.2015 - 15:03DROPS Design ha risposto:
Die Antwort finden Sie unten beim Eintrag vom 20.09.
04.10.2015 - 22:09
![]() Maja ha scritto:
Maja ha scritto:
Hallo, ich arbeite den Cardigan in Größe S. Wenn ich über die 68 Maschen des Ärmel das Muster A1 arbeiten soll, bleiben 8 Maschen übrig. Was mache ich mit diesen? Schon einmal vielen Dank!
03.10.2015 - 14:27DROPS Design ha risposto:
Antwort siehe unten! :-)
04.10.2015 - 22:13
![]() Maja ha scritto:
Maja ha scritto:
Hallo, ich arbeite den Cardigan in Größe S. Wenn ich über die 68 Maschen des Ärmel das Muster A1 arbeiten soll, bleiben 8 Maschen übrig. Was mache ich mit diesen? Schon einmal vielen Dank!
20.09.2015 - 13:36DROPS Design ha risposto:
Antwort siehe unten! :-)
20.09.2015 - 14:12
![]() Maja ha scritto:
Maja ha scritto:
Hallo, ich arbeite den Cardigan in Größe S. Wenn ich über die 68 Maschen des Ärmel das Muster A1 arbeiten soll, bleiben 8 Maschen übrig. Was mache ich mit diesen? Schon einmal vielen Dank!
20.09.2015 - 03:40DROPS Design ha risposto:
Diese M stricken Sie auch im Muster A.2 (nicht A.1), auch wenn es nicht aufgeht. Sie müssen das Muster von der oberen Ärmelmitte aus ausrechnen, so wie es in der Anleitung beschrieben ist, dann können Sie nach rechts und links zur unteren Ärmelmitte hin die M abzählen und ausrechnen, welche M Sie dann noch an der unteren Ärmelmitte stricken müssen. Es fällt nicht so auf, dass das Muster nicht aufgeht, da es ja unter dem Ärmel ist. Außerdem machen Sie dann ja auch Ärmelabnahmen, sodass an der unteren Ärmelmitte weitere Maschen verschwinden.
20.09.2015 - 12:56
![]() Maple ha scritto:
Maple ha scritto:
Hi, i am knitting drops 157-24. U say, when work WS rows have the yarn following in front of work, is that mean, purl on the wrong side when knit fair isle WS rows ????
04.09.2015 - 01:35DROPS Design ha risposto:
Dear Mrs Maple, that's right, you are working in stocking st, ie rows from WS are purled (= K 1 row, P 1 row following at the same time the diagram: 1 square = 1 st x 1 row). Happy knitting!
04.09.2015 - 09:53
![]() Maple ha scritto:
Maple ha scritto:
Hi,i'm knitting silver stag cardigan drops 157-24. I want to know, do sliver stag cardigan have purl stitches ??? Because drops fair isle video show purl stitches on wrong side row.. is this cardigan knit all ,right side row and wrong side row,all knit stitches ????
03.09.2015 - 22:38DROPS Design ha risposto:
Dear Mrs Maple, this jacket is worked in stocking st, back and forth on circular needle, ie you will K every row from RS and P every row from WS when working the body. Sleeves are then worked in the round with double pointed needles, ie you will then K every round. Happy knitting!
04.09.2015 - 09:22
![]() Maple ha scritto:
Maple ha scritto:
Hi i am knitting silver stag cardigan with circular needle.large size chart A.1.i try to knit row 6=(wrong side). But the floats is show on the right side... should i keep knitting row 6 even the floats is show in right side. Or i do wrong....please help...
03.09.2015 - 02:15DROPS Design ha risposto:
Dear Mrs Maple, When working WS rows have the yarn following in front of work, again make sure you have the right tension on the thread. Happy knitting!
03.09.2015 - 09:30
![]() Maple ha scritto:
Maple ha scritto:
Hi, i am knitting sliver stag cardigan drop 157-24. I don't know how to knit row 6 and i watch the fair isle video but doesn't help me because the video use straight needle to knit fair isle. But sliver stag cardigan use circular needle to knit fair isle...i don't know how to knit fair isle with circular needle and knit wrong side row...because don't seen right...
03.09.2015 - 01:56DROPS Design ha risposto:
Dear Mrs Maple, working fair isle with circular needle will be done the same way as with straight needles: at the end of each row you turn and work next row, ie you work alternately from RS and from WS, as with straigth needles. Happy knitting!
03.09.2015 - 09:29
![]() Maple ha scritto:
Maple ha scritto:
Hi,i am knitting sliver stag cardigan drops 157-24. I don't know how to knit row 6. I never working fair isle cardigan pattern.. after i done knitting row 5 =(right side). And i try to knit row 6=(wrong side ).but the yarn,the stitch..... long yarn...is show... i hope u understand me...
03.09.2015 - 01:37DROPS Design ha risposto:
Dear Mrs Maple, when working fair isle, you will have to make sure you are working not too tight or too loose. If you are not used to work fair isle, it can be a good idea to practise a bit making a swatch with another yarn before working on the jacket. Happy knitting!
03.09.2015 - 09:27
![]() Maple ha scritto:
Maple ha scritto:
Hi,i am knitting sliver stag cardigan drops 157-24. I'm knitting large size, chart A.1 and i am not sure how to knit row 6 because if i knit row 6= wrong size, the yarn is not on the wrong size,the yarn is show in right side..i hope you understand what i mean...please help....
03.09.2015 - 01:21DROPS Design ha risposto:
Dear Mrs Maple, you read diagram starting from the bottom corner on the right side: From RS: read from the right towards the left From WS: read from the left towards the right. This means you work row 6 as follows: 1 edge st in grey, *K3 in white, K1 in grey, K1 in white, K1 in grey, K3 in white, K1 in grey, K1 in white, K3 in grey* repeat from *-*, 1 edge st in grey. Happy knitting!
03.09.2015 - 09:23
|
||||||||||
Silver Stag Cardigan#silverstagcardigan |
||||||||||
|
|
||||||||||
Giacca DROPS ai ferri, con sprone rotondo, motivo jacquard con renna, lavorata top down, in "Karisma". Taglie: Dalla S alla XXXL.
DROPS 157-24 |
||||||||||
|
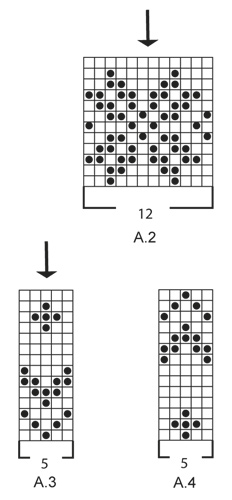
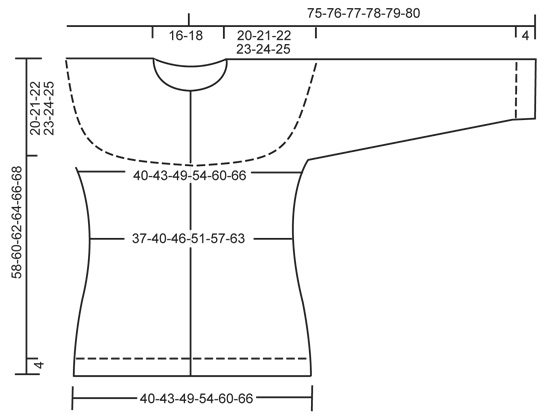
PUNTO LEGACCIO (avanti e indietro sui ferri): Lavorare tutti i ferri a dir. 1 “costa” a legaccio = 2 ferri a dir. MOTIVO: Vedere i diagrammi da A.1 a A.4. I diagrammi mostrano tutti i ferri del motivo, visti sul diritto del lavoro. Lavorare i diagrammi a maglia rasata. SUGGERIMENTO PER LE DIMINUZIONI (per i lati e le maniche): Diminuire prima del segno e 1 m dir, come segue: lavorare 2 m insieme a dir. Diminuire dopo il segno e 1 m dir, come segue: passare 1 m a dir senza lavorarla, 1 m dir, accavallare la m passata sulla m lavorata SUGGERIMENTO PER GLI AUMENTI (per i lati): Aumentare sempre sul diritto del lavoro. Aumentare in tutto 4 m sul ferro: Lavorare finché non rimane 1 m prima del segno, 1 m gettata, 2 m a maglia rasata, 1 m gettata = 2 m aumentate. Nel corso del ferro successivo, lavorare la m gettata a rov ritorto (quindi lavorare la m nel filo posteriore e non in quello anteriore) per evitare che si formi un buco. ---------------------------------------------------------- GIACCA: Lavorare avanti e indietro, dall’alto verso il basso sui ferri circolari. Lavorare le maniche in tondo sui ferri a doppia punta. SPRONE: Avviare 90-98-106-122-130-138 m sui ferri circolari n° 4 con il colore grigio medio. Lavorare il 1° ferro come segue (= diritto del lavoro): 1 m vivagno a PUNTO LEGACCIO - vedere le spiegazioni sopra - diagramma A.1 finché non rimane 1 m, 1 m vivagno a punto legaccio. RICORDARSI LA TENSIONE DEL LAVORO! Dopo aver lavorato il diagramma A.1 1 volta in verticale, ci sono 266-290-314-362-386-410 m sui ferri. Proseguire con 3-5-9-5-7-11 ferri a maglia rasata (con 1 m vivagno a punto legaccio da ciascun lato) con il colore grigio medio. Lavorare il ferro successivo sul rovescio del lavoro, come segue: Lavorare le prime 38-41-47-53-59-65 m (compresa 1 m vivagno a punto legaccio), mettere in attesa su un ferma maglie le 58-64-64-76-76-76 m successive (= manica), avviare 10 nuove m sotto la manica, inserire un segno al centro di queste 10 m, lavorare le 74-80-92-104-116-128 m successive, mettere in attesa su un ferma maglie le 58-64-64-76-76-76 m successive (= manica), avviare 10 nuove m sotto la manica, inserire un segno al centro di queste 10 m, lavorare le rimanenti 38-41-47-53-59-65 m. DAVANTI E DIETRO: Ci sono ora 170-182-206-230-254-278 m per il davanti e il dietro. Lavorare ora come segue: 1 m vivagno a punto legaccio, diagramma A.2 (= 12 m) finché non rimane 1 m, 1 m vivagno a punto legaccio. Proseguire in questo modo finché il diagramma A.2 non è stato lavorato 1 volta in verticale. Proseguire ora a maglia rasata con il colore grigio medio. Al ferro successivo sul diritto del lavoro, diminuire 1 m da ciascun lato di ogni segno ai lati del lavoro - VEDERE IL SUGGERIMENTO PER LE DIMINUZIONI. Ripetere queste diminuzioni ogni 2 cm altre 2 volte = 158-170-194-218-242-266 m. Quando il lavoro misura 12-13-14-15-16-17 cm dal segno sotto la manica, aumentare 1 m da ciascun lato del segno ai lati del lavoro – vedere il SUGGERIMENTO PER GLI AUMENTI. Ripetere questi aumenti ogni 2 cm altre 2 volte = 170-182-206-230-254-278 m. Quando il lavoro misura 56-58-60-62-64-66 cm, passare ai ferri circolari n° 3 e aumentare 22-26-26-30-30-34 m in modo uniforme = 192-208-232-260-284-312 m. Proseguire a lavorare a coste sul diritto del lavoro come segue: 1 m vivagno a punto legaccio, * 2 m dir, 2 m rov *, ripetere da *-* finché non rimangono 3 m, 2 m dir, 1 m vivagno a punto legaccio. Quando le coste misurano 4 cm, intrecciare le m lavorando a dir le m dir e a rov le m rov. MANICHE: Riportare sui ferri a doppia punta n° 4 le m messe in attesa sul ferma maglie. Ci sono ora 58-64-64-76-76-76 m per la manica. Lavorare 1 ferro a maglia rasata e avviare 10 m sotto la manica = 68-74-74-86-86-86 m. Inserire un segno al centro di queste nuove m. Proseguire a lavorare le maniche in tondo. Lavorare ora il diagramma A.2. ATTENZIONE: Assicurarsi che le 2 m centrali del diagramma (vedere la freccia) siano le 2 m centrali della manica. Dopo aver lavorato il diagramma A.2, proseguire con il diagramma A.3. ATTENZIONE: Assicurarsi che la m centrale del diagramma (vedere la freccia) sia una delle 2 m centrali della manica. ALLO STESSO TEMPO, nel corso del primo giro del diagramma A.3, iniziare a diminuire sotto la manica - VEDERE IL SUGGERIMENTO PER LE DIMINUZIONI. Ripetere queste diminuzioni ogni 3-2½-2½-2½-2½-2½ cm altre 9-12-12-12-12-12 volte = 48-48-48-60-60-60 m. Quando la manica misura 38 cm, lavorare il diagramma A.4. ATTENZIONE: Assicurarsi che la m centrale del diagramma (vedere la freccia) sia una delle 2 m centrali della manica. Dopo aver completato il diagramma A.4, passare ai ferri a doppia punta n° 3 e aumentare 4-8-8-0-4-4 m in modo uniforme = 52-56-56-60-64-64 m. Proseguire a coste (= 2 m dir / 2 m rov) per 3 cm. Intrecciare le m lavorando a dir le m dir e a rov le m rov. BORDO DAVANTI SINISTRO: Lavorare avanti e indietro sui ferri circolari n° 3. Con il colore grigio medio, riprendere ca. da 144 a 168 m (il numero delle m deve essere divisibile per 4) all’interno di 1 m vivagno lungo il bordo davanti sinistro. Lavorare a coste come segue sul rovescio del lavoro: 1 m a punto legaccio, * 2 m rov, 2 m dir *, ripetere da *-*, finire con 2 m rov e 1 m a punto legaccio. Sul diritto del lavoro, le coste iniziano e finiscono con 2 m dir e 1 m a punto legaccio. Lavorare finché le coste non misurano 3 cm. Intrecciare le m lavorando a dir le m dir e a rov le m rov. BORDO DAVANTI DESTRO: Lavorare come indicato per il bordo sinistro, ma dopo 1 cm, intrecciare le m per 7 asole a intervalli regolari (lavorare le asole nei gruppi di m lavorate a rov, viste sul diritto del lavoro). 1 ASOLA = lavorare 2 m insieme a rov e fare 1 m getatta– l’asola più in alto si trova a ca.6-7 cm dal bordo superiore (ci sarà un’asola sul collo), e l’asola più in basso a ca.5-6 cm dal bordo inferiore. COLLO: Con i ferri circolari n° 3 ed il colore grigio medio, riprendere 96-100-104-108-112-116 m lungo il bordo di avvio delle m e sulle m dei bordi davanti. Lavorare a coste come segue: 1 m vivagno a punto legaccio, * 2 m rov, 2 m dir *, ripetere da *-* finché non rimangono 3 m, 2 m rov, 1 m vivagno a punto legaccio. Quando il collo misura 1 cm, intrecciare le m per 1 asola, in linea con le altre asole sul bordo davanti destro, lavorando 2 m insieme a dir e facendo 1 m gettata. Proseguire in questo modo finché le coste non misurano 3 cm. Intrecciare le m lavorando a dir le m dir e a rov le m rov. CONFEZIONE: Cucire le aperture sotto le maniche. Attaccare i bottoni sul bordo davanti sinistro. |
||||||||||
Spiegazioni del diagramma |
||||||||||
|
||||||||||
 |
||||||||||
 |
||||||||||
 |
||||||||||
Avete terminato questo modello?Allora taggate le vostre foto con #dropspattern #silverstagcardigan o inviatele alla #dropsfan gallery. Avete bisogno di aiuto con questo modello?Troverete 29 video tutorial, una sezione per i commenti/domande e molto altro guardando il modello su www.garnstudio.com © 1982-2026 DROPS Design A/S. Ci riserviamo tutti i diritti. Questo documento, compreso tutte le sue sotto-sezioni, è protetto dalle leggi sul copyright. Potete leggere quello che potete fare con i nostri modelli alla fine di ogni modello sul nostro sito. |
||||||||||


Con oltre 40 anni di esperienza nel design di modelli di maglia e uncinetto, DROPS Design offre la più estesa collezione di modelli gratuiti su internet - tradotti in 17 lingue. Ad oggi vi possiamo fornire 324 cataloghi e 12290 modelli - 9561 dei quali sono tradotti in Italiano.
Ci stiamo impegnando molto per darvi il meglio che vi possiamo offrire in termini di maglia e uncinetto, ispirazioni e consigli così come filati di grande qualità ad un prezzo incredibile! Volete utilizzare i nostri modelli per qualcosa d'altro oltre al vostro uso personale? Potete leggere tutto ciò che è consentito nel testo sul Copyright in basso su tutte le pagine dei nostri modelli. Buon lavoro!
Lasciare un commento sul modello DROPS 157-24
Noi saremmo felici di ricevere i tuoi commenti e opinioni su questo modello!
Se vuoi fare una domanda, fai per favore attenzione a selezionare la categoria corretta nella casella qui sotto per velocizzare il processo di risposta. I campi richiesti sono indicati da *.