
Categorie popolari
State cercando un filato?


Commenti / Domande (22)
![]() Pavlína ha scritto:
Pavlína ha scritto:
Dobrý den, sháním návod na takovýto svetr z šestiúhelníku, ale háčkovaný. Jednoduše dl. sloupky. Měli byste?? Děkuji
20.02.2019 - 20:17DROPS Design ha risposto:
Hi Pavlina, please look for crocheted circle jacket on the website. Happy crocheting!
25.02.2020 - 07:52
![]() Pavlína ha scritto:
Pavlína ha scritto:
Dobrý den, sháním návod na takovýto svetr z šestiúhelníku, ale háčkovaný. Jednoduše dl. sloupky. Měli byste?? Děkuji
20.02.2019 - 20:15
![]() Bernadette ha scritto:
Bernadette ha scritto:
Also, can I knit the sleeves on normal pointed needles? Why does the pattern ask for circular needles but knit back and forth? Could this be worsening the distortion? Thanks for your help again!
24.09.2017 - 23:06DROPS Design ha risposto:
Dear Bernadette, the sleeves are knitted with circulars to have the number of stitches comfortably fit onto the needle, but, if you prefer, you can knit them on straights. However, I do not think that the type of the needle you are knitting with affects the distortion. Happy Knitting!
25.09.2017 - 00:20
![]() Bernadette ha scritto:
Bernadette ha scritto:
I've ripped out the whole sleeve and started again with particular attention to tension. The stitches are neither increased not decreased but the distortion is still there. Please can I check that I've interpreted the pattern correctly? A3 is worked as follows: 1 edge stitch,knit 2 together (k2t) yarn over (YO), k2t, YO etc ending in k2t, YO, edge stitch. Knit row. 1 edge stitch, knit 1, k2t, YO, k2t, YO etc, ending in YO knit 1, edge stitch. Is that right?
24.09.2017 - 23:01DROPS Design ha risposto:
Dear Bernadette, sorry to hear you are still having troubles with the sleeve. You read the pattern correctly, however the second row is a purl row (from the wrong side, the diagram shows every row from the right side). And please do try to block the piece out (wet and pin into shape, then let it dry). I hope this helps. Happy Knitting!
25.09.2017 - 00:17
![]() Bernadette ha scritto:
Bernadette ha scritto:
Please help! I have completed the main body of the garment, which is fine. However the sleeves are completely out of shape - it looks as though there is a consistent increase on one side and a decrease on the other! I don't think it is the tension. Rather than a rectangle, it looks like a parallelogram! The pattern looks right and I have definitely not added or dropped any stitches. When I fold in two to stitch together, the seams don't match.
16.09.2017 - 19:54DROPS Design ha risposto:
Dear Bernadette, the sleeves should be more or less symmetric, when folded. Granted that the ajour pattern has a tendency to slightly distort the shape, but if you look at the dieagram, there is equal number of decreases and increases, the number of stitches do not chnage. Try to wet-block the piece and pull it into shape, while it is wet. I hope this helps. Happy Knitting!
17.09.2017 - 23:46
![]() Bernadette Buckley ha scritto:
Bernadette Buckley ha scritto:
After casting off and then on again to make the armholes, do I YO after every 7 markers as previously? The pattern doesn't say to do this. Also when casting off, the pattern says that 57 stitches should remain "on the needle". Is this a mistake? (Circular needles are being used here. Does it mean ' 57 stitches should remain AT THE END OF THE ROW? The wording is very unclear!
01.07.2017 - 20:00DROPS Design ha risposto:
Dear Mrs Buckley, correct, 57 sts should remain before end of round, then continue pattern as before with YOs to inc circle. Happy knitting!
03.07.2017 - 09:28
![]() Anne ha scritto:
Anne ha scritto:
Chart A2 has YO at the beginning and end of each repeat. This is 2YO next to each other. Working the following row, you lose one of the YO and end up not increasing and one big hole. Could you please explain how to work this to stay in pattern and keep the increase?
27.10.2015 - 17:10DROPS Design ha risposto:
Dear Anne, diagram A.2 starts with K1 on every round (first st in A.2 = white square in the column at the right side). Read more about diagram here. Happy knitting!
28.10.2015 - 11:19
![]() Kerstin ha scritto:
Kerstin ha scritto:
Hallo liebes Drops-Team, jedesmal bewundere ich Eure schönen Kreisjacken, sowie auch dieses Model. Gestrickt habe ich noch keine, weil ich schon beim ermitteln der Grösse scheitere. Die angegebenen Masse sagen mir gar nichts!!?? Wie ermittele ich meine Grösse? Vielen Dank
19.08.2015 - 14:21DROPS Design ha risposto:
Liebe Kerstin, dann wählen Sie am besten die Grösse, die Sie üblicherweise tragen. Die Zahlen sind die cm-Angaben an der Stelle, an der sie eingezeichnet sind. Vielleicht kann Ihnen jemand beim messen helfen.
19.11.2015 - 17:42
![]() Elena ha scritto:
Elena ha scritto:
Grazie mille, ci riprovo!
29.12.2014 - 16:51
![]() Elena ha scritto:
Elena ha scritto:
Salve, purtroppo non riesco ad avanzare nel lavoro. dopo il primo A.2 bisogna ricominciare dall'inizio di A.2 ??? non riesco proprio a capire
29.12.2014 - 15:03DROPS Design ha risposto:
Buongiorno Elena. Sì è corretto: dopo aver completato A,2 una prima volta, continua a lavorare iniziando di nuovo dalla prima riga del diagramma A.2. Proseguirà con il diagramma A.2 finchè il lavoro non misura 17-18-19-20 cm (a seconda della taglia). Buon lavoro!
29.12.2014 - 15:28
|
|||||||||||||||||||
Saralyn#saralyncardigan |
|||||||||||||||||||
 |
 |
||||||||||||||||||
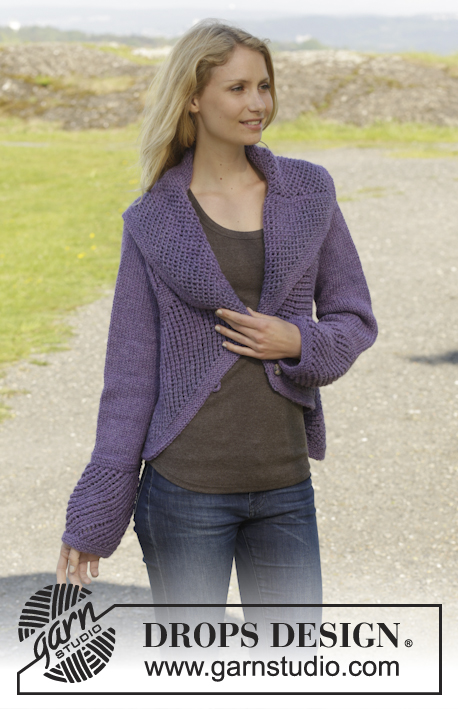
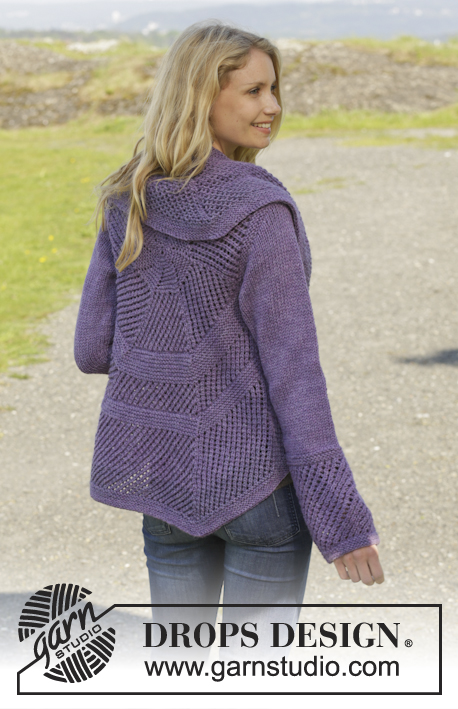
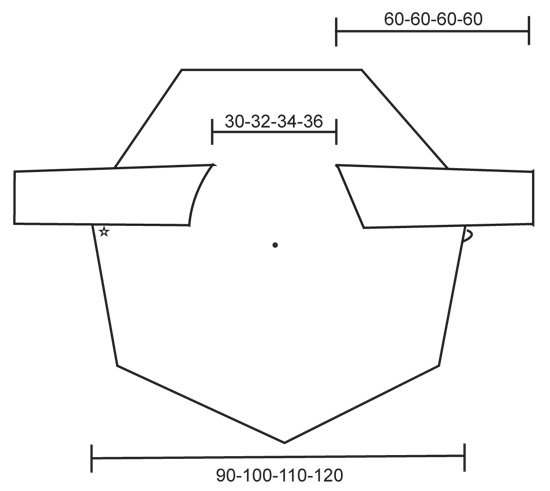
Giacca DROPS ai ferri, lavorata in tondo, a punto legaccio, con motivo traforato, in "Big Merino". Taglie: Dalla S alla XXXL.
DROPS 156-37 |
|||||||||||||||||||
|
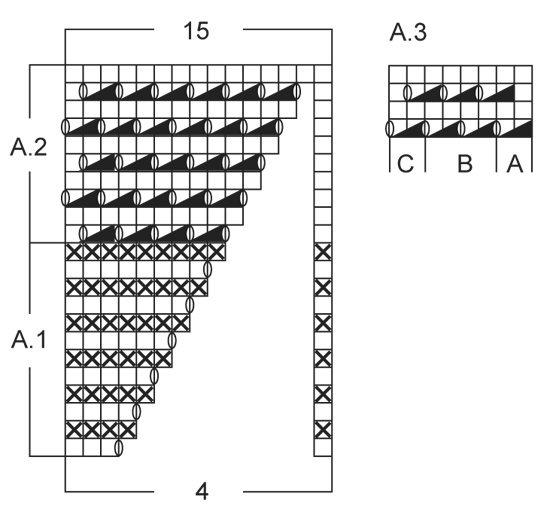
PUNTO LEGACCIO (in tondo, sui ferri circolari): Lavorare * 1 giro a dir, 1 giro a rov *, ripetere da *-*. 1 “costa” a legaccio = 2 giri. PUNTO LEGACCIO (avanti e indietro sui ferri): Lavorare tutti i ferri a dir. 1 “costa” a legaccio = 2 ferri a dir. MOTIVO: Vedere i diagrammi da A.1 a A.3. I diagrammi mostrano tutti i ferri del motivo, visti sul diritto del lavoro. SUGGERIMENTO PER GLI AUMENTI: Per aumentare 1 m, fare 1 m gettata; al ferro successivo, lavorare la m gettata ritorta (quindi lavorarla nel filo posteriore e non in quello anteriore) per evitare che si formi un buco. ---------------------------------------------------------- DAVANTI E DIETRO: Si lavora in tondo in cerchio, dal centro sul dietro. Avviare 7 m con il filato Big Merino e suddividerli sui 4 ferri a doppia punta n° 5. Lavorare 1 giro a dir e, ALLO STESSO TEMPO, lavorare 2 m dir in ogni m = 14 m. Inserire 7 segni nel lavoro, a distanza di 2 m l’uno dall’altro. 1° segno = inizio del giro = dietro, sul collo. Lavorare 1 giro a rov. Al giro successivo, lavorare a dir e, ALLO STESSO TEMPO, lavorare 2 volte una m, ogni due maglie = 21 m. Lavorare 1 giro a rov. Al giro successivo, lavorare a dir e allo stesso tempo, lavorare 2 volte una m, ogni 3 maglie = 28 m. Lavorare 1 giro a rov. Proseguire seguendo il diagramma A.1, lavorare 1 ripetizione del diagramma sulle 4 m tra ogni segno. Dopo aver lavorato il diagramma A.1, proseguire seguendo il diagramma A.2. Dopo aver completato il diagramma A.2, proseguire con il diagramma A.2 in modo uguale con 7 m aumentate ogni 2 giri, lavorare le m aumentate seguendo il motivo. Passare ai ferri circolari n° 5 quando necessario. RICORDARSI LA TENSIONE DEL LAVORO! Quando il lavoro misura 17-18-19-20 cm dal centro, lavorare 3 coste a legaccio– vedere le spiegazioni sopra - su tutte le m. ATTENZIONE! Proseguire aumentando ogni 2 giri, aumentare facendo 1 m gettata dopo ogni segno (= 7 m aumentate). Lavorare il giro successivo come segue: Lavorare 25-27-29-31 m, intrecciare 32-34-37-40 m (= scalfo), lavorare finché sui ferri non rimangono 57-61-66-71 m, intrecciare 32-34-37-40 m (= scalfo) e lavorare 25-27-29-31 m. Lavorare 1 giro a rov - ALLO STESSO TEMPO, avviare 32-34-37-40 nuove m sopra ogni scalfo, aumentare quindi lo stesso numero di m chiuse per lo per lo scalfo. Lavorare 4 coste a legaccio. Proseguire con il diagramma A.2 e con gli aumenti per 4-5-7-9 cm, lavorare 5 coste a legaccio con gli aumenti, lavorare il diagramma A.2 con gli aumenti per 13-16-18-20 cm, finire con 5 coste a legaccio con gli aumenti – il lavoro misura ca.45-50-55-60 cm dal centro verso l’esterno. Intrecciare le m senza stringere troppo il filo. MANICHE: Si lavorano avanti e indietro sui ferri circolari. Avviare 44-46-48-50 m (compresa 1 m vivagno da ciascun lato) sui ferri n° 5 con il filato Big Merino, lavorare 3 COSTE A LEGACCIO - vedere le spiegazioni sopra (= 1° ferro = rovescio del lavoro). Lavorare il ferro successivo come segue, sul diritto del lavoro: 1 m vivagno a punto legaccio, diagramma A.3A (= 2 m) diagramma A.3B finché non rimangono 3 m, finire con il diagramma A.3C (= 2 m) e 1 m vivagno a punto legaccio. Quando il lavoro misura 17 cm, lavorare 3 coste a legaccio. Proseguire a maglia rasata con 1 m vivagno a punto legaccio da ciascun lato – ALLO STESSO TEMPO, nel corso del ferro successivo sul diritto del lavoro, aumentare 1 m da ciascun lato – vedere il SUGGERIMENTO PER GLI AUMENTI; ripetere questi aumenti ogni 3½-3-2½-2 cm 9-10-12-15 volte in tutto = 62-66-72-80 m. Quando il lavoro misura 52 cm per tutte le taglie, intrecciare per l’arrotondamento delle maniche all’inizio di ogni ferro, da ciascun lato, come segue: 5 m 1 volta poi 2-2-3-3 m da ciascun lato finché la manica non misura ca.60 cm - ATTENZIONE! per le taglie XL/XXL intrecciare 3 m solo 6 volte da ciascun lato, poi intrecciare 2 m una volta. Intrecciare le rimanenti m. CONFEZIONE: Cucire le maniche all’interno di 1 m vivagno. Cucire le maniche in modo che il centro dell’arrotondamento della manica si trovi dove gli scalfi sono più vicini tra loro (quindi dove la 1a m è stata intrecciata per il primo scalfo e dove l’ultima m è stata intrecciata per il secondo scalfo) e la cucitura della manica si trova dove gli scalfi sono più lontani tra loro (quindi sul lato opposto - vedere il grafico). BOTTONI e ASOLA: Mettere la giacca come mostrato nel grafico, sul diritto del lavoro e con le maniche stese verso l’esterno, attaccare il bottone sul lato sinistro sotto la manica, sul diritto del lavoro (vedere il grafico). Con l’uncinetto n° 4 lavorare 1 asola sul bordo di chiusura sotto la manica sul lato destro, come segue: 1 m.b sul bordo di chiusura della giacca, 5 cat, saltare ca.1 cm e 1 m.b sul bordo di chiusura delle m. |
|||||||||||||||||||
Spiegazioni del diagramma |
|||||||||||||||||||
|
|||||||||||||||||||
 |
|||||||||||||||||||
 |
|||||||||||||||||||
Avete terminato questo modello?Allora taggate le vostre foto con #dropspattern #saralyncardigan o inviatele alla #dropsfan gallery. Avete bisogno di aiuto con questo modello?Troverete 25 video tutorial, una sezione per i commenti/domande e molto altro guardando il modello su www.garnstudio.com © 1982-2026 DROPS Design A/S. Ci riserviamo tutti i diritti. Questo documento, compreso tutte le sue sotto-sezioni, è protetto dalle leggi sul copyright. Potete leggere quello che potete fare con i nostri modelli alla fine di ogni modello sul nostro sito. |
|||||||||||||||||||


Con oltre 40 anni di esperienza nel design di modelli di maglia e uncinetto, DROPS Design offre la più estesa collezione di modelli gratuiti su internet - tradotti in 17 lingue. Ad oggi vi possiamo fornire 324 cataloghi e 12290 modelli - 9561 dei quali sono tradotti in Italiano.
Ci stiamo impegnando molto per darvi il meglio che vi possiamo offrire in termini di maglia e uncinetto, ispirazioni e consigli così come filati di grande qualità ad un prezzo incredibile! Volete utilizzare i nostri modelli per qualcosa d'altro oltre al vostro uso personale? Potete leggere tutto ciò che è consentito nel testo sul Copyright in basso su tutte le pagine dei nostri modelli. Buon lavoro!
Lasciare un commento sul modello DROPS 156-37
Noi saremmo felici di ricevere i tuoi commenti e opinioni su questo modello!
Se vuoi fare una domanda, fai per favore attenzione a selezionare la categoria corretta nella casella qui sotto per velocizzare il processo di risposta. I campi richiesti sono indicati da *.