
Categorie popolari
State cercando un filato?


Commenti / Domande (63)
Rainbowis ha scritto:
How can I read the diagram? and how i recognize the size as L above it M and so on?
19.02.2015 - 14:18DROPS Design ha risposto:
Dear Mrs Rainbowis, start at the arrow for your size, ie L start in first row in A.1 and start with 3rd row in diagram in size M. Read all rounds from the right towards the left (from RS here) starting at the right corner on the very bottom. (read more about diagrams here). Happy knitting!
19.02.2015 - 14:36Rainbowis ha scritto:
Ok. So how the instructionsis stating to use 80 cm circular needle taking into consideration that I'm making medium size?.
19.02.2015 - 09:41DROPS Design ha risposto:
Dear Mrs Rainbowis, see answer below. Happy knitting!
19.02.2015 - 10:27Rainbowis ha scritto:
Hi, how to increase EVENLY in rounds? Regards,
16.02.2015 - 12:41DROPS Design ha risposto:
Dear Mrs Rainbowis, divide your number of sts by the number of inc to work. The number you get should be rounded to full or half number, if you get for example 10, work 10 sts, make 1 inc, work 10 more sts, make 1 inc and so on, you should then get correct number of inc/sts. Happy knitting!
16.02.2015 - 13:52Rainbowis ha scritto:
Ok. So how the instructionsis stating to use 80 cm circular needle taking into consideration that I'm making medium size?.
10.02.2015 - 08:25DROPS Design ha risposto:
Dear Mrs Rainbowis, you start yoke with the smaller (40 cm) circular needle and then when there are too much sts because of inc you can switch to longer (80 cm) circular needle. Happy knitting!
10.02.2015 - 08:49Rainbowis ha scritto:
1 ridge =2 rounds, is that means 4 ridges = 8 rounds?
08.02.2015 - 14:47Rainbowis ha scritto:
Does the Garter St differs from the Stcoking St?
08.02.2015 - 14:45DROPS Design ha risposto:
Dear Mrs Rainbowis, when you work in round, you K all the rounds to work stocking st and to get garter st, work 2 rounds (K1 round, P1 round). Happy knitting!
08.02.2015 - 19:22
![]() Ines ha scritto:
Ines ha scritto:
Gracias x la respuesta pero ... Con esta elevación de puntos tal y la explicáis, no quedaría mas elevado un lado que otro? Gracias
03.01.2015 - 17:24DROPS Design ha risposto:
Hola Ines. La elevación se trabaja a ambos lados del centro de la espalda. Se comienza en el centro de la espalda, por ejemplo para la talla S se trabajan 9 pts a un lado a partir del centro de la espalda, se giran y trabajan los 9 pts de vta (hasta el centro de la espalda) y sigen trabajando otros 9 pts a otro lado del centro de la espalda (= 18 pts) etc...se termina en el mismo sitio donde se empezó por eso no queda más elevado un lado que otro.
08.01.2015 - 00:24
![]() Ines ha scritto:
Ines ha scritto:
Gracias por la respuesta pero al levantar esos puntos tal y como lo explicais no quedaría mas elevado un lado del cuello que otro al hacer vueltas cortas en un lado y en el otro no? Podríais aclaro ello ? Gracias
03.01.2015 - 17:21
![]() Ines ha scritto:
Ines ha scritto:
Podríais publicar videos con las técnicas del top donw especialmente en los jerseys de cuello alto? Gracias
31.12.2014 - 17:46DROPS Design ha risposto:
Hola Ines. Cada patrón tiene su apartado de vídeos correspondiente para realizar la labor junto a las pestañas de materiales y lanas alternativas. Puedes ver los vídeos nuevos en el apartado "Videos Tutoriales"
07.01.2015 - 23:32
![]() Ines ha scritto:
Ines ha scritto:
No acabo de comprender las vueltas cortas cuando en las instrucciones decís que "levantar puntos" desde el centro de la espalda. ¿Se hacen solo en uno de los lados? (ilógico) Entoces, cual es la referencia para levantar correctamente los puntos que se suponen es para hacer la forma del cuello de la espalda? Gracias
31.12.2014 - 17:43DROPS Design ha risposto:
Hola Inés. No hay que "levantar puntos", simplemente tejer desde el centro 7 pts hacia un lado y girar, 14 hacia el otro lado y girar, etc...Se le llama elevación porque queda más alto en esa parte que el resto del cuello.
01.01.2015 - 11:56
|
||||||||||
Elinor Dashwood#elinordashwoodsweater |
||||||||||
|
|
||||||||||
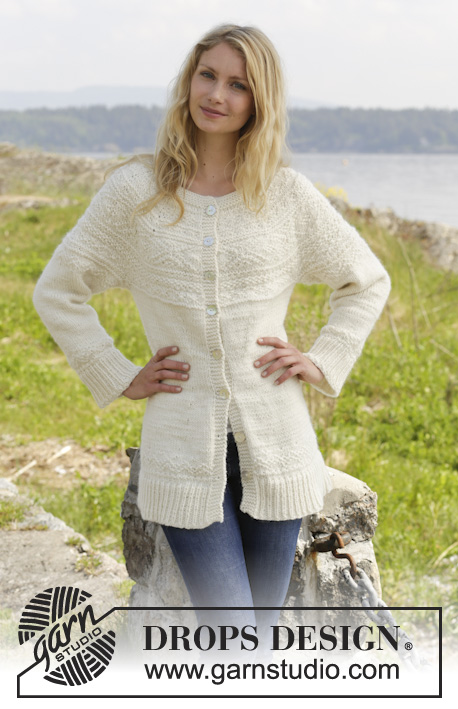
Maglione DROPS lavorato ai ferri con sprone arrotondato e motivo a punto fantasia, lavorato top down in "Alaska". Taglie: S - XXXL.
DROPS 157-5 |
||||||||||
|
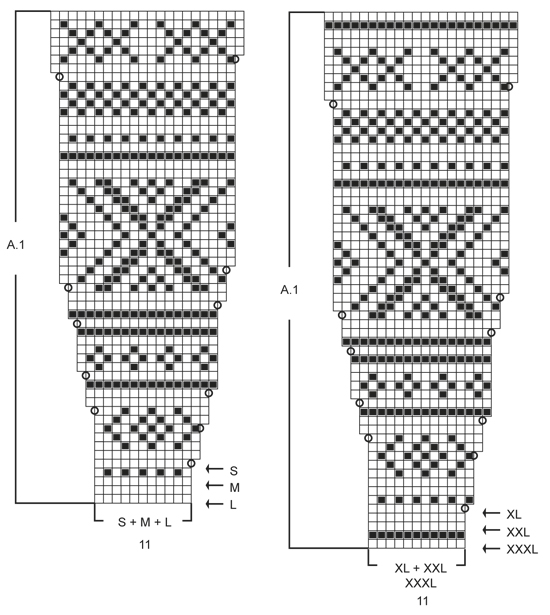
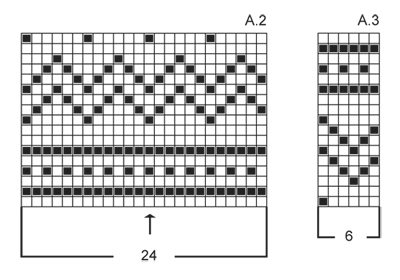
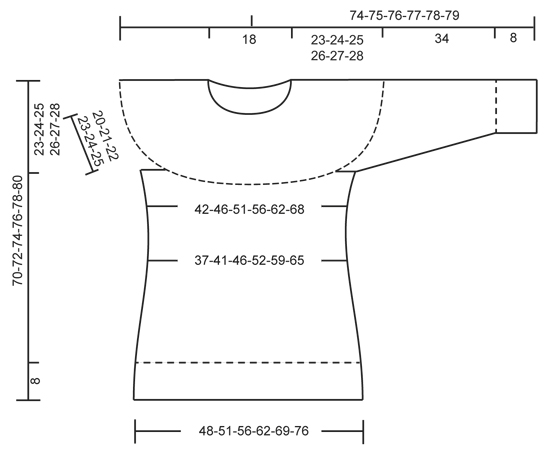
M LEGACCIO (in tondo sui f circolari): * 1 giro dir e 1 giro rov *, ripetere *-*. 1 “costa” a m legaccio =2 giri. MOTIVO: Vedere i diagrammi A.1-A.3. I diagrammi mostrano tutti i f del motivo visti dal diritto del lavoro. SUGGERIMENTO PER GLI AUMENTI 1 (applicato allo sprone): Aumentare 1 m facendo 1 gettato, sul giro successivo lavorare il gettato a ritorto (cioè lavorare nel filo dietro della m invece di quello davanti) per evitare buchi. SUGGERIMENTO PER GLI AUMENTI 2: Lavorare fino a quando rimane 1 m prima del segnapunti, 1 gettato, 2 m dir (il segnapunti è tra queste), 1 gettato. Sul giro successivo lavorare il gettato a ritorto (cioè lavorare nel filo dietro del gettato invece di quello davanti) per evitare buchi. SUGGERIMENTO PER LE DIMINUZIONI (applicato alla vita + manica): Diminuire come segue dopo il segnapunti: passare 1 m a dir senza lavorarla, 1 m dir, accavallare la m passata sopra quella appena lavorata. Diminuire come segue 2 m prima del segnapunti: 2 m insieme a dir. ---------------------------------------------------------- MAGLIONE: Lavorato in tondo, top down. SPRONE: Avviare 69-76-80-84-87-91 m con i f circolari n° 4 mm con Alaska. Lavorare 4 “coste” a M LEGACCIO – leggere la spiegazione sopra. Inserire 1 segnapunti all’inizio del giro = centro dietro. Ora passare ai f circolari n° 5 mm. Lavorare a m rasata, ALLO STESSO TEMPO distribuire 41-45-52-59-67-85 aumenti in modo uniforme – LEGGERE IL SUGGERIMENTO PER GLI AUMENTI 1! Ora ci sono 110-121-132-143-154-176 m sul giro. Poi lavorare un’alzata avanti e indietro sul collo dal centro dietro come segue: 9-10-11-12-13-14 m dir, girare il lavoro e lavorare 18-20-22-24-26-28 m rov. Girare il lavoro, 27-29-31-33-35-37 m dir, girare il lavoro e lavorare 36-38-40-42-44-46 m rov. Girare il lavoro e lavorare 45-47-49-51-53-55 m dir, girare il lavoro e lavorare 54-56-58-60-62-64 m rov. Girare il lavoro e lavorare a dir su tutte le m fino al segnapunti. Sul giro successivo lavorare e aumentare secondo il motivo A.1 – scegliere il diagramma per la taglia corretta. FARE ATTENZIONE ALLA TENSIONE DEL LAVORO! Quando tutto il diagramma A.1 è stato lavorato 1 volta in verticale, ci sono 220-242-264-286-308-352 m sul f. Sul giro successivo lavorare il 1° f di A.2, ALLO STESSO TEMPO distribuire 8-8-8-10-16-0 aumenti in modo uniforme = 228-250-272-296-324-352 m. Lavorare il giro successivo come segue: 2° f in A.2 sulle prime 31-35-39-43-48-53 m successive, trasferire le 51-55-57-61-65-69 m successive su un fermamaglie per la manica, avviare 8 nuove m (= sotto manica), continuare con A.2 sulle 64-70-80-88-98-108 m successive (= davanti), trasferire le 51-55-57-61-65-69 m successive su un fermamaglie per la manica, avviare 8 nuove m sotto la manica, A.2 sulle 31-35-39-43-48-53 m successive. Ora ci sono 142-156-174-190-210-230 m per il corpo. CORPO: Continuare a m rasata. Quando il lavoro misura 4 cm dalle nuove m sotto la manica, inserire 4 segnapunti nel lavoro come segue: 17-20-23-25-28-31 m a m rasata, inserire un segnapunti, 36-38-40-42-48-52 m a m rasata, inserire un segnapunti, 36-40-48-52-58-64 m a m rasata, inserire un segnapunti, 36-38-40-42-48-52 m a m rasata, inserire un segnapunti, 17-20-23-25-28-31 m a m rasata. Ora iniziare a diminuire – LEGGERE IL SUGGERIMENTO PER LE DIMINUZIONI! Diminuire 1 m prima del 1° e del 3° segnapunti e 1 m dopo il 2° e il 4° segnapunti (NOTA! il 1° segnapunti è il 1° segnapunti sul f dal diritto del lavoro!). Ripetere le diminuzioni ogni 1-1-1½-2-3½-3½ cm 4-4-4-3-2-2 volte in totale = 126-140-158-178-202-222 m. Ora inserire un segnapunti al centro delle 36-38-40-42-48-52 m a ogni lato (cioè tra il 1° e il 2° segnapunti e tra il 3° e il 4° segnapunti) = 5° e 6° segnapunti. Quando il lavoro misura 14-15-16-17-18-19 cm dalle nuove m sotto la manica, iniziare gli aumenti – ricordarsi del SUGGERIMENTO PER GLI AUMENTI 1! Aumentare prima del 1° e 3° segnapunti e dopo il 2° e il 4° segnapunti. Ripetere gli aumenti ogni 3 cm altre 4 volte, ALLO STESSO TEMPO sul 2°, 3° e 4° aumento, aumentare 1 m a ogni lato del 5° e 6° segnapunti (= lati) – LEGGERE IL SUGGERIMENTO PER GLI AUMENTI 2! Alla fine di tutti gli aumenti ci sono 158-172-190-210-234-254 m sul f. Quando il lavoro misura 31-32-33-34-35-36 cm dalle nuove m sotto la manica, distribuire 4-2-2-0-0-4 aumenti in modo uniforme = 162-174-192-210-234-258 m. Poi lavorare A.3 su tutte le m. Quando A.3 è stato lavorato in verticale, distribuire 42-45-51-66-78-90 aumenti in modo uniforme = 204-219-243-276-312-348 m. Lavorare 1 giro a m rasata. Poi passare ai f circolari n° 4 mm e lavorare a coste come segue: * 1 m dir, 2 m rov *, ripetere *-*. Continuare in questo modo fino a quando le coste misurano 8 cm. Intrecciare con dir su dir e rov su rov. MANICA: Lavorata in tondo sui f a doppia punta. Riportare le 51-55-57-61-65-69 m dal fermamaglie sui f a doppia punta n° 5 mm. Lavorare il 2° f di A.2, avviare 8 nuove m sotto la manica alla fine del f = 59-63-65-69-73-77 m. Inserire un segnapunti al centro delle 8 nuove m (cioè 4 m a ogni lato del segnapunti). Poi lavorare in tondo. Continuare con il motivo secondo il diagramma A.2 – NOTA: Aggiustare il motivo secondo il centro, la freccia nel diagramma indica la m centrale in cima alla manica, ALLO STESSO TEMPO quando il lavoro misura 4 cm dal segnapunti, iniziare le diminuzioni – LEGGERE IL SUGGERIMENTO PER LE DIMINUZIONI! Ripetere le diminuzioni ogni 2-1½-1½-1½-1½-1 cm altre 8-10-11-10-12-14 volte = 41-41-41-47-47-47 m rimaste. Quando il lavoro misura 34 cm per tutte le taglie, aumentare 1 m = 42-42-42-48-48-48 m. Poi lavorare il motivo secondo il diagramma A.3. Quando A.3 è stato lavorato 1 volta in verticale, distribuire 3 aumenti in modo uniforme = 45-45-45-51-51-51 m. Ora passare ai f a doppia punta n° 4 mm e lavorare a coste (1 m dir/2 m rov). Intrecciare con dir su dir e rov su rov quando le coste misurano 8 cm. CONFEZIONE: Cucire i buchi sotto le maniche. |
||||||||||
Spiegazioni del diagramma |
||||||||||
|
||||||||||
 |
||||||||||
 |
||||||||||
 |
||||||||||
Avete terminato questo modello?Allora taggate le vostre foto con #dropspattern #elinordashwoodsweater o inviatele alla #dropsfan gallery. Avete bisogno di aiuto con questo modello?Troverete 25 video tutorial, una sezione per i commenti/domande e molto altro guardando il modello su www.garnstudio.com © 1982-2026 DROPS Design A/S. Ci riserviamo tutti i diritti. Questo documento, compreso tutte le sue sotto-sezioni, è protetto dalle leggi sul copyright. Potete leggere quello che potete fare con i nostri modelli alla fine di ogni modello sul nostro sito. |
||||||||||


Con oltre 40 anni di esperienza nel design di modelli di maglia e uncinetto, DROPS Design offre la più estesa collezione di modelli gratuiti su internet - tradotti in 17 lingue. Ad oggi vi possiamo fornire 324 cataloghi e 12290 modelli - 9561 dei quali sono tradotti in Italiano.
Ci stiamo impegnando molto per darvi il meglio che vi possiamo offrire in termini di maglia e uncinetto, ispirazioni e consigli così come filati di grande qualità ad un prezzo incredibile! Volete utilizzare i nostri modelli per qualcosa d'altro oltre al vostro uso personale? Potete leggere tutto ciò che è consentito nel testo sul Copyright in basso su tutte le pagine dei nostri modelli. Buon lavoro!
Lasciare un commento sul modello DROPS 157-5
Noi saremmo felici di ricevere i tuoi commenti e opinioni su questo modello!
Se vuoi fare una domanda, fai per favore attenzione a selezionare la categoria corretta nella casella qui sotto per velocizzare il processo di risposta. I campi richiesti sono indicati da *.