
Categorie popolari
State cercando un filato?


Commenti / Domande (63)
![]() Iris ha scritto:
Iris ha scritto:
Bonjour, pour le dos et le devant, il est indiqué... "continuer en jersey"..."A 4 cm..." On n'a tricoté que les 2 premiers rangs de A2, "jersey" signifie-t-il continuer à partir du 3ème rang de A2 ? Puis faire tout le motif A2 et jersey ensuite ? Le motif A2 n'est plus cité dans la suite des explications ? Que dois-je comprendre ? Merci :)
10.10.2016 - 13:10DROPS Design ha risposto:
Bonjour Iris, on ne tricote plus A.2 pour le dos et le devant après les emmanchures, seulement les premiers rangs tricotés avant, et on continue en jersey. Vous pourrez également noter sur la photo que le "zig-zag" en haut de A.2 ne se retrouve que sur les manches. Bon tricot!
12.10.2016 - 09:41
![]() Gunn ha scritto:
Gunn ha scritto:
Jeg strikker denne på oppdrag for ei annen dame. Det var et flott mønster, og oppskriften var lett å følge. Kan også anbefales til de som ikke har noe særlig strikkeerfaring da alt var godt forklart.
21.02.2016 - 15:29
![]() Helle Knudsen ha scritto:
Helle Knudsen ha scritto:
Der refereres til diagram A1, A2 og A3. Jeg kan kun se diagram A1 i opskriften. Hvor er A2 og A3. Mvh Helle
05.10.2015 - 23:46DROPS Design ha risposto:
Hej Helle. De staar lige under A.1
06.10.2015 - 12:18
![]() Anke ha scritto:
Anke ha scritto:
Ich habe noch eine weitere Frage: Das Muster A.2 läuft ja über 24M (wobei eine Wdh nach 6M), d.h. die Maschenzahl müsste ein Vielfaches von 6 sein, was nicht immer der Fall ist. Ist der Bruch im Muster am Ende der Reihe so gewollt?
25.09.2015 - 23:02DROPS Design ha risposto:
A.2 stricken Sie ja nur am Ärmel komplett zu Ende. Dadurch, dass Sie an der unteren Ärmelmitte Abnahmen machen, geht das Muster dort nicht auf. Sie müssen es, wenn Sie oben am Ärmel beginnen, das Muster so anpassen, dass die Mitte des Musters oben in der Mitte auf dem Ärmel liegt. Sie stricken dann einfach so weit es geht, es ist normal, dass das Muster an der unteren Ärmelmitte einen "Bruch" hat.
28.09.2015 - 10:50
![]() Anke ha scritto:
Anke ha scritto:
Ich habe ein kleines Verständnisproblem mit der Anleitung: "In der nächsten Rd die 1. Rd von A.2 stricken und GLEICHZEITIG 8M gleichmäßig verteilt zunehmen (=250M)" Ist mit "die 1. Rd von A.2 stricken" gemeint, dass man das Muster A.2 erstmal durchstrickt und anschließend 8M zunimmt? und dann weiter mit der Anleitung verfährt? Besten Dank und viele Grüße Anke
22.09.2015 - 00:10DROPS Design ha risposto:
Nein, Sie müssen bereits in der 1. Rd von A.2 die 8 M zunehmen. Sie stricken also die 1. Rd von A.2, das sind nur rechte Maschen, und nehmen dabei 8 M zu. Denn stricken Sie die 2. Rd von A.2, das sind nur linke Maschen, und legen dabei wie beschrieben M still.
27.09.2015 - 22:39
![]() Constanza ha scritto:
Constanza ha scritto:
Hola. Estoy tejiendo la talla M y no entiendo cómo se ajusta el gráfico A2 al comienzo de la manga. Ya la cuarta fila del gráfico no coincide con la cantidad de puntos (63 puntos). Gracias por la ayuda!
04.09.2015 - 02:24DROPS Design ha risposto:
Hola Constanza. El pt con la flecha en el diagrama tiene que coincidir con el pt central de la manga (en la parte superior de la manga). A cada lado del pt central hay 31 pts, es decir que empezamos a trabajar el diagrama en el 5º pt del diagrama (se trabajan 20 pts hasta el final del diagrama + 11 pts de otra repetición del diagrama desde el principio hasta la flecha (el pt con la flecha no está incluído))
08.09.2015 - 11:31Debbie ha scritto:
Hi - I am having a problem with getting the pattern to line up at the back marker ( still at the top) especially the the large criss cross section - am I doing something wrong with the increasing of the stitches? Or will it work itself out - doesn't look right to me - please help!!!!
04.08.2015 - 09:38DROPS Design ha risposto:
Dear Debbie, insert a marker between each repetition to check your sts following the diagram appropriate to your size to be sure it will match. Happy knitting!
04.08.2015 - 17:51Rainbowis ha scritto:
Sorry for my many questions. You mean that i continue decreasing until the piece measures 14cm from the new markers under sleeves then start increasing from here as instructed? Regards.
03.08.2015 - 11:09DROPS Design ha risposto:
Dear Mrs Rainbowis, dec should be done when you insert new markers (5th and 6th ones), then start inc when piece measures 16 cm (in size L) from the new sts under sleeve as stated. Happy knitting!
03.08.2015 - 16:12Rainbowis ha scritto:
Thanks for helping. I need to know shall I continue knitting without decreasing after putting the 5th & 6th sts? Regards.
01.08.2015 - 11:17DROPS Design ha risposto:
Dear Mrs Rainbowis, markers 5 and 6 are inserted when all sts are dec (when you have 158 sts) then you will inc 1 st on each side of these both markers when it says: "When piece measures 14-15-16-17-18-19 cm from the new sts under sleeve, beg inc – remember INCREASE TIP 1! Inc before 1st and 3rd marker and after 2nd and 4th marker. Repeat inc every 3 cm 4 more times, AT THE SAME TIME on 2nd, 3rd and 4th inc, inc 1 st on each side of 5th and 6th marker (= sides) – READ INCREASE TIP 2!" Happy knitting!
03.08.2015 - 09:18Rainbowis ha scritto:
Does between means in the middle of the 1st and 2nd markers or it means at the 40th St? Regards & thanks
29.07.2015 - 19:51DROPS Design ha risposto:
Dear Mrs Rainbowis, that's correct you put marker in the middle of 40 sts in st st, ie you will have 20 sts before and 20 sts after the new markers. Happy knitting!
30.07.2015 - 10:54
|
||||||||||
Elinor Dashwood#elinordashwoodsweater |
||||||||||
|
|
||||||||||
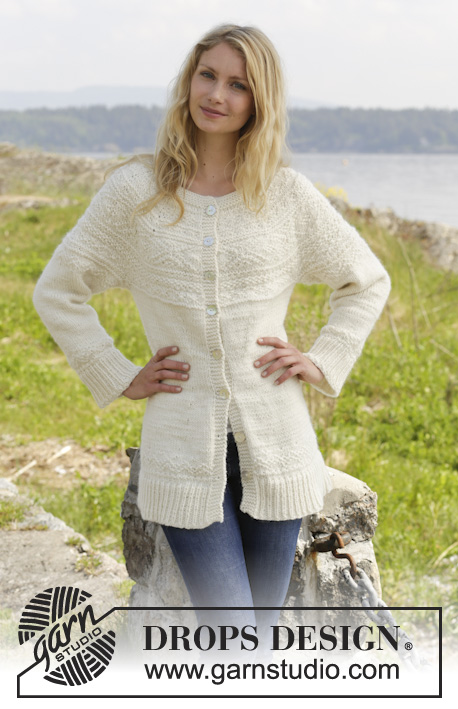
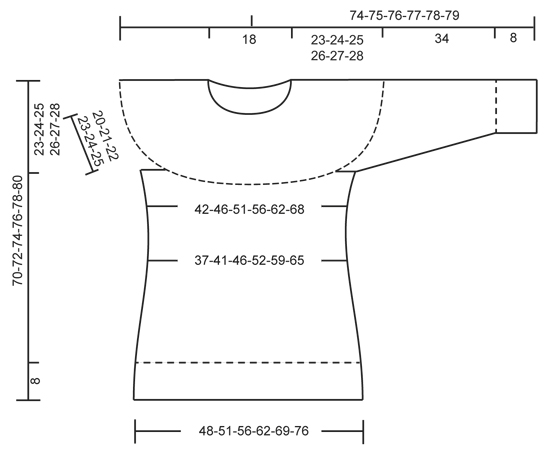
Maglione DROPS lavorato ai ferri con sprone arrotondato e motivo a punto fantasia, lavorato top down in "Alaska". Taglie: S - XXXL.
DROPS 157-5 |
||||||||||
|
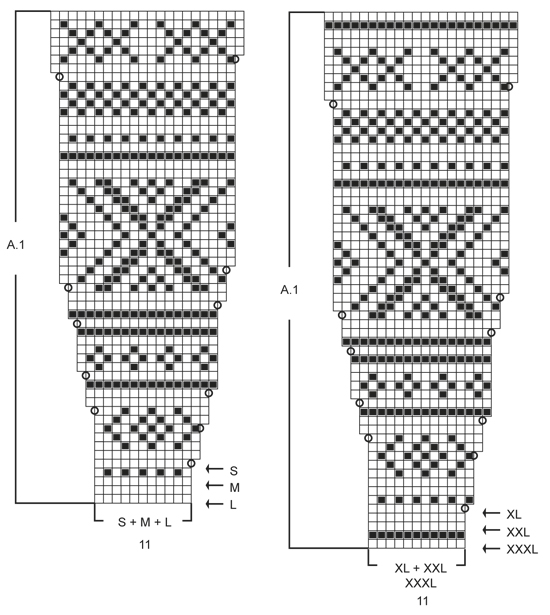
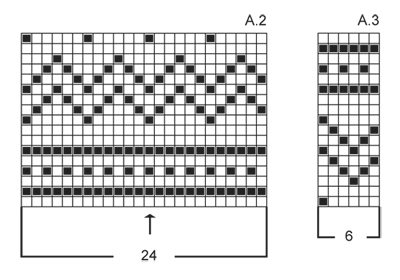
M LEGACCIO (in tondo sui f circolari): * 1 giro dir e 1 giro rov *, ripetere *-*. 1 “costa” a m legaccio =2 giri. MOTIVO: Vedere i diagrammi A.1-A.3. I diagrammi mostrano tutti i f del motivo visti dal diritto del lavoro. SUGGERIMENTO PER GLI AUMENTI 1 (applicato allo sprone): Aumentare 1 m facendo 1 gettato, sul giro successivo lavorare il gettato a ritorto (cioè lavorare nel filo dietro della m invece di quello davanti) per evitare buchi. SUGGERIMENTO PER GLI AUMENTI 2: Lavorare fino a quando rimane 1 m prima del segnapunti, 1 gettato, 2 m dir (il segnapunti è tra queste), 1 gettato. Sul giro successivo lavorare il gettato a ritorto (cioè lavorare nel filo dietro del gettato invece di quello davanti) per evitare buchi. SUGGERIMENTO PER LE DIMINUZIONI (applicato alla vita + manica): Diminuire come segue dopo il segnapunti: passare 1 m a dir senza lavorarla, 1 m dir, accavallare la m passata sopra quella appena lavorata. Diminuire come segue 2 m prima del segnapunti: 2 m insieme a dir. ---------------------------------------------------------- MAGLIONE: Lavorato in tondo, top down. SPRONE: Avviare 69-76-80-84-87-91 m con i f circolari n° 4 mm con Alaska. Lavorare 4 “coste” a M LEGACCIO – leggere la spiegazione sopra. Inserire 1 segnapunti all’inizio del giro = centro dietro. Ora passare ai f circolari n° 5 mm. Lavorare a m rasata, ALLO STESSO TEMPO distribuire 41-45-52-59-67-85 aumenti in modo uniforme – LEGGERE IL SUGGERIMENTO PER GLI AUMENTI 1! Ora ci sono 110-121-132-143-154-176 m sul giro. Poi lavorare un’alzata avanti e indietro sul collo dal centro dietro come segue: 9-10-11-12-13-14 m dir, girare il lavoro e lavorare 18-20-22-24-26-28 m rov. Girare il lavoro, 27-29-31-33-35-37 m dir, girare il lavoro e lavorare 36-38-40-42-44-46 m rov. Girare il lavoro e lavorare 45-47-49-51-53-55 m dir, girare il lavoro e lavorare 54-56-58-60-62-64 m rov. Girare il lavoro e lavorare a dir su tutte le m fino al segnapunti. Sul giro successivo lavorare e aumentare secondo il motivo A.1 – scegliere il diagramma per la taglia corretta. FARE ATTENZIONE ALLA TENSIONE DEL LAVORO! Quando tutto il diagramma A.1 è stato lavorato 1 volta in verticale, ci sono 220-242-264-286-308-352 m sul f. Sul giro successivo lavorare il 1° f di A.2, ALLO STESSO TEMPO distribuire 8-8-8-10-16-0 aumenti in modo uniforme = 228-250-272-296-324-352 m. Lavorare il giro successivo come segue: 2° f in A.2 sulle prime 31-35-39-43-48-53 m successive, trasferire le 51-55-57-61-65-69 m successive su un fermamaglie per la manica, avviare 8 nuove m (= sotto manica), continuare con A.2 sulle 64-70-80-88-98-108 m successive (= davanti), trasferire le 51-55-57-61-65-69 m successive su un fermamaglie per la manica, avviare 8 nuove m sotto la manica, A.2 sulle 31-35-39-43-48-53 m successive. Ora ci sono 142-156-174-190-210-230 m per il corpo. CORPO: Continuare a m rasata. Quando il lavoro misura 4 cm dalle nuove m sotto la manica, inserire 4 segnapunti nel lavoro come segue: 17-20-23-25-28-31 m a m rasata, inserire un segnapunti, 36-38-40-42-48-52 m a m rasata, inserire un segnapunti, 36-40-48-52-58-64 m a m rasata, inserire un segnapunti, 36-38-40-42-48-52 m a m rasata, inserire un segnapunti, 17-20-23-25-28-31 m a m rasata. Ora iniziare a diminuire – LEGGERE IL SUGGERIMENTO PER LE DIMINUZIONI! Diminuire 1 m prima del 1° e del 3° segnapunti e 1 m dopo il 2° e il 4° segnapunti (NOTA! il 1° segnapunti è il 1° segnapunti sul f dal diritto del lavoro!). Ripetere le diminuzioni ogni 1-1-1½-2-3½-3½ cm 4-4-4-3-2-2 volte in totale = 126-140-158-178-202-222 m. Ora inserire un segnapunti al centro delle 36-38-40-42-48-52 m a ogni lato (cioè tra il 1° e il 2° segnapunti e tra il 3° e il 4° segnapunti) = 5° e 6° segnapunti. Quando il lavoro misura 14-15-16-17-18-19 cm dalle nuove m sotto la manica, iniziare gli aumenti – ricordarsi del SUGGERIMENTO PER GLI AUMENTI 1! Aumentare prima del 1° e 3° segnapunti e dopo il 2° e il 4° segnapunti. Ripetere gli aumenti ogni 3 cm altre 4 volte, ALLO STESSO TEMPO sul 2°, 3° e 4° aumento, aumentare 1 m a ogni lato del 5° e 6° segnapunti (= lati) – LEGGERE IL SUGGERIMENTO PER GLI AUMENTI 2! Alla fine di tutti gli aumenti ci sono 158-172-190-210-234-254 m sul f. Quando il lavoro misura 31-32-33-34-35-36 cm dalle nuove m sotto la manica, distribuire 4-2-2-0-0-4 aumenti in modo uniforme = 162-174-192-210-234-258 m. Poi lavorare A.3 su tutte le m. Quando A.3 è stato lavorato in verticale, distribuire 42-45-51-66-78-90 aumenti in modo uniforme = 204-219-243-276-312-348 m. Lavorare 1 giro a m rasata. Poi passare ai f circolari n° 4 mm e lavorare a coste come segue: * 1 m dir, 2 m rov *, ripetere *-*. Continuare in questo modo fino a quando le coste misurano 8 cm. Intrecciare con dir su dir e rov su rov. MANICA: Lavorata in tondo sui f a doppia punta. Riportare le 51-55-57-61-65-69 m dal fermamaglie sui f a doppia punta n° 5 mm. Lavorare il 2° f di A.2, avviare 8 nuove m sotto la manica alla fine del f = 59-63-65-69-73-77 m. Inserire un segnapunti al centro delle 8 nuove m (cioè 4 m a ogni lato del segnapunti). Poi lavorare in tondo. Continuare con il motivo secondo il diagramma A.2 – NOTA: Aggiustare il motivo secondo il centro, la freccia nel diagramma indica la m centrale in cima alla manica, ALLO STESSO TEMPO quando il lavoro misura 4 cm dal segnapunti, iniziare le diminuzioni – LEGGERE IL SUGGERIMENTO PER LE DIMINUZIONI! Ripetere le diminuzioni ogni 2-1½-1½-1½-1½-1 cm altre 8-10-11-10-12-14 volte = 41-41-41-47-47-47 m rimaste. Quando il lavoro misura 34 cm per tutte le taglie, aumentare 1 m = 42-42-42-48-48-48 m. Poi lavorare il motivo secondo il diagramma A.3. Quando A.3 è stato lavorato 1 volta in verticale, distribuire 3 aumenti in modo uniforme = 45-45-45-51-51-51 m. Ora passare ai f a doppia punta n° 4 mm e lavorare a coste (1 m dir/2 m rov). Intrecciare con dir su dir e rov su rov quando le coste misurano 8 cm. CONFEZIONE: Cucire i buchi sotto le maniche. |
||||||||||
Spiegazioni del diagramma |
||||||||||
|
||||||||||
 |
||||||||||
 |
||||||||||
 |
||||||||||
Avete terminato questo modello?Allora taggate le vostre foto con #dropspattern #elinordashwoodsweater o inviatele alla #dropsfan gallery. Avete bisogno di aiuto con questo modello?Troverete 25 video tutorial, una sezione per i commenti/domande e molto altro guardando il modello su www.garnstudio.com © 1982-2026 DROPS Design A/S. Ci riserviamo tutti i diritti. Questo documento, compreso tutte le sue sotto-sezioni, è protetto dalle leggi sul copyright. Potete leggere quello che potete fare con i nostri modelli alla fine di ogni modello sul nostro sito. |
||||||||||


Con oltre 40 anni di esperienza nel design di modelli di maglia e uncinetto, DROPS Design offre la più estesa collezione di modelli gratuiti su internet - tradotti in 17 lingue. Ad oggi vi possiamo fornire 324 cataloghi e 12290 modelli - 9561 dei quali sono tradotti in Italiano.
Ci stiamo impegnando molto per darvi il meglio che vi possiamo offrire in termini di maglia e uncinetto, ispirazioni e consigli così come filati di grande qualità ad un prezzo incredibile! Volete utilizzare i nostri modelli per qualcosa d'altro oltre al vostro uso personale? Potete leggere tutto ciò che è consentito nel testo sul Copyright in basso su tutte le pagine dei nostri modelli. Buon lavoro!
Lasciare un commento sul modello DROPS 157-5
Noi saremmo felici di ricevere i tuoi commenti e opinioni su questo modello!
Se vuoi fare una domanda, fai per favore attenzione a selezionare la categoria corretta nella casella qui sotto per velocizzare il processo di risposta. I campi richiesti sono indicati da *.