
Categorie popolari
State cercando un filato?


Commenti / Domande (44)
![]() Dzana ha scritto:
Dzana ha scritto:
Hvordan settes hette sammen med halsdelen? Jeg finner ikke ut av det Mvh Dzana
18.11.2025 - 13:13DROPS Design ha risposto:
Hei Dzana, Hetta og halsdelen er sydd sammen. Hilsen Drops team.
19.11.2025 - 07:16
![]() Victoria ha scritto:
Victoria ha scritto:
Jeg har nu strikket 58cm til skuldrene i str s/m og den er ikke i nærheden af at kunne nå rundt, ikke engang om brystet. Jeg bruger normalt str s/m. Det virker som om der nærmest skal strikkes dobbelt så meget mere for at det kan nå rundt. Hvordan kan det være?
02.08.2025 - 15:45DROPS Design ha risposto:
Hei Victoria. Arbeidet vil strekke seg, men har du nok garn kan du strikke den litt lengre. mvh DROPS Design
25.08.2025 - 13:39
![]() Ivana ha scritto:
Ivana ha scritto:
Per lo scaldacollo non ci sono spiegazioni: quali le misure finali?
02.01.2024 - 13:51DROPS Design ha risposto:
Buonasera Ivana, il modello è unico e le misure sono riportate nello schema in fondo alla pagina. Buon lavoro!
02.01.2024 - 19:29
![]() Laura ha scritto:
Laura ha scritto:
Non è specificato che nel 2 ferro dopo aver lavorato insieme m gettata e m passata segue 1 maglia a diritto Ferro 2: 1 m dir, * lavorare insieme a rov la m gettata e la m passata *, ripetere da *-* fino alla fine del ferro.
08.11.2021 - 12:10DROPS Design ha risposto:
Buonasera Laura, abbiamo corretto il testo: grazie per la segnalazione. Buon lavoro!
10.11.2021 - 22:52
![]() Maria ha scritto:
Maria ha scritto:
La taille pour fille de 8 ans s.v.p. merci
02.11.2021 - 14:45DROPS Design ha risposto:
Bonjour Maria, ce modèle n'est disponible que pour femme, retrouvez ici nos modèles capuche/cagoule enfant. Bon tricot!
03.11.2021 - 08:09
![]() Simone ha scritto:
Simone ha scritto:
Jeg er forvirret over størrelserne her - jeg har altid været en XS-S, nogle gange endda XXS. Men jeg synes at 29 cm fra skulder til skulder er meget kort, er det meningen? For jeg tvivler på at jeg kan passe den over skuldrene.
06.01.2021 - 15:13DROPS Design ha risposto:
Hej Simone, jeg synes du skal prøve at måle arbejdet rundt om dine skuldre inden du lukker af, så ser du om du er nødt til at strikke nogle flere cm. God fornøjelse!
08.01.2021 - 10:38
![]() Elisa ha scritto:
Elisa ha scritto:
Buongiorno. Cosa si intende per "imbastire un filo" nella confezione del collo? A cosa serve il filo imbastito? Grazie
05.12.2020 - 09:22DROPS Design ha risposto:
Buongiorno Elisa, per imbastire deve passare dentro e fuori il capo con un filo, le può essere di aiuto per la cucitura. Buon lavoro!
05.12.2020 - 20:24
![]() Gabrielle ha scritto:
Gabrielle ha scritto:
Me again... Even more confused. I was following the instruction written on the pattern ok. I watched the video on false english ribs and on the video, it is Row 1: 1 edge st in garter st, * K 1, 1 YO, slip 1 st as if to P (with yarn behind piece) *, repeat from *-* until 2 sts remain, finish with K 1 and 1 edge st in garter st. Would that be why I cannot make it go straight as it is a K instead of a P?
16.03.2020 - 08:39DROPS Design ha risposto:
Dear Gabrielle, follow the pattern as explained, ie work on row 1: 1 edge st in garter st, * P 1, 1 YO, slip 1 st as if to P *, repeat from *-* until 1 st remains, finish with P 1, 1 edge st in garter stitch. Row 2: 1 edge stitch in garter stitch, K.1 * P tog YO and slipped st, K 1 *, repeat from *-* until the end of row, 1 edge stitch in garter stitch. Hope this can help, but it might be quite easier for your store to help you when seeing what you worked. Happy knitting!
16.03.2020 - 10:12
![]() Gabrielle ha scritto:
Gabrielle ha scritto:
What do you mean when talking about twisting the stitches? When I knit on the WS and purl together the yarn over and the slipped stitch, the slipped stitch comes first... Would that change anything?
16.03.2020 - 08:06
![]() Gabrielle ha scritto:
Gabrielle ha scritto:
It seems to me that I am following the pattern to the letter. I start and finish my row with a garter stich and follow the instructions for inbetween but one side of my work is 10 cm longer that the other side.
16.03.2020 - 07:59DROPS Design ha risposto:
Dear Gabrielle, it's a bit tricky to answer you what's going on there, please show your work to your store (even per mail) so that they can see what might happen and help you further. Happy knitting!
16.03.2020 - 10:08
|
|||||||
Maid Marian#maidmarianbalaclava |
|||||||
|
|
|||||||
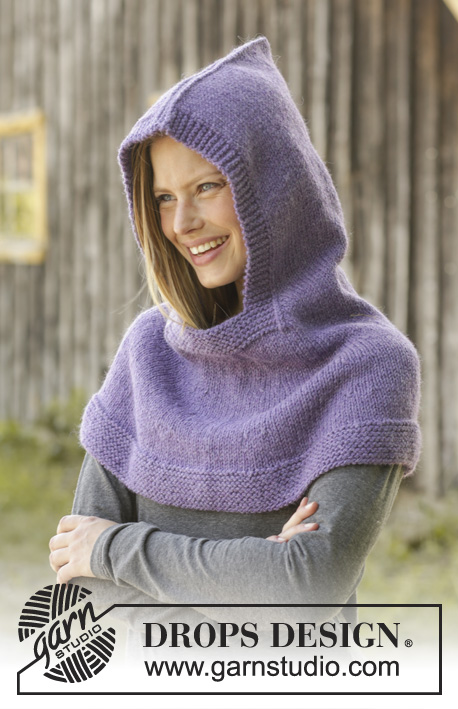
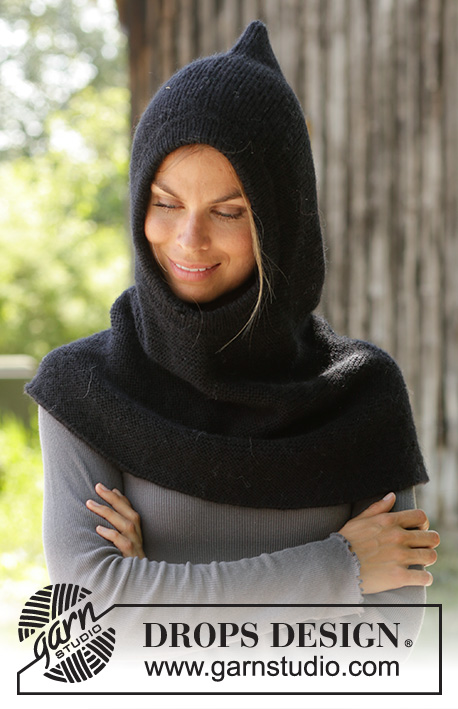
Scaldacollo DROPS con cappuccio / passamontanga ai ferri, in false coste inglesi, lavorato con 2 capi del filato "Brushed Alpaca Silk". Taglie: Dalla S alla XXXL.
DROPS 158-33 |
|||||||
|
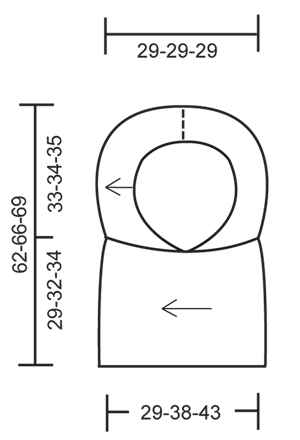
PUNTO LEGACCIO (avanti e indietro sui ferri): Lavorare tutti i ferri a dir. 1 “costa” a legaccio = 2 ferri a dir. FALSE COSTE INGLESI (avanti e indietro sui ferri): Ferro 1: * 1 m rov, 1 m gettata, passare 1 m a rov senza lavorarla *, ripetere da *-* finché non rimane 1 m, finire con 1 m rov. Ferro 2: 1 m dir, * lavorare insieme a rov la m gettata e la m passata, 1 m dir *, ripetere da *-* fino alla fine del ferro. Ripetere i ferri 1 e 2. ---------------------------------------------------------- SCALDACOLLO: Si lavora in 2 parti cucite insieme alla fine. CAPPUCCIO: Si lavora avanti e indietro sui ferri. Avviare, SENZA STRINGERE TROPPO IL FILO, 35-37-39 m (compresa 1 m vivagno da ciascun lato) con i ferri n° 9 e 2 capi del filato Brushed Alpaca Silk. Lavorare 2 COSTE A LEGACCIO - vedere le spiegazioni sopra. Proseguire in FALSE COSTE INGLESI - vedere le spiegazioni sopra – con 1 m vivagno a punto legaccio da ciascun lato - RICORDARSI LA TENSIONE DEL LAVORO. Quando il lavoro misura 56-56-56 cm, lavorare 2 coste a legaccio; intrecciare le m SENZA STRINGERE TROPPO IL FILO. COLLO: Si lavora avanti e indietro sui ferri. Avviare, senza stringere troppo il filo, 31-33-35 m (compresa 1 m vivagno da ciascun lato) con i ferri n° 9 e 2 capi del filato Brushed Alpaca Silk. Lavorare 1 ferro a rov, proseguire in FALSE COSTE INGLESI con 1 m vivagno a punto legaccio da ciascun lato - RICORDARSI LA TENSIONE DEL LAVORO. Quando il lavoro misura 58-72-86 cm, lavorare 1 ferro a rov. Intrecciare le m SENZA STRINGERE TROPPO IL FILO. CONFEZIONE: Piegare in due il cappuccio, cucire lungo uno dei lati lunghi, iniziando dal centro sul davanti e procedendo fino al centro sul dietro - vedere lo schema. Piegare lo scalda collo in due e cucire insieme i lati corti in modo da formare un anello. Per le taglie L/XL e XXL/XXXL: Imbastire 1 filo lungo l’apertura dello scalda collo; rimuovere il filo una volta terminata la confezione. Cucire il cappuccio allo scalda collo (la cucitura sullo scalda collo si deve trovare sul lato opposto rispetto all’apertura del cappuccio) all’interno della m vivagno. |
|||||||
Spiegazioni del diagramma |
|||||||
|
|||||||
 |
|||||||
Avete terminato questo modello?Allora taggate le vostre foto con #dropspattern #maidmarianbalaclava o inviatele alla #dropsfan gallery. Avete bisogno di aiuto con questo modello?Troverete 12 video tutorial, una sezione per i commenti/domande e molto altro guardando il modello su www.garnstudio.com © 1982-2026 DROPS Design A/S. Ci riserviamo tutti i diritti. Questo documento, compreso tutte le sue sotto-sezioni, è protetto dalle leggi sul copyright. Potete leggere quello che potete fare con i nostri modelli alla fine di ogni modello sul nostro sito. |
|||||||


Con oltre 40 anni di esperienza nel design di modelli di maglia e uncinetto, DROPS Design offre la più estesa collezione di modelli gratuiti su internet - tradotti in 17 lingue. Ad oggi vi possiamo fornire 324 cataloghi e 12290 modelli - 9561 dei quali sono tradotti in Italiano.
Ci stiamo impegnando molto per darvi il meglio che vi possiamo offrire in termini di maglia e uncinetto, ispirazioni e consigli così come filati di grande qualità ad un prezzo incredibile! Volete utilizzare i nostri modelli per qualcosa d'altro oltre al vostro uso personale? Potete leggere tutto ciò che è consentito nel testo sul Copyright in basso su tutte le pagine dei nostri modelli. Buon lavoro!
Lasciare un commento sul modello DROPS 158-33
Noi saremmo felici di ricevere i tuoi commenti e opinioni su questo modello!
Se vuoi fare una domanda, fai per favore attenzione a selezionare la categoria corretta nella casella qui sotto per velocizzare il processo di risposta. I campi richiesti sono indicati da *.