
Categorie popolari
State cercando un filato?


Commenti / Domande (52)
![]() Lise-Gro Henriksen ha scritto:
Lise-Gro Henriksen ha scritto:
Hei. Maskeantallet stemmer ikke når jeg setter merketrå for raglanfelling. Er sikker på at jeg har fulgt maskeantallet i mønsteret . Forslag til hva jeg skal gjøre videre?
27.11.2018 - 13:14DROPS Design ha risposto:
Hei Lise-Gro. Så etter å ha økt masker jevnt fordelt har du nå (86) 86-102-102-118 (134-134) masker på pinnen. Hvilken størrelse strikker du? vi kan enklere forklare deg akkurat hva du skal gjøre om vi vet hvilken størrelse du strikker nemlig. Hilsen Drops
29.11.2018 - 14:25Dhanam ha scritto:
Hi, me again - I counted the total stitches in 1/3 month size - starting with 86 after the increase in the yoke section. In the following pattern - the stitches totoalled to 96 !
03.02.2018 - 18:37DROPS Design ha risposto:
Hi Dhanam, You have a total of 12 band stitches in garter stitch, + 2 x A.1 (4 stitches), + K2, P2 x 17 (68 stitches) + P2, which is a total of 86 stitches. Hope this helps and happy knitting!
04.02.2018 - 06:53Salomé ha scritto:
I am already done with the yoke and the neck elevation, there is no indication whether you start the diagram on the row where you make a stitch or whether you start at the bottom which is just plain knitting. Normally the diagrams are numbered, but yours is not.
31.12.2017 - 19:07DROPS Design ha risposto:
Dear Salomé, start reading diagram on the bottom corner on the right side, from the right towards the left from RS (and every round), and from the left towards the right from WS when working back and forth. Happy knitting!
02.01.2018 - 11:20Salomé ha scritto:
Hi there, I have an uncertainty about where to start with the diagram, normally it is numbered starting from the bottom. I am to start on the pattern after the increase but am not sure whether to start from the bottom of the diagram which is a make one row or do I start at the top which is just plain knit?
29.12.2017 - 19:40DROPS Design ha risposto:
Dear Salomé, after you finish knitting the yoke (including the elevation of the back) you start the patterned stitches with the first row of the diagram. Happy Knitting!
30.12.2017 - 15:54
![]() Cathrine ha scritto:
Cathrine ha scritto:
Hei Strikker denne i størrelse 0/1. Frem til bærestykket er det ok, og det står at man skal ha 86 m på pinnen. På neste omgang gjør man klart til raglan og oppskriften er delt etter størrelse. Det som står på størrelse 0/1 stemmer ikke med det maskeantallet man har. Derimot stemmer det som står på prematurstørrelsen, og man har jo samme maskeantall som prematurstørrelsen avslutter med i avsnittet over.
06.10.2017 - 13:27
![]() Lisa ha scritto:
Lisa ha scritto:
Stemmer det verkeleg at pinnestr. 3,5 gjev strikkefasthet 24 m x 32 p glattstrikk på 10 x 10 cm? Ser på andre oppskrifter med akkurat same garn at det står at pinnestr. 3 gjev strikkefasthet 24 m x 32 p glattstrikk på 10 x 10 cm, og skjønar ikkje heilt korleis det på akkurat denne oppskrifta (og tilsvarande i Simply Sweet Singlet) er slik at ein må ha større pinnar for same strikkefasthet..
26.07.2017 - 18:28DROPS Design ha risposto:
Hei Lisa. På denne bodyen er det den strikkefastheten som er oppgitt, men om du får samme strikkefasthet med å bruke pinne nr 3.0, kan du fint bruke det. Det som er viktig er å få strikkefastheten som er oppgitt for å få de målene som er i oppskriften. God Fornøyelse!
07.08.2017 - 12:39Ni ha scritto:
Hi, I am just knitting this pattern but am stuck in the middle of the "all sizes" section where it says: for the rs " place pieces together (...). Work 1 round in the round (...), work the rest of the round, cut the yarn and beg next round mid back". I understand the knitting tog the 6 band stitches, but why don't I just continue in the round from there. Why do I just continue for one round, then cut the yarn and Beginn mid back? Somehow stick here... thank you
29.05.2017 - 17:32DROPS Design ha risposto:
Dear Ni, you have then to finish this round, but at the end of this round (when reaching the previous beg of rows), cut the yarn. You continue now in the round but from mid back: join the yarn on mid back and continue in the round from mid back. Happy knitting!
29.05.2017 - 18:17
![]() Birthe Isaksen ha scritto:
Birthe Isaksen ha scritto:
Hej, jeg er ved at strikke denne sag, men er i tvivl om raglan indtagninger,Under emnet alle str,1/3 mdr, gentag udt, 7 gange til total 8 gange, men skal der tages ud endnu 8 gange, da jeg ikke kan få raglan målene til at passe på 8 cm, hvis ikke der skal tages mere ud. Strikke fastheden passer. Håber det er forståeligt, som jeg ser skal raglan målene være 10 cm. Kh Birthe
03.11.2016 - 13:31DROPS Design ha risposto:
Hej Birthe. Du tager ud i hver anden pind 8 gange i alt = 16 pinde strikket. Du har 32 p paa 10 cm, saa det er 5 cm til raglan. Du har allerede strikket kant/förhöjning bag. Dit aermegab (maalt lige ned - altsaa ikke maalt i "raglanlinien") skal vaere ca. 6 cm i str 1/3 mdr.
03.11.2016 - 15:50
![]() Elisabeth Jensen ha scritto:
Elisabeth Jensen ha scritto:
Jeg forstår ikke raglandøknignen. Fordi det står at jeg øke ved "1 kast på hver side av de 2 m rett i hver raglanlinje (sett fra retten). " Men etter første pinne med A1 og så en pinne vrang tilbake (stemmer det) så har jeg 1maske, 1 kast som nå er strikket til en mase og en maske. For å øke skal jeg da ta et kast strikke de 3 maskene og så et kast til?
13.07.2016 - 22:30DROPS Design ha risposto:
Hej Elisabeth, du skal altid øge på hver side af de 2 rett i raglanlinjen, det vil sige at du kun skal have de 2 masker imellem kasten. Når du strikker kasten på næste pind, så skal de strikkes ind i mønsteret. God fornøjelse!
29.03.2017 - 08:46
![]() Tonje ha scritto:
Tonje ha scritto:
Hei, jeg oppdaget at jeg har begynt på mønsteret i feil retning, dvs jeg har begynt med to rette uten kast, så tre masker med felling osv.. Gjør det noe at jeg har strikket mønsteret omvendt, eller kan jeg bare fortsette sånn?
15.05.2016 - 17:07DROPS Design ha risposto:
Hej Tonje. Nej, det tror jeg ikke gör noget. Men se hvordan det gaar.
17.05.2016 - 13:36
|
||||||||||
Simply Sweet#simplysweetonesie |
||||||||||
|
|
||||||||||
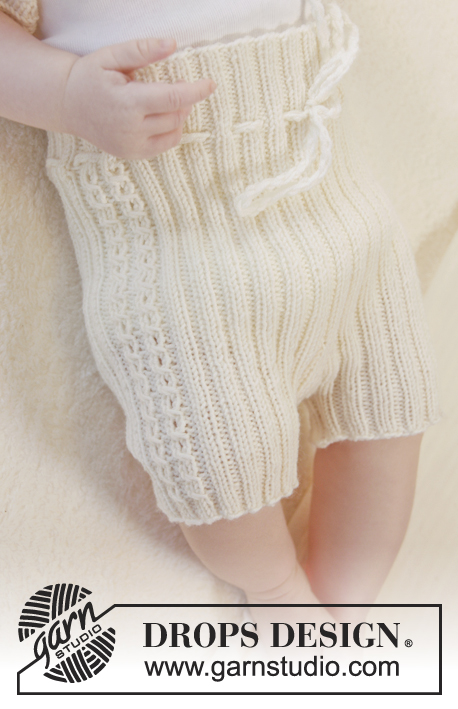
Body per neonati lavorato ai ferri a coste, lavorato dall’alto verso il basso in DROPS BabyMerino. Taglie: (prematuri) - 4 anni.
DROPS Baby 25-30 |
||||||||||
|
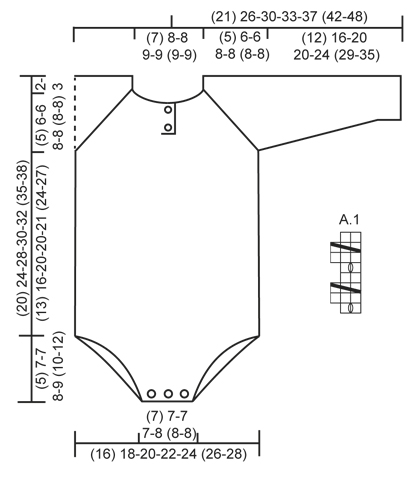
M LEGACCIO (avanti e indietro sui f): Lavorare tutti i f a dir. 1 “costa” a m legaccio = 2 f dir. MOTIVO: Vedere il diagramma A.1. Il diagramma mostra tutti i f del motivo visto dal diritto del lavoro. RAGLAN: Tutti gli aumenti vengono fatti dal diritto del lavoro. Aumentare 1 m a ogni lato delle 4 linee del raglan facendo 1 gettato a ogni lato delle 2 m dir. in ogni riga del raglan (visto dal diritto del lavoro). Lavorare i gettati nelle coste, cioè lavorare a rov le prime 2 m dal rovescio del lavoro, lavorare a dir le 2 m successive dal rovescio del lavoro etc. – NOTA: non lavorare i gettati a ritorto (cioè ci devono essere dei buchi a ogni lato delle 2 m dir sulla linea del raglan). ASOLE: Diminuire per le asole sul bordo destro. 1 asola = lavorare insieme a dir la 3° e la 4° m dal bordo e fare un gettato (diminuire per le asole dal rovescio del lavoro). Diminuire per le asole quando il lavoro misura: TAGLIA (prematuri): 1 e 3 cm. TAGLIA 0/1 mesi + 1/3 mesi: 1 e 4 cm. TAGLIA 6/9 mesi + 1218 mesi: 1 e 4½ cm. TAGLIA (2 anni + 3/4 anni): 1 e 5 cm. SUGGERIMENTO PER LE DIMINUZIONI 1 (applicato all’apertura della gamba): Diminuire prima/dopo le 3 m di vivagno a m legaccio. DAL DIRITTO DEL LAVORO: Diminuire dopo le 3 m a m legaccio come segue: 2 m insieme a rov ritorto. Diminuire come segue prima delle 3 m a m legaccio (iniziare quando rimangono 5 m sul f): 2 m insieme a rov. DAL ROVESCIO DEL LAVORO: Diminuire dopo le 3 m a m legaccio come segue: 2 m insieme a dir ritorto. Diminuire come segue prima delle 3 m a m legaccio (iniziare quando rimangono 5 m sul f): 2 m insieme a dir. SUGGERIMENTO PER LE DIMINUZIONI 2 (applicato alle maniche): Lavorare fino a quando rimangono 3 m prima del segnapunti, lavorare 2 m insieme (nelle coste), lavorare 2 m (il segnapunti è tra queste 2 m) e poi lavorare 2 m insieme a ritorto (nelle coste). ---------------------------------------------------------- BODY: Lavorato dall’alto in basso. Lavorare avanti e indietro sui f circolari fino a dopo lo spacco del collo, poi lavorare in tondo sui f a doppia punta/circolari prima della divisione per le gambe. Lavorare le maniche in tondo sui f a doppia punta. SPRONE: Avviare (54) 60-60-64-74 (74-74) m (comprese 6 m per il bordo a ogni lato verso il centro davanti) con i f circolari n° 3,5 mm con il Baby Merino panna/ECRù. Lavorare 2 “COSTE” a m legaccio – leggere la spiegazione sopra (1° f = diritto del lavoro). Poi lavorare un’alzata sul dietro del collo come segue (1° f = diritto del lavoro): lavorare a dir fino a quando rimangono (6) 8-8-8-10 (10-10) m, girare, tirare il filo e lavorare fino a quando rimangono (6) 8-8-8-10 (10-10) m dall’altro lato. Girare il lavoro, tirare il filo e lavorare fino a quando rimangono (12) 16-16-16-20 (20-20) m, girare il lavoro, tirare il filo e lavorare indietro fino a quando rimangono (12) 16-16-16-20 (20-20) m. Girare il lavoro,tirare il filo e lavorare fino a quando rimangono (18) 24-24-24-30 (30-30) m, girare il lavoro, tirare il filo e lavorare indietro fino a quando rimangono (18) 24-24-24-30 (30-30) m dall’altro lato. Girare il modello, tirare il filo e lavorare il resto del f. Lavorare il f successivo come segue dal rovescio del lavoro: 6 m dir per il bordo, lavorare a rov le (42) 48-48-52-62 (62-62) m successive, ALLO STESSO TEMPO distribuire (32) 26-42-38-44 (60-60) aumenti in modo uniforme su queste m e finire con 6 m dir per il bordo (ricordarsi delle ASOLE sul bordo – leggere la spiegazione sopra) = (86) 86-102-102-118 (134-134) m sul f. LAVORARE IL F SUCCESSIVO COME SEGUE DAL DIRITTO DEL LAVORO: TAGLIE (prematuri) + 0/1 mesi: 6 m per il bordo a M LEGACCIO – leggere la spiegazione sopra, 2 m dir, 2 m rov, A.1 (= 2 m), 2 m rov, 2 m dir (inserire 1 segnapunti al centro di queste 2 m = linea del raglan), * 2 m rov, 2 m dir *, ripetere *-* 3 volte in totale, 2 m rov, 2 m dir (inserire 1 segnapunti al centro di queste 2 m = linea del raglan), * 2 m rov, 2 m dir *, ripetere *-* 5 volte in totale, 2 m rov, 2 m dir (inserire 1 segnapunti al centro di queste 2 m = linea del raglan), * 2 m rov, 2 m dir *, ripetere *-* 3 volte in totale, 2 m rov, 2 m dir (inserire 1 segnapunti al centro di queste 2 m = linea del raglan), 2 m rov, A.1 (= 2 m), 2 m rov, 2 m dir e 6 m per il bordo a M LEGACCIO. TAGLIE 1/3 mesi + 6/9 mesi + 12/18 mesi: 6 m per il bordo a M LEGACCIO – leggere la spiegazione sopra, 2 m dir, 2 m rov, A.1 (= 2 m), 2 m rov, 2 m dir, 2 m rov, 2 m dir (inserire 1 segnapunti al centro di queste 2 m = linea del raglan), * 2 m rov, 2 m dir *, ripetere *-* 3-3-5 volte in totale, 2 m rov, 2 m dir (inserire 1 segnapunti al centro di queste 2 m = linea del raglan), * 2 m rov, 2 m dir *, ripetere *-* 7 volte in totale, 2 m rov, 2 m dir (inserire 1 segnapunti al centro di queste 2 m = linea del raglan), * 2 m rov, 2 m dir *, ripetere *-* 3-3-5 volte in totale, 2 m rov, 2 m dir (inserire 1 segnapunti al centro di queste 2 m = linea del raglan), 2 m rov, 2 m dir, P 2, A.1 (= 2 m), 2 m rov, 2 m dir e 6 m per il bordo a M LEGACCIO. SIZE (2 anni + 3/4 anni): 6 m per il bordo a M LEGACCIO – leggere la spiegazione sopra, ** 2 m dir, 2 m rov, A.1 (= 2 m), 2 m rov **, ripetere **-** 2 volte in totale, 2 m dir (inserire 1 segnapunti al centro di queste 2 m = linea del raglan), * 2 m rov, 2 m dir *, ripetere *-* 5 volte in totale, 2 m rov, 2 m dir (inserire 1 segnapunti al centro di queste 2 m = linea del raglan), * 2 m rov, 2 m dir *, ripetere *-* 9 volte in totale, 2 m rov, 2 m dir (inserire 1 segnapunti al centro di queste 2 m = linea del raglan), * 2 m rov, 2 m dir *, ripetere *-* 5 volte in totale, 2 m rov, 2 m dir (inserire 1 segnapunti al centro di queste 2 m = linea del raglan), ** 2 m rov, A.1 (= 2 m), 2 m rov, 2 m dir **, ripetere **-** 2 volte in totale e finire con 6 m per il bordo a M LEGACCIO. TUTTE LE TAGLIE: Continuare il motivo in questo modo avanti e indietro. ALLO STESSO TEMPO sul f successivo dal diritto del lavoro per il RAGLAN – leggere la spiegazione sopra (= 8 aumenti). Ripetere gli aumenti ogni f/giro (cioè ogni f dal diritto del lavoro) altre (7) 7-7-11-11 (11-11) volte (= (8) 8-8-12-12 (12-12) aumenti in totale a ogni lato di ogni linea del raglan). ALLO STESSO TEMPO quando il lavoro misura (4) 5-5-6-6 (7-7) cm, il bordo finisce e si lavora in tondo sui f come segue (aggiustarlo in modo che il f successivo sia lavorato dal diritto del lavoro): unire il lavoro con le m del bordo destro in alto (in modo che i bordi siano uno sull’altro e le asole siano sul bordo). Lavorare 1 giro in tondo e ALLO STESSO TEMPO lavorare insieme 2 a 2 a dir le 6 m dai bordi destro e sinistro, lavorare il resto del giro, tagliare il filo e iniziare il giro successivo al centro dietro. Continuare a coste e con il motivo in tondo e ALLO STESSO TEMPO continuare ad aumentare per il raglan come prima ma lavorare le 6 m al centro davanti come segue: 2 m rov, A.1 (= 2 m) e 2 m rov. Alla fine degli aumenti per il raglan ci sono (144) 144-160-192-208 (224-224) m sul f. Lavorare altri (0) 2-2-2-2 (2-2) giri come prima, il lavoro misura circa (7) 8-8-10-11 (11-11) cm dalla spalla. Sul giro successivo trasferire le (32) 32-32-40-48 (48-48) m tra ogni segnapunti sulla manica sui fermamaglie (lavorare le m prima di trasferirle sul fermamaglie) = (40) 40-48-56-56 (64-64) m rimaste sul davanti e sul dietro. CORPO: = (80) 80-96-112-112 (128-128) m. Sul giro successivo avviare (8) 16-12-12-16 (16-20) m SENZA STRINGERE sotto ogni manica = (96) 112-120-136-144 (160-168) m sul corpo – ORA MISURARE IL LAVORO DA QUI. Mettere un segnapunti a ogni lato. Continuare a coste in tondo come prima (= 2 m dir/2 m rov) con A.1 sul davanti come prima. Quando il lavoro misura (13) 16-20-20-21 (24-27) cm dallo scalfo, dividerlo all’altezza dei segnapunti a ogni lato e finire il davanti e il dietro in modo separato. DIETRO: = (48) 56-60-68-72 (80-84) m. Lavorare a coste avanti e indietro come prima ma lavorare le 3 m più esterne a ogni lato a m legaccio. ALLO STESSO TEMPO diminuire 1 m all’interno delle 3 m di vivagno a ogni lato – LEGGERE IL SUGGERIMENTO PER LE DIMINUZIONI 1 (= 2 diminuzioni). Ripetere le diminuzioni su ogni f (cioè sia dal diritto che dal rovescio del lavoro) altre (6) 10-12-16-14 (18-14) volte (= (7) 11-13-17-15 (19-15) volte in totale) e poi a f alterni (cioè ogni f dal diritto del lavoro) (5) 5-5-5-7 (7-11) volte in totale = (24) 24-24-24-28 (28-32) m rimaste sul f. Lavorare 1 f dir dal diritto del lavoro e ALLO STESSO TEMPO distribuire (8) 8-8-8-10 (10-12) diminuzioni in modo uniforme = (16) 16-16-16-18 (18-20) m rimaste sul f. Lavorare 10 f dir (= 5 “coste”) e intrecciare senza stringere a dir dal rovescio del lavoro. DAVANTI: = (48) 56-60-68-72 (80-84) m. Lavorare a coste avanti e indietro come prima ma lavorare le 3 m più esterne a ogni lato a m legaccio. ALLO STESSO TEMPO diminuire 1 m all’interno delle 3 m di vivagno a ogni lato – LEGGERE IL SUGGERIMENTO PER LE DIMINUZIONI 1 (= 2 diminuzioni). Ripetere le diminuzioni su ogni f (cioè sia dal diritto che dal rovescio del lavoro) altre (11) 13-17-21-19 (23-17) volte (= (12) 14-18-22-20 (24-18) volte in totale) e poi a f alterni (cioè ogni f dal diritto del lavoro) (0) 2-0-0-2 (2-8) volte in totale = (24) 24-24-24-28 (28-32) m rimaste sul f. Lavorare 1 f dir dal diritto del lavoro e ALLO STESSO TEMPO distribuire (8) 8-8-8-10 (10-12) diminuzioni in modo uniforme = (16) 16-16-16-18 (18-20) m rimaste sul f. Lavorare 1 f dir dal rovescio del lavoro. Sul f successivo (= diritto del lavoro), diminuire per 3 asole come segue: (3) 3-3-3-3 (3-4) m dir, * 1 gettato, 2 m insieme a dir, (2) 2-2-2-3 (3-3) m dir *, ripetere *-* un’altra volta, 2 m insieme a dir, 1 gettato e (3) 3-3-3-3 (3-4) m dir. Lavorare 4 f dir (= 2 “coste”) e intrecciare senza stringere a dir dal rovescio del lavoro. MANICA: = (32) 32-32-40-48 (48-48) m. Avviare (8) 16-12-12-16 (16-20) m SENZA STRINGERE sotto la manica = (40) 48-44-52-64 (64-68) m sul f (lavorare in tondo sui f a doppia punta). Inserire 1 segnapunti all’inizio del giro (= centro sotto la manica) – ORA MISURARE IL LAVORO DA QUI. Continuare a coste in tondo come prima (= 2 m dir/2 m rov). ALLO STESSO TEMPO quando il lavoro misura 1 cm, diminuire 1 m a ogni lato del segnapunti – LEGGERE IL SUGGERIMENTO PER LE DIMINUZIONI 2. Ripetere le diminuzioni ogni (4) 4-6-6-6 (8-8) f altre (3) 7-3-7-7 (7-7) volte (= (4) 8-4-8-8 (8-8) volte in totale) = (32) 32-36-36-48 (48-52) m rimaste sul f. Quando la manica misura (12) 16-20-20-24 (29-35) cm, intrecciare senza stringere con dir su dir e rov su rov. Lavorare l’altra manica nello stesso modo. CONFEZIONE: Cucire le aperture sotto le maniche. Attaccare 2 bottoni sul bordo sinistro nel collo e 3 bottoni sulla parte inferiore del body. |
||||||||||
Spiegazioni del diagramma |
||||||||||
|
||||||||||
 |
||||||||||
Avete terminato questo modello?Allora taggate le vostre foto con #dropspattern #simplysweetonesie o inviatele alla #dropsfan gallery. Avete bisogno di aiuto con questo modello?Troverete 27 video tutorial, una sezione per i commenti/domande e molto altro guardando il modello su www.garnstudio.com © 1982-2026 DROPS Design A/S. Ci riserviamo tutti i diritti. Questo documento, compreso tutte le sue sotto-sezioni, è protetto dalle leggi sul copyright. Potete leggere quello che potete fare con i nostri modelli alla fine di ogni modello sul nostro sito. |
||||||||||


Con oltre 40 anni di esperienza nel design di modelli di maglia e uncinetto, DROPS Design offre la più estesa collezione di modelli gratuiti su internet - tradotti in 17 lingue. Ad oggi vi possiamo fornire 324 cataloghi e 12290 modelli - 9561 dei quali sono tradotti in Italiano.
Ci stiamo impegnando molto per darvi il meglio che vi possiamo offrire in termini di maglia e uncinetto, ispirazioni e consigli così come filati di grande qualità ad un prezzo incredibile! Volete utilizzare i nostri modelli per qualcosa d'altro oltre al vostro uso personale? Potete leggere tutto ciò che è consentito nel testo sul Copyright in basso su tutte le pagine dei nostri modelli. Buon lavoro!
Lasciare un commento sul modello DROPS Baby 25-30
Noi saremmo felici di ricevere i tuoi commenti e opinioni su questo modello!
Se vuoi fare una domanda, fai per favore attenzione a selezionare la categoria corretta nella casella qui sotto per velocizzare il processo di risposta. I campi richiesti sono indicati da *.