
Categorie popolari
State cercando un filato?


Commenti / Domande (38)
![]() Hana Mikulandová ha scritto:
Hana Mikulandová ha scritto:
Dobrý den,chtěla bych se zeptat kolik řetízkových ok mám udělat na velikost 0/1 měsíců?
01.02.2016 - 13:09DROPS Design ha risposto:
Dobrý den, čepeček začínáme pro všechny velikosti stejně, tj. 4 řo. U nejmenší velikosti 0/1 měsíc končíme s rozšiřováním po dokončení 8. kruhové řady (= 48 KS), pak postupujeme podle popisu v odstavci VŠECHNY VELIKOSTI. Hodně zdaru! Hana
01.02.2016 - 18:23
![]() Bianca ha scritto:
Bianca ha scritto:
Super tolle Anleitung, die Mütze gehört bei mir zu einem Taufkleid
30.01.2016 - 13:54
![]() Willow ha scritto:
Willow ha scritto:
Please disregard my earlier posts as I have already figured them out! Now, in the Fan Edge sec. do I start at the corner where at bottom of Eyelet sec. or 5 rows in to exclude the Eyelet sec.? With the eyelet sec. it is 72 stitches w/o it is 62. Either way, do I need to adjust my stitches for R1? 72 is a multiple of 3 with no room for first sc. 62 is multiple of 3 with 2 left over, should I just do sc in beginning and end. Please help.
07.12.2015 - 05:17DROPS Design ha risposto:
Dear Willow, the fan edge is worked along last row on hat, ie 62 sts in 1st size, inc 2 sts evenly on 1st row to get 64 sts: work then a total of 21 times (sc, ch3, skip 2 sts) (= 21 ch-loops) and finish with 1 sc in last st. Happy crocheting!
07.12.2015 - 11:40
![]() Willow ha scritto:
Willow ha scritto:
Please clarify the 5+1 under the eyelet section. I am just beginning the the eyelet section and I have 10, 6, and 10 (26). If I add 2dc in each dc, I will have 36 stitches. My stitches aren't working out on the "Work next row as follows: ch 1, 1 sc in each of the first 2 sc, * skip 2 sc, ch 2, 1 sc in each of the next 3 sc *, repeat from *-* until 4 sts remain, skip 2 sc, ch 2 and work 1 sc in each of the last 2 sc." Please help.
04.12.2015 - 04:40DROPS Design ha risposto:
Dear Willow, see below how to crochet this row over 36 sc. Happy crocheting!
04.12.2015 - 09:18
![]() Willow ha scritto:
Willow ha scritto:
I am beginning the Eyelet Tie section. I have 10 stitches on my short sides and 6 stitches in middle, a total of 26. If I do 2 dc in each dc I will have total of 36. This is divisible by 5, 7 times with 1 stitch remaining. But at "ch 1, 1 sc in each of the first 2 sc, * skip 2 sc, ch 2, 1 sc in each of the next 3 sc *, repeat from *-* until 4 sts remain, skip 2 sc, ch 2 and work 1 sc in each of the last 2 sc." , it won't work with 36 stitches. Where am I messing up?
04.12.2015 - 04:27DROPS Design ha risposto:
Dear Willow, work as follows over 36 sc: 2 sc (over 2 sc), repeat a total of 6 times: *skip 2 sc, ch 2, 1 sc in each of the next 3 sc* (= you work over 5 sc a total of 6 times = 30 sc from previous row), finish with skip 2 sc, ch2 and 1 sc in each of the last 2 sc (4 sc at the end of row), so that you have worked over 2+30+4=36 sc from previous row. Happy crocheting!
04.12.2015 - 09:17
![]() Willow ha scritto:
Willow ha scritto:
Please clarify "do not work over sc in 6 btwn two markers". Thank you!!
19.11.2015 - 17:02DROPS Design ha risposto:
Dear Willow, these 6 sts are between both markers on mid back: 1st marker = beg of round, 1nd marker is inserted after the 6th st from beg of round seen from RS. Happy crocheting!
20.11.2015 - 09:47
![]() Willow ha scritto:
Willow ha scritto:
Thank you so much for getting back to me quickly. I almost put a marker after every 6 stitches. It says to dc in every sc but round 8 was dc so I'm confused where sc are. What does "increase at the same time mean". Where are am I increasing 20? If round 8 is all dc then do I just crochet 2 dc in each of the first 6 stitches? That would only be an increase of 6. What do I do in the remaining 42 stitches? And how do I get 60? That would be an increase of 12....
19.11.2015 - 16:57DROPS Design ha risposto:
Dear Willow, on round 8 you worked 1 sc in every dc (=48 sc). Then place 2 markers from RS: 1st one at beg of round and 2nd one after 6 sts. Starting from WS from marker at beg of round work 1 dc in each of the next 42 st (48 sts from previous row less 6 sts unworked) to 2nd marker (= you leave 6 sts unworked at mid back), at the same time inc 20 sts evenly to get 62 dc at the end of this row between both markers - see here how to inc evenly. Happy crocheting!
20.11.2015 - 09:45
![]() Willow ha scritto:
Willow ha scritto:
I am stuck. I finished round 8. I have 48 stitches. I don't understand what to do next? Under All sizes, what does this section mean? Beg from WS at marker at beg of round and work 1 dc in every sc until second marker AT THE SAME TIME inc 20-26-20-28 (20-22) dc evenly over these sts – READ INCREASE TIP = 62-68-74-80 (84-86) dc on row (do not work over the 6-6-6-8 (8-8) sc between the 2 markers).
19.11.2015 - 06:23DROPS Design ha risposto:
Dear Willow, after you have 48 sts (1st size), go to "All sizes" and insert 2 markers: 1 at the beg of round and 1 after 6 sts. Then work as stated, and follow instructions for 1st size (= 1st of the numbers). Happy crocheting!
19.11.2015 - 10:11
![]() AUJOGUE ha scritto:
AUJOGUE ha scritto:
Bonjour, a la seconde étape du bonnet j'ai du mal a comprendre certaines phrases, pourriez vous m'expliquer s'il vous plait. "1 autre marqueur après 6-6-6-8 (8-8) m (vu sur l'endroit)." Que veulent dire les 8-8 entre parenthèse et cette phrase non plus "augmenter 20-26-20-28 (20-22) B à intervalles réguliers" en vous remerciant sincerement
12.10.2015 - 19:20DROPS Design ha risposto:
Bonjour Mme Aujogue, ce bonnet existe en 6 tailles: du 0/1 mois au 12/18 mois avant la parenthèse et les 2 plus grandes tailles: 2 et 3/4 ans dans la parenthèse. Chaque chiffre/nombre se réfère à la taille dans l'ordre indiqué. Voir ici comment répartir des augmentations. Bon crochet!
13.10.2015 - 09:34
![]() Louise Tremblay ha scritto:
Louise Tremblay ha scritto:
Bonjour; je ne comprends pas du tout quoi faire avec l'arrière du bonnet; avez-vous une photo pour voir comment faire? Merci.
20.08.2015 - 17:25DROPS Design ha risposto:
Bonjour Mme Tremblay, le fond du bonnet est un simple rond fait de ms et de brides: on commence par un rond de 12 B, puis 12 ms, puis on augmente tous les 2 tours: 24 B, puis 24 ms, puis 36 B, 36 ms et ainsi de suite jusqu'à la taille souhaitée. Bon crochet!
20.08.2015 - 18:24
|
||||||||||
Camille#camillebonnet |
||||||||||
|
|
||||||||||
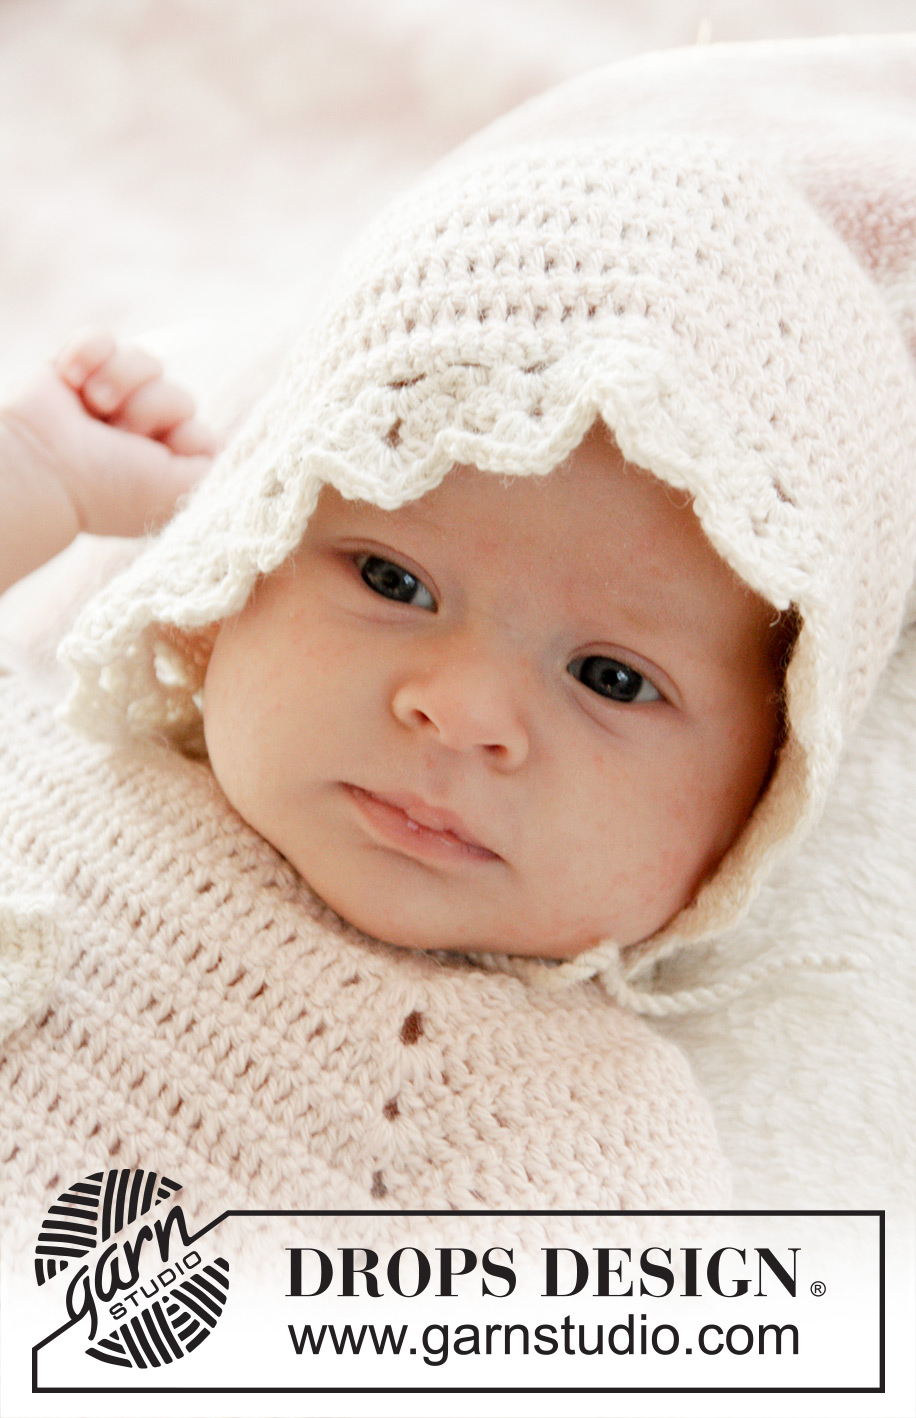
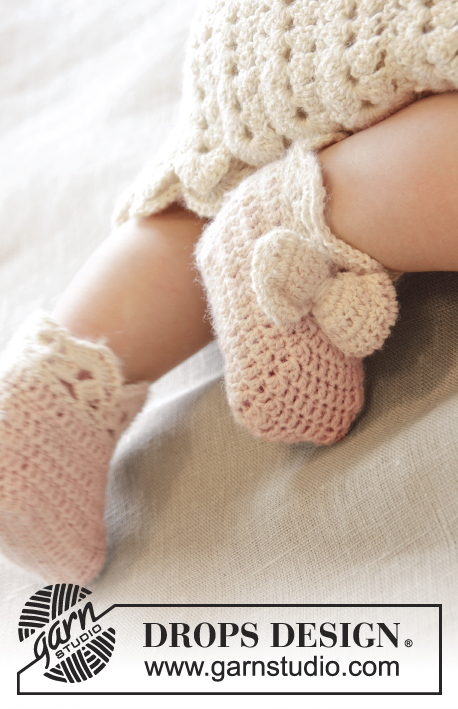
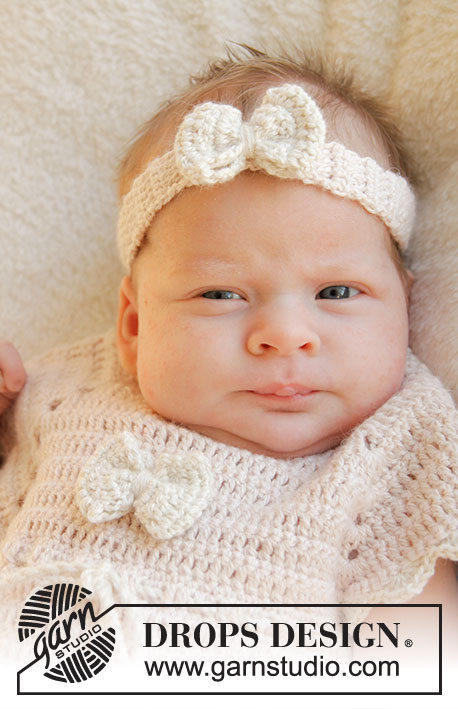
Cappello all'uncinetto con motivo a ventagli per neonati, in DROPS BabyAlpaca Silk. Taglie: Da 0 a 4 anni.
DROPS Baby 25-14 |
||||||||||
|
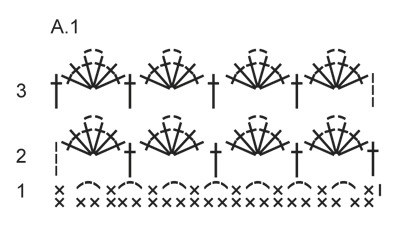
INFORMAZIONI PER IL LAVORO: Sostituire la prima m.b all’inizio di ogni riga/giro di m.b con 1 cat. Finire ogni giro con 1 m.bss nella cat iniziale del giro. Finire ogni riga con 1 m.b nella 3a cat dall’inizio della riga precedente. Sostituire la prima m.a all’inizio di ogni riga/giro di m.a con 3 cat. Finire ogni giro con 1 m.bss nella 3a cat dall’inizio del giro. Finire ogni riga con 1 m.a nella cat all’inizio della riga precedente. RIGA A PUNTO FANTASIA: * 1 riga di m.b sul rovescio del lavoro, 1 riga di m.a sul diritto del lavoro *, ripetere da *-* (1 riga di m.b + 1 riga di m.a = 1 riga a punto fantasia). SUGGERIMENTO PER GLI AUMENTI: Per aumentare 1 m.b/m.a lavorare 2 m.b/m.a nella stessa m. MOTIVO: Vedere il diagramma A.1. ---------------------------------------------------------- BERRETTO: Si lavora inizialmente in tondo, dal centro, sul dietro; proseguire poi avanti e indietro per la parte superiore della testa. Avviare 4 cat con l’uncinetto n° 3,5 con il colore polvere e formare un anello con 1 m.bss nella prima cat. GIRO 1: Vedere le INFORMAZIONI PER IL LAVORO! Lavorare 12 m.a nell’anello di cat. GIRO 2: Lavorare 1 m.b in ogni m.a = 12 m.b. GIRO 3: Lavorare 2 m.a in ogni m.b = 24 m.a. GIRO 4: Lavorare 1 m.b in ogni m.a = 24 m.b. GIRO 5: * Lavorare 1 m.a nella prima m.b, 2 m.a nella m.b successiva *, ripetere da *-* su tutto il giro = 36 m.a. GIRO 6: Lavorare 1 m.b in ogni m.a = 36 m.b. GIRO 7: * Lavorare 1 m.a in ognuna delle prime 2 m.b, 2 m.a nella m.b successiva *, ripetere da *-* su tutto il giro = 48 m.a. GIRO 8: Lavorare 1 m.b in ogni m.a = 48 m.b. Fermarsi qui per le taglie 0/1 + 1/3 mesi. GIRO 9: * Lavorare 1 m.a in ognuna delle prime 3 m.b, 2 m.a nella m.b successiva *, ripetere da *-* su tutto il giro = 60 m.a. GIRO 10: Lavorare 1 m.b in ogni m.a = 60 m.b. Fermarsi qui per le taglie 6/9 + 12/18 mesi. GIRO 11: * Lavorare 1 m.a in ognuna delle prime 4 m.b, 2 m.a nella m.b successiva*, ripetere da *-* su tutto il giro = 72 m.a. GIRO 12: Lavorare 1 m.b in ogni m.a = 72 m.b. Fermarsi qui per le taglie 2 + 3/4 anni. TUTTE LE TAGLIE: Inserire 1 segno all’inizio del giro e 1 segno dopo 6-6-6-8 (8-8) m (visto sul diritto del lavoro). Iniziare sul diritto del lavoro del lavoro in corrispondenza del segno all’inizio del giro e lavorare 1 m.a in ogni m.b fino al secondo segno; ALLO STESSO TEMPO, aumentare 20-26-20-28 (20-22) m.a in modo uniforme – VEDERE IL SUGGERIMENTO PER GLI AUMENTI = 62-68-74-80 (84-86) m.a (non lavorare sulle 6-6-6-8 (8-8) m.b tra i 2 segni). Proseguire ora a RIGHE A PUNTO FANTASIA avanti e indietro – vedere le spiegazioni sopra, finché il lavoro non misura ca.8-9-10-11 (12-13) cm dai segni – finire dopo 1 riga di m.b sul rovescio del lavoro. Tagliare il filo. RIGA TRAFORATA PER I CORDINI: Lavorare il seguente bordo nella parte in basso del berretto, con il colore polvere, come segue: iniziare sul diritto del lavoro e lavorare m.b lungo uno dei lati corti nella parte in basso del berretto (lavorare 1 m.b in ogni riga di m.b e 2-3 m.b in ogni riga di m.a), lavorare 1 m.b in ognuna delle 6-6-6-8 (8-8) m.b tra i 2 segni del giro e lavorare m.b lungo l’altro lato corto (1 m.b in ogni riga di m.b e 2-3 m.b in ogni riga di m.a). Girare il lavoro e lavorare un'altra riga di m.b; ALLO STESSO TEMPO, aggiustare il n° di m.b in modo che sia divisibile per 5 + 1. Lavorare la riga successiva come segue: 1 cat, 1 m.b in ognuna delle prime 2 m.b, * saltare 2 m.b, 2 cat, 1 m.b in ognuna delle 3 m.b successive *, ripetere da *-* finché non rimangono 4 m, saltare 2 m.b, lavorare 2 cat e 1 m.b in ognuna delle ultime 2 m.b. Lavorare 2 righe di m.b avanti e indietro (1 m.b in ogni m.b e 2 m.b in ogni arco di cat). Tagliare il filo. CORDINO: Tagliare 4 capi del colore panna lunghi ca. 2,5 metri ognuno, avvolgerli insieme finché non oppongono resistenza, piegarli in due in modo che si avvolgano ancora; fare un nodo ad ogni estremità. Far passare il cordino attraverso i buchi della riga traforata. BORDO A VENTAGLI: Con il colore panna, lavorare 1 riga di m.b sul rovescio del lavoro nella parte davanti del berretto e, ALLO STESSO TEMPO, aumentare in modo uniforme in modo da avere 64-70-76-82 (88-94) m.b – VEDERE IL SUGGERIMENTO PER GLI AUMENTI. Proseguire con il motivo a ventagli seguendo il diagramma A.1, quindi lavorare come segue: RIGA 1 (= diritto del lavoro): 1 cat, 1 m.b nella prima m.b, * 3 cat, saltare 2 m, 1 m.b nella m successiva *, ripetere da *-* su tutta la riga = 21-23-25-27 (29-31) archi di cat, girare. RIGA 2 (= rovescio del lavoro): 3 cat (= 1 m.a), 3 m.a + 2 cat + 3 m.a nel primo arco di cat, * 1 m.a nell'arco di cat successivo, 3 m.a + 2 cat + 3 m.a nell'arco di cat successivo*, ripetere da *-* su tutta la riga e finire con 1 m.a nella prima m.b dall’inizio della riga precedente = 11-12-13-14 (15-16) gruppi di m.a con 1 m.a tra ogni gruppo di m.a, girare il lavoro. RIGA 3 (= diritto del lavoro): 3 cat (= 1 m.a), 3 m.a + 2 cat + 3 m.a nell'arco di cat del primo gruppo di m.a, * 1 m.a nella m.a successiva, 3 m.a + 2 cat + 3 m.a nell'arco di cat al centro del gruppo di m.a successivo *, ripetere da *-* su tutta la riga e finire con 1 m.a nella 3a cat dall’inizio della riga precedente. Tagliare il filo. |
||||||||||
Spiegazioni del diagramma |
||||||||||
|
||||||||||
 |
||||||||||
Avete terminato questo modello?Allora taggate le vostre foto con #dropspattern #camillebonnet o inviatele alla #dropsfan gallery. Avete bisogno di aiuto con questo modello?Troverete 11 video tutorial, una sezione per i commenti/domande e molto altro guardando il modello su www.garnstudio.com © 1982-2026 DROPS Design A/S. Ci riserviamo tutti i diritti. Questo documento, compreso tutte le sue sotto-sezioni, è protetto dalle leggi sul copyright. Potete leggere quello che potete fare con i nostri modelli alla fine di ogni modello sul nostro sito. |
||||||||||


Con oltre 40 anni di esperienza nel design di modelli di maglia e uncinetto, DROPS Design offre la più estesa collezione di modelli gratuiti su internet - tradotti in 17 lingue. Ad oggi vi possiamo fornire 324 cataloghi e 12239 modelli - 9507 dei quali sono tradotti in Italiano.
Ci stiamo impegnando molto per darvi il meglio che vi possiamo offrire in termini di maglia e uncinetto, ispirazioni e consigli così come filati di grande qualità ad un prezzo incredibile! Volete utilizzare i nostri modelli per qualcosa d'altro oltre al vostro uso personale? Potete leggere tutto ciò che è consentito nel testo sul Copyright in basso su tutte le pagine dei nostri modelli. Buon lavoro!
Lasciare un commento sul modello DROPS Baby 25-14
Noi saremmo felici di ricevere i tuoi commenti e opinioni su questo modello!
Se vuoi fare una domanda, fai per favore attenzione a selezionare la categoria corretta nella casella qui sotto per velocizzare il processo di risposta. I campi richiesti sono indicati da *.